

 User Notice
 Forum Links
Thread Information
Thread Actions


Walkthrough Trace Memory
02-27-17 09:33 AM
Laian is Offline
| ID: 1331139 | 2699 Words

POSTS: 2205/2232
POST EXP: 457173
LVL EXP: 7124176
CP: 23726.2
VIZ: 3569925

Hello folks, Laian here with a new game guide. Today, it's a DS game I played a lot called «Trace Memory» (a.k.a «Another Code» in the European version). It feels good to replay this game and make a game guide for you, frankly. Besides Ghost Trick: Phantom Detective, Phoenix Wright and other games of that kind, I really like this game. So, if you're ready for a memory lane (or not, if you're new to this series then you're welcome aboard), I suggest we start that game guide without wasting any more time. Let's just jump into it, shall we?
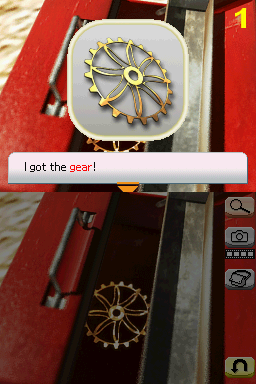
CHAPTER 1 First things first, talk to the lady. She's your father's little sister, Jessica. Talk about all the topics available to learn more about the story. The red text will always open new topics to talk about. Click on the «back» icon below to end the conversation and carry on. Once you landed on Blood Edward Island, talk to the captain. Once more, talk about all the available topics then click on the «back» button. You'll get some candies from the captain. Go search Jessica. You'll hear a scream right when you will reach the drawbridge. Unfortunately, you can't get to the other part of the island if the drawbridge is raised. Check the panel to your right, turn the wheel twice and carry on. Check the stone then move on until you get to a gate and a signboard. The gate is locked, sadly. However, there's a puzzle to solve. Just check the signboard. Remember the symbol to its right once you fixed it (or take a picture so you will get it memorized), it will come to an use later in the game. Go right now, skip the road blocked by big rocks and go right. You will get to a cemetery. Check the tombstones then the stone slab that blocks another way. Move it to unlock the path and see a letter carved on the back of the stone. Talk to the ghost kid afterwards. Carry on after the discussion to get past the obstacle you saw earlier and go forth. Check the grinder and try to clean the plate. Alas, you can't without the proper tool. Check the red toolbox next to the minecart and grab the gear (1). Check the other toolbox nearby the water tower to find a metal brush. Now you can scrape the rust off the plate. Remember the symbol, go back to the gate, check it to find a panel and
CHAPTER 2 Head to the front door of the mansion, talk to D then go inside. Look around and discuss once more with D. Take a photo of both of the paintings and merge the two photos to get a code. Use this code to open the door to the north with this code and proceed to the next area. Go check the painting, then go in the room to the left to enter the music room. Pick up the part of an essay on the ground, then the display case to find a DTS card. Check the book shelf to find another puzzle to solve. Unfortunately, you need to find more books in order to solve it. Leave that room and go to the butler's room to the right. Check the wardrobes to find some information about the Edward family and a puzzle to solve. You'll get the silver medal as a token of your success. Check the notepad on the desk and try to reveal what was written. The pencil lead breaks so you need another way to do that. Check the fi
CHAPTER 3 Go in the art studio to the right, check the drawing of Frannie and the desk to find a DTS card and another drawing. Check the chest, note all the stuff inside and leave the room. Go in the next room, check the dresser to find a DTS card, then the bottle on the table. You'll have to come back later since Ashley cannot open it with her bare hands. Examine the dolls between the beds, go back to the golden bird room and pick up the doll holding a drum. Head back to the art studio room, grab the hammer in the chest and go back to Mary and Henry's room. With the hammer, break the bottle and collect the gold bird key and a letter. Put the doll where it belongs to. You'll learn from D that device is a music box and needs a key to work. Go in the second room to the right, which is Frannie's room. Examine the teddy bear on the shelf to your right, then the desk to find a DTS card in the drawer and the sketchbook. Looks like you'll have to complete what has been unfinished. Check the ribbon on the bed then the wooden box on the shelf to find two stamps. You can complete the sketchbook by closing your system twice (without turning it off). Now explore the second room to the left. Check the framed picture on the table (you need to do some kind of reflection by slowly closing your system until you get a message), then the painting above the fi
CHAPTER 4 Check the newspaper on the table and the fi
CHAPTER 5 Go in the room to the right, check the book shelf next to the fi
CHAPTER 6 Go down the stairs to get to the cave. Walk in the cave until you find D's other shoe and carry on. You will meet Bill. Talk to him. After the conversation, you have to answer Bill's questions as he's pointing the gun towards Richard. Answer «Someone came in», «She hid me in the closet», «I heard Mom's voice», «You can't have Trace!», «I heard a gunshot», «Bill». After the discussion, Bill will die, falling into the endless pit. Cross the bridge after the conversation with your dad and head to the bay.
EPILOGUE This is a series of conversations. Talk to the captain, then to your dad and finally to D. If he remembered enough things about his story, he will ask you to touch the mark on the chest. Otherwise, he will stay on the island for the rest of his ghostly life. Yep, there are two endings as you can tell. Talk to your dad and watch the credits after the discussion. And blow the candles on your birthday cake. Save your progress and beat the game twice to get another surprise at the end.
BONUS PART: D's Memory Recovery Since a good part of the game is based on D's story, you need to find stuff that will help him recover his memory. Doing so will grant you the good ending at the end of the game. Here's the complete list of what you must do to get that ending, chapter by chapter and in order of appearance. Some of them are easy to get but some others are missable. Note that I mentioned some of them in the first part of the game guide and, most important, the ones you need to do during chapter 1 cannot be done in the next chapters since you can't leave the mansion.
CHAPTER 1 -Check the stone slab saying «Edward Mansion» to the left of the road. -Check Thomas and Henry's tombstones in the cemetery. -Check the metal slab on the machine at the mine entrance. -Find Sayoko's picture in the porter's lodge. -Find the Trace file in the lodge.
CHAPTER 2 -Check the paintings in the foyer twice. -Check the portrait at the end of the hallway. -Play the piano -Check the portrait nearby the piano -Read the letter in the left wardrobe, in the butler's room. -Look at the photo album in the middle wardrobe, in the butler's room. -Check the scroll in the right wardrobe and click on the underlined names. -Read the butler's diary in the right wardrobe. -Use the piece of charcoal on the notepad to reveal the message. -Check the gun case. -Examine the fallen birdcage. -Read the diary and remake the page.
CHAPTER 3 -Check Ashley's sketch made by Richard on the table in the art studio. -Check Frannie's sketch. -Check the teddy bear in Frannie's room. -Check the ribbon on the bed, in Frannie's room. -Solve the sketchbook puzzle with the stamps. -Solve the bottle puzzle in Henry's room. -Check the family photo next to the bottle. -Check the stereo system in the office. -Find D's shoe in the suitcase.
CHAPTER 4 -Check the newspaper. -Check the painting of the two boys in the dining room and click on both of the children. -Check the handkerchief covered with blood.
CHAPTER 5 -Check the painting in Lawrence's room and click on each of the characters. -Use the gold bird key to open the drawer and read the diary. -Check the envelope in the nightstand. -Give a candy to Richard. -Read the letter on the typewriter. -Read the letter next to the safe. -Check the book in the safe. -Examine the photo next to the computer. -Read all the messages on the computer. -Take the teddy bear.
CHAPTER 6 AND EPILOGUE -Find D's other shoe. -Talk to D at the bay.
That's all folks. I hope you enjoyed that game guide as always. I might do the sequel released for Wii once I find a way to configure a decent Wii emulator. Anyway, I see you in the next walkthrough. Take care!
Hello folks, Laian here with a new game guide. Today, it's a DS game I played a lot called «Trace Memory» (a.k.a «Another Code» in the European version). It feels good to replay this game and make a game guide for you, frankly. Besides Ghost Trick: Phantom Detective, Phoenix Wright and other games of that kind, I really like this game. So, if you're ready for a memory lane (or not, if you're new to this series then you're welcome aboard), I suggest we start that game guide without wasting any more time. Let's just jump into it, shall we?
CHAPTER 1 First things first, talk to the lady. She's your father's little sister, Jessica. Talk about all the topics available to learn more about the story. The red text will always open new topics to talk about. Click on the «back» icon below to end the conversation and carry on. Once you landed on Blood Edward Island, talk to the captain. Once more, talk about all the available topics then click on the «back» button. You'll get some candies from the captain. Go search Jessica. You'll hear a scream right when you will reach the drawbridge. Unfortunately, you can't get to the other part of the island if the drawbridge is raised. Check the panel to your right, turn the wheel twice and carry on. Check the stone then move on until you get to a gate and a signboard. The gate is locked, sadly. However, there's a puzzle to solve. Just check the signboard. Remember the symbol to its right once you fixed it (or take a picture so you will get it memorized), it will come to an use later in the game. Go right now, skip the road blocked by big rocks and go right. You will get to a cemetery. Check the tombstones then the stone slab that blocks another way. Move it to unlock the path and see a letter carved on the back of the stone. Talk to the ghost kid afterwards. Carry on after the discussion to get past the obstacle you saw earlier and go forth. Check the grinder and try to clean the plate. Alas, you can't without the proper tool. Check the red toolbox next to the minecart and grab the gear (1). Check the other toolbox nearby the water tower to find a metal brush. Now you can scrape the rust off the plate. Remember the symbol, go back to the gate, check it to find a panel and
CHAPTER 2 Head to the front door of the mansion, talk to D then go inside. Look around and discuss once more with D. Take a photo of both of the paintings and merge the two photos to get a code. Use this code to open the door to the north with this code and proceed to the next area. Go check the painting, then go in the room to the left to enter the music room. Pick up the part of an essay on the ground, then the display case to find a DTS card. Check the book shelf to find another puzzle to solve. Unfortunately, you need to find more books in order to solve it. Leave that room and go to the butler's room to the right. Check the wardrobes to find some information about the Edward family and a puzzle to solve. You'll get the silver medal as a token of your success. Check the notepad on the desk and try to reveal what was written. The pencil lead breaks so you need another way to do that. Check the fi
CHAPTER 3 Go in the art studio to the right, check the drawing of Frannie and the desk to find a DTS card and another drawing. Check the chest, note all the stuff inside and leave the room. Go in the next room, check the dresser to find a DTS card, then the bottle on the table. You'll have to come back later since Ashley cannot open it with her bare hands. Examine the dolls between the beds, go back to the golden bird room and pick up the doll holding a drum. Head back to the art studio room, grab the hammer in the chest and go back to Mary and Henry's room. With the hammer, break the bottle and collect the gold bird key and a letter. Put the doll where it belongs to. You'll learn from D that device is a music box and needs a key to work. Go in the second room to the right, which is Frannie's room. Examine the teddy bear on the shelf to your right, then the desk to find a DTS card in the drawer and the sketchbook. Looks like you'll have to complete what has been unfinished. Check the ribbon on the bed then the wooden box on the shelf to find two stamps. You can complete the sketchbook by closing your system twice (without turning it off). Now explore the second room to the left. Check the framed picture on the table (you need to do some kind of reflection by slowly closing your system until you get a message), then the painting above the fi
CHAPTER 4 Check the newspaper on the table and the fi
CHAPTER 5 Go in the room to the right, check the book shelf next to the fi
CHAPTER 6 Go down the stairs to get to the cave. Walk in the cave until you find D's other shoe and carry on. You will meet Bill. Talk to him. After the conversation, you have to answer Bill's questions as he's pointing the gun towards Richard. Answer «Someone came in», «She hid me in the closet», «I heard Mom's voice», «You can't have Trace!», «I heard a gunshot», «Bill». After the discussion, Bill will die, falling into the endless pit. Cross the bridge after the conversation with your dad and head to the bay.
EPILOGUE This is a series of conversations. Talk to the captain, then to your dad and finally to D. If he remembered enough things about his story, he will ask you to touch the mark on the chest. Otherwise, he will stay on the island for the rest of his ghostly life. Yep, there are two endings as you can tell. Talk to your dad and watch the credits after the discussion. And blow the candles on your birthday cake. Save your progress and beat the game twice to get another surprise at the end.
BONUS PART: D's Memory Recovery Since a good part of the game is based on D's story, you need to find stuff that will help him recover his memory. Doing so will grant you the good ending at the end of the game. Here's the complete list of what you must do to get that ending, chapter by chapter and in order of appearance. Some of them are easy to get but some others are missable. Note that I mentioned some of them in the first part of the game guide and, most important, the ones you need to do during chapter 1 cannot be done in the next chapters since you can't leave the mansion.
CHAPTER 1 -Check the stone slab saying «Edward Mansion» to the left of the road. -Check Thomas and Henry's tombstones in the cemetery. -Check the metal slab on the machine at the mine entrance. -Find Sayoko's picture in the porter's lodge. -Find the Trace file in the lodge.
CHAPTER 2 -Check the paintings in the foyer twice. -Check the portrait at the end of the hallway. -Play the piano -Check the portrait nearby the piano -Read the letter in the left wardrobe, in the butler's room. -Look at the photo album in the middle wardrobe, in the butler's room. -Check the scroll in the right wardrobe and click on the underlined names. -Read the butler's diary in the right wardrobe. -Use the piece of charcoal on the notepad to reveal the message. -Check the gun case. -Examine the fallen birdcage. -Read the diary and remake the page.
CHAPTER 3 -Check Ashley's sketch made by Richard on the table in the art studio. -Check Frannie's sketch. -Check the teddy bear in Frannie's room. -Check the ribbon on the bed, in Frannie's room. -Solve the sketchbook puzzle with the stamps. -Solve the bottle puzzle in Henry's room. -Check the family photo next to the bottle. -Check the stereo system in the office. -Find D's shoe in the suitcase.
CHAPTER 4 -Check the newspaper. -Check the painting of the two boys in the dining room and click on both of the children. -Check the handkerchief covered with blood.
CHAPTER 5 -Check the painting in Lawrence's room and click on each of the characters. -Use the gold bird key to open the drawer and read the diary. -Check the envelope in the nightstand. -Give a candy to Richard. -Read the letter on the typewriter. -Read the letter next to the safe. -Check the book in the safe. -Examine the photo next to the computer. -Read all the messages on the computer. -Take the teddy bear.
CHAPTER 6 AND EPILOGUE -Find D's other shoe. -Talk to D at the bay.
That's all folks. I hope you enjoyed that game guide as always. I might do the sequel released for Wii once I find a way to configure a decent Wii emulator. Anyway, I see you in the next walkthrough. Take care!
|


| Games have secrets, I have my eagle gaze. |
Affected by 'Laziness Syndrome'
Registered: 10-21-11
Location: France
Last Post: 1836 days
Last Active: 1010 days
