

 User Notice
 Forum Links


Thread Information
Views
941
Replies
1
Rating
2
Status
OPEN
Thread
Creator
Creator
Lexatom
04-06-15 02:52 PM
04-06-15 02:52 PM
Last
Post
Post
gamerforlifefor..
04-11-15 07:54 PM
04-11-15 07:54 PM
System
9.5
Views: 556
Today: 0
Users: 0 unique
Today: 0
Users: 0 unique
Thread Actions


Order
ALBW - Chapter 2 Guide
Game's Ratings
Overall
Graphics
Sound
Addictiveness
Depth
Story
Difficulty
Average User Score
9.5
9
9.2
8.3
8.7
7.7
5.5
04-06-15 02:52 PM
 Lexatom is Offline
| ID: 1154990 | 2257 Words
Lexatom is Offline
| ID: 1154990 | 2257 Words
 Lexatom is Offline
| ID: 1154990 | 2257 Words
Lexatom
LunarDarkness2
LunarDarkness2
Level: 130


POSTS: 1178/5106
POST EXP: 331704
LVL EXP: 25066477
CP: 27262.3
VIZ: 730342

POSTS: 1178/5106
POST EXP: 331704
LVL EXP: 25066477
CP: 27262.3
VIZ: 730342
Likes: 1 Dislikes: 0
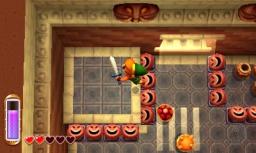
Chapter 2 Since you have 2 locations marked on your map, you can go to them in any order. However, we will cover the House of Gales first. Go back to your home, but don’t go inside. Go east from your home and cross the bridge you see above you. You will then meet Irene. She is the witch’s granddaughter, and she was told by the fortune teller, that if she didn’t take care of you, she would be met with a terrible fate. So, now she will take you to the signposts you’ve saved at before! Now, go back in the direction to the House of Gales. Walk across the first cliff (platform) you see. (It’s directly west from the House of Gales). You’ll see a man standing there. He says the only way to get to the House of Gales is to swim there. (No, really?) He says you should visit the Zora’s. They live in the northeastern part of the map. Go back on the bridge where you met Irene, and keep going north. Once you get behind the Eastern Palace, you will the Witch’s Hut. We don’t need to go there now, though. So, just go east of the hut. Sooner or later, you will see a Zora. He tells you that there is no way to get into Zora’s Domain because the bridge is out. Cross the gap by turning into a painting. When you cross the gap, turn back to your normal self. When you move on to the next area, you’ll see a chest on a ledge. It's not that important, as it only contains 20 rupees. Keep going northeast. Whenever you see a waterfall, go towards it. There is a secret cave behind the waterfall. The first time you try to enter, a Shady Guy will bump into you and run away after talking a bit. Ignore him, and go into Zora’s Domain. Once you get in, you’ll the princess of the Zora’s has gotten huge and angry, because her Smooth Gem was stolen. Go outside of Zora’s Domain and ring the bell. Tell Irene to take you to Kakariko Village. Once you get there, go to where Sahasrahla’s house was, but don’t go inside. You’ll see the Shady Guy eventually. He will run away from you. After he runs away, go to the shop merchant. (The one you probably bought a bottle from). He has the Smooth Gem for sale for 200 rupees. If you don’t have enough rupees, go around the overworld and look for some. Once you bought the Smooth Gem, go back to Zora’s Domain. Give her the Smooth Gem, and she will give you some flippers so you can swim in water. If you swim to the House of Gales, you’ll see pillars with the Tornado Rod symbol on it. You know what this means. Go back to your house and talk to Ravio. Rent the Tornado Rod from him. The bombs are also suggested, but optional. Once you have the Tornado Rod, walk outside your house. You’ll see Gulley’s mom looking for her son, Gulley. (She has an annoying voice….I swear). She says she hopes he hasn’t gotten lost in the woods to the south. Go south of your house and into the woods. (It’s that area with lots of trees on the map). You’ll have to go in from the bottom of the woods to get there. Once you get to the middle of the woods, you’ll see a tree stump with a bag on it. Go and pick it up. Gulley’s mom will appear, and say that was Gulley’s bag. She lets you keep it instead, though. Now you can equip 2 items at once! Optional If you already rented bombs from Ravio’s house, go to the blocked off cave with a sign that says, “strange creature inside, do not blow up entrance!” Blow up the closed entrance with a bomb, and go inside. You’ll see a giant squid named Mother Maimai. She lost all her babies, and needs you to find them all. Each time you find 10 of them, you can upgrade your items. She tells you what her babies sound like. If you hear it, then they must be nearby. Exit Mother Maimai’s cave, and go back to where the House of Gales is. Swim in the northeast direction and follow the stream. Eventually, you’ll see a bridge. Go under it, to meet a bird lover. After a short talk with him, he will give you a bottle. End of optional Destroy the six pots in the center of the room and step on the switch to cause the propellers to blow wind. Use the Tornado Rod while near one of them and it will blow Link to the higher platform. Continue on to the next room.Swim to the House of Gales. Once you’re there and standing next to the blocked-off entrance, use the Tornado Rod, and the tiles will fly away, revealing a button. Press the button to open the door. Go inside to start your 2nd dungeon! Walk to the north end of the room and light the two torches causing a treasure chest to appear. Open it up to get a red rupee. Drop off the ledge at the northeast corner of the room and head onward to the next room. Slash at the crystal switch, causing the propellers to stop blowing. Run over to the treasure chest and open it to get some monster guts. Back in the large room, walk along the wall on the ride side of the room to reach the next platform. Make your way to the southeast corner of the room and hit the crystal switch, causing the nearby wall to move. Run back to the higher platform and then walk along the wall to reach the door at the southeast corner of the room. In this room you will find a trio of fire bubbles. When they are nearby, use the Tornado Rod, causing their flames to disappear for a short while. Deliver a few sword slashes to defeat them. After they have been defeated, grab the small key from the treasure chest and then head back to the previous room. Make your way to the southwest corner of the room and head through the locked door. Merge onto the moving platform and ride it to the next platform. Open the treasure chest here to get the Compass. Next merge along the walls on the right side to get to another moving platform near the top of the room. While still a painting, walk onto this platform and make your way to the northwest part of the room. Get out of painting form and climb the nearby steps. Walk on top of the two moving platforms to reach the northeast corner of the room. You can step on the switch to cause the propeller in the room to start blowing, making it easier to reach the higher area. Walk through the door to the right to get back to the main room. Step on the nearby floor switch, causing the nearby propeller to start blowing. Walk to the right and use the Tornado Rod to get blown to the north end of the room. Stand on the left side of the room and merge into the wall. Walk to the northwest corner of the room and head through the door to the west. Run through this room and head south through the door at the bottom-left corner. Walk along the wall to the southwest corner and open the treasure chest to get a Silver Rupee! Walk along the south wall and then use the Tornado Rod to blow Link into the moving propeller. Head back right to the main room once again. Once again use the Tornado Rod to reach the northern end of the room. Walk to the east end and then turn into the painting to walk along the eastern wall. Land on the platform and hit the crystal orb nearby, causing a large propeller in the center of the room to blow wind upwards. Drop into the propeller to have it shoot you up to the second floor. Walk southward where you’ll find a rolling spike. Use the Tornado Rod to launch yourself up, allowing the rolling spike to pass by and then continue southward. Break the pots at the southwest part of the room and step on the switch, causing a small key to drop down in the room. Walk to the right and head through the door at the corner of the room. There is a door along the south portion of the wall, so run on through. Pull the switch on the far right, causing a large treasure chest to appear. Run over and open it to get the Big Key. A circle of flames will appear around you, but they can be blown out by using the Tornado Rod. Run back to the previous room. Climb the steps in this room and head back left to the large central room. Walk along the wall on the right side to reach the narrow ledge with a small key. Grab the key and drop down. Use the small key on the locked door at the south end of the room. Fall off the ledge to the left. Walk to the far left and pull the lever, causing a small platform to move. Stand to the side of the moving platform and use the Tornado Rod to spring yourself upward. Time it so that you land on the moving platform. Walk to the left side of the locked door and merge into the wall. Walk around the corner to the left and step on the red switch. Walk back around the corner and drop down to the lower level. Use the Tornado Rod to remove the flames and then grab the small key. Use the Tornado Rod to get back up to the higher floor and then head through the locked door. Here you will take on the dungeon mini-boss in the form of a pair of flaming enemies that walk around on the ground. You need to be near them and use the Tornado Rod, causing their flames to temporarily dim. Slash them a number of times before their flames return. Repeat this process until they have both been defeated. A green portal will appear, but run by it and head through the door that opens up to the right. Climb down the steps and head through the door on the left side of the room. Step on the switch near the southwest part of the room and then step on the switch along the western wall. Next step on the top switch and then head back right a screen through the other door. Climb the steps and walk over to the east side of the room. Step on the floor switch, causing the propellers to stop blowing wind. Walk back around to the northwest part of the room and climb the nearby steps. Leap off the ledge and climb the next set of stairs. With the wind out of the way, you can walk to the upper door against the eastern wall. Climb the steps and drop off the ledge to the top of the room. Defeat the enemy eyegore and step on the floor switch. Use the Tornado Rod to land on top of the moving platform and strike the orb with your sword. Ride to the south end of the room and then fall down onto the blowing propeller, shooting you up to the third floor. Merge on the wall to the right and make your way to the south end of the room. Walk left a screen and defeat the eyegore. Light the two torches and then head through the door that opens to the left. Use the Tornado Rod to defeat all six of the fire bubbles in the room. When all six have been defeated, head right through the door that opens. Walk along the wall and head back to the room to the right. Open the treasure chest here to get a small key. Walk along the wall to the right to get some rupees and then head through the door at the southwest part of the room once again. You can quickly head left a screen to reach the final treasure chest in the dungeon, containing a purple rupee. Return to the previous room and head through the locked door. Step onto the first moving platform and ride it up a bit. Use the Tornado Rod to float in the air and land on the second moving platform when it moves under you. Use the big key and head through the large door to take on the dungeon boss. The boss’s weak spot is the large eye on top of its body. In order to get on top of the boss, you need to use the Tornado Rod to propel yourself up there. Slash at the eye several times. After harming the boss, he will grow a part of his body, making the eye higher up and out of reach. Slash at the layers of its body with your sword and then repeat the process with the Tornado Rod. Repeat this through three stages until the boss has been defeated. Grab the Heart Container that is left behind and then grab the Pendant of Wisdom. Link will then be transported back outside the dungeon. Chapter 2 Since you have 2 locations marked on your map, you can go to them in any order. However, we will cover the House of Gales first. Go back to your home, but don’t go inside. Go east from your home and cross the bridge you see above you. You will then meet Irene. She is the witch’s granddaughter, and she was told by the fortune teller, that if she didn’t take care of you, she would be met with a terrible fate. So, now she will take you to the signposts you’ve saved at before! Now, go back in the direction to the House of Gales. Walk across the first cliff (platform) you see. (It’s directly west from the House of Gales). You’ll see a man standing there. He says the only way to get to the House of Gales is to swim there. (No, really?) He says you should visit the Zora’s. They live in the northeastern part of the map. Go back on the bridge where you met Irene, and keep going north. Once you get behind the Eastern Palace, you will the Witch’s Hut. We don’t need to go there now, though. So, just go east of the hut. Sooner or later, you will see a Zora. He tells you that there is no way to get into Zora’s Domain because the bridge is out. Cross the gap by turning into a painting. When you cross the gap, turn back to your normal self. When you move on to the next area, you’ll see a chest on a ledge. It's not that important, as it only contains 20 rupees. Keep going northeast. Whenever you see a waterfall, go towards it. There is a secret cave behind the waterfall. The first time you try to enter, a Shady Guy will bump into you and run away after talking a bit. Ignore him, and go into Zora’s Domain. Once you get in, you’ll the princess of the Zora’s has gotten huge and angry, because her Smooth Gem was stolen. Go outside of Zora’s Domain and ring the bell. Tell Irene to take you to Kakariko Village. Once you get there, go to where Sahasrahla’s house was, but don’t go inside. You’ll see the Shady Guy eventually. He will run away from you. After he runs away, go to the shop merchant. (The one you probably bought a bottle from). He has the Smooth Gem for sale for 200 rupees. If you don’t have enough rupees, go around the overworld and look for some. Once you bought the Smooth Gem, go back to Zora’s Domain. Give her the Smooth Gem, and she will give you some flippers so you can swim in water. If you swim to the House of Gales, you’ll see pillars with the Tornado Rod symbol on it. You know what this means. Go back to your house and talk to Ravio. Rent the Tornado Rod from him. The bombs are also suggested, but optional. Once you have the Tornado Rod, walk outside your house. You’ll see Gulley’s mom looking for her son, Gulley. (She has an annoying voice….I swear). She says she hopes he hasn’t gotten lost in the woods to the south. Go south of your house and into the woods. (It’s that area with lots of trees on the map). You’ll have to go in from the bottom of the woods to get there. Once you get to the middle of the woods, you’ll see a tree stump with a bag on it. Go and pick it up. Gulley’s mom will appear, and say that was Gulley’s bag. She lets you keep it instead, though. Now you can equip 2 items at once! Optional If you already rented bombs from Ravio’s house, go to the blocked off cave with a sign that says, “strange creature inside, do not blow up entrance!” Blow up the closed entrance with a bomb, and go inside. You’ll see a giant squid named Mother Maimai. She lost all her babies, and needs you to find them all. Each time you find 10 of them, you can upgrade your items. She tells you what her babies sound like. If you hear it, then they must be nearby. Exit Mother Maimai’s cave, and go back to where the House of Gales is. Swim in the northeast direction and follow the stream. Eventually, you’ll see a bridge. Go under it, to meet a bird lover. After a short talk with him, he will give you a bottle. End of optional Destroy the six pots in the center of the room and step on the switch to cause the propellers to blow wind. Use the Tornado Rod while near one of them and it will blow Link to the higher platform. Continue on to the next room.Swim to the House of Gales. Once you’re there and standing next to the blocked-off entrance, use the Tornado Rod, and the tiles will fly away, revealing a button. Press the button to open the door. Go inside to start your 2nd dungeon! Walk to the north end of the room and light the two torches causing a treasure chest to appear. Open it up to get a red rupee. Drop off the ledge at the northeast corner of the room and head onward to the next room. Slash at the crystal switch, causing the propellers to stop blowing. Run over to the treasure chest and open it to get some monster guts. Back in the large room, walk along the wall on the ride side of the room to reach the next platform. Make your way to the southeast corner of the room and hit the crystal switch, causing the nearby wall to move. Run back to the higher platform and then walk along the wall to reach the door at the southeast corner of the room. In this room you will find a trio of fire bubbles. When they are nearby, use the Tornado Rod, causing their flames to disappear for a short while. Deliver a few sword slashes to defeat them. After they have been defeated, grab the small key from the treasure chest and then head back to the previous room. Make your way to the southwest corner of the room and head through the locked door. Merge onto the moving platform and ride it to the next platform. Open the treasure chest here to get the Compass. Next merge along the walls on the right side to get to another moving platform near the top of the room. While still a painting, walk onto this platform and make your way to the northwest part of the room. Get out of painting form and climb the nearby steps. Walk on top of the two moving platforms to reach the northeast corner of the room. You can step on the switch to cause the propeller in the room to start blowing, making it easier to reach the higher area. Walk through the door to the right to get back to the main room. Step on the nearby floor switch, causing the nearby propeller to start blowing. Walk to the right and use the Tornado Rod to get blown to the north end of the room. Stand on the left side of the room and merge into the wall. Walk to the northwest corner of the room and head through the door to the west. Run through this room and head south through the door at the bottom-left corner. Walk along the wall to the southwest corner and open the treasure chest to get a Silver Rupee! Walk along the south wall and then use the Tornado Rod to blow Link into the moving propeller. Head back right to the main room once again. Once again use the Tornado Rod to reach the northern end of the room. Walk to the east end and then turn into the painting to walk along the eastern wall. Land on the platform and hit the crystal orb nearby, causing a large propeller in the center of the room to blow wind upwards. Drop into the propeller to have it shoot you up to the second floor. Walk southward where you’ll find a rolling spike. Use the Tornado Rod to launch yourself up, allowing the rolling spike to pass by and then continue southward. Break the pots at the southwest part of the room and step on the switch, causing a small key to drop down in the room. Walk to the right and head through the door at the corner of the room. There is a door along the south portion of the wall, so run on through. Pull the switch on the far right, causing a large treasure chest to appear. Run over and open it to get the Big Key. A circle of flames will appear around you, but they can be blown out by using the Tornado Rod. Run back to the previous room. Climb the steps in this room and head back left to the large central room. Walk along the wall on the right side to reach the narrow ledge with a small key. Grab the key and drop down. Use the small key on the locked door at the south end of the room. Fall off the ledge to the left. Walk to the far left and pull the lever, causing a small platform to move. Stand to the side of the moving platform and use the Tornado Rod to spring yourself upward. Time it so that you land on the moving platform. Walk to the left side of the locked door and merge into the wall. Walk around the corner to the left and step on the red switch. Walk back around the corner and drop down to the lower level. Use the Tornado Rod to remove the flames and then grab the small key. Use the Tornado Rod to get back up to the higher floor and then head through the locked door. Here you will take on the dungeon mini-boss in the form of a pair of flaming enemies that walk around on the ground. You need to be near them and use the Tornado Rod, causing their flames to temporarily dim. Slash them a number of times before their flames return. Repeat this process until they have both been defeated. A green portal will appear, but run by it and head through the door that opens up to the right. Climb down the steps and head through the door on the left side of the room. Step on the switch near the southwest part of the room and then step on the switch along the western wall. Next step on the top switch and then head back right a screen through the other door. Climb the steps and walk over to the east side of the room. Step on the floor switch, causing the propellers to stop blowing wind. Walk back around to the northwest part of the room and climb the nearby steps. Leap off the ledge and climb the next set of stairs. With the wind out of the way, you can walk to the upper door against the eastern wall. Climb the steps and drop off the ledge to the top of the room. Defeat the enemy eyegore and step on the floor switch. Use the Tornado Rod to land on top of the moving platform and strike the orb with your sword. Ride to the south end of the room and then fall down onto the blowing propeller, shooting you up to the third floor. Merge on the wall to the right and make your way to the south end of the room. Walk left a screen and defeat the eyegore. Light the two torches and then head through the door that opens to the left. Use the Tornado Rod to defeat all six of the fire bubbles in the room. When all six have been defeated, head right through the door that opens. Walk along the wall and head back to the room to the right. Open the treasure chest here to get a small key. Walk along the wall to the right to get some rupees and then head through the door at the southwest part of the room once again. You can quickly head left a screen to reach the final treasure chest in the dungeon, containing a purple rupee. Return to the previous room and head through the locked door. Step onto the first moving platform and ride it up a bit. Use the Tornado Rod to float in the air and land on the second moving platform when it moves under you. Use the big key and head through the large door to take on the dungeon boss. The boss’s weak spot is the large eye on top of its body. In order to get on top of the boss, you need to use the Tornado Rod to propel yourself up there. Slash at the eye several times. After harming the boss, he will grow a part of his body, making the eye higher up and out of reach. Slash at the layers of its body with your sword and then repeat the process with the Tornado Rod. Repeat this through three stages until the boss has been defeated. Grab the Heart Container that is left behind and then grab the Pendant of Wisdom. Link will then be transported back outside the dungeon. -------------------- |
Vizzed Elite
Affected by 'Laziness Syndrome'
Registered: 07-30-13
Location: Denver, CO
Last Post: 1349 days
Last Active: 176 days
| The Dragon of Rock Bottom |
Affected by 'Laziness Syndrome'
Registered: 07-30-13
Location: Denver, CO
Last Post: 1349 days
Last Active: 176 days
Post Rating: 1 Liked By: gamerforlifeforever,
04-11-15 07:54 PM
gamerforlifeforever is Offline
| ID: 1157015 | 48 Words
| ID: 1157015 | 48 Words
gamerforlifeforever2
Level: 180

POSTS: 1044/10715
POST EXP: 585502
LVL EXP: 79293177
CP: 104770.6
VIZ: 3513677

POSTS: 1044/10715
POST EXP: 585502
LVL EXP: 79293177
CP: 104770.6
VIZ: 3513677
Likes: 1 Dislikes: 0
Like the 1st chapter, I think you did a fantastic job making this game guide. Having played the game myself, I can see that this game guide will be very helpful to those who aren't quite as skilled at Zelda games as you and I. Again, great job! -------------------- |
Vizzed Elite
Affected by 'Laziness Syndrome'
Registered: 07-04-12
Location: Somewhere in Ohio
Last Post: 325 days
Last Active: 199 days
| Ultimate Pokemon Fanboy, Member of the Year 2016, and Vizzed's #1 My Hero Academia fan |
Affected by 'Laziness Syndrome'
Registered: 07-04-12
Location: Somewhere in Ohio
Last Post: 325 days
Last Active: 199 days
Post Rating: 1 Liked By: Lexatom,
