Forum Links
Guide: Dragon Quest 8 Journey Of The Cursed King Walkthrough Part 3
Here is part 3 of this guide
Here is part 3 of this guide
Play Dragon Quest VIII Online
Thread Information
Views
6,798
Replies
3
Rating
6
Status
OPEN
Thread
Creator
Creator
Eniitan
08-22-16 12:37 PM
08-22-16 12:37 PM
Last
Post
Post
Deacon DeMan
08-22-16 01:28 PM
08-22-16 01:28 PM
System
9.5
Views: 5,891
Today: 0
Users: 2 unique
Today: 0
Users: 2 unique
Thread Actions
Order
Dragon Quest 8 Journey Of The Cursed King Walkthrough Part 3
Game's Ratings
Overall
Graphics
Sound
Addictiveness
Depth
Story
Difficulty
Average User Score
9.5
8
8
7
8
8
8
08-22-16 12:37 PM
 Eniitan is Offline
| ID: 1297033 | 7185 Words
 Eniitan is Offline
| ID: 1297033 | 7185 Words
Eniitan
Level: 178



POSTS: 7016/10522
POST EXP: 959649
LVL EXP: 75765160
CP: 55510.5
VIZ: 2641976

POSTS: 7016/10522
POST EXP: 959649
LVL EXP: 75765160
CP: 55510.5
VIZ: 2641976

Likes: 3 Dislikes: 0
Dragon Quest 8 Journey Of The Cursed King Walkthrough Part 3 The Western Continent Seaview Church Now to get to seaview church it is bit dodgy, basically you need to go to the left on the map from princess minis castle. By going west if that helps a little more you will see it on the map here. Some people get stuck on this part, and end up going around most places that they shouldn't go to as of yet. When that happens you come to face stronger monsters way beyond your parties levels, and they end up dying which is what you wouldn't want. 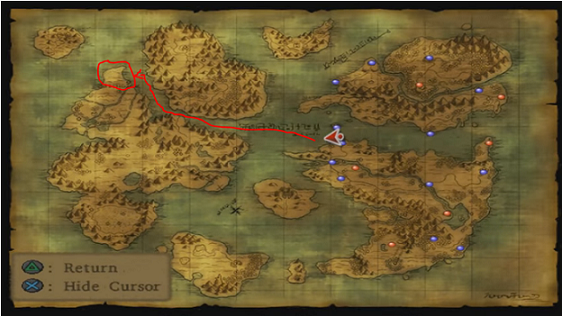 Monsters found in this region Slime – The slimes in this area are a bit stronger so they will try, and turn into a stronger foe. They have the ability to call for back up. Meaning more slimes. stop them before they turn into something, that will be harder for you to face. Cockateer - It can do a move called *Wind sickles* this attack can do some damage to one of your party members. Great Sabrecat – When you first encounter them they are really quite annoying to deal with so watch out. There is one move they do which they jump up and come down by attacking you with their claws. To know when they do this move it will say *Thrusts a force with hurricane* They are quite quick to attack your party members on so that is something else to take note on. Spitnik - This foe has a strange appearance when you first meet him. He does 2 skills which are *Dazzle and Flame Breath* Venom Wasp - This is another annoying one to deal with the skills it uses are *Poison Attack and Paralysis Attack* Orc – This guy does a move called *Muiltithrust* with his weapon. So it can attack all party members randomly. Bomboulder - Can use *Psyche up* this bolder is hard on its hits so with that power up he will try to kill. So don't let him have that chance. Now the road you take to get to your next destination which would be *Baccarat* it’s a little far to get there. But, it shouldn't take you too long to get there. On your way there will be a special monster blocking the bridge. Don't go and attack it if you can draw it out then run around going through without having been caught. Remember morries place? That’s what its for as said before that will be done in another walkthrough, and not in this one. Anyways continue on your way. Baccarat Monsters found in this region Treeface Metal Slime Knight - The only difference with the last one you face this slime is made out of metal. They can cast *Heal* So it will take a little more time defeating these guys when you come across them. their attacks are still the same. Puppet Player - When *Performs Lame story* it makes the party to lose their tension like as in any psyche up build that you did. There is another one this enemy does which I found rather interesting and surprising to come upon since haven't really experienced it myself the years I have played this game. Anyways when he does *Performs Love Story* this would randomize status effects on party members. Like for instance one ends up confused while someone else is put to Bodkin Fletcher - Another foe which is annoying to deal with. It has the same attacks as the previous one, but the only difference is that your party can get poison from the attacks. The normal attacks it does won't always hit poison but some of them do so watch out when that happens. Venom Wasp Orc Jumping Jackal - Now this guy is just funny for some odd reason. Anyways when first meeting him he has weapons something similar to wolverine from x men. That’s the best way I can describe it. His special attack is not said but he goes up to one of your party members does a spin and another claw attack to end it. Another thing he does is *Wind sickles* Bomboulder Once you head here you will be a little confused as of what to do. You will need to go into the bank first which is straight ahead of you as soon as you enter. When you get in you should see some stairs head up the stairs and you will come to this corridor and this should trigger a cut scene which will help you. There will be two people talking which would be a bartender and some other person who works in the casino. They start to talk about someone called Mr Golding and his house. Not knowing the full information he was actually murdered so the poor guy is dead. They keep on talking and then something catches on with what you need to hear they say of a jester who was there at the time. You know who that is right? Dhoulmagus the guy you are looking for! Talk to the guy with the bowtie first before going after the bartender. He won't say anything. Now go down the stairs and go down again which will be a bar place with a stage as well. Go and talk to the bartender and he will tell you what you need to know. He will say of these people called Cash and Carrie that they sent people to go and track down Dhoulmagus who killed their father, and he heard that they headed straight for some island north of baccarat. On the island there is some ruins. As of now you can't do anything else in baccarat. If you go to that island now it will save the journey for when you need to get back there. Anyways after the talk trode will say to go there to look for clues. So I suggest finding the island so when you need to go back you can just use zoom. There are some shops in Baccarat so don't go leaving just yet. Make sure your party have new weapons and other things to go by on. So it will be easier to battle monsters. A detour to explore the ruins to the north Now to get to this place use zoom to get back to seaview church, and you need to sail to this place 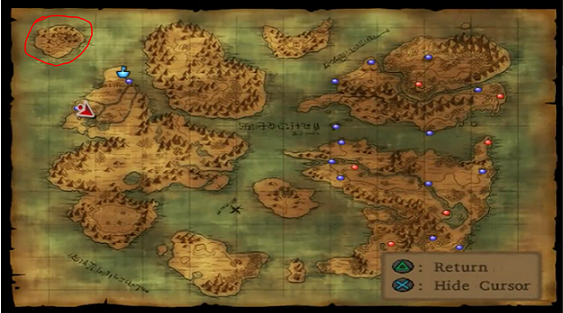 Because it will be easier from there. When you get to the place you will see another small looking ship and some guy standing next to it. Go up and talk to him this will trigger a cut scene. There won't be much to know of so go deeper into the ruins to explore. Use your map to help and guide you to the right way in. And when you get there you should see some dark looking shadow. When you move you will trigger another cut scene guess who you see walking in? Dhoulmagus! So quickly follow after him! When you enter the place would be so so dark and the only thing you will see is the floor. Go forth by running and you will hear Dhoulmagus laugh this will make you to leave. When you have that person who you talk to before will be seen go and talk to him again. He will give you some help saying of some magic mirror that it is in *Argonia* so that will be your next destination to head too. So zoom back to baccarat and head straight not the path to the left it will take you back to seaview church. Actually I suggest going to Savella Cathedral after, and not Baccarat yet. Because there is a cut scene there you need to know about. To find it here it is on the map 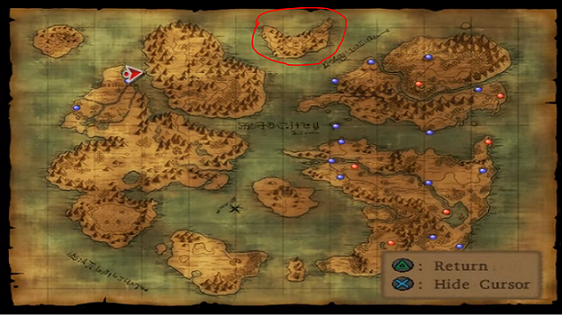 Monsters found on this island Magic Dumbbell - These guys again.....just make sure that there isn't a lot of them to the point they level up and use a death spell song on you. Best thing to do is use the spell *Sizzle* on them have either hero or Jessica do it since it will attack them all at once when done it will be easier to attack them. Also they can do *Cursed tune* which can attack all party members except for hero. They have other abilities too so watch out. Bulldozer Shade - These guys if I am correct only appears during the night time. The skills they use is *Cursed Mist and can Call for backup* Hoodlum Demonrider - For this one they can be quite medisome with their attacks. Also they have these skills that they use. *Kacrackle Slash and Chilly Breath* Killer Moth Silenus - Plays counting sheep like the other previous ones which will hit all party members, and could make them to fall a Robo-Robin – These guys will be very annoying to deal with at first. Once you level up more and com back to the area much later on in the game then they won't be so much of a bother. Also you need to watch out they can use self destruct on you....when it says *Robo-Robin A is blown away!* that’s when it will happen. So once in the place there are stores you can buy from an inn also you can save the game. First when you enter there will be long looking stairs there will be two go up the first one and go to the path to the left. You will need to go up the stairs take the path to the left and go up another pair of stairs. You should see two guards go through the small bridge to get across it. You don't need to talk to the open the door and a cut scene should trigger you will end up seeing Marcello who ends up again insulting Angelo once done head out and you will see the two guards you pass talk about Angelo. That will be about it. You can now head back to baccarat and take the route to get to Argonia. There is a small sidequest you can do here, near baccarat there will be a house on a hill avoid it. I rather you continue on the main story since I will be doing a guide based on that in another section. On the way to Argonia Monsters found in this region Cureslime Tap Devil Iron Scorpion Skullrider - This guy uses a skill called *Flame slash* Magic Dumbbell Gargoyle - Uses a skill called *Vacuum Slash* and another move that he flies in the air and points his sword into you and holding it with two hands. Notso Macho – When I first saw these guys they look so funny! Plus they really look like samurai warriors. Anyways when first encountered they are quite annoying to deal with at first. So leveling up to overpower them is the best way to kill them easier. For now just find a way to bypass that use any spells or just attack. They also have cool names too I have to agree they just do. They can use a spell called *Oomph* as Jessica can so watch out this can double their attacks. And when that happens they can do serious damage trust me I know enough to say this. They have killed m party as a whole on a few occasions by doing that. Another thing to know sometimes when he attacks with his sword he will miss. Bulldozer - Can do a skill called *Burning Breath* so watch out it can attack all your party members and if hit they will become paralyzed that’s something you wouldn't want. But if it does happen just use the spell *Tingle* which cures the effect of King Cureslime - As for this foe he can pretty much heal his ally which isn't a good thing. He uses spells such as *Omniheal And Fullheal* and it does get annoying when used often so quickly take it down. Now its going to like take a while before getting to Argonia. when you get to another split path don't go to the path on the left on the map here go down 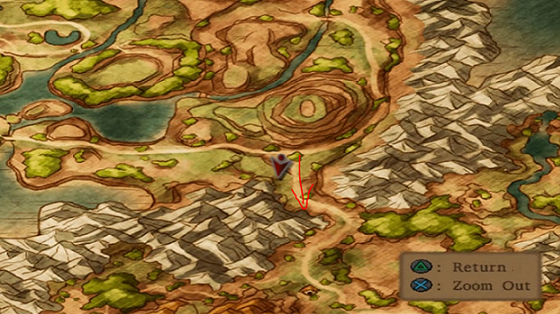 As you saw there is like this small house seen on the map. Go there and its like some small camp set up with some people it seems to be travelling. Talk to the people there one of them will be able to direct you to where you are actually headed. And say a bit about Argonia as well. If you speak to some others you will find out about an old man who lives in the forest to the west. Its not so far off from their camp its best to go there first before going onto Argonia. Or you don't have to go there first this is optional you can go to Argonia first so when done the story part for that you can go to the old mans house then. Another small note I suggest you going to the desert chapel while you are at it. Because you will need to pass there and getting there first time is annoying so when you go there now you can use zoom later on. To get to the desert chapel you need to go here I will set up a link here showing you. https://youtu.be/PbSw4-DyNOE The Strange Man and a Mystical Spring So to get to the old mans house either now or later its through here 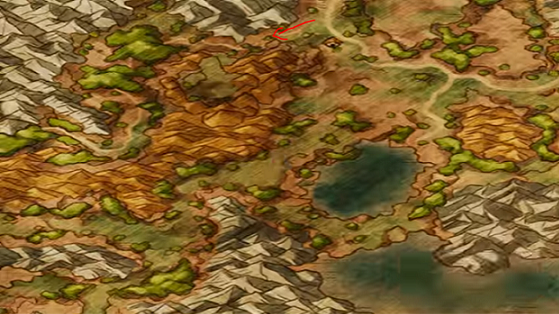 Its quite a mile of a walk to get to the place which is long. Like halfway down or near to the house you should see a board to the left saying *NO ENTERY BEYOND THIS POINT.* ignore and keep going once you get there you will know because onto the right you will see a house. So when you enter the house you will see a slime and another monster. Not to fear! These are good ones you can talk to. So talk to them since the old man cannot be seen around in the house. First talk to the slime. He will ask *Did you come to see the old man who lives here?* say yes. The slime will be a bit of a jerk and say he is not in the house and is not telling where he is either. Then talk to the other monster but you see.....he can't speak human sadly....go up the stairs and you will see another friendly monster which is dracky. He will say what the old man used to do by working in the castle and was a very important person back in his younger days. That is all he will say leave the house and when you do, go to the right to continue on another path. When you get there a cut scene will happen and you will see the old man that you are looking for. The old man notices princess medea first. Since he is blind he doesn't know that she is in her horse form instead he sees her human form. He then goes and inspects after he has done that he will explain how he went blind. And that now he views the world through his minds eye instead. And he says what he sees is a princes not a beast of burden. He will then ask what happened. Then the party explains on how their journey came to be. When the talking is done he will suggest for her to drink from a spring that is behind him. This is no ordinary spring it’s a magical enchanted spring that can list curses and help with other things as well. So it works! Medea tries out by drinking and she goes back to normal! So trode tries this but then.....something happens medea starts glowing again and is turned back into a horse sadly. The old man said the curse that is placed upon her is indeed really strong so the only way to lift it is to go and defeat Dhoulmagus. So after that he will say that he is getting a bit cold and would go back into the house. After that talk to medea she seems sad let her drink from the spring again and she will ask of a request from you. She will ask from time to time to bring her to the spring to talk to you. So this is something that has opened up. I do suggest you doing this. Because if you don't she will like get upset at you for not taking her as often as you should. Another helpful note. You can go to the spring to heal party members of the health and magic as well. So you wouldn't really need to go to the inn anymore from then. You can now be on your way to Argonia. You will come back to visit the old man again for his help. So go back to where the campsite was and keep on going on route to get to Argonia. You will come to another split path this is where you need to go 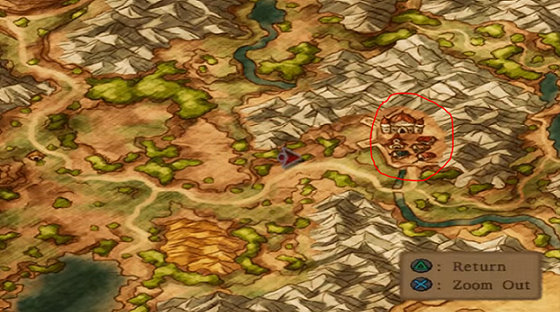 Also you will see another monster avoid it and keep on going. And you will come to being in Argonia. Trode will talk a bit saying about arrange marriage medea to prince charmles so they can't go in as of yet because of the curse so enter in. Argonia So when you enter you see it’s a very spacious place. So to get into the castle you will need to cross one of the bridges that is on the left when you do go straight and into the castle doors to open them. Head upstairs to the right and then to the left again if it’s a bit confusing here are some pictures to help 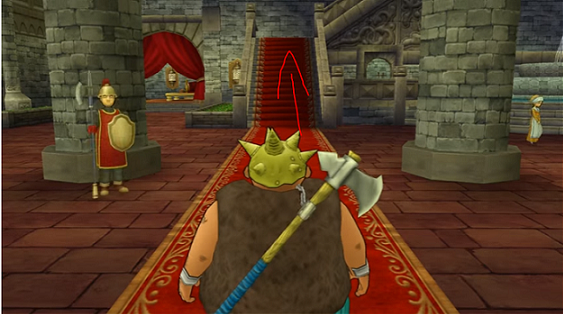 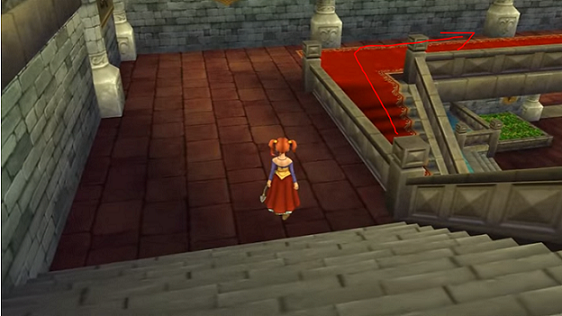 You should come into a big looking door open it and it seems to be the throne room. Go up and a cut scene will happen. When the first one is over go and talk to the king and another long cut scene will happen and you will have a request to be asked of to escort the dumb prince I call him or better yet the fat prince to the *royal hunting ground* so he can succeed the throne from his father. Sadly the prince has run off again and you will have to find him. It will be annoying to do so go out of the throne room and go up the stairs. You can go and find where the prince is hiding but its not worth it so save the time by dragging him out This is where you get stuck but don't worry when you exit out of the throne room go up the upper stairs that you see. Here is something that should help 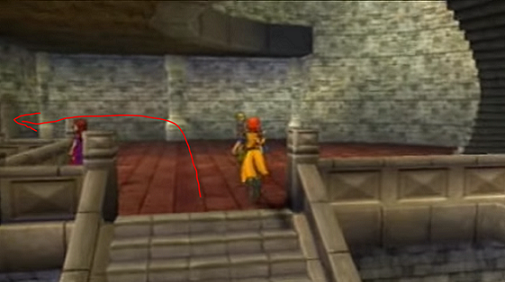 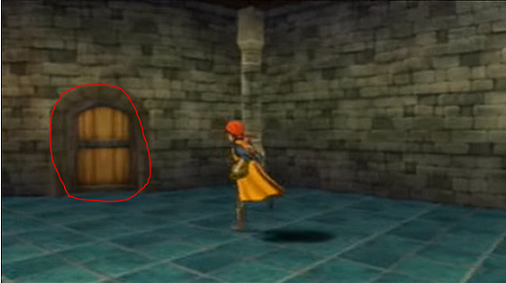 Go through the path and then open the door you see before you. In this room there will be a treasure chest and 2 vases blocking something. Break them to reveal a mouse hole! So send munchie in Another Mini Playthrough as Munchie So you will get to play and munchie again! Ok so go to the right in the tunnel hole and you should see a lizard and another hole. What you need to do here is draw the lizard to the hole by using the right pattern path when you have managed to do that the lizard will drop on the princes head and making him to scream and run out of the room he locked himself in. Go back from where you entered in to get back to hero. After that go back to the throne room and you will see the prince. A cut scene will happen and the king will introduce the prince to you. As you see he is a spoilt, jerk of a brat with the way he talks out of disrespect. Anyways so the king managed to convince the king to do with medea. So after that cut scene save and then head out. There will be like a small cut scene when that ends you need to take this path to get to the royal hunting ground. You will come to another split path which is here 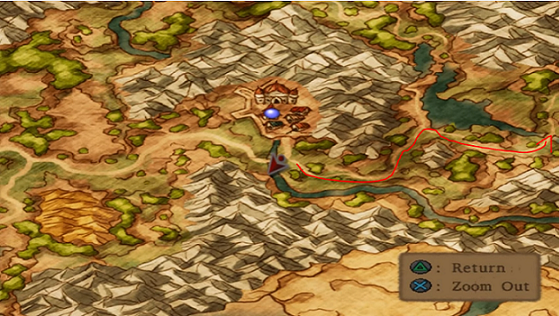 Also you will see the direction board read it to know where to go next which would be to the right. When you get there you should see a farmer go up to him and this will trigger a cut scene. After he scene head into the house to check things an old woman in there will allow you to rest for free so take up the offer. Once done head to the royal hunting ground but before you go in don't forget to use the scent that the prince gave to use to use so that you can disguise yourself. Royal Hunting Ground Here is a map I luckily found somewhere to help you. Since sadly there are no maps made. This is from a guide book someone took a picture of 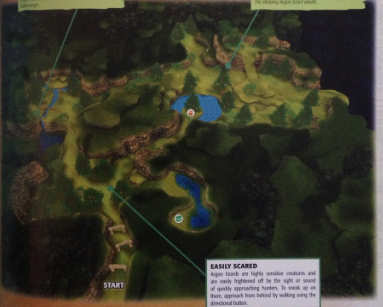 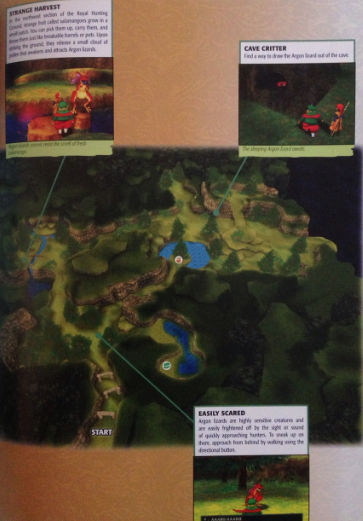 Monsters found in this region Hocus Chimaera – Quick on attacks and is annoying to deal with. They can also use *Flame breath* or *Cool breath* as well so watch out. They can also heal themselves as well. Killer Moth – Can use poison breath and can poison a party member when one or all of them don't dodge the fowl breath. Also can use the spell *Dazzle* which will make your party go blind and won't be able to attack properly. Jackal Ripper – With this guy he will use *Psyche up* which will mean double the trouble and meaning to take him down as soon as. Also uses a skill called *Thin air* this move will be used when he has used psyche up. Up to an amount that will damage your party. Hackasaurus – Uses *Flame breath* that can attack all party members. Orc King – Can use the spell *Zing* to revive a foe back to life So when you first go in this is the argon lizard that you are looking for 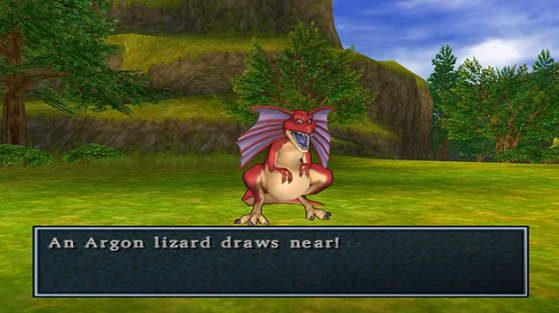 Apparently they will run away from you. So the best thing to do is to approach them from behind. Not to run but to walk so it doesn't hear or notice you coming. When you do you will go into battle with it. Miniboss boss fight 6 Argon Lizard His attacks and spells Ferocious battle cry Venom Mist Argon lizard is a mini boss fight the big one you will end up finding later and you will know since it looks very much different. The attacks are quite powerful so be on guard. There will be more argon lizards to find. Go to this place next since you really can't use a map which I find pretty annoying. You should come across another one 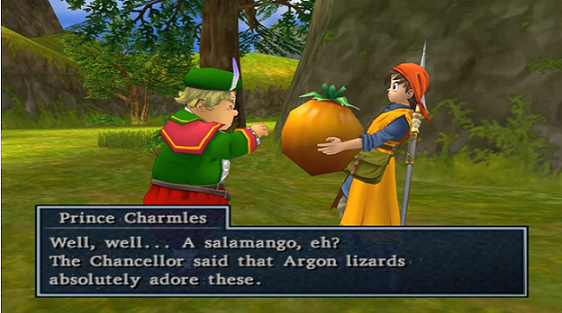 So pick it up and you see the two logs right? The big and small one just carry the big fruit there and drop it this will wake up the argon lizard when it does go and eat go up to it quickly to trigger a battle. Sadly this will be again another small argon heart. So you'll have to keep on going with this until you have found the right size. Now this is going to get a bit tricky to explain, I'll try my best to map out areas you need to go through on. Here is where you need to go next 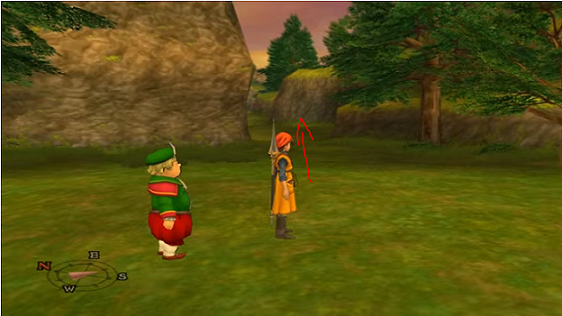 Keep going till you get to a bridge go under then go up by taking this route 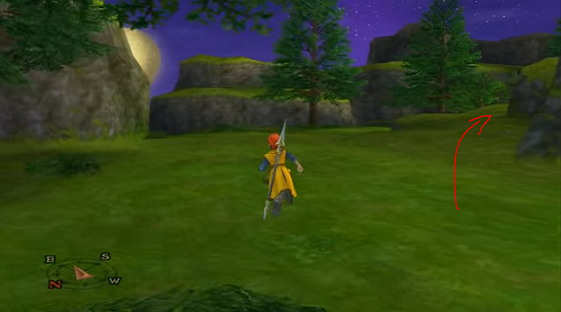 When you are halfway onto the bridge a small cut scene will happen you will see another argon lizard and you will need to draw it out. Across the bridge will be more of the salamango how you will need to do it is pick up the fruit. And then don't fall off the bridge be near the end and drop it to the ground near the cave that the argon lizard is Boss fight 7 The Great Argon Lizard His attacks and spells Uses a sweep attack with its tail A bite attack A huge stomp attack Now this argon lizard is really powerful so first things first. Have Angelo use kabuff on all party members then have Jessica use oomph on each party member. When buffed up have Jessica use accelerate as well to increase all parties speed. Also another thing here with some bosses you can use spells on them. You can use *Sap* which decreases their defences it works with this boss so it would make things a whole lot more easier for you. If you want to double the power with the damage use psyche up. It shouldn't take too long to beat this boss with this type of strategy. After the boss battle you can now go back to argonia. When you get out of the royal hunting ground go and talk to the farmer which will trigger a cut scene. So rest up and then use zoom to go back to argonia it saves the trip of having to do the long journey back. Argonia Bazaar So there will be like this special event that is happening and happened while you left. Called *Argonia bazaar* this will be very useful for you, and to buy what you need. They are expensive so I suggest you taking the time off from the story mode to train gain a lot of money and get what you need. Remember you can go to neos for money problems. Because the bazaar only is on for a limited time. And when you go to a certain point of a story mode it will disappear never to return. When you have finally finished what you needed to do. Go to this place first before going to the castle to talk to the king. 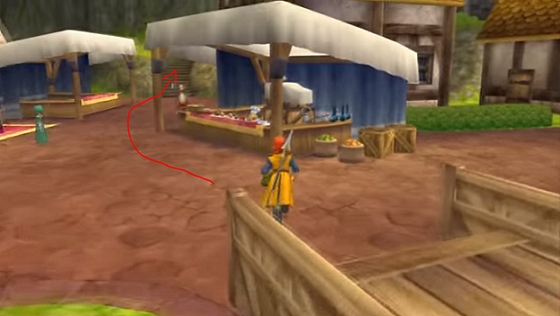 You will see the prince talking to someone go up and talk to him this will trigger a cut scene. The prince will be doing something he shouldn't do to do with the argon heart. It would mean the argon heart that was caught in the royal hunting grounds you get to keep. While he takes the one that he brought from a peddler to the castle. This doesn't go unnoticed the king sees this and what he has done and the king would be displeased and heartbroken foe what his son has done. So after go to the castle to talk to the king another cut scene will happen the king will go off somewhere so make your way as if you are going to leave the throne room to your right he will be where the windows are go up and talk to him a small cut scene will happen. He won't give you the magic mirror you will have to like find it sadly. Its on the forth floor here is how you can get to it. Since first time around it will annoy you. 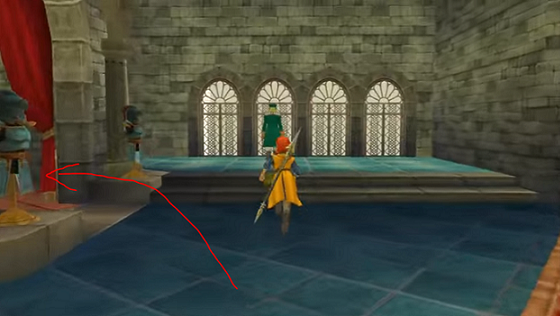 Take this path in the throne room go up the stairs until you see this door 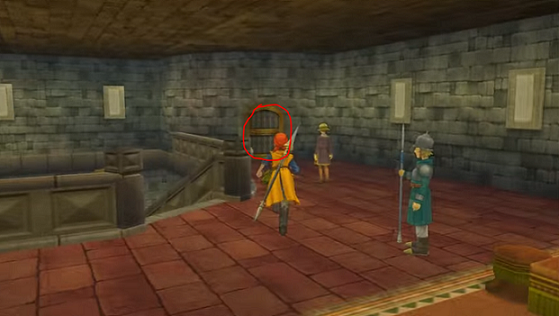 After you have obtained the mirror someone will talk to you this will trigger a cut scene he will say of an old man go back to his house to talk to him about the mirror. He will say about the magic mirror being a sun mirror before and there is a way to restore it. By encountering a purple sea dragon you faced a few times while being at sea. That will be the end of this storyline. Reviving The Magic Mirror and Finally Facing Dhoulmagus Powering up the magic Mirror So after you got some information on how to restore the magic mirror you will need to head back to the sea. The easiest way to get there is if you zoom to seaview church To find a purple sea dragon as told you have seen before. It has the move *Giga flash* which makes your party go blind. If you are having trouble remembering where it is here is something that should help you 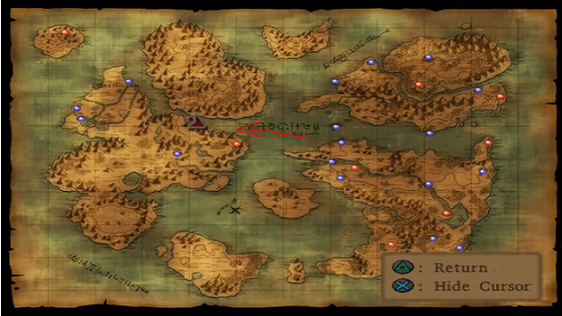 When you encounter it make sure with the right timing to have hero hold up the sun mirror and if the dragon uses the move defeat it and then head back to the dark ruins. Dark Ruins When you have the sun mirror head back to the dark runs. Remember that hole? Go into the main item section and click use sun mirror it will say of something else to first before proceeding. Monsters found in this dungeon Mummy Boy Mummy Mimic Blood Mummy - This one is a little more powerful than the previous mummies you have faced. It doesn’t have a new skill and has the same like the others have. Phantom Swordsman – You met a foe similar of this in swordsman labyrinth. They are a little stronger and annoying to deal with so watch out. This enemy *Calls forth a terrible lightning* that will hit all party members be on guard for that at all times. Bone Baron – Does some crest attack. this would hit one of your party member but it does a lot of damage. Soulspawn – Now for these guys....they are quite annoying to deal with how? Physical attacks won't work so much on them sadly. So what you need to do is use magic to defeat them. Also they can do *Sweet breath* which will if hit put your party members to Fallen Priest – Can cast *Kazing* that’s bad it means this guy can fully resurrect a foe that you killed and bring it back to full life. Also can cast *Kasizzle* a powerful spell fire skill. Troll – Now this one is the most annoying of all when you first encounter this enemy he is very large looking so he will put in some powerful attacks on you. Like for instance his *Desperation Attacks* so be very wary when facing this foe. When you enter the ruins you see a stairs area sadly it seems its not going up. So its not visible at first but near those stairs as you get closer there are two doors. One on the left and the other to the right one of these pathways hold the key for you to unlock the stairs how they are and to help rise them. The path you need to go to is the left one. On the right you can go there I suggest taking that path first it will lead you to an upper floor look alike in the room that you are in. You will see a bridge to cross and some stairs to climb as well. You should come to see a treasure chest when you open the door to the upper floor. Once you have opened the chest leave, and then go to the other path. When you get back to the upper floor you should come to seeing a switch. Go up to it and press x it will release the locked stairs. Go back down and take the stairs to carry on finding Dhoulmagus. You should see a door to the right ok so....you will come to a puzzle in a very big room which would be here. 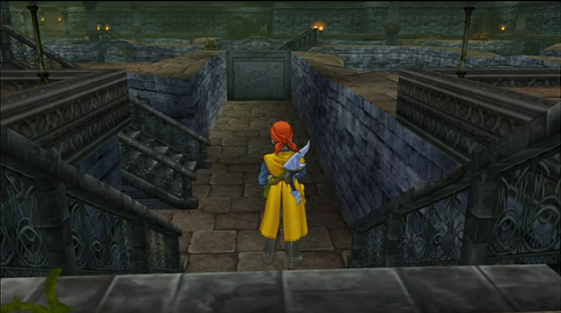 Go down the stairs and take the path the first stairs that you see this will lead you to a switch which will release one pathway for you. There will be many switches for you to do to get to the right path. So after hitting the first switch go to the path you just opened. You will need to go around this place to trigger another switch 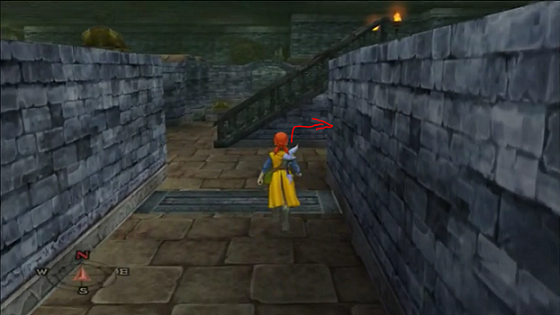 when you have done that go around again and go up the stairs. Ok so go down and not far off you should see another switch hit this one so it grants you access to get to those two treasure chests that you saw not long before. Go all the way back to the stairs then head for this path. 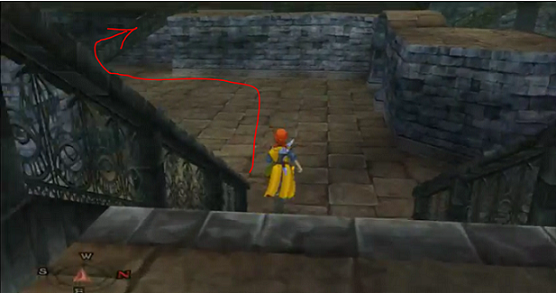 Ok when near the treasure chests the one on the left is a dragon scale and the other one is a mini medal. So go all the way back to hit off that switch that access open to where you get the chests. So once you hit the switch again to reopen the path you will see another stairs to take and another not so far off. Don't go to the first one you see go to the far off one it has a switch there. So again hit the switch and go to the other stair path you first saw. This will lead to hitting the last switch which would had been blocking another path. So go back to the other switch you hit before the last one so you can take the path. When you have done that go down the stairs again and take the path to the left when coming to the end of the bridge you are crossing. Go straight then left. And you should see where to go next You will come to another big room. So basically in this room you encounter the troll in the list area I said of some monsters doesn't always appear in the same place others are at. So in this room there will be a lot of stairs you need to descend down too. Don't go to the first stairs you see it won't lead you to the right way. Instead go to the one that is further down descend down the first stairs and you should come to another. Here will be 2 spilt paths you will see another pair of stairs before you and another one to the left. If you keep on going you will come to another treasure chest only to see it’s a mimic. So the path to the left is the right way. When you get to the near end of the stairs there will be another path stairs to the left and right the one to the left has a treasure chest. In the chest will be saints ashes. Then go ahead to take the right path. Now you will come to another room that has a puzzle. There will be two statues of this 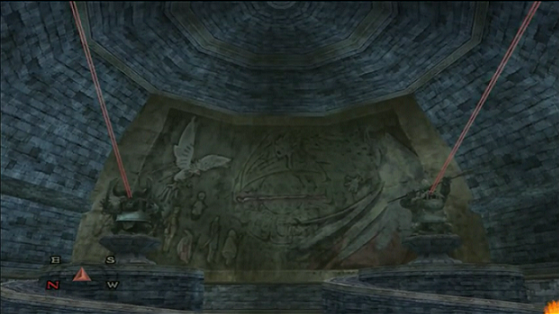 With lasers coming from their eyes what you have to do here is turn both of them to hit onto the right spot of a wall to open up the hidden path. Go to the statue on the left first there will be two switches the red is for the left and the blue is for the right direction wise. Now what you need to do is with each eye to hit a wing of a bird that is on the wall. For the statue on the left use the beam of the eyes at the left wing and as for the right statue use the beam of the eyes to hit the right wing. When done a small cut scene will happen this will open the hidden path descend down the stairs and this will lead you to the main room where Dhoulmagus is. This will be it people him not running this time and will face you. WARNING BEFORE FACING THIS BOSS Now let me warn you. For facing Dhoulmagus make sure you are well prepared like getting certain items that you need. When you have found the hidden path in the last room to do with the statues. Use*Evac* not to worry! What you have done in the ruins puzzle wise will stay and won't revert at all. You will need to grind up some more before fighting him trust me it will be worth it why? Lets just say a surprise will happen. When fighting Dhoulmagus you will use a lot of mp, and then when it runs out you will get stuck. To restore your mp you can use a bottle called *Magic Water* but sadly this won't restore full. What you actually need is an item called *Elfin Elixer* this special item fully restores your mp, but will take quite some time to make in the alchemy pot. But trust me it will be so worth your time. To make this Yggdrasil Dew and Magic Water Makes - Elfin Elixer Yggdrasil Leaf and Magic Water Makes - Yggdrasil Dew Holy Water and The Seed of Magic Makes - Magic Water These are the items you need to get to make it. Sadly you can't buy seed of magic in stores so it would be in areas like in houses, barrels, vases etc. Remember I said at the beginning of the guide you can collect special items by doing that. So if you have some make as many as you can. Also I suggest using holy water when going back into the ruins. So you can avoid any unnecessary encounter with monsters. You can by holy water in shops hero would had learned a spell for it to use I say its safer that way you need as much mp as you can when facing Dhoulmagus. Just use the holy water often so you don't get into a fight with any monsters. Go in through the ruins as quickly as you can. When entering into the room that Dhoulmagus is in a small cut scene will happen after that go forward and another one will happen after this is where the real battle begins! Boss fight 8 Dhoulmagus normal His attacks and spells Throws debris Thorn attacks from his staff Eyes gleam eerily attack Wind sickles Thin air attack Disrupted wave < This move removes all status attacks. when it happens don't panic stay calm, and build up again there is no need to rush this boss. Ok so this battle will be dodgy Dhoulmagus can actually wipe away any stats you build up. Like for instance using accelerate to build up speed kabuff to raise defence and so on. You can still use them but I say do it smartly and learn when he will do it and how to rebuild on them again to attack him. Start off with Angelo raising everyones defence while Jessica builds up on attack power by using oomph. He can spilt himself into 3 so it will get a little tough to face on. Get rid of the other two fakes and keep on building before doing anything else. Make sure to keep an eye on jesscia and her health the same for the others to heal them at the right times so that they don't die. When it gets to the point that Dhoulmagus is hitting low on you because of the build up. And the oomph completed. Have Jessica on psyche up same with hero and yangus as well. While keeping Angelo on healing since you should have for him mulitheal. Only use him to attack sometimes when needed. When the oomph goes have jesscia re apply it again to whoever has theirs gone. If Dhoulmagus shows sign of healing it means you have lowered his health a lot. Its best to take out the one in the middle first. So if you have done things as you should you will come to the point that you defeated him! Oh yay what joy! So the curse is over now?! We can all go back and live happily ever after? Nope sadly there is a shock that will happen. A cut scene will happen. It’s a pretty cool scene, but then uh..... Dhoulmagus transform into a monster so.....you have to face him again but in this mode. I should warn you he is hard at this point. Boss fight 9 Monster Dhoulmagus His attacks and spells Intimidating scream Blazing fire Disruptive wave of energy Colourful feather attack from his wings Kacrackle Kasizzle Ok so you can now use the Elfin Elixer to restore mp to those who need it. Start off with the usual as you did before. But this time around be very cautious since he can pull off anything that can catch you off guard. So once you get around defeating him that will be the end of the game yay! A cut scene will happen after. Jessica will pick up the sceptre when trode asks for it then.....something happens. You last see Jessica holding it. You go back to argonia then in the morning yangus comes thundering in he will say Jessica is no where to be found and her stuff is gone. So head down the stairs and then talk to the in lady she will say about Jessica heading north where the checkpoint is. I will end this part 3 walkthrough I wonder what happens now? It seems the game is far yet to be finished! And about Jessica too! I know you guys will be wondering about her! Until next time around. The Western Continent Seaview Church Now to get to seaview church it is bit dodgy, basically you need to go to the left on the map from princess minis castle. By going west if that helps a little more you will see it on the map here. Some people get stuck on this part, and end up going around most places that they shouldn't go to as of yet. When that happens you come to face stronger monsters way beyond your parties levels, and they end up dying which is what you wouldn't want.  Monsters found in this region Slime – The slimes in this area are a bit stronger so they will try, and turn into a stronger foe. They have the ability to call for back up. Meaning more slimes. stop them before they turn into something, that will be harder for you to face. Cockateer - It can do a move called *Wind sickles* this attack can do some damage to one of your party members. Great Sabrecat – When you first encounter them they are really quite annoying to deal with so watch out. There is one move they do which they jump up and come down by attacking you with their claws. To know when they do this move it will say *Thrusts a force with hurricane* They are quite quick to attack your party members on so that is something else to take note on. Spitnik - This foe has a strange appearance when you first meet him. He does 2 skills which are *Dazzle and Flame Breath* Venom Wasp - This is another annoying one to deal with the skills it uses are *Poison Attack and Paralysis Attack* Orc – This guy does a move called *Muiltithrust* with his weapon. So it can attack all party members randomly. Bomboulder - Can use *Psyche up* this bolder is hard on its hits so with that power up he will try to kill. So don't let him have that chance. Now the road you take to get to your next destination which would be *Baccarat* it’s a little far to get there. But, it shouldn't take you too long to get there. On your way there will be a special monster blocking the bridge. Don't go and attack it if you can draw it out then run around going through without having been caught. Remember morries place? That’s what its for as said before that will be done in another walkthrough, and not in this one. Anyways continue on your way. Baccarat Monsters found in this region Treeface Metal Slime Knight - The only difference with the last one you face this slime is made out of metal. They can cast *Heal* So it will take a little more time defeating these guys when you come across them. their attacks are still the same. Puppet Player - When *Performs Lame story* it makes the party to lose their tension like as in any psyche up build that you did. There is another one this enemy does which I found rather interesting and surprising to come upon since haven't really experienced it myself the years I have played this game. Anyways when he does *Performs Love Story* this would randomize status effects on party members. Like for instance one ends up confused while someone else is put to Bodkin Fletcher - Another foe which is annoying to deal with. It has the same attacks as the previous one, but the only difference is that your party can get poison from the attacks. The normal attacks it does won't always hit poison but some of them do so watch out when that happens. Venom Wasp Orc Jumping Jackal - Now this guy is just funny for some odd reason. Anyways when first meeting him he has weapons something similar to wolverine from x men. That’s the best way I can describe it. His special attack is not said but he goes up to one of your party members does a spin and another claw attack to end it. Another thing he does is *Wind sickles* Bomboulder Once you head here you will be a little confused as of what to do. You will need to go into the bank first which is straight ahead of you as soon as you enter. When you get in you should see some stairs head up the stairs and you will come to this corridor and this should trigger a cut scene which will help you. There will be two people talking which would be a bartender and some other person who works in the casino. They start to talk about someone called Mr Golding and his house. Not knowing the full information he was actually murdered so the poor guy is dead. They keep on talking and then something catches on with what you need to hear they say of a jester who was there at the time. You know who that is right? Dhoulmagus the guy you are looking for! Talk to the guy with the bowtie first before going after the bartender. He won't say anything. Now go down the stairs and go down again which will be a bar place with a stage as well. Go and talk to the bartender and he will tell you what you need to know. He will say of these people called Cash and Carrie that they sent people to go and track down Dhoulmagus who killed their father, and he heard that they headed straight for some island north of baccarat. On the island there is some ruins. As of now you can't do anything else in baccarat. If you go to that island now it will save the journey for when you need to get back there. Anyways after the talk trode will say to go there to look for clues. So I suggest finding the island so when you need to go back you can just use zoom. There are some shops in Baccarat so don't go leaving just yet. Make sure your party have new weapons and other things to go by on. So it will be easier to battle monsters. A detour to explore the ruins to the north Now to get to this place use zoom to get back to seaview church, and you need to sail to this place  Because it will be easier from there. When you get to the place you will see another small looking ship and some guy standing next to it. Go up and talk to him this will trigger a cut scene. There won't be much to know of so go deeper into the ruins to explore. Use your map to help and guide you to the right way in. And when you get there you should see some dark looking shadow. When you move you will trigger another cut scene guess who you see walking in? Dhoulmagus! So quickly follow after him! When you enter the place would be so so dark and the only thing you will see is the floor. Go forth by running and you will hear Dhoulmagus laugh this will make you to leave. When you have that person who you talk to before will be seen go and talk to him again. He will give you some help saying of some magic mirror that it is in *Argonia* so that will be your next destination to head too. So zoom back to baccarat and head straight not the path to the left it will take you back to seaview church. Actually I suggest going to Savella Cathedral after, and not Baccarat yet. Because there is a cut scene there you need to know about. To find it here it is on the map  Monsters found on this island Magic Dumbbell - These guys again.....just make sure that there isn't a lot of them to the point they level up and use a death spell song on you. Best thing to do is use the spell *Sizzle* on them have either hero or Jessica do it since it will attack them all at once when done it will be easier to attack them. Also they can do *Cursed tune* which can attack all party members except for hero. They have other abilities too so watch out. Bulldozer Shade - These guys if I am correct only appears during the night time. The skills they use is *Cursed Mist and can Call for backup* Hoodlum Demonrider - For this one they can be quite medisome with their attacks. Also they have these skills that they use. *Kacrackle Slash and Chilly Breath* Killer Moth Silenus - Plays counting sheep like the other previous ones which will hit all party members, and could make them to fall a Robo-Robin – These guys will be very annoying to deal with at first. Once you level up more and com back to the area much later on in the game then they won't be so much of a bother. Also you need to watch out they can use self destruct on you....when it says *Robo-Robin A is blown away!* that’s when it will happen. So once in the place there are stores you can buy from an inn also you can save the game. First when you enter there will be long looking stairs there will be two go up the first one and go to the path to the left. You will need to go up the stairs take the path to the left and go up another pair of stairs. You should see two guards go through the small bridge to get across it. You don't need to talk to the open the door and a cut scene should trigger you will end up seeing Marcello who ends up again insulting Angelo once done head out and you will see the two guards you pass talk about Angelo. That will be about it. You can now head back to baccarat and take the route to get to Argonia. There is a small sidequest you can do here, near baccarat there will be a house on a hill avoid it. I rather you continue on the main story since I will be doing a guide based on that in another section. On the way to Argonia Monsters found in this region Cureslime Tap Devil Iron Scorpion Skullrider - This guy uses a skill called *Flame slash* Magic Dumbbell Gargoyle - Uses a skill called *Vacuum Slash* and another move that he flies in the air and points his sword into you and holding it with two hands. Notso Macho – When I first saw these guys they look so funny! Plus they really look like samurai warriors. Anyways when first encountered they are quite annoying to deal with at first. So leveling up to overpower them is the best way to kill them easier. For now just find a way to bypass that use any spells or just attack. They also have cool names too I have to agree they just do. They can use a spell called *Oomph* as Jessica can so watch out this can double their attacks. And when that happens they can do serious damage trust me I know enough to say this. They have killed m party as a whole on a few occasions by doing that. Another thing to know sometimes when he attacks with his sword he will miss. Bulldozer - Can do a skill called *Burning Breath* so watch out it can attack all your party members and if hit they will become paralyzed that’s something you wouldn't want. But if it does happen just use the spell *Tingle* which cures the effect of King Cureslime - As for this foe he can pretty much heal his ally which isn't a good thing. He uses spells such as *Omniheal And Fullheal* and it does get annoying when used often so quickly take it down. Now its going to like take a while before getting to Argonia. when you get to another split path don't go to the path on the left on the map here go down  As you saw there is like this small house seen on the map. Go there and its like some small camp set up with some people it seems to be travelling. Talk to the people there one of them will be able to direct you to where you are actually headed. And say a bit about Argonia as well. If you speak to some others you will find out about an old man who lives in the forest to the west. Its not so far off from their camp its best to go there first before going onto Argonia. Or you don't have to go there first this is optional you can go to Argonia first so when done the story part for that you can go to the old mans house then. Another small note I suggest you going to the desert chapel while you are at it. Because you will need to pass there and getting there first time is annoying so when you go there now you can use zoom later on. To get to the desert chapel you need to go here I will set up a link here showing you. https://youtu.be/PbSw4-DyNOE The Strange Man and a Mystical Spring So to get to the old mans house either now or later its through here  Its quite a mile of a walk to get to the place which is long. Like halfway down or near to the house you should see a board to the left saying *NO ENTERY BEYOND THIS POINT.* ignore and keep going once you get there you will know because onto the right you will see a house. So when you enter the house you will see a slime and another monster. Not to fear! These are good ones you can talk to. So talk to them since the old man cannot be seen around in the house. First talk to the slime. He will ask *Did you come to see the old man who lives here?* say yes. The slime will be a bit of a jerk and say he is not in the house and is not telling where he is either. Then talk to the other monster but you see.....he can't speak human sadly....go up the stairs and you will see another friendly monster which is dracky. He will say what the old man used to do by working in the castle and was a very important person back in his younger days. That is all he will say leave the house and when you do, go to the right to continue on another path. When you get there a cut scene will happen and you will see the old man that you are looking for. The old man notices princess medea first. Since he is blind he doesn't know that she is in her horse form instead he sees her human form. He then goes and inspects after he has done that he will explain how he went blind. And that now he views the world through his minds eye instead. And he says what he sees is a princes not a beast of burden. He will then ask what happened. Then the party explains on how their journey came to be. When the talking is done he will suggest for her to drink from a spring that is behind him. This is no ordinary spring it’s a magical enchanted spring that can list curses and help with other things as well. So it works! Medea tries out by drinking and she goes back to normal! So trode tries this but then.....something happens medea starts glowing again and is turned back into a horse sadly. The old man said the curse that is placed upon her is indeed really strong so the only way to lift it is to go and defeat Dhoulmagus. So after that he will say that he is getting a bit cold and would go back into the house. After that talk to medea she seems sad let her drink from the spring again and she will ask of a request from you. She will ask from time to time to bring her to the spring to talk to you. So this is something that has opened up. I do suggest you doing this. Because if you don't she will like get upset at you for not taking her as often as you should. Another helpful note. You can go to the spring to heal party members of the health and magic as well. So you wouldn't really need to go to the inn anymore from then. You can now be on your way to Argonia. You will come back to visit the old man again for his help. So go back to where the campsite was and keep on going on route to get to Argonia. You will come to another split path this is where you need to go  Also you will see another monster avoid it and keep on going. And you will come to being in Argonia. Trode will talk a bit saying about arrange marriage medea to prince charmles so they can't go in as of yet because of the curse so enter in. Argonia So when you enter you see it’s a very spacious place. So to get into the castle you will need to cross one of the bridges that is on the left when you do go straight and into the castle doors to open them. Head upstairs to the right and then to the left again if it’s a bit confusing here are some pictures to help   You should come into a big looking door open it and it seems to be the throne room. Go up and a cut scene will happen. When the first one is over go and talk to the king and another long cut scene will happen and you will have a request to be asked of to escort the dumb prince I call him or better yet the fat prince to the *royal hunting ground* so he can succeed the throne from his father. Sadly the prince has run off again and you will have to find him. It will be annoying to do so go out of the throne room and go up the stairs. You can go and find where the prince is hiding but its not worth it so save the time by dragging him out This is where you get stuck but don't worry when you exit out of the throne room go up the upper stairs that you see. Here is something that should help   Go through the path and then open the door you see before you. In this room there will be a treasure chest and 2 vases blocking something. Break them to reveal a mouse hole! So send munchie in Another Mini Playthrough as Munchie So you will get to play and munchie again! Ok so go to the right in the tunnel hole and you should see a lizard and another hole. What you need to do here is draw the lizard to the hole by using the right pattern path when you have managed to do that the lizard will drop on the princes head and making him to scream and run out of the room he locked himself in. Go back from where you entered in to get back to hero. After that go back to the throne room and you will see the prince. A cut scene will happen and the king will introduce the prince to you. As you see he is a spoilt, jerk of a brat with the way he talks out of disrespect. Anyways so the king managed to convince the king to do with medea. So after that cut scene save and then head out. There will be like a small cut scene when that ends you need to take this path to get to the royal hunting ground. You will come to another split path which is here  Also you will see the direction board read it to know where to go next which would be to the right. When you get there you should see a farmer go up to him and this will trigger a cut scene. After he scene head into the house to check things an old woman in there will allow you to rest for free so take up the offer. Once done head to the royal hunting ground but before you go in don't forget to use the scent that the prince gave to use to use so that you can disguise yourself. Royal Hunting Ground Here is a map I luckily found somewhere to help you. Since sadly there are no maps made. This is from a guide book someone took a picture of   Monsters found in this region Hocus Chimaera – Quick on attacks and is annoying to deal with. They can also use *Flame breath* or *Cool breath* as well so watch out. They can also heal themselves as well. Killer Moth – Can use poison breath and can poison a party member when one or all of them don't dodge the fowl breath. Also can use the spell *Dazzle* which will make your party go blind and won't be able to attack properly. Jackal Ripper – With this guy he will use *Psyche up* which will mean double the trouble and meaning to take him down as soon as. Also uses a skill called *Thin air* this move will be used when he has used psyche up. Up to an amount that will damage your party. Hackasaurus – Uses *Flame breath* that can attack all party members. Orc King – Can use the spell *Zing* to revive a foe back to life So when you first go in this is the argon lizard that you are looking for  Apparently they will run away from you. So the best thing to do is to approach them from behind. Not to run but to walk so it doesn't hear or notice you coming. When you do you will go into battle with it. Miniboss boss fight 6 Argon Lizard His attacks and spells Ferocious battle cry Venom Mist Argon lizard is a mini boss fight the big one you will end up finding later and you will know since it looks very much different. The attacks are quite powerful so be on guard. There will be more argon lizards to find. Go to this place next since you really can't use a map which I find pretty annoying. You should come across another one  So pick it up and you see the two logs right? The big and small one just carry the big fruit there and drop it this will wake up the argon lizard when it does go and eat go up to it quickly to trigger a battle. Sadly this will be again another small argon heart. So you'll have to keep on going with this until you have found the right size. Now this is going to get a bit tricky to explain, I'll try my best to map out areas you need to go through on. Here is where you need to go next  Keep going till you get to a bridge go under then go up by taking this route  When you are halfway onto the bridge a small cut scene will happen you will see another argon lizard and you will need to draw it out. Across the bridge will be more of the salamango how you will need to do it is pick up the fruit. And then don't fall off the bridge be near the end and drop it to the ground near the cave that the argon lizard is Boss fight 7 The Great Argon Lizard His attacks and spells Uses a sweep attack with its tail A bite attack A huge stomp attack Now this argon lizard is really powerful so first things first. Have Angelo use kabuff on all party members then have Jessica use oomph on each party member. When buffed up have Jessica use accelerate as well to increase all parties speed. Also another thing here with some bosses you can use spells on them. You can use *Sap* which decreases their defences it works with this boss so it would make things a whole lot more easier for you. If you want to double the power with the damage use psyche up. It shouldn't take too long to beat this boss with this type of strategy. After the boss battle you can now go back to argonia. When you get out of the royal hunting ground go and talk to the farmer which will trigger a cut scene. So rest up and then use zoom to go back to argonia it saves the trip of having to do the long journey back. Argonia Bazaar So there will be like this special event that is happening and happened while you left. Called *Argonia bazaar* this will be very useful for you, and to buy what you need. They are expensive so I suggest you taking the time off from the story mode to train gain a lot of money and get what you need. Remember you can go to neos for money problems. Because the bazaar only is on for a limited time. And when you go to a certain point of a story mode it will disappear never to return. When you have finally finished what you needed to do. Go to this place first before going to the castle to talk to the king.  You will see the prince talking to someone go up and talk to him this will trigger a cut scene. The prince will be doing something he shouldn't do to do with the argon heart. It would mean the argon heart that was caught in the royal hunting grounds you get to keep. While he takes the one that he brought from a peddler to the castle. This doesn't go unnoticed the king sees this and what he has done and the king would be displeased and heartbroken foe what his son has done. So after go to the castle to talk to the king another cut scene will happen the king will go off somewhere so make your way as if you are going to leave the throne room to your right he will be where the windows are go up and talk to him a small cut scene will happen. He won't give you the magic mirror you will have to like find it sadly. Its on the forth floor here is how you can get to it. Since first time around it will annoy you.  Take this path in the throne room go up the stairs until you see this door  After you have obtained the mirror someone will talk to you this will trigger a cut scene he will say of an old man go back to his house to talk to him about the mirror. He will say about the magic mirror being a sun mirror before and there is a way to restore it. By encountering a purple sea dragon you faced a few times while being at sea. That will be the end of this storyline. Reviving The Magic Mirror and Finally Facing Dhoulmagus Powering up the magic Mirror So after you got some information on how to restore the magic mirror you will need to head back to the sea. The easiest way to get there is if you zoom to seaview church To find a purple sea dragon as told you have seen before. It has the move *Giga flash* which makes your party go blind. If you are having trouble remembering where it is here is something that should help you  When you encounter it make sure with the right timing to have hero hold up the sun mirror and if the dragon uses the move defeat it and then head back to the dark ruins. Dark Ruins When you have the sun mirror head back to the dark runs. Remember that hole? Go into the main item section and click use sun mirror it will say of something else to first before proceeding. Monsters found in this dungeon Mummy Boy Mummy Mimic Blood Mummy - This one is a little more powerful than the previous mummies you have faced. It doesn’t have a new skill and has the same like the others have. Phantom Swordsman – You met a foe similar of this in swordsman labyrinth. They are a little stronger and annoying to deal with so watch out. This enemy *Calls forth a terrible lightning* that will hit all party members be on guard for that at all times. Bone Baron – Does some crest attack. this would hit one of your party member but it does a lot of damage. Soulspawn – Now for these guys....they are quite annoying to deal with how? Physical attacks won't work so much on them sadly. So what you need to do is use magic to defeat them. Also they can do *Sweet breath* which will if hit put your party members to Fallen Priest – Can cast *Kazing* that’s bad it means this guy can fully resurrect a foe that you killed and bring it back to full life. Also can cast *Kasizzle* a powerful spell fire skill. Troll – Now this one is the most annoying of all when you first encounter this enemy he is very large looking so he will put in some powerful attacks on you. Like for instance his *Desperation Attacks* so be very wary when facing this foe. When you enter the ruins you see a stairs area sadly it seems its not going up. So its not visible at first but near those stairs as you get closer there are two doors. One on the left and the other to the right one of these pathways hold the key for you to unlock the stairs how they are and to help rise them. The path you need to go to is the left one. On the right you can go there I suggest taking that path first it will lead you to an upper floor look alike in the room that you are in. You will see a bridge to cross and some stairs to climb as well. You should come to see a treasure chest when you open the door to the upper floor. Once you have opened the chest leave, and then go to the other path. When you get back to the upper floor you should come to seeing a switch. Go up to it and press x it will release the locked stairs. Go back down and take the stairs to carry on finding Dhoulmagus. You should see a door to the right ok so....you will come to a puzzle in a very big room which would be here.  Go down the stairs and take the path the first stairs that you see this will lead you to a switch which will release one pathway for you. There will be many switches for you to do to get to the right path. So after hitting the first switch go to the path you just opened. You will need to go around this place to trigger another switch  when you have done that go around again and go up the stairs. Ok so go down and not far off you should see another switch hit this one so it grants you access to get to those two treasure chests that you saw not long before. Go all the way back to the stairs then head for this path.  Ok when near the treasure chests the one on the left is a dragon scale and the other one is a mini medal. So go all the way back to hit off that switch that access open to where you get the chests. So once you hit the switch again to reopen the path you will see another stairs to take and another not so far off. Don't go to the first one you see go to the far off one it has a switch there. So again hit the switch and go to the other stair path you first saw. This will lead to hitting the last switch which would had been blocking another path. So go back to the other switch you hit before the last one so you can take the path. When you have done that go down the stairs again and take the path to the left when coming to the end of the bridge you are crossing. Go straight then left. And you should see where to go next You will come to another big room. So basically in this room you encounter the troll in the list area I said of some monsters doesn't always appear in the same place others are at. So in this room there will be a lot of stairs you need to descend down too. Don't go to the first stairs you see it won't lead you to the right way. Instead go to the one that is further down descend down the first stairs and you should come to another. Here will be 2 spilt paths you will see another pair of stairs before you and another one to the left. If you keep on going you will come to another treasure chest only to see it’s a mimic. So the path to the left is the right way. When you get to the near end of the stairs there will be another path stairs to the left and right the one to the left has a treasure chest. In the chest will be saints ashes. Then go ahead to take the right path. Now you will come to another room that has a puzzle. There will be two statues of this  With lasers coming from their eyes what you have to do here is turn both of them to hit onto the right spot of a wall to open up the hidden path. Go to the statue on the left first there will be two switches the red is for the left and the blue is for the right direction wise. Now what you need to do is with each eye to hit a wing of a bird that is on the wall. For the statue on the left use the beam of the eyes at the left wing and as for the right statue use the beam of the eyes to hit the right wing. When done a small cut scene will happen this will open the hidden path descend down the stairs and this will lead you to the main room where Dhoulmagus is. This will be it people him not running this time and will face you. WARNING BEFORE FACING THIS BOSS Now let me warn you. For facing Dhoulmagus make sure you are well prepared like getting certain items that you need. When you have found the hidden path in the last room to do with the statues. Use*Evac* not to worry! What you have done in the ruins puzzle wise will stay and won't revert at all. You will need to grind up some more before fighting him trust me it will be worth it why? Lets just say a surprise will happen. When fighting Dhoulmagus you will use a lot of mp, and then when it runs out you will get stuck. To restore your mp you can use a bottle called *Magic Water* but sadly this won't restore full. What you actually need is an item called *Elfin Elixer* this special item fully restores your mp, but will take quite some time to make in the alchemy pot. But trust me it will be so worth your time. To make this Yggdrasil Dew and Magic Water Makes - Elfin Elixer Yggdrasil Leaf and Magic Water Makes - Yggdrasil Dew Holy Water and The Seed of Magic Makes - Magic Water These are the items you need to get to make it. Sadly you can't buy seed of magic in stores so it would be in areas like in houses, barrels, vases etc. Remember I said at the beginning of the guide you can collect special items by doing that. So if you have some make as many as you can. Also I suggest using holy water when going back into the ruins. So you can avoid any unnecessary encounter with monsters. You can by holy water in shops hero would had learned a spell for it to use I say its safer that way you need as much mp as you can when facing Dhoulmagus. Just use the holy water often so you don't get into a fight with any monsters. Go in through the ruins as quickly as you can. When entering into the room that Dhoulmagus is in a small cut scene will happen after that go forward and another one will happen after this is where the real battle begins! Boss fight 8 Dhoulmagus normal His attacks and spells Throws debris Thorn attacks from his staff Eyes gleam eerily attack Wind sickles Thin air attack Disrupted wave < This move removes all status attacks. when it happens don't panic stay calm, and build up again there is no need to rush this boss. Ok so this battle will be dodgy Dhoulmagus can actually wipe away any stats you build up. Like for instance using accelerate to build up speed kabuff to raise defence and so on. You can still use them but I say do it smartly and learn when he will do it and how to rebuild on them again to attack him. Start off with Angelo raising everyones defence while Jessica builds up on attack power by using oomph. He can spilt himself into 3 so it will get a little tough to face on. Get rid of the other two fakes and keep on building before doing anything else. Make sure to keep an eye on jesscia and her health the same for the others to heal them at the right times so that they don't die. When it gets to the point that Dhoulmagus is hitting low on you because of the build up. And the oomph completed. Have Jessica on psyche up same with hero and yangus as well. While keeping Angelo on healing since you should have for him mulitheal. Only use him to attack sometimes when needed. When the oomph goes have jesscia re apply it again to whoever has theirs gone. If Dhoulmagus shows sign of healing it means you have lowered his health a lot. Its best to take out the one in the middle first. So if you have done things as you should you will come to the point that you defeated him! Oh yay what joy! So the curse is over now?! We can all go back and live happily ever after? Nope sadly there is a shock that will happen. A cut scene will happen. It’s a pretty cool scene, but then uh..... Dhoulmagus transform into a monster so.....you have to face him again but in this mode. I should warn you he is hard at this point. Boss fight 9 Monster Dhoulmagus His attacks and spells Intimidating scream Blazing fire Disruptive wave of energy Colourful feather attack from his wings Kacrackle Kasizzle Ok so you can now use the Elfin Elixer to restore mp to those who need it. Start off with the usual as you did before. But this time around be very cautious since he can pull off anything that can catch you off guard. So once you get around defeating him that will be the end of the game yay! A cut scene will happen after. Jessica will pick up the sceptre when trode asks for it then.....something happens. You last see Jessica holding it. You go back to argonia then in the morning yangus comes thundering in he will say Jessica is no where to be found and her stuff is gone. So head down the stairs and then talk to the in lady she will say about Jessica heading north where the checkpoint is. I will end this part 3 walkthrough I wonder what happens now? It seems the game is far yet to be finished! And about Jessica too! I know you guys will be wondering about her! Until next time around. |
Vizzed Elite
Affected by 'Laziness Syndrome'
Registered: 08-16-12
Last Post: 1229 days
Last Active: 332 days
  Number 1 Sailor Moon, Final Fantasy And Freedom Planet Fan On Vizzed! Number 1 Sailor Moon, Final Fantasy And Freedom Planet Fan On Vizzed! |
Affected by 'Laziness Syndrome'
Registered: 08-16-12
Last Post: 1229 days
Last Active: 332 days
(edited by Eniitan on 08-22-16 03:25 PM) Post Rating: 3 Liked By: Deacon DeMan, RDay13, sonicthehedgehog57,
08-22-16 01:02 PM
Deacon DeMan is Offline
| ID: 1297040 | 55 Words
| ID: 1297040 | 55 Words
Deacon DeMan
Level: 20


POSTS: 13/74
POST EXP: 3083
LVL EXP: 37775
CP: 4173.3
VIZ: 2825217
POSTS: 13/74
POST EXP: 3083
LVL EXP: 37775
CP: 4173.3
VIZ: 2825217

Likes: 1 Dislikes: 0
Eniitan :
WOW! This is a great walkthrough! I've added this to my favorite threads, and I was wondering if you could kindly direct me to Part 1 and Part 2 of this guide. This seems like just my kind of game, and I like to keep walkthroughs handy for when I get stuck or frustrated. WOW! This is a great walkthrough! I've added this to my favorite threads, and I was wondering if you could kindly direct me to Part 1 and Part 2 of this guide. This seems like just my kind of game, and I like to keep walkthroughs handy for when I get stuck or frustrated. |
Vizzed Elite
Affected by 'Laziness Syndrome'
Registered: 06-22-16
Last Post: 1930 days
Last Active: 203 days
Affected by 'Laziness Syndrome'
Registered: 06-22-16
Last Post: 1930 days
Last Active: 203 days
Post Rating: 1 Liked By: Eniitan,
08-22-16 01:10 PM
 Eniitan is Offline
| ID: 1297043 | 51 Words
 Eniitan is Offline
| ID: 1297043 | 51 Words
Eniitan
Level: 178


POSTS: 7017/10522
POST EXP: 959649
LVL EXP: 75765160
CP: 55510.5
VIZ: 2641976

POSTS: 7017/10522
POST EXP: 959649
LVL EXP: 75765160
CP: 55510.5
VIZ: 2641976

Likes: 1 Dislikes: 0
Deacon DeMan : Thank you so much for the positivity, and sure. I forgot to put up the links usually I remember, but have had a lot of things going through my mind. I hope this helps you out a lot. ^-^ Here is part 1 https://www.vizzed.com/boards/thread.php?id=94992 Here is part 2 https://www.vizzed.com/boards/thread.php?id=95990 Here is part 1 https://www.vizzed.com/boards/thread.php?id=94992 Here is part 2 https://www.vizzed.com/boards/thread.php?id=95990 |
Vizzed Elite
Affected by 'Laziness Syndrome'
Registered: 08-16-12
Last Post: 1229 days
Last Active: 332 days
  Number 1 Sailor Moon, Final Fantasy And Freedom Planet Fan On Vizzed! Number 1 Sailor Moon, Final Fantasy And Freedom Planet Fan On Vizzed! |
Affected by 'Laziness Syndrome'
Registered: 08-16-12
Last Post: 1229 days
Last Active: 332 days
Post Rating: 1 Liked By: Deacon DeMan,
08-22-16 01:28 PM
Deacon DeMan is Offline
| ID: 1297059 | 26 Words
| ID: 1297059 | 26 Words
Deacon DeMan
Level: 20


POSTS: 14/74
POST EXP: 3083
LVL EXP: 37775
CP: 4173.3
VIZ: 2825217
POSTS: 14/74
POST EXP: 3083
LVL EXP: 37775
CP: 4173.3
VIZ: 2825217

Likes: 1 Dislikes: 0
Vizzed Elite
Affected by 'Laziness Syndrome'
Registered: 06-22-16
Last Post: 1930 days
Last Active: 203 days
Affected by 'Laziness Syndrome'
Registered: 06-22-16
Last Post: 1930 days
Last Active: 203 days
Post Rating: 1 Liked By: Eniitan,


 User Notice


