

 User Notice
 Forum Links

Thread Information
Thread Actions


Dragon Warrior III Guide
04-02-16 08:16 AM
janus is Offline
| ID: 1258127 | 5627 Words
SecureYourCodeDavid
POSTS: 4227/4824
POST EXP: 567678
LVL EXP: 23553021
CP: 64477.9
VIZ: 638187

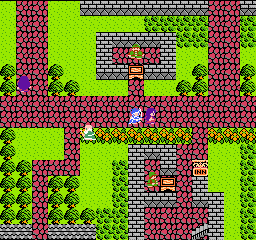
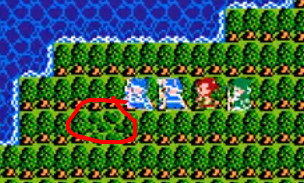
Hello gamers and welcome to another of my guides. As usual, my goal is to show you how to progress fast, find major treasures and level grinding spots. Unlike the previous two games, there are TONS of sidequests, i.e. missions not vital for your completion of the game. They will be clearly marked so you don’t do them if you don’t want to. Also, the game introduces the concept of night. For some missions, you will need to enter certain places after night fall. To do it, simply walk around a little or cast day-night. Also, casting return will automatically get you to a place with broad daylight. Furthermore, since the world map of the real world is loosely based on our own planet, I will use appropriate comparisons when pertinent. Finally, your spot in the fight determines how much damage you receive (further in front = more). 1. The beginning Town: Aliahan After following your mom, enter the castle as she says and go upstairs to the throne room. After the King’s speech, exit the castle and go to Luisa’s place west of the castle (the first kiosk is a bank/storage facility). Go talk to her in the back of the room to start your team. By default you will have a soldier, a mage and a pilgrim (priest). Since you can pretty much wear everything the soldier gets, I recommend creating a fighter instead. Their luck gets pretty high, meaning they can do more critical hits; plus they get decent attack. Just make sure you watch over their health since they can’t wear heavy armors and take more damage. When ready, leave the village cross a bridge and go south to your first dungeon. Dungeon: Cave to Tower of Najima Go downstairs and follow the southern wall east to get medical herb. Come back, follow the path up and take the Wayfarer’s clothes. Always walk up to get gold, come back and walk east to go upstairs. Walk east, and when you see columns walk down to go into the next dungeon. Dungeon: Tower of Najima Walk up straight and left at the second dragon statue to go downstairs to an inn if need be (8 gold). If not walk right of the statue to go upstairs. Walk west, north and east to go upstairs to get leather helmet. Go back down, walk straight west to get gold, come back to the first flight of stairs you took and walk down. Take the second entrance you see from the “gridded” room and go upstairs. Follow the path, go down to the second entrance you see to get wing of the wyvern and come back to the first one down to go upstairs. Talk with the man, say yes and unlock the big door down. You can either jump off the ledge and use the wing back to the castle or re-enter the tower. Go straight down and left to get gold; go back east and open the door to get agility seed and medical herb. Go back up to go upstairs and walk down to exit the cave. Note that if you had gone right and upstairs, you would have ended up in Aliahan’s prison (just use the key to open the door). Anyway from the forest you came from, just walk up to the next village. Village: Reeve Walk east of the village and open the door where a unicorn (?) stands. Talk to the man upstairs to get his magic ball. Make sure you have the latest equipment and exit the village. Follow the clearing east, go down between a narrow passage of unpassable mountains and keep walking east to a small lake. Dungeon: Cave of Enticement Walk around the lake to enter a hole, and follow the path to a wall with statues. Use the magic ball, go downstairs, takes the second opening to your left, follow the path and go northwest to get antidote herb. Walk as far east as you can, follow the path down, walk up a large corridor and take the third entrance to your left to eventually go downstairs. Open the door to your far left and take the portal. Walk up to your next town 1.2 Optional quest: Stolen Crown Village: Romaly Downstairs from the weapon shop is the monster arena. If you abuse savestates then you are assured to win; simply save BEFORE placing your bets, look who wins and bet accordingly. No more money problems! Anyway, walk up straight upstairs to talk with the king. Exit town, walk up straight to gray mountains, always going up to the next village. Village: Kanave If you enter the village at night, you will be able to get the chests from the item store (right above the inn, in the lower-right corner of the village). You can get poison needle (wizard has a chance to instantly kill) and club. Powerup as needed and walk west of the village between the gray mountains. Follow the clearing SW, cross a bridge and enter the tower. Dungeon: Tower of Shanpane Follow the path, go SW at the intersection and walk east to get wing of the wyvern. Go back to the stairs you skipped, walk west, up and follow the path to enter a gridded room to go upstairs. Walk up, enter the gridded room to get gold, go back to the stairs and keep walking west and up to enter another gridded room to go upstairs. Walk down, open the door, go upstairs *3 (you will fall into a trap), leap at the end of the corridor and get ready to fight. Be around level 10 Boss fight: Kandar and Kandar Henchman *3 (are separated, not as a group) Be sure to cast Increase since they are purely physical. If you use savestates, don’t be afraid to defend to save your health. The fight shouldn’t be too hard if you take the henchmen first. After the fight, say yes to Kandar and take the crown from the chest. Go back to Romaly and talk with the King, say yes and become king! To finish you reign, go to the monster arena and talk with the man with the blue mustache on your left (the King). 1.3 Optional quest: the Walk straight north of Kanave to the next village. Village: Nohaniels Everyone seems frozen here. Strange… Exit the village and walk west to here
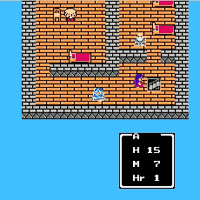
Village: Elf Town Walk northeast to talk with the Queen and exit the village to the cave south. Dungeon: Cave of the Dream Ruby Take the first opening to your left for a wing of the wyvern. Go straight down, right and up to get gold. Go straight down again to go downstairs, take the acorn of life, go up and upstairs, take the next flight going down and walk around the water pond to walk on healing panels. Walk back to the opening on your left, walk up as far north as you can, east to a strength seed, west to a magic knife, back down and left when you can to go downstairs. Follow the path to a flight of stairs and go SE of it to get gold. Walk west of the stairs, take the opening on your left and go down to get gold. Come back to the main corridor, walk down as far as you can, take the opening to your right to get gold, take the opening immediately above to get fairy water and go downstairs. Get the dream ruby and to back to the elf village. Go back to the elf village and talk with the Queen to get the Wake Up Powder. Warp back to Noaniels, use it and the villagers will wake up. 2. The magic key Now go back to Romaly, walk east (following the clearing and crossing a bridge) to the next village Village: Assaram Powerup as needed and exit town. Walk west in a clearing south of passable mountains. Walk into the desert, go south, and when you see the shrine in the swamp walk west to the oasis. Village: Isis Simply follow the stone path east, up and west to enter the castle proper. Walk west and up a narrow corridor of trees. Walk up straight to a secret passage, go downstairs, take the first corridor up and eventually get the Meteorite armband, which doubles agility (use it to put it on). Talk to the skeleton, say yes twice and exit town. Walk straight north to enter your next dungeon. Dungeon: Pyramid Walk up straight (around the middle to avoid a trap), the second corridor to your left has 2 man-eater chests, and the second to your right leads upstairs. Walk down, left, down the second corridor and follow the path to go upstairs. Walk east and press the button on the right; do the mirror action of the left side. Come back towards the center and walk up to get vitality seed and magic key. Go back down and take the NE corridor to go upstairs. Use the magic key to ride the treasure vault. But since this is a pyramid, every single chest will make you fight for it, generally 4 mummies. You will get (clockwise, starting with the one above the right-hand statue): strength seed, gold, agility seed, gold*3, wing of the wyvern, gold, medical herb and gold*3. Walk south to go upstairs, open the door to get flashy clothes, go upstairs and jump off to exit the pyramid. Go back in, walking left before entering to go downstairs. Follow the path and search here
2.1 Optional quest: getting more treasures Warp back to Aliahan. Store your thief’s key and enter the castle to open the silver-and-red doors to get gold, fighting suit, agility seed, strength seed, wing of the wyvern and gold. Warp back to Isis at night to raid the treasure vault. You can get gold*2, wing of the wyvern, intelligence seed, wayfarer’s clothes, acorn of life, gold and poison moth powder. 3. The sacred pepper Warp to Romaly and walk west to a shrine surrounded by mountains. Enter it, and once on the other side walk south to the next village. Village: Portoga Follow the stone path, cross the water and enter the castle. You can take the chest to your right, but be wary of the barrier floor (-15 hp per step). You will get spider’s web, vitality seed and gold. Go talk to the king, warp back to Assaram and enter the cave just north of town. Simply follow the path, open the door and talk with the dwarf (use the royal scroll before). Get the club and training suit before following him down the secret passage he opens. Follow it to the exit; simply walk straight south and right when you see the coast to another village. Village: Baharata Walk south towards the beach and talk with the old man in green. Exit town, cross the bridge you see, walk north to cross another one and enter a cave. Dungeon: Cave of the pepper merchant Walk left, up, use the key to walk up some more and get gold (the other chest is a man-eater). Walk left to get fairy water, left again for gold and medical herb and open the door. Walk left, down*3, use your key and walk down again, right (the chest is a mean-eater) until you go downstairs. Walk left, use your key and get acorn of life, agility seed, intelligence seed and strength seed. Go back, open the next door and answer no to fight. Boss fight: Kandar Henchman *4 They are in a group, so you can use spells like firebane to dispose of them quickly. After the fight, just walk down to the switch to open the cells and walk back up for another fight. Boss fight: Kandar and Kandar Henchman*2 If you’re around level 15, this battle is a joke. However he seems more resistant to magic. Anyway, after the fight warp back to Baharata. Talk with Galen (in the SW corner of town) to get your pepper. Warp back to Portoga and talk with the king to get your boat. Enter it, navigate south to exit town. 4. The final key Navigate south along the coast you see and go right at the first river you see. Enter the village in the middle. Village: Tedanki Make sure you enter during the day; Go back outside, navigate back to the ocean and go south along the coast. Keep following it until the southernmost portion of it; then navigate east until you reach the two peak of, er, Australia and enter the village there. Village: Lancel Buy the invisibility herbs (300 gold) from the shop. Exit, warp back to Portoga and navigate west, then straight north to the next village. Village: Eginbear Use the invisibility herb to get past the guard. Make your way NW to go downstairs. Move the rocks according to what you see in this video: https://youtu.be/F1njYEDaV68?t=2m38s. Enter the opening you created to get Vase of Drought. Exit the castle, warp to Aliahan and navigate due south of the first cave’s entrance to eventually see rocks in the water. Go below them and use the Vase of Drought. Enter the temple to get the final key. You can now store your magic key away. 5. The magic orbs 5.1 Optional quest: Shrine of Dhama Warp to Baharata and take your boat east along the coast. Enter the first river to your left and follow it. Walk north of the castle you see and follow the path to a dungeon. This is a good place for grinding with the metal slimes roaming around. Dungeon: Tower of Garuna Enter the gridded room below the middle isle to get intelligence seed. Now walk as far west as you can, go up on the grass and go upstairs. Walk on the iron wire to go downstairs, take the warp and take the stairs south to get to a man-eater chest. Go back down to take the stairs north to get some gold. Go back down to take the stairs east, take the stairs south, eventually walk on an iron wire, go upstairs and get iron helmet. Go on the iron wire and fall off it (about 2 steps after the stone walls), fall into the hole and follow the path to get the Book of Satori. Exit the tower and walk south to a castle. Village: Shrine of Dhama Make sure your wizard has the book before changing his job to sage. It’s better that he does it because he will get more hit points. Plus you will gain another healer which is always a welcomed addition. However, note that he will start back to level 1 (with his stats halved), although he will retain all the spells he had gained before changing (minimum level 20), and will keep learning wizard spells once he gets back to level 20. 5.2 Getting the orbs Exit Dhama, navigate on the river and then due east to the next village. Village: Jipang Walk north of the city (beyond arches) to talk with Himiko. Exit town and enter the cave right next to the city. Dungeon: Cave of the Orochi Walk west, follow the path south and southwest, up when you can and go downstairs. Take the first right and walk towards the dragon for a fight. Be around level 24 (except for the sage). Boss fight: Orochi It’s a dragon so it breathes fire to everyone; it can also attack twice per round. Cast bikill on your attackers to increase their strength and dispose of it. After the fight jump in the hole to get back to Himoko’s dojo. Make sure your health is good because you will fight him again (say no when you talk to him). Boss fight: Orochi Same strategy as above. After the fight search the fight to get purple orb. Now, navigate due west of Eginbear and go south once you see a coast to here
Now warp to Portoga and navigate west, then south when you hit a coast. Go around the cap with impassable mountains and go up the first river you see. Take the second left, first left, first up and keep going to the next village (behind impassable mountains). Village: Soo The well in the middle of the village has a staff of thunder. Now make you way back to Tedanki during the night to open the prison cell to get green orb. From Reeve, navigate east and make your way around, er, South America to reach the next village. Village: House of Pirates Walk to the right of the villager you see when you enter and walk straight up until you see a boulder. Push it from below, search for stairs and get strength seed, red orb and wing of wyvern. Now warp back to Lancel. Walk to the right of the first shop and go up.
Go up just around where the soldier in the building is pacing, open the prison door and talk to the old man in your way. Say yes (have the main hero since he’s well-balanced), follow him and exit left. Walk in the desert towards the next dungeon. Dungeon: Navel of the Earth Walk south, open the door, walk south, east at the second opening for intelligence seed, left at the top opening for gold and back down. Follow the path downstairs, walk up about 5 paces and then east to go upstairs to get armor or terrafirma. Go back downstairs, walk straight up to go downstairs some more, go up and ignore the talking masks to get medical herb and blue orb. Warp back to Lancel and exit town. Warp back to Jipang, navigate north around the, er, Straight of Bering and follow the coast east until you see an island north of you. Then navigate east to another island, and go NE of there to enter a shrine. Take the warp north, the next one and exit that shrine. Walk up north following the clearing, cross a bridge, keep following the clearing to get to the next town. Village: Samanao Walk east and up to a picket fence to see a funeral. Talk with everyone and follow the stone road to the castle. Walk to the right and hug the wall going up and open the door you see. Go down to open the prison door, walk towards the king and get thrown in jail. Free yourself, go around the room and open the cell door to the far right and follow the path. Open the cell opposite of the real king, walk straight west and one step up to go through a secret passage. Follow it to end up in the cemetery. Exit the village, walk southeast and get into a cave surrounded by poisonous marshes. Dungeon: Cave to the Mirror of Ra Walk west, go up when you can, west after a small lake, south and go downstairs. Get gold, strength seed, gold, wing of wyvern, gold*2, acorn of life, medical herb and gold (the other room has man-eater chests). Come back to the stairs and walk south to jump into a hole to get the Mirror of Ra, jump into the other hole and go upstairs. Follow the path to the left, ignoring the stairs for now, and get animal suit (transforms the fighter into a cat). Take the stairs you missed, walk left and up to get stone of life (the other 2 are man-eater chests). Go down, left and follow the path to get vitality seed, gold, medical herb and man-eater chest*2. Make your way back to Samanao and enter the castle by night. Take the service entrance once again and follow the path west pass the throne room. Take the stairs up at the end, go up until you see ledges to jump from and take the first one to your left-down side. Use the Mirror in front of the fake king and get ready to fight. Being around level 26 should be enough Boss fight: Boss Troll Make sure to cast Bikill to increase your attack. This should be enough for you to kill it before you have time to heal, unless it focuses on your spell casters. Get the staff of change from the chest and jump off the ledge behind the bed and exit the village. If you are patient (and lucky) you can go to the elf village and use the staff of transform to change into an elf (or dwarf) to buy wizard rings from the shop (2500 gold). When you are done, go back to the shrine that lead you to Samanao and navigate up to a giant frozen island. Enter the lone green square surrounded by ice. Village: Greenlad Walk straight up and enter the shack. Talk with the old man to get Sailor’s Thigh Bone. Use it to know the position of the Ghost Ship. It’s generally south of Romaly, but it moves so it’s always useful. Dungeon: Ghost Ship Go towards the center of the ship and go downstairs. Walk south and open a locked door to get gold*3, man-eater chest (lower-right corner) and full moon herbs. Enter the room opposite of this one to get Locket of Love. Exit the ship. Warp back to Jipang, navigate north to Bering and follow the coast west until you see ice. Enter the river you see. Keep navigating west until a mysterious force repels you (the music changes too). As soon as it happens open the menu and use the Locket of Love. Then keep navigating west to enter the island shrine. Walk down and enter the second left, talk with the flame and enter the room opposite of it. Search at the skeleton’s feet to get Sword of Gaia. Warp to Assaram and navigate south. Go to the left (between impassable mountain ranges) and land where you see a black square. Use the Sword of Gaia there and follow the newly-formed road south to your next dungeon. You might encounter a few metal babbles, but there is a better spot later on. Dungeon: Necrogrond Walk west to go upstairs, and keep walking as far west as you can to get gold. Go back, walk due east, down and follow the path to thunder sword. Walk south, west without deviating and get swordedge armor (foes get some damage). Come back, walk south to go upstairs, go as far south as you can, avoid the pits and keep walking to go upstairs. Walk straight right to fall into a hole, go upstairs, follow the path to go upstairs, go down and cross a stone bridge. Take the first path above you, walk due east, cross another stone bridge and walk down to another bridge. Take the path east of it, go south when you can, south some more and follow the path to go upstairs. Enter the shrine you see to get the silver orb. Now make your way to your merchant’s new village. Enter and exit until you learn that he has been jailed. Go talk to him (in the lower-left corner) and go to his house just above it. Get luck seed and gold, and search behind his throne (behind where he sat) to get yellow orb. Exit the city and warp back to Lancel. Take your boat and navigate SW of, er, Australia to an icy continent. Enter the shrine you see and place all the orbs you have and talk with one of the priestesses to hatch the egg. Exit the shrine and you can now fly everywhere you please (note that the bird will only stop if you press A; once you move in one direction it won’t stop moving). Remember where you used the Locket of Love (north of Assaram?) Fly there and go NE to enter a castle surrounded by mountains. Village: Castle of the Dragon Queen Walk up, open any door (left or right), walk up to open another door, open another one and walk straight south to see the Queen. Talk to her to get the Sphere of light, which will greatly simplify the final boss battle. 6. The end? To accelerate things, warp back to Assaram and fly towards the shrine where you got the silver orb. Then fly to the castle in the middle of the lake. Dungeon: Baramos’ Castle As soon as you can, walk right and hug the far-right wall up. Once you see a lake walk west and take some stairs. Follow the path downstairs, follow that next one (don’t forget to cast step guard), go upstairs and follow the path to get to wizard’s ring, unlucky helmet (cursed) and demon axe (soldier only). Go back to the barrier floor level and go downstairs. Walk east to go upstairs, follow the path up and walk west down some stairs when you are in the castle’s court. Follow the path, and when you see an opening to your left cast step guard before entering. Exit the throne room, walk east and cross the bridge to go downstairs (beware of the barrier floor). Walk up to the altar (surrounded by barrier floor) for a fight. Be around level 32 Boss fight: Baramos Incredibly enough, he can be put to After the fight, warp outside and warp to Aliahan (the only option anyway). Go talk with the king for a scene, and exit town. 7. The Dark World 7.1 The legendary equipment Go back towards Baramos’ castle and land the phoenix on a small island with a black hole surrounded by poisonous marshes. Enter it and walk into the hole. Enter the house, exit south and take the boat. Navigate east to reach a familiar village Village: Breconnaly Walk east on the brick path to reach Tantegel Castle. Walk to the NW, always staying in the corridor until you see a guard pacing around a door. Open it, walk under the first table to enter a secret passage and get stone of sunlight. Go back to your boat and follow the southern coast to the west. Follow it until you see a bridge; cross it and keep walking west. Enter the village in the desert. Village: Hauksness Enter the stables to the SE of town (outside the city walls) and look here
to get Oricon. Exit town and go back to your boat. Go to the edge of the coast and navigate south to the edge of the map (literally). Navigate east, start going up north when you see forest (instead of mountains) and continue east until you see a shrine surrounded by poisonous marshes. Enter it and get the staff of rain from the priestess. Get back to your boat and follow the coastline east. Disembark around here
Village: Kol Go NW of town to the baths (a square of water) and walk four paces south to search for fairy flute. Keep walking west and south of the baths, enter a house with a blue square and go upstairs. Talk with the merchant, sell your Oricon, go rest (or exit town) and come back to buy the sword of kings (35k gold). Exit town and get back to your boat. Navigate south along the coast to here
Walk around the impassable mountain range under you to reach your next village. Village: Rimuldar Go at the inn and open the doors to get ring of life. Around the village is also ideal to level up thanks to the metal babbles. But to make your life easier, warp back to Breconnaly, get on the boat and follow the north coastline to the west. Continue to the edge of land and land to enter a shrine. Open the door, walk through a secret passage due north of the man and go downstairs to get silver harp. Use it to instantly get into a fight. Anyway, after grinding to your comfort level go back to Kol and follow the coastline to the north until you see an island with a tower. Land there. Dungeon: Tower of Rubiss Unlock the doors (be careful with the barrier floor) and keep walking straight to get gold and mimic (left-hand). Walk left and follow the passage to go upstairs. Walk up straight, right and cross the barrier floor up to get mimic (first and third quadrants), full moon herb and gold. You can try to walk on the “inverted” floor if you want, but you will need to be patient to know which arrow will make you move the way you want. The treasures below the barrier floor contain vitality seed and acorn of life*3. Keep walking east to go upstairs, walk straight south to go upstairs again, walk straight north and turn left on the inverted tiles to get armor of radiance. Go back down one floor, walk as far west as you can, north into a gridded room and jump off the ledge on the inverting tiles. Open the door below you, follow the path left, follow the next one across inverting tiles, and when the floor become gray walk south around a giant wall. Enter the brick path in the middle, open the door and use the fairy flute next to the statue to free Rubiss. She gives you the sacred amulet and talks some more. Now warp back to Tantegel, walk north following the clearing and enter the cave surrounded by sand. Dungeon: Cave of the ultimate shield Walk east, south, east and southeast to go downstairs. Follow the path (you can’t get lost), and walk towards stairs going down. Move towards the opening and get gold*2, stone of life, mimic (furthest left below the hole) and shield of heroes. Walk outside and make you way back to Kol. 7.2 Looping the loop Navigate south until you see an island with a shrine; enter it to get the rainbow drop from the old man. Warp to Rimuldar, walk NW to a desert and walk until the end. Use the rainbow drop to cross and follow the path to the final dungeon (be careful with the poisonous marshes). Final dungeon: Zoma’s Castle Follow the path left, never deviating from it until a room with statues. Open the door, keep moving up and down until a voice talks to you. You will have to fight three pairs of granite titans before you can go further. Cast defence and increase to facilitate the fights. Be careful as they can attack twice. After defeating them, proceed to the barrier floor and search here for stairs.
Take these stairs, go up, north and cross the inverting tiles towards the center of the room to go downstairs. Follow the southern wall towards the west, go down in an opening when you can, walk east and follow the path to go downstairs some more. Open the door, follow the path and watch your father (Ortega) getting defeated by a monster. Walk west, north as far as you can, east, open the first door you see to get sage’s stone, wizard’s ring, mimic (far right and left), leaf of world tree and stone of life. Go back and keep walking east (never deviating) to go downstairs. Make sure you heal properly before walking on the altar; the end is nigh. Be around level 40. Boss fight: King Hydra Your chance to avenge your father! It’s a dragon so it can breathe fire, and sometimes twice in a row. Make sure you cast bikill on you attackers and finish it in no time. Heal if you need and walk straight into another fight. Boss fight: Baramos Bomus Like other bosses he can attack twice and cast attack-all spells. Have your magician cast bounce so the boss can suffer a little (at times). Also cast bikill to have stronger attacks. Heal again as needed and walk up straight for another fight. Boss fight: Baramos Gonus Despite its look, it’s not undead. As always, cast bikill and stay healthy (it only attacks once, fortunately). The monster is physical so don’t worry about bounce. Heal as you need after the fight for the final confrontation. Final boss: Zoma Make sure your quickest character has the sphere of light; make him use it immediately. It will transform Zoma into an undead, meaning that he can be hurt by healing spells. Don’t bother with augmenting spells as Zoma often cancels them out (and he can attack twice and cast attack-all spells like icy breath). Just pummel him with holy energy, stay healthy and you will win. After the fight, walk south and you will be propelled to the cave of the shield of heroes. Just make your way out, walk to Tantegel and talk with the king to conclude the game. Hello gamers and welcome to another of my guides. As usual, my goal is to show you how to progress fast, find major treasures and level grinding spots. Unlike the previous two games, there are TONS of sidequests, i.e. missions not vital for your completion of the game. They will be clearly marked so you don’t do them if you don’t want to. Also, the game introduces the concept of night. For some missions, you will need to enter certain places after night fall. To do it, simply walk around a little or cast day-night. Also, casting return will automatically get you to a place with broad daylight. Furthermore, since the world map of the real world is loosely based on our own planet, I will use appropriate comparisons when pertinent. Finally, your spot in the fight determines how much damage you receive (further in front = more). 1. The beginning Town: Aliahan After following your mom, enter the castle as she says and go upstairs to the throne room. After the King’s speech, exit the castle and go to Luisa’s place west of the castle (the first kiosk is a bank/storage facility). Go talk to her in the back of the room to start your team. By default you will have a soldier, a mage and a pilgrim (priest). Since you can pretty much wear everything the soldier gets, I recommend creating a fighter instead. Their luck gets pretty high, meaning they can do more critical hits; plus they get decent attack. Just make sure you watch over their health since they can’t wear heavy armors and take more damage. When ready, leave the village cross a bridge and go south to your first dungeon. Dungeon: Cave to Tower of Najima Go downstairs and follow the southern wall east to get medical herb. Come back, follow the path up and take the Wayfarer’s clothes. Always walk up to get gold, come back and walk east to go upstairs. Walk east, and when you see columns walk down to go into the next dungeon. Dungeon: Tower of Najima Walk up straight and left at the second dragon statue to go downstairs to an inn if need be (8 gold). If not walk right of the statue to go upstairs. Walk west, north and east to go upstairs to get leather helmet. Go back down, walk straight west to get gold, come back to the first flight of stairs you took and walk down. Take the second entrance you see from the “gridded” room and go upstairs. Follow the path, go down to the second entrance you see to get wing of the wyvern and come back to the first one down to go upstairs. Talk with the man, say yes and unlock the big door down. You can either jump off the ledge and use the wing back to the castle or re-enter the tower. Go straight down and left to get gold; go back east and open the door to get agility seed and medical herb. Go back up to go upstairs and walk down to exit the cave. Note that if you had gone right and upstairs, you would have ended up in Aliahan’s prison (just use the key to open the door). Anyway from the forest you came from, just walk up to the next village. Village: Reeve Walk east of the village and open the door where a unicorn (?) stands. Talk to the man upstairs to get his magic ball. Make sure you have the latest equipment and exit the village. Follow the clearing east, go down between a narrow passage of unpassable mountains and keep walking east to a small lake. Dungeon: Cave of Enticement Walk around the lake to enter a hole, and follow the path to a wall with statues. Use the magic ball, go downstairs, takes the second opening to your left, follow the path and go northwest to get antidote herb. Walk as far east as you can, follow the path down, walk up a large corridor and take the third entrance to your left to eventually go downstairs. Open the door to your far left and take the portal. Walk up to your next town 1.2 Optional quest: Stolen Crown Village: Romaly Downstairs from the weapon shop is the monster arena. If you abuse savestates then you are assured to win; simply save BEFORE placing your bets, look who wins and bet accordingly. No more money problems! Anyway, walk up straight upstairs to talk with the king. Exit town, walk up straight to gray mountains, always going up to the next village. Village: Kanave If you enter the village at night, you will be able to get the chests from the item store (right above the inn, in the lower-right corner of the village). You can get poison needle (wizard has a chance to instantly kill) and club. Powerup as needed and walk west of the village between the gray mountains. Follow the clearing SW, cross a bridge and enter the tower. Dungeon: Tower of Shanpane Follow the path, go SW at the intersection and walk east to get wing of the wyvern. Go back to the stairs you skipped, walk west, up and follow the path to enter a gridded room to go upstairs. Walk up, enter the gridded room to get gold, go back to the stairs and keep walking west and up to enter another gridded room to go upstairs. Walk down, open the door, go upstairs *3 (you will fall into a trap), leap at the end of the corridor and get ready to fight. Be around level 10 Boss fight: Kandar and Kandar Henchman *3 (are separated, not as a group) Be sure to cast Increase since they are purely physical. If you use savestates, don’t be afraid to defend to save your health. The fight shouldn’t be too hard if you take the henchmen first. After the fight, say yes to Kandar and take the crown from the chest. Go back to Romaly and talk with the King, say yes and become king! To finish you reign, go to the monster arena and talk with the man with the blue mustache on your left (the King). 1.3 Optional quest: the Walk straight north of Kanave to the next village. Village: Nohaniels Everyone seems frozen here. Strange… Exit the village and walk west to here
Village: Elf Town Walk northeast to talk with the Queen and exit the village to the cave south. Dungeon: Cave of the Dream Ruby Take the first opening to your left for a wing of the wyvern. Go straight down, right and up to get gold. Go straight down again to go downstairs, take the acorn of life, go up and upstairs, take the next flight going down and walk around the water pond to walk on healing panels. Walk back to the opening on your left, walk up as far north as you can, east to a strength seed, west to a magic knife, back down and left when you can to go downstairs. Follow the path to a flight of stairs and go SE of it to get gold. Walk west of the stairs, take the opening on your left and go down to get gold. Come back to the main corridor, walk down as far as you can, take the opening to your right to get gold, take the opening immediately above to get fairy water and go downstairs. Get the dream ruby and to back to the elf village. Go back to the elf village and talk with the Queen to get the Wake Up Powder. Warp back to Noaniels, use it and the villagers will wake up. 2. The magic key Now go back to Romaly, walk east (following the clearing and crossing a bridge) to the next village Village: Assaram Powerup as needed and exit town. Walk west in a clearing south of passable mountains. Walk into the desert, go south, and when you see the shrine in the swamp walk west to the oasis. Village: Isis Simply follow the stone path east, up and west to enter the castle proper. Walk west and up a narrow corridor of trees. Walk up straight to a secret passage, go downstairs, take the first corridor up and eventually get the Meteorite armband, which doubles agility (use it to put it on). Talk to the skeleton, say yes twice and exit town. Walk straight north to enter your next dungeon. Dungeon: Pyramid Walk up straight (around the middle to avoid a trap), the second corridor to your left has 2 man-eater chests, and the second to your right leads upstairs. Walk down, left, down the second corridor and follow the path to go upstairs. Walk east and press the button on the right; do the mirror action of the left side. Come back towards the center and walk up to get vitality seed and magic key. Go back down and take the NE corridor to go upstairs. Use the magic key to ride the treasure vault. But since this is a pyramid, every single chest will make you fight for it, generally 4 mummies. You will get (clockwise, starting with the one above the right-hand statue): strength seed, gold, agility seed, gold*3, wing of the wyvern, gold, medical herb and gold*3. Walk south to go upstairs, open the door to get flashy clothes, go upstairs and jump off to exit the pyramid. Go back in, walking left before entering to go downstairs. Follow the path and search here
2.1 Optional quest: getting more treasures Warp back to Aliahan. Store your thief’s key and enter the castle to open the silver-and-red doors to get gold, fighting suit, agility seed, strength seed, wing of the wyvern and gold. Warp back to Isis at night to raid the treasure vault. You can get gold*2, wing of the wyvern, intelligence seed, wayfarer’s clothes, acorn of life, gold and poison moth powder. 3. The sacred pepper Warp to Romaly and walk west to a shrine surrounded by mountains. Enter it, and once on the other side walk south to the next village. Village: Portoga Follow the stone path, cross the water and enter the castle. You can take the chest to your right, but be wary of the barrier floor (-15 hp per step). You will get spider’s web, vitality seed and gold. Go talk to the king, warp back to Assaram and enter the cave just north of town. Simply follow the path, open the door and talk with the dwarf (use the royal scroll before). Get the club and training suit before following him down the secret passage he opens. Follow it to the exit; simply walk straight south and right when you see the coast to another village. Village: Baharata Walk south towards the beach and talk with the old man in green. Exit town, cross the bridge you see, walk north to cross another one and enter a cave. Dungeon: Cave of the pepper merchant Walk left, up, use the key to walk up some more and get gold (the other chest is a man-eater). Walk left to get fairy water, left again for gold and medical herb and open the door. Walk left, down*3, use your key and walk down again, right (the chest is a mean-eater) until you go downstairs. Walk left, use your key and get acorn of life, agility seed, intelligence seed and strength seed. Go back, open the next door and answer no to fight. Boss fight: Kandar Henchman *4 They are in a group, so you can use spells like firebane to dispose of them quickly. After the fight, just walk down to the switch to open the cells and walk back up for another fight. Boss fight: Kandar and Kandar Henchman*2 If you’re around level 15, this battle is a joke. However he seems more resistant to magic. Anyway, after the fight warp back to Baharata. Talk with Galen (in the SW corner of town) to get your pepper. Warp back to Portoga and talk with the king to get your boat. Enter it, navigate south to exit town. 4. The final key Navigate south along the coast you see and go right at the first river you see. Enter the village in the middle. Village: Tedanki Make sure you enter during the day; Go back outside, navigate back to the ocean and go south along the coast. Keep following it until the southernmost portion of it; then navigate east until you reach the two peak of, er, Australia and enter the village there. Village: Lancel Buy the invisibility herbs (300 gold) from the shop. Exit, warp back to Portoga and navigate west, then straight north to the next village. Village: Eginbear Use the invisibility herb to get past the guard. Make your way NW to go downstairs. Move the rocks according to what you see in this video: https://youtu.be/F1njYEDaV68?t=2m38s. Enter the opening you created to get Vase of Drought. Exit the castle, warp to Aliahan and navigate due south of the first cave’s entrance to eventually see rocks in the water. Go below them and use the Vase of Drought. Enter the temple to get the final key. You can now store your magic key away. 5. The magic orbs 5.1 Optional quest: Shrine of Dhama Warp to Baharata and take your boat east along the coast. Enter the first river to your left and follow it. Walk north of the castle you see and follow the path to a dungeon. This is a good place for grinding with the metal slimes roaming around. Dungeon: Tower of Garuna Enter the gridded room below the middle isle to get intelligence seed. Now walk as far west as you can, go up on the grass and go upstairs. Walk on the iron wire to go downstairs, take the warp and take the stairs south to get to a man-eater chest. Go back down to take the stairs north to get some gold. Go back down to take the stairs east, take the stairs south, eventually walk on an iron wire, go upstairs and get iron helmet. Go on the iron wire and fall off it (about 2 steps after the stone walls), fall into the hole and follow the path to get the Book of Satori. Exit the tower and walk south to a castle. Village: Shrine of Dhama Make sure your wizard has the book before changing his job to sage. It’s better that he does it because he will get more hit points. Plus you will gain another healer which is always a welcomed addition. However, note that he will start back to level 1 (with his stats halved), although he will retain all the spells he had gained before changing (minimum level 20), and will keep learning wizard spells once he gets back to level 20. 5.2 Getting the orbs Exit Dhama, navigate on the river and then due east to the next village. Village: Jipang Walk north of the city (beyond arches) to talk with Himiko. Exit town and enter the cave right next to the city. Dungeon: Cave of the Orochi Walk west, follow the path south and southwest, up when you can and go downstairs. Take the first right and walk towards the dragon for a fight. Be around level 24 (except for the sage). Boss fight: Orochi It’s a dragon so it breathes fire to everyone; it can also attack twice per round. Cast bikill on your attackers to increase their strength and dispose of it. After the fight jump in the hole to get back to Himoko’s dojo. Make sure your health is good because you will fight him again (say no when you talk to him). Boss fight: Orochi Same strategy as above. After the fight search the fight to get purple orb. Now, navigate due west of Eginbear and go south once you see a coast to here
Now warp to Portoga and navigate west, then south when you hit a coast. Go around the cap with impassable mountains and go up the first river you see. Take the second left, first left, first up and keep going to the next village (behind impassable mountains). Village: Soo The well in the middle of the village has a staff of thunder. Now make you way back to Tedanki during the night to open the prison cell to get green orb. From Reeve, navigate east and make your way around, er, South America to reach the next village. Village: House of Pirates Walk to the right of the villager you see when you enter and walk straight up until you see a boulder. Push it from below, search for stairs and get strength seed, red orb and wing of wyvern. Now warp back to Lancel. Walk to the right of the first shop and go up.
Go up just around where the soldier in the building is pacing, open the prison door and talk to the old man in your way. Say yes (have the main hero since he’s well-balanced), follow him and exit left. Walk in the desert towards the next dungeon. Dungeon: Navel of the Earth Walk south, open the door, walk south, east at the second opening for intelligence seed, left at the top opening for gold and back down. Follow the path downstairs, walk up about 5 paces and then east to go upstairs to get armor or terrafirma. Go back downstairs, walk straight up to go downstairs some more, go up and ignore the talking masks to get medical herb and blue orb. Warp back to Lancel and exit town. Warp back to Jipang, navigate north around the, er, Straight of Bering and follow the coast east until you see an island north of you. Then navigate east to another island, and go NE of there to enter a shrine. Take the warp north, the next one and exit that shrine. Walk up north following the clearing, cross a bridge, keep following the clearing to get to the next town. Village: Samanao Walk east and up to a picket fence to see a funeral. Talk with everyone and follow the stone road to the castle. Walk to the right and hug the wall going up and open the door you see. Go down to open the prison door, walk towards the king and get thrown in jail. Free yourself, go around the room and open the cell door to the far right and follow the path. Open the cell opposite of the real king, walk straight west and one step up to go through a secret passage. Follow it to end up in the cemetery. Exit the village, walk southeast and get into a cave surrounded by poisonous marshes. Dungeon: Cave to the Mirror of Ra Walk west, go up when you can, west after a small lake, south and go downstairs. Get gold, strength seed, gold, wing of wyvern, gold*2, acorn of life, medical herb and gold (the other room has man-eater chests). Come back to the stairs and walk south to jump into a hole to get the Mirror of Ra, jump into the other hole and go upstairs. Follow the path to the left, ignoring the stairs for now, and get animal suit (transforms the fighter into a cat). Take the stairs you missed, walk left and up to get stone of life (the other 2 are man-eater chests). Go down, left and follow the path to get vitality seed, gold, medical herb and man-eater chest*2. Make your way back to Samanao and enter the castle by night. Take the service entrance once again and follow the path west pass the throne room. Take the stairs up at the end, go up until you see ledges to jump from and take the first one to your left-down side. Use the Mirror in front of the fake king and get ready to fight. Being around level 26 should be enough Boss fight: Boss Troll Make sure to cast Bikill to increase your attack. This should be enough for you to kill it before you have time to heal, unless it focuses on your spell casters. Get the staff of change from the chest and jump off the ledge behind the bed and exit the village. If you are patient (and lucky) you can go to the elf village and use the staff of transform to change into an elf (or dwarf) to buy wizard rings from the shop (2500 gold). When you are done, go back to the shrine that lead you to Samanao and navigate up to a giant frozen island. Enter the lone green square surrounded by ice. Village: Greenlad Walk straight up and enter the shack. Talk with the old man to get Sailor’s Thigh Bone. Use it to know the position of the Ghost Ship. It’s generally south of Romaly, but it moves so it’s always useful. Dungeon: Ghost Ship Go towards the center of the ship and go downstairs. Walk south and open a locked door to get gold*3, man-eater chest (lower-right corner) and full moon herbs. Enter the room opposite of this one to get Locket of Love. Exit the ship. Warp back to Jipang, navigate north to Bering and follow the coast west until you see ice. Enter the river you see. Keep navigating west until a mysterious force repels you (the music changes too). As soon as it happens open the menu and use the Locket of Love. Then keep navigating west to enter the island shrine. Walk down and enter the second left, talk with the flame and enter the room opposite of it. Search at the skeleton’s feet to get Sword of Gaia. Warp to Assaram and navigate south. Go to the left (between impassable mountain ranges) and land where you see a black square. Use the Sword of Gaia there and follow the newly-formed road south to your next dungeon. You might encounter a few metal babbles, but there is a better spot later on. Dungeon: Necrogrond Walk west to go upstairs, and keep walking as far west as you can to get gold. Go back, walk due east, down and follow the path to thunder sword. Walk south, west without deviating and get swordedge armor (foes get some damage). Come back, walk south to go upstairs, go as far south as you can, avoid the pits and keep walking to go upstairs. Walk straight right to fall into a hole, go upstairs, follow the path to go upstairs, go down and cross a stone bridge. Take the first path above you, walk due east, cross another stone bridge and walk down to another bridge. Take the path east of it, go south when you can, south some more and follow the path to go upstairs. Enter the shrine you see to get the silver orb. Now make your way to your merchant’s new village. Enter and exit until you learn that he has been jailed. Go talk to him (in the lower-left corner) and go to his house just above it. Get luck seed and gold, and search behind his throne (behind where he sat) to get yellow orb. Exit the city and warp back to Lancel. Take your boat and navigate SW of, er, Australia to an icy continent. Enter the shrine you see and place all the orbs you have and talk with one of the priestesses to hatch the egg. Exit the shrine and you can now fly everywhere you please (note that the bird will only stop if you press A; once you move in one direction it won’t stop moving). Remember where you used the Locket of Love (north of Assaram?) Fly there and go NE to enter a castle surrounded by mountains. Village: Castle of the Dragon Queen Walk up, open any door (left or right), walk up to open another door, open another one and walk straight south to see the Queen. Talk to her to get the Sphere of light, which will greatly simplify the final boss battle. 6. The end? To accelerate things, warp back to Assaram and fly towards the shrine where you got the silver orb. Then fly to the castle in the middle of the lake. Dungeon: Baramos’ Castle As soon as you can, walk right and hug the far-right wall up. Once you see a lake walk west and take some stairs. Follow the path downstairs, follow that next one (don’t forget to cast step guard), go upstairs and follow the path to get to wizard’s ring, unlucky helmet (cursed) and demon axe (soldier only). Go back to the barrier floor level and go downstairs. Walk east to go upstairs, follow the path up and walk west down some stairs when you are in the castle’s court. Follow the path, and when you see an opening to your left cast step guard before entering. Exit the throne room, walk east and cross the bridge to go downstairs (beware of the barrier floor). Walk up to the altar (surrounded by barrier floor) for a fight. Be around level 32 Boss fight: Baramos Incredibly enough, he can be put to After the fight, warp outside and warp to Aliahan (the only option anyway). Go talk with the king for a scene, and exit town. 7. The Dark World 7.1 The legendary equipment Go back towards Baramos’ castle and land the phoenix on a small island with a black hole surrounded by poisonous marshes. Enter it and walk into the hole. Enter the house, exit south and take the boat. Navigate east to reach a familiar village Village: Breconnaly Walk east on the brick path to reach Tantegel Castle. Walk to the NW, always staying in the corridor until you see a guard pacing around a door. Open it, walk under the first table to enter a secret passage and get stone of sunlight. Go back to your boat and follow the southern coast to the west. Follow it until you see a bridge; cross it and keep walking west. Enter the village in the desert. Village: Hauksness Enter the stables to the SE of town (outside the city walls) and look here
to get Oricon. Exit town and go back to your boat. Go to the edge of the coast and navigate south to the edge of the map (literally). Navigate east, start going up north when you see forest (instead of mountains) and continue east until you see a shrine surrounded by poisonous marshes. Enter it and get the staff of rain from the priestess. Get back to your boat and follow the coastline east. Disembark around here
Village: Kol Go NW of town to the baths (a square of water) and walk four paces south to search for fairy flute. Keep walking west and south of the baths, enter a house with a blue square and go upstairs. Talk with the merchant, sell your Oricon, go rest (or exit town) and come back to buy the sword of kings (35k gold). Exit town and get back to your boat. Navigate south along the coast to here
Walk around the impassable mountain range under you to reach your next village. Village: Rimuldar Go at the inn and open the doors to get ring of life. Around the village is also ideal to level up thanks to the metal babbles. But to make your life easier, warp back to Breconnaly, get on the boat and follow the north coastline to the west. Continue to the edge of land and land to enter a shrine. Open the door, walk through a secret passage due north of the man and go downstairs to get silver harp. Use it to instantly get into a fight. Anyway, after grinding to your comfort level go back to Kol and follow the coastline to the north until you see an island with a tower. Land there. Dungeon: Tower of Rubiss Unlock the doors (be careful with the barrier floor) and keep walking straight to get gold and mimic (left-hand). Walk left and follow the passage to go upstairs. Walk up straight, right and cross the barrier floor up to get mimic (first and third quadrants), full moon herb and gold. You can try to walk on the “inverted” floor if you want, but you will need to be patient to know which arrow will make you move the way you want. The treasures below the barrier floor contain vitality seed and acorn of life*3. Keep walking east to go upstairs, walk straight south to go upstairs again, walk straight north and turn left on the inverted tiles to get armor of radiance. Go back down one floor, walk as far west as you can, north into a gridded room and jump off the ledge on the inverting tiles. Open the door below you, follow the path left, follow the next one across inverting tiles, and when the floor become gray walk south around a giant wall. Enter the brick path in the middle, open the door and use the fairy flute next to the statue to free Rubiss. She gives you the sacred amulet and talks some more. Now warp back to Tantegel, walk north following the clearing and enter the cave surrounded by sand. Dungeon: Cave of the ultimate shield Walk east, south, east and southeast to go downstairs. Follow the path (you can’t get lost), and walk towards stairs going down. Move towards the opening and get gold*2, stone of life, mimic (furthest left below the hole) and shield of heroes. Walk outside and make you way back to Kol. 7.2 Looping the loop Navigate south until you see an island with a shrine; enter it to get the rainbow drop from the old man. Warp to Rimuldar, walk NW to a desert and walk until the end. Use the rainbow drop to cross and follow the path to the final dungeon (be careful with the poisonous marshes). Final dungeon: Zoma’s Castle Follow the path left, never deviating from it until a room with statues. Open the door, keep moving up and down until a voice talks to you. You will have to fight three pairs of granite titans before you can go further. Cast defence and increase to facilitate the fights. Be careful as they can attack twice. After defeating them, proceed to the barrier floor and search here for stairs.
Take these stairs, go up, north and cross the inverting tiles towards the center of the room to go downstairs. Follow the southern wall towards the west, go down in an opening when you can, walk east and follow the path to go downstairs some more. Open the door, follow the path and watch your father (Ortega) getting defeated by a monster. Walk west, north as far as you can, east, open the first door you see to get sage’s stone, wizard’s ring, mimic (far right and left), leaf of world tree and stone of life. Go back and keep walking east (never deviating) to go downstairs. Make sure you heal properly before walking on the altar; the end is nigh. Be around level 40. Boss fight: King Hydra Your chance to avenge your father! It’s a dragon so it can breathe fire, and sometimes twice in a row. Make sure you cast bikill on you attackers and finish it in no time. Heal if you need and walk straight into another fight. Boss fight: Baramos Bomus Like other bosses he can attack twice and cast attack-all spells. Have your magician cast bounce so the boss can suffer a little (at times). Also cast bikill to have stronger attacks. Heal again as needed and walk up straight for another fight. Boss fight: Baramos Gonus Despite its look, it’s not undead. As always, cast bikill and stay healthy (it only attacks once, fortunately). The monster is physical so don’t worry about bounce. Heal as you need after the fight for the final confrontation. Final boss: Zoma Make sure your quickest character has the sphere of light; make him use it immediately. It will transform Zoma into an undead, meaning that he can be hurt by healing spells. Don’t bother with augmenting spells as Zoma often cancels them out (and he can attack twice and cast attack-all spells like icy breath). Just pummel him with holy energy, stay healthy and you will win. After the fight, walk south and you will be propelled to the cave of the shield of heroes. Just make your way out, walk to Tantegel and talk with the king to conclude the game. -------------------- |


YouTube Video Editor
| the unknown |
Affected by 'Laziness Syndrome'
Registered: 12-14-12
Location: Murica
Last Post: 146 days
Last Active: 5 hours
