

 User Notice
 Forum Links


Thread Information
Views
1,057
Replies
0
Rating
2
Status
OPEN
Thread
Creator
Creator
supernerd117
05-22-15 10:25 PM
05-22-15 10:25 PM
Last
Post
Post
supernerd117
05-22-15 10:25 PM
05-22-15 10:25 PM
System
9.4
Views: 748
Today: 0
Users: 0 unique
Today: 0
Users: 0 unique
Thread Actions


Order
Kid Icarus Uprising Walkthrough - Part Three!
Game's Ratings
Overall
Graphics
Sound
Addictiveness
Depth
Story
Difficulty
Average User Score
9.4
9.3
9
9.8
10
8.8
5.8
05-22-15 10:25 PM
supernerd117 is Offline
| ID: 1169725 | 1924 Words
| ID: 1169725 | 1924 Words
supernerd117
Level: 145


POSTS: 4369/6187
POST EXP: 404633
LVL EXP: 37500945
CP: 17982.0
VIZ: 16125

POSTS: 4369/6187
POST EXP: 404633
LVL EXP: 37500945
CP: 17982.0
VIZ: 16125
Likes: 2 Dislikes: 0
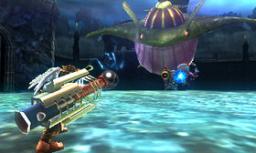
Welcome to part three in a series of nine! Today will cover chapter three, “Heads of the Hewdraw”, Where Pit does his best to defeat the powerful (and mouthy) three-headed dragon, Hewdraw! Due to the names and such of the bosses, this walkthrough is not entirely spoiler-free. However, I am trying my best to stick to gameplay and such, using only names and such when necessary. Links to the previous parts can be found here: Link to Part 1: https://www.vizzed.com/boards/thread.php?id=86441 Link to Part 2: https://www.vizzed.com/boards/thread.php?id=86442 Let’s begin! ______________________________________________________________________________ Chapter 3: Heads of the Hewdraw, played on Intensity 4.0 Recommended Weapon Class: Claws or blades. Claws may provide an advantage in the level, whereas blades may provide an advantage at the boss. Many Metroids Komaytos are in this level. Only Melee attacks do damage to them. ______________________________________________________________________________ Air Battle: Pit is greeted out of the gate by Monoeyes, Syrens, and “paratroopers”. Large numbers of them appear to attack Pit for a while. Dodge their fire and take them out quickly. Before too long, Daphnes (flying plant creatures) and a Belunka join in the fray, as well as Corals. Don’t forget that the whale drops enemies, and the Corals explode if destroyed with ranged fire. A souffle appears briefly. Destroy and ignore it while resting/preparing for the next assault. You can use this time to go into glide mode, if you wish. To enter, don’t attack for five seconds, and refrain from attacking afterwards. In this mode, you’ll be able to dodge enemy fire more efficiently. This helps on higher intensities, but isn’t very helpful on lower ones. More Speknoses and corals appear, as well as Syrens, Monoeyes and Miks. Grab the Recovery Orbs and prepare for your fight against Hewdraw and his three heads. ______________________________________________________________________________ Miniboss: Hewdraw Attacks: Fire Blast A head releases a stream of fire that can hurt Pit if he goes near. It will also inflict “burning” status. Fireball A fireball is launched towards Pit. Laser attack Miniature beams of light are fired towards Pit. This is often used in conjunction with other attacks. Bite One head flies towards Pit to attempt to bite him Laser Beam A head releases a laser beam that can damage Pit several times. This is similar to Fire Blast, but does no burning damage. Wave Attack A head releases a vertical wave towards Pit, similar to the Wave Angler attack. If you take too long, Palutena will fire a “glam blaster” that will execute Hewdraw, excepting two heads. ______________________________________________________________________________ Air Battle Continued: Afterwards, Pit hurtles towards the ground. Make sure to grab the Recovery Orbs on the way down. Pit will be attacked by Monoeyes, Miks, Wave Anglers and Komaytos. Pit then flies towards the town at high speed. Take greater care to dodge fire here, rather than focusing on shooting, except on lower intensities. Before long, Pit will fly over the gate into town. Prepare for Land Battle! ______________________________________________________________________________ Land Battle: As usual, directly in front of Pit are three food items. Grab all you need, and save whatever leftovers you can in case you need to come back. Head straight and you’ll run into some Monoeyes. They likely aren’t much trouble. To the right are some Gyrazers. Run into the right alley, then come back to shoot at them from a distance. Or, if you’re feeling adventurous, you can dodge through their attacks and take them out at the same time. Either way, it’s likely best to clear them out before proceeding forwards. 2 Commylooses are to the right. Leave some distance to avoid their missiles, and be quick to take them out before proceeding. If you’re facing where the Commylooses were, then to your right is an intensity gate. If you’re playing on 4.0 or higher, go ahead and proceed. When you reach the treasure chest, turn around to find a Souffle for some easy hearts. Next, turn back or drop down the ledge and make your way back to the plaza where the Commylooses were. I recommend turning back, but it’s a personal choice. It’s faster that way. Keep an eye out for the Gyrazer that now fills the plaza. Then take the stairs to the right to your next destination. At the top of the stairs is an enemy that will pop out of the ground. This enemy is called a Stackjaw, and it has four heads. Keep aiming at the top one (they will be destroyed one at a time) while dodging between the lasers that come out of the mouths. An alternate strategy is to go down the stairs in between heads. Any heads you destroy will stay destroyed. Once you’re down to the last head, make sure to destroy it quickly! It has alternate attacks at that point that can be difficult to dodge. Grab the food it drops and proceed. To your left is a corner with a bit of fruit. You can grab it if you need it, but if you do, you’ll be attacked by a Wave Angler in the opposite corner. Defeat it quickly! Its attacks can be a bugger to dodge since you’re boxed in. As you move forward, you’ll run into a crossing. At this crossing are several Komaytos. Take them out using melee attacks. To the right is a jump pad guarded by a Monoeye. You don’t have to go this way, and the jump pad is mainly to demonstrate what they do (it only shoots you back out). To the left are several Syrens. Watch out for them, they can be easy to miss. Take them out before proceeding. As you proceed, you’ll see a Monolith. Stay behind it as it goes forward and dodge left before it comes back. This likely shouldn’t prove much of a problem. A single Gyrazer will attack you as you proceed forward. Take it out. The next section is filled with jump pads. Before taking the first one, search the area to find a treasure chest as well as several Shemums. Once you’ve taken care of that, hop on the first one. Before hopping on the second, grab the grenade to your right. The second will launch you on a third, then a fourth, then back to land again. In front of you is a Shemum Urn and a Minos (a spiky puffball that inflates when damaged). Take them out with the grenade you obtained earlier, then grab the key. Next walk slowly down the adjacent alley while taking out a Monoeye. Palutena will yell “WATCH OUT!”, and a Hewdraw Head will pop out in front of you (or on you, if you moved too quickly). Keep proceeding down the alley to run into some Miks. To your right is a treasure chest, and to your left is the door you need to enter. If you grab the treasure, you’ll be facing some extra enemies, so be prepared. The enemies that pop out are a Merenguy, a Komayto, and a Fire Wyrm. Be careful with the Fire Wyrm, it will twist down the alley and can be difficult to dodge. After you’ve taken care of them, proceed through the gate with the key you obtained. ______________________________________________________________________________ Miniboss: Hewdraw Head Lady Palutena presents you with a “gift”. This gift turns out to be a monster pheromone that attracts one of the Hewdraw heads. Stay away from the center of the arena, that’s where it will pop out. Several enemies will also join it, such as Monoeyes and Gyrazers. Attacks: Hop Charge Hops several times, trying to hit Pit with energy surrounding it Mega Charge Builds up energy in its mouth, then charges wildly towards Pit. This can be countered by attacking the mouth. This will daze the Hewdraw Head and give you a chance to attack unpunished. Watch out for other enemies, though. Once you defeat the Hewdraw Head, head through the gate at the back and proceed forwards. ______________________________________________________________________________ Land Battle Continued: In front of you is a Monolith rotating in a circular motion around some food. Hurry and grab some if you need it. If not, leave it alone. To the left is an intensity gate that unlocks at 7.0 Intensity. Proceed through it to fight some enemies and grab a treasure. To the right is where you need to go to continue. Your path will be blocked by the Mega Mussel. Destroy the floating pink balls to destroy the enemy. Continuing onward, you run into another Stackjaw. Attack it from the top of the adjacent stairs until it has only one segment left. Then run down to destroy it for some food. At the top of the stairs, a Gloomerang waits to attack you. Watch out, it throws a portion of its body like a boomerang. Attack the lower section of its body to destroy it, then walk over the jump pad to jump down into a tunnel. In this tunnel are several Shulms, a Komayto, and a Shemum Urn. Destroy them all to earn a treasure chest filled with food and hearts. Grab it before proceeding up the stairs. Watch out for the Gyrazer at the top (behind you). Next, walk over the jump pad by the Gyrazer to jump into an arena of sorts. Be prepared for several rounds of enemy ambush. In the first, you’ll encounter a Minos, Komayto, and Daphne. Use a Grenade to take them out. In the second, there are two Ganewmedes and a Mega Mussel. Take care of the Ganewmedes first, then the Mega Mussel, or use a Grenade. In the third, there is a Merenguy, a Syren, and a Stackjaw. Defeat the first two first, then concentrate on the Tower. Use the Back Shield to fend of the Stackjaw’s attacks while firing at the top in between. Then the final gate will open. Run down the ramp to grab a Drink of the Gods and prepare for the boss. ______________________________________________________________________________ Boss: Hewdraw Reborn The remaining Hewdraw head regenerated a body and attacks Pit from the water. Aim for its head. When it is flushed from the water, then is your chance to melee or fire at it without retribution. It soon returns to the water, and cannot be defeated on land, but can be damaged. Attacks: Roar Doesn’t do damage, but pushes Pit backwards considerably. Hewdraw Reborn uses this at the start of the battle. Red spheres These are used to flush Hewdraw Reborn from the water. Attack a red sphere while Hewdraw Reborn is below it and it will shoot it out of the water. Timing is essential. Spike shoot Hewdraw Reborn shoots spikes towards pit while it is underwater and the red spheres are out. Shoot or dodge them. Fireball attack This will shoot five fireballs towards Pit while Hewdraw Reborn is above water level. Dodge them. Water Balls Hewdraw Reborn shoots several balls upwards from its mouth. These will connect with the ground and do damage to Pit if they connect. Arrows of Power Hewdraw Reborn fires a number of arrows from his mouth. Dodge these quickly and at the last moment. They home, and will do considerable damage to Pit if they connect. Purple Spheres These may appear later on in the battle, and must be destroyed to make way for red spheres. When destroyed, they will split into several other spheres and launch towards Pit. Tidbit: What the boss says at the beginning and end will depend on which heads you defeated in the Air Battle. And that concludes Part 3! Keep your eyes peeled for Part 4 soon! Link to Part 1: https://www.vizzed.com/boards/thread.php?id=86441 Link to Part 2: https://www.vizzed.com/boards/thread.php?id=86442 Let’s begin! ______________________________________________________________________________ Chapter 3: Heads of the Hewdraw, played on Intensity 4.0 Recommended Weapon Class: Claws or blades. Claws may provide an advantage in the level, whereas blades may provide an advantage at the boss. Many Metroids Komaytos are in this level. Only Melee attacks do damage to them. ______________________________________________________________________________ Air Battle: Pit is greeted out of the gate by Monoeyes, Syrens, and “paratroopers”. Large numbers of them appear to attack Pit for a while. Dodge their fire and take them out quickly. Before too long, Daphnes (flying plant creatures) and a Belunka join in the fray, as well as Corals. Don’t forget that the whale drops enemies, and the Corals explode if destroyed with ranged fire. A souffle appears briefly. Destroy and ignore it while resting/preparing for the next assault. You can use this time to go into glide mode, if you wish. To enter, don’t attack for five seconds, and refrain from attacking afterwards. In this mode, you’ll be able to dodge enemy fire more efficiently. This helps on higher intensities, but isn’t very helpful on lower ones. More Speknoses and corals appear, as well as Syrens, Monoeyes and Miks. Grab the Recovery Orbs and prepare for your fight against Hewdraw and his three heads. ______________________________________________________________________________ Miniboss: Hewdraw Attacks: Fire Blast A head releases a stream of fire that can hurt Pit if he goes near. It will also inflict “burning” status. Fireball A fireball is launched towards Pit. Laser attack Miniature beams of light are fired towards Pit. This is often used in conjunction with other attacks. Bite One head flies towards Pit to attempt to bite him Laser Beam A head releases a laser beam that can damage Pit several times. This is similar to Fire Blast, but does no burning damage. Wave Attack A head releases a vertical wave towards Pit, similar to the Wave Angler attack. If you take too long, Palutena will fire a “glam blaster” that will execute Hewdraw, excepting two heads. ______________________________________________________________________________ Air Battle Continued: Afterwards, Pit hurtles towards the ground. Make sure to grab the Recovery Orbs on the way down. Pit will be attacked by Monoeyes, Miks, Wave Anglers and Komaytos. Pit then flies towards the town at high speed. Take greater care to dodge fire here, rather than focusing on shooting, except on lower intensities. Before long, Pit will fly over the gate into town. Prepare for Land Battle! ______________________________________________________________________________ Land Battle: As usual, directly in front of Pit are three food items. Grab all you need, and save whatever leftovers you can in case you need to come back. Head straight and you’ll run into some Monoeyes. They likely aren’t much trouble. To the right are some Gyrazers. Run into the right alley, then come back to shoot at them from a distance. Or, if you’re feeling adventurous, you can dodge through their attacks and take them out at the same time. Either way, it’s likely best to clear them out before proceeding forwards. 2 Commylooses are to the right. Leave some distance to avoid their missiles, and be quick to take them out before proceeding. If you’re facing where the Commylooses were, then to your right is an intensity gate. If you’re playing on 4.0 or higher, go ahead and proceed. When you reach the treasure chest, turn around to find a Souffle for some easy hearts. Next, turn back or drop down the ledge and make your way back to the plaza where the Commylooses were. I recommend turning back, but it’s a personal choice. It’s faster that way. Keep an eye out for the Gyrazer that now fills the plaza. Then take the stairs to the right to your next destination. At the top of the stairs is an enemy that will pop out of the ground. This enemy is called a Stackjaw, and it has four heads. Keep aiming at the top one (they will be destroyed one at a time) while dodging between the lasers that come out of the mouths. An alternate strategy is to go down the stairs in between heads. Any heads you destroy will stay destroyed. Once you’re down to the last head, make sure to destroy it quickly! It has alternate attacks at that point that can be difficult to dodge. Grab the food it drops and proceed. To your left is a corner with a bit of fruit. You can grab it if you need it, but if you do, you’ll be attacked by a Wave Angler in the opposite corner. Defeat it quickly! Its attacks can be a bugger to dodge since you’re boxed in. As you move forward, you’ll run into a crossing. At this crossing are several Komaytos. Take them out using melee attacks. To the right is a jump pad guarded by a Monoeye. You don’t have to go this way, and the jump pad is mainly to demonstrate what they do (it only shoots you back out). To the left are several Syrens. Watch out for them, they can be easy to miss. Take them out before proceeding. As you proceed, you’ll see a Monolith. Stay behind it as it goes forward and dodge left before it comes back. This likely shouldn’t prove much of a problem. A single Gyrazer will attack you as you proceed forward. Take it out. The next section is filled with jump pads. Before taking the first one, search the area to find a treasure chest as well as several Shemums. Once you’ve taken care of that, hop on the first one. Before hopping on the second, grab the grenade to your right. The second will launch you on a third, then a fourth, then back to land again. In front of you is a Shemum Urn and a Minos (a spiky puffball that inflates when damaged). Take them out with the grenade you obtained earlier, then grab the key. Next walk slowly down the adjacent alley while taking out a Monoeye. Palutena will yell “WATCH OUT!”, and a Hewdraw Head will pop out in front of you (or on you, if you moved too quickly). Keep proceeding down the alley to run into some Miks. To your right is a treasure chest, and to your left is the door you need to enter. If you grab the treasure, you’ll be facing some extra enemies, so be prepared. The enemies that pop out are a Merenguy, a Komayto, and a Fire Wyrm. Be careful with the Fire Wyrm, it will twist down the alley and can be difficult to dodge. After you’ve taken care of them, proceed through the gate with the key you obtained. ______________________________________________________________________________ Miniboss: Hewdraw Head Lady Palutena presents you with a “gift”. This gift turns out to be a monster pheromone that attracts one of the Hewdraw heads. Stay away from the center of the arena, that’s where it will pop out. Several enemies will also join it, such as Monoeyes and Gyrazers. Attacks: Hop Charge Hops several times, trying to hit Pit with energy surrounding it Mega Charge Builds up energy in its mouth, then charges wildly towards Pit. This can be countered by attacking the mouth. This will daze the Hewdraw Head and give you a chance to attack unpunished. Watch out for other enemies, though. Once you defeat the Hewdraw Head, head through the gate at the back and proceed forwards. ______________________________________________________________________________ Land Battle Continued: In front of you is a Monolith rotating in a circular motion around some food. Hurry and grab some if you need it. If not, leave it alone. To the left is an intensity gate that unlocks at 7.0 Intensity. Proceed through it to fight some enemies and grab a treasure. To the right is where you need to go to continue. Your path will be blocked by the Mega Mussel. Destroy the floating pink balls to destroy the enemy. Continuing onward, you run into another Stackjaw. Attack it from the top of the adjacent stairs until it has only one segment left. Then run down to destroy it for some food. At the top of the stairs, a Gloomerang waits to attack you. Watch out, it throws a portion of its body like a boomerang. Attack the lower section of its body to destroy it, then walk over the jump pad to jump down into a tunnel. In this tunnel are several Shulms, a Komayto, and a Shemum Urn. Destroy them all to earn a treasure chest filled with food and hearts. Grab it before proceeding up the stairs. Watch out for the Gyrazer at the top (behind you). Next, walk over the jump pad by the Gyrazer to jump into an arena of sorts. Be prepared for several rounds of enemy ambush. In the first, you’ll encounter a Minos, Komayto, and Daphne. Use a Grenade to take them out. In the second, there are two Ganewmedes and a Mega Mussel. Take care of the Ganewmedes first, then the Mega Mussel, or use a Grenade. In the third, there is a Merenguy, a Syren, and a Stackjaw. Defeat the first two first, then concentrate on the Tower. Use the Back Shield to fend of the Stackjaw’s attacks while firing at the top in between. Then the final gate will open. Run down the ramp to grab a Drink of the Gods and prepare for the boss. ______________________________________________________________________________ Boss: Hewdraw Reborn The remaining Hewdraw head regenerated a body and attacks Pit from the water. Aim for its head. When it is flushed from the water, then is your chance to melee or fire at it without retribution. It soon returns to the water, and cannot be defeated on land, but can be damaged. Attacks: Roar Doesn’t do damage, but pushes Pit backwards considerably. Hewdraw Reborn uses this at the start of the battle. Red spheres These are used to flush Hewdraw Reborn from the water. Attack a red sphere while Hewdraw Reborn is below it and it will shoot it out of the water. Timing is essential. Spike shoot Hewdraw Reborn shoots spikes towards pit while it is underwater and the red spheres are out. Shoot or dodge them. Fireball attack This will shoot five fireballs towards Pit while Hewdraw Reborn is above water level. Dodge them. Water Balls Hewdraw Reborn shoots several balls upwards from its mouth. These will connect with the ground and do damage to Pit if they connect. Arrows of Power Hewdraw Reborn fires a number of arrows from his mouth. Dodge these quickly and at the last moment. They home, and will do considerable damage to Pit if they connect. Purple Spheres These may appear later on in the battle, and must be destroyed to make way for red spheres. When destroyed, they will split into several other spheres and launch towards Pit. Tidbit: What the boss says at the beginning and end will depend on which heads you defeated in the Air Battle. And that concludes Part 3! Keep your eyes peeled for Part 4 soon! -------------------- John 11:35 Jesus wept. |
Vizzed Elite
Affected by 'Laziness Syndrome'
Registered: 03-21-10
Location: Location
Last Post: 2397 days
Last Active: 876 days
| WOOOOOOOO |
Affected by 'Laziness Syndrome'
Registered: 03-21-10
Location: Location
Last Post: 2397 days
Last Active: 876 days
