

 User Notice
 Forum Links


Thread Information
Views
1,256
Replies
1
Rating
0
Status
OPEN
Thread
Creator
Creator
supernerd117
04-13-15 02:46 PM
04-13-15 02:46 PM
Last
Post
Post
gamerforlifefor..
04-14-15 05:33 PM
04-14-15 05:33 PM
System
9.4
Views: 838
Today: 2
Users: 0 unique
Today: 2
Users: 0 unique
Thread Actions


Order
Kid Icarus Uprising Walkthrough - Part Two!
Game's Ratings
Overall
Graphics
Sound
Addictiveness
Depth
Story
Difficulty
Average User Score
9.4
9.3
9
9.8
10
8.8
5.8
04-13-15 02:46 PM
supernerd117 is Offline
| ID: 1157729 | 1758 Words
| ID: 1157729 | 1758 Words
supernerd117
Level: 145


POSTS: 4286/6187
POST EXP: 404633
LVL EXP: 37488534
CP: 17982.0
VIZ: 16125

POSTS: 4286/6187
POST EXP: 404633
LVL EXP: 37488534
CP: 17982.0
VIZ: 16125
Likes: 0 Dislikes: 0
Welcome to part two in a series of nine! Today we’ll be covering chapter two, Pit’s battle against the furious elements and his quest to take down Dark Lord Gaol. Due to the names and such of the bosses, this walkthrough is not entirely spoiler-free. However, I am trying my best to stick to gameplay and such, using only names and such when necessary.
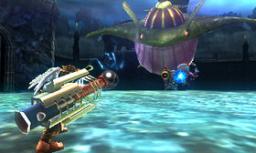
Let’s begin! ______________________________________________________________________________ Chapter 2: Magnus and the Dark Lord Recommended Weapon Class: Medium to long range weapons, particularly belonging to three classes. These include claws, blades, and bows. Staffs are not recommended, due to their slowness. You will also be in enclosed spaces at times. This will require a weapon that is good at close range. ______________________________________________________________________________ Air Battle: Pit heads into some nasty weather. Lightning is all around Pit, but will not damage him as of yet. Monoeyes, Syrens, and miks appear to attack Pit. A Ganewmede appears briefly (don’t forget to melee!). Take the enemies out while dodging their fire. Note: Don’t forget that circular motions are good practice earlier on. As you develop skills in air battles, you will adapt individually to each level, learning what sort of motions work best. Soon afterwards, lighting splits down in front of Pit. If you hit it, you’ll take large damage. It likely won’t prove very difficult to avoid, though. Dodge it while avoiding fire from Wave Anglers. If you can manage to destroy the Souffle (a pudding-like enemy with a cherry on top), you’ll gain a good number of hearts. Palutena then sends Pit hurtling downwards, away from the lightning. Shrips (spinning sword enemies) will attack from the back. These also do a good bit of damage, but probably won’t prove difficult for most people to destroy. If they reach the front of the screen, though; they can be difficult to avoid. Pit turns around again before being assaulted by Monoeyes, Syrens (enemies that blow mini tornados from their mouths) and Gyrazers. Destroy what you can and avoid the rest. As Pit reaches ground level, he is assaulted by Wave Anglers and Monoeyes. The Wave Angler fire can be difficult to avoid. I suggest to try playing in 2D or 3D and see which one you prefer, and stick to that. Either one can make all the difference to some to know how to avoid the fire. Pit soon makes his way underground. Octos and a Treasurefish appear. Make sure you dodge through the middle of the rings or to the side. Also, make sure to hit the Treasurefish and get its item. It will prove useful in the next segment. Two groups of five Miks appear. If you got the Happy Trigger powerup, it will allow you to rake through each group all at once. Next, Palutena stops Pit at two locations. Both are manned by Porkuspines (enemies that shoot out quills in many directions), as well as Monoeyes or Gyrazers. Pit is then healed by recovery orbs. Near the end, a Belunka (a giant whale that summons enemies) appears. It chases after Pit, and sends out a wide variety of enemies to attack him. You can take out the Belunka and/or focus on the enemies. The Belunka will not do damage to Pit, but the enemies can. However, if you manage to take out the Belunka before it self-destructs by hitting a rock face, you can gain a significant number of hearts. Palutena then helps Pit over a large wall while various enemies attack. Your primary concern here should be to take out enemies, not so much dodging, although that proves important as well. Gyrazers, Syrens, Shrips, Miks, and Monoeyes all attack Pit at the next section. Try to destroy as many as possible while practicing your air dodging skills. At this point, however; the enemies aren’t focusing on attacking Pit, rather, they are attacking a variety of humans. After this point, Pit heads into the castle. ______________________________________________________________________________ Land Battle: To your left is nothing. To your right is a single Handora (a hand that shoots balls of energy) that shouldn’t be difficult to take out. In front of Pit is food, a door, and a switch. Grab all the food you need (you won’t be coming back), then hit the switch and head through the door. In front of Pit is a...erm, pit. A single Monoeye will come out of it before you have a chance to drop down. Be prepared to melee it to oblivion, then drop through the pit. In this section, you’re in a great hall filled with two Scuttlers and two Scuttler Cannoneers. Grab the flame card to the left then go to work. Once you’ve taken them down, don’t forget the treasure chest in the middle of the room. At the top of the stairs are two sections with two switches you need to hit. To your left (turned towards the two sections) is a Boogity (this has an impenetrable shield). Attack it when it turns around, then hit the switch. To your right is a Coral and a Handora. Watch out for the explosion of the Coral as you defeat it. The Handora is easy to deal with. Hit the second switch. It is recommended that you avoid the middle section between them. If you try to dodge the Monolith (a giant flying panel), you almost definitely will get hit. Experts may be able to get past it without damage, but early on, it may be risky. Once you’ve hit the two switches, a Ganewmede appears in front of the door. You can attack it or ignore it. Don’t forget that you should melee it instead of shooting at it, if you wish to attack it. Head through the doors behind it. Head where prompted by Palutena to get treasure...it’s a trap! Several statues spring to life, become Skuttlers and attack you. However, it’s well worth the hassle. Two treasure chests await at the back of the room. After you get back, you’re attacked by a Specknose (it drops powerful bombs) and a Splin that splits in two if you don’t destroy it quickly enough. Defeat them to gain food before leaving the room. Proceed over the bridge and continue down the path to encounter a Shemum Urn and a Commyloose (a squid that shoots missiles). The path continues down some stairs. As you continue, you’ll see a Skuttler Cannonholder by a curtain. This curtain is false, proceed through it to gain your first Gemini Weapon, the Sagittarius Bow. Return to the main path. After going down the stairs, a cutscene will queue. Feel free to watch it or skip it. In this segment, you’ll attack a lot of foes in an enclosed room with a friend, Magnus. He is controlled by the AI of the game. If you hit him, he may attack you, so be careful. Among the new enemies are Shulms. If you don’t defeat it by meleeing it, it will release a cloud of poison gas. If you’re too close, Pit will be poisoned. Once you clear the room, grab the treasure and food then proceed through the next pit. In the next chamber, Miks and a Fire Wyrm will attack you. Be prepared. Once you’ve proceeded past them or taken them out, head into the next room. In this room, a bomb is on the floor. Don’t mistake it for an enemy. Attack it, and it will spread damage balls throughout the entire floor. Defeat the waves of enemies to proceed. The Shildeen makes a shield for itself and other enemies around it. Simply attack this shield to shatter it, then defeat the Shildeen, followed by the other enemies. If you take too long, the shield will reappear. Next, hop onto the elevator. On the next floor, there is a room to your right. Go there if you need healed. The hot spring will restore a great portion of your health. If you go far left, you’ll run into a trap. There is a treasure chest, but it contains only a single heart. I suggest avoiding it altogether. The hearts gained aren’t worth it. The next section is the final section. You’ll run up a circular ramp towards the boss chamber. If you have the power-up “Tirelessness”, use it here. Dash past all the enemies, and take them out as necessary. At the top is a Drink of the Gods and the boss, Dark Lord Gaol. ______________________________________________________________________________ Boss: Dark Lord Gaol Keep your distance and this fight won’t be too hard. Gaol has a variety of attacks up his sleeve: 1. Dark Balls of Energy His basic attack. It sends out small dark balls to attack Pit. These are easy to avoid. 2. Gravity Well Gaol sends out a purple gravity well to draw Pit in. If drawn in to the center, it will connect with Pit several times, doing massive damage. 3. Dash attack Gaol charges directly at Pit at great speed. Do a quick dash out of the way if this happens. You might be able to get in a few melee attacks as well. 4. Dark Line Gaol sends down a dark line on the floor. If Pit is hit by this, it will do damage and temporarily stun him. 5. Reflect Barrier This barrier will reflect any ranged shots sent at him. It is suggested that you lay low and prepare to attack until it is gone 6. Skuttler Summon This will summon two Skuttlers to attack Pit and Magnus. 7. Dark Quake This is a brief, circular burst of energy. Stay away from Gaol to avoid this attack, and it shouldn't be too hard to dodge. 8. Mega Laser This attack shoots out a giant laser. Gaol will spin slightly making the laser’s path change a little. Dash through or in the opposite direction or the laser to avoid it. Dashing through it is trickier, so it is not suggested, except for expert players. As you might see, Gaol has a variety of ranged and close-range attacks, but his most devastating attacks are close-range, hence the warning to keep your distance. Occasionally, you may get in a few melee hits, but don’t be obsessed with it. It’s best to be careful. ______________________________________________________________________________ NOTA BENE: There is no intensity gate in this level. However, once again, you might want to try this level on higher intensities before taking on the next level. The next level has two intensity gates, and it doesn’t hurt to be prepared. Hope to see you all for part three! Let’s begin! ______________________________________________________________________________ Chapter 2: Magnus and the Dark Lord Recommended Weapon Class: Medium to long range weapons, particularly belonging to three classes. These include claws, blades, and bows. Staffs are not recommended, due to their slowness. You will also be in enclosed spaces at times. This will require a weapon that is good at close range. ______________________________________________________________________________ Air Battle: Pit heads into some nasty weather. Lightning is all around Pit, but will not damage him as of yet. Monoeyes, Syrens, and miks appear to attack Pit. A Ganewmede appears briefly (don’t forget to melee!). Take the enemies out while dodging their fire. Note: Don’t forget that circular motions are good practice earlier on. As you develop skills in air battles, you will adapt individually to each level, learning what sort of motions work best. Soon afterwards, lighting splits down in front of Pit. If you hit it, you’ll take large damage. It likely won’t prove very difficult to avoid, though. Dodge it while avoiding fire from Wave Anglers. If you can manage to destroy the Souffle (a pudding-like enemy with a cherry on top), you’ll gain a good number of hearts. Palutena then sends Pit hurtling downwards, away from the lightning. Shrips (spinning sword enemies) will attack from the back. These also do a good bit of damage, but probably won’t prove difficult for most people to destroy. If they reach the front of the screen, though; they can be difficult to avoid. Pit turns around again before being assaulted by Monoeyes, Syrens (enemies that blow mini tornados from their mouths) and Gyrazers. Destroy what you can and avoid the rest. As Pit reaches ground level, he is assaulted by Wave Anglers and Monoeyes. The Wave Angler fire can be difficult to avoid. I suggest to try playing in 2D or 3D and see which one you prefer, and stick to that. Either one can make all the difference to some to know how to avoid the fire. Pit soon makes his way underground. Octos and a Treasurefish appear. Make sure you dodge through the middle of the rings or to the side. Also, make sure to hit the Treasurefish and get its item. It will prove useful in the next segment. Two groups of five Miks appear. If you got the Happy Trigger powerup, it will allow you to rake through each group all at once. Next, Palutena stops Pit at two locations. Both are manned by Porkuspines (enemies that shoot out quills in many directions), as well as Monoeyes or Gyrazers. Pit is then healed by recovery orbs. Near the end, a Belunka (a giant whale that summons enemies) appears. It chases after Pit, and sends out a wide variety of enemies to attack him. You can take out the Belunka and/or focus on the enemies. The Belunka will not do damage to Pit, but the enemies can. However, if you manage to take out the Belunka before it self-destructs by hitting a rock face, you can gain a significant number of hearts. Palutena then helps Pit over a large wall while various enemies attack. Your primary concern here should be to take out enemies, not so much dodging, although that proves important as well. Gyrazers, Syrens, Shrips, Miks, and Monoeyes all attack Pit at the next section. Try to destroy as many as possible while practicing your air dodging skills. At this point, however; the enemies aren’t focusing on attacking Pit, rather, they are attacking a variety of humans. After this point, Pit heads into the castle. ______________________________________________________________________________ Land Battle: To your left is nothing. To your right is a single Handora (a hand that shoots balls of energy) that shouldn’t be difficult to take out. In front of Pit is food, a door, and a switch. Grab all the food you need (you won’t be coming back), then hit the switch and head through the door. In front of Pit is a...erm, pit. A single Monoeye will come out of it before you have a chance to drop down. Be prepared to melee it to oblivion, then drop through the pit. In this section, you’re in a great hall filled with two Scuttlers and two Scuttler Cannoneers. Grab the flame card to the left then go to work. Once you’ve taken them down, don’t forget the treasure chest in the middle of the room. At the top of the stairs are two sections with two switches you need to hit. To your left (turned towards the two sections) is a Boogity (this has an impenetrable shield). Attack it when it turns around, then hit the switch. To your right is a Coral and a Handora. Watch out for the explosion of the Coral as you defeat it. The Handora is easy to deal with. Hit the second switch. It is recommended that you avoid the middle section between them. If you try to dodge the Monolith (a giant flying panel), you almost definitely will get hit. Experts may be able to get past it without damage, but early on, it may be risky. Once you’ve hit the two switches, a Ganewmede appears in front of the door. You can attack it or ignore it. Don’t forget that you should melee it instead of shooting at it, if you wish to attack it. Head through the doors behind it. Head where prompted by Palutena to get treasure...it’s a trap! Several statues spring to life, become Skuttlers and attack you. However, it’s well worth the hassle. Two treasure chests await at the back of the room. After you get back, you’re attacked by a Specknose (it drops powerful bombs) and a Splin that splits in two if you don’t destroy it quickly enough. Defeat them to gain food before leaving the room. Proceed over the bridge and continue down the path to encounter a Shemum Urn and a Commyloose (a squid that shoots missiles). The path continues down some stairs. As you continue, you’ll see a Skuttler Cannonholder by a curtain. This curtain is false, proceed through it to gain your first Gemini Weapon, the Sagittarius Bow. Return to the main path. After going down the stairs, a cutscene will queue. Feel free to watch it or skip it. In this segment, you’ll attack a lot of foes in an enclosed room with a friend, Magnus. He is controlled by the AI of the game. If you hit him, he may attack you, so be careful. Among the new enemies are Shulms. If you don’t defeat it by meleeing it, it will release a cloud of poison gas. If you’re too close, Pit will be poisoned. Once you clear the room, grab the treasure and food then proceed through the next pit. In the next chamber, Miks and a Fire Wyrm will attack you. Be prepared. Once you’ve proceeded past them or taken them out, head into the next room. In this room, a bomb is on the floor. Don’t mistake it for an enemy. Attack it, and it will spread damage balls throughout the entire floor. Defeat the waves of enemies to proceed. The Shildeen makes a shield for itself and other enemies around it. Simply attack this shield to shatter it, then defeat the Shildeen, followed by the other enemies. If you take too long, the shield will reappear. Next, hop onto the elevator. On the next floor, there is a room to your right. Go there if you need healed. The hot spring will restore a great portion of your health. If you go far left, you’ll run into a trap. There is a treasure chest, but it contains only a single heart. I suggest avoiding it altogether. The hearts gained aren’t worth it. The next section is the final section. You’ll run up a circular ramp towards the boss chamber. If you have the power-up “Tirelessness”, use it here. Dash past all the enemies, and take them out as necessary. At the top is a Drink of the Gods and the boss, Dark Lord Gaol. ______________________________________________________________________________ Boss: Dark Lord Gaol Keep your distance and this fight won’t be too hard. Gaol has a variety of attacks up his sleeve: 1. Dark Balls of Energy His basic attack. It sends out small dark balls to attack Pit. These are easy to avoid. 2. Gravity Well Gaol sends out a purple gravity well to draw Pit in. If drawn in to the center, it will connect with Pit several times, doing massive damage. 3. Dash attack Gaol charges directly at Pit at great speed. Do a quick dash out of the way if this happens. You might be able to get in a few melee attacks as well. 4. Dark Line Gaol sends down a dark line on the floor. If Pit is hit by this, it will do damage and temporarily stun him. 5. Reflect Barrier This barrier will reflect any ranged shots sent at him. It is suggested that you lay low and prepare to attack until it is gone 6. Skuttler Summon This will summon two Skuttlers to attack Pit and Magnus. 7. Dark Quake This is a brief, circular burst of energy. Stay away from Gaol to avoid this attack, and it shouldn't be too hard to dodge. 8. Mega Laser This attack shoots out a giant laser. Gaol will spin slightly making the laser’s path change a little. Dash through or in the opposite direction or the laser to avoid it. Dashing through it is trickier, so it is not suggested, except for expert players. As you might see, Gaol has a variety of ranged and close-range attacks, but his most devastating attacks are close-range, hence the warning to keep your distance. Occasionally, you may get in a few melee hits, but don’t be obsessed with it. It’s best to be careful. ______________________________________________________________________________ NOTA BENE: There is no intensity gate in this level. However, once again, you might want to try this level on higher intensities before taking on the next level. The next level has two intensity gates, and it doesn’t hurt to be prepared. Hope to see you all for part three! -------------------- John 11:35 Jesus wept. |
Vizzed Elite
Affected by 'Laziness Syndrome'
Registered: 03-21-10
Location: Location
Last Post: 2393 days
Last Active: 872 days
| WOOOOOOOO |
Affected by 'Laziness Syndrome'
Registered: 03-21-10
Location: Location
Last Post: 2393 days
Last Active: 872 days
(edited by supernerd117 on 05-22-15 01:52 PM)
04-14-15 05:33 PM
gamerforlifeforever is Offline
| ID: 1158219 | 52 Words
| ID: 1158219 | 52 Words
gamerforlifeforever2
Level: 180

POSTS: 1110/10715
POST EXP: 585502
LVL EXP: 79195030
CP: 104764.4
VIZ: 3513073

POSTS: 1110/10715
POST EXP: 585502
LVL EXP: 79195030
CP: 104764.4
VIZ: 3513073
Likes: 0 Dislikes: 0
Nice job with this second part of your Game guide for Kid Icarus: Uprising. This will be useful to those people who think that this chapter is tough. I myself had trouble on the higher intensities on this chapter. Overall I think you did a great job. Keep up the good work. -------------------- |
Vizzed Elite
Affected by 'Laziness Syndrome'
Registered: 07-04-12
Location: Somewhere in Ohio
Last Post: 313 days
Last Active: 187 days
| Ultimate Pokemon Fanboy, Member of the Year 2016, and Vizzed's #1 My Hero Academia fan |
Affected by 'Laziness Syndrome'
Registered: 07-04-12
Location: Somewhere in Ohio
Last Post: 313 days
Last Active: 187 days
