

 User Notice
 Forum Links
Guide: Genghis Khan 2: Tricks, Tips and Tactics
Strategy Gaming Help
Strategy Gaming Help
Play Genghis Khan II - Clan of the Gray Wolf Online


Thread Information
Views
3,962
Replies
3
Rating
3
Status
OPEN
Thread
Creator
Creator
Fireproof
06-24-14 07:24 PM
06-24-14 07:24 PM
Last
Post
Post
MysteryMan007
11-19-14 12:24 PM
11-19-14 12:24 PM
System
8.7
Views: 2,949
Today: 1
Users: 0 unique
Today: 1
Users: 0 unique
Thread Actions


Order
Genghis Khan 2: Tricks, Tips and Tactics
Game's Ratings
Overall
Graphics
Sound
Addictiveness
Depth
Story
Difficulty
Average User Score
8.7
5.5
7
8
7.5
6
7
06-24-14 07:24 PM
Fireproof is Offline
| ID: 1040254 | 5884 Words
| ID: 1040254 | 5884 Words
Fireproof
Level: 49


POSTS: 321/518
POST EXP: 219650
LVL EXP: 870099
CP: 11910.6
VIZ: 4005769

POSTS: 321/518
POST EXP: 219650
LVL EXP: 870099
CP: 11910.6
VIZ: 4005769
Likes: 1 Dislikes: 0
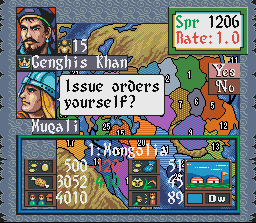
My first Genghis Khan Guide?was created to help players understand the different functions found throughout the game and explained each option in detail. It also explained, in minimal detail, what can be done in terms of game-play and as a player. I've designed this guide to cover the different tricks, tips and tactics I use to play Genghis Khan 2 with some detail as to what each function is and detail as to what I do. I hope that I can help players understand the different elements on a greater level and create a strategic guide to success even if this isn't a walk-through. This guide will cover each element one at a time in a semi-step by step setup to build your nation. Red indicates each different element. Light Blue highlights each key factor of each element.. Yellow highlights other things to pay attention to. This color is bleeding through the rest of the thread and causes all non-yellow text to become yellow. Each section has "Tricks Tips and Tactics" labelled on it for specifics. A New Game This guide is designed to work as any nation for any of the 4 scenarios you can play. For newer/less experienced players, I recommend you play as Temujin/Genghis Khan as he is the original Khan that conquered most of the known world. I also recommend you begin your game in the Mongol Conquest Scenario. Temujin begins with access to powerful generals which will impact the game quite a bit. Other nations lack powerful generals. All AI will not use their better generals for war so they can not be captured or persuaded to join. The reason why I recommend you begin with Mongol Conquest is because you get to choose 8 generals and an adviser to take with you to the second scenario. You must unite the Mongolian Steppes before the year 1214 in order to proceed to the second scenario. Tayan Khan would be the easiest to play on the Mongol Conquest because he begins with 2 territories. This might be the ideal choice to start but lack of generals will bite you later.?Your choice matters! Looking for a challenge? Try playing Genghis Khan Scenario or Yuan Dynasty as empires other than Mongolia. Italy, England, Japan and others provide a more difficult game-play option. Empires in Europe have Knights but they're the most expensive unit in the game. Japan has Samurai and start with a weak country but very defensive landscape. Playing as Mongolia is too easy sometimes! Internal Affairs/Domestic Element This can be the most detrimental element to any game because it effects your economy and whether or not you can recruit from your population. A lower population will produce less gold in the winter and less food throughout the year. Because units cost 200 people each, you will need to establish a higher population to support a higher number of units.?A higher population produces more gold and food. Units cost maintenance every season and they eat your food. Without a higher population you'll limit your gold and food for war ?It is absolutely essential that you focus on your population first.?There are 2 major things that you need to worry about; Loyalty and Labor. 1. Loyalty - This factor 0 to 100 represents how loyal your people are to the empire. This effects whether or not your people will revolt against you. Any loyalty below 50 is at risk of a minor revolt ?to a major revolt. Lower loyalties means more units formed by your populace. When a revolt happens, you go to war and must kill the revolt. This takes away from your population by 200 per a unit. Because you have less people you reduce your production of food and gold. Because their loyalty is lower you also lose gold and food. A higher loyalty will make the people reproduce more each year. The more people you have, the more they reproduce and the more they produce. This helps keep your people from revolting and helps provide more for your empire. In turn, this also helps build your farming and infrastructure. Increasing loyalty will boost your farming, gold income and defenses to be more precise.? Loyalty can be reduced in several ways. The first method is through war when an enemy legion plunders your towns for supplies. AI will rarely or never do this but playing against another player can be used to cripple an economy. The second method is by taking gold from your people because you are in desperate need of gold. The 3rd method is by hazard referring to Drought, Blizzard, Typhoon or Epidemic. Epidemic can be the most killer of the hazards and sometimes lingers for several seasons when spreading. The last method is by recruiting units from your population which increases the more you recruit. The only way to boost loyalty is to gift your people gold, food or a specialty you possess. I always max out my loyalty before I do anything else. 2. Labor - This is allocated through 4 options from 0 to 100%. Farming, Herding, Specialty and City are the 4 options you can reallocate your population to work. Farming or Herding seems to have specific territories where they work especially well or especially poorly. Although you might reallocate herding into farming, you may need to invest in farming in order to maximize your income for food. Farming and Herding represent how your territory will earn their food. Specialty is used to sell your manufactured goods on the market. City builds your gold income through taxation. I always allocate my labor with zero in specialty and about 50% in city. I almost always leave herding and farming how they are. Sometimes I need to allocate farming into herding or herding into farming usually 10-40% 20-30% or 25-25% in various combinations between the 2. Altering this statistic too much seems to destroy your earned food income so I always try to leave it alone. I will alter the city income sometimes to be about 40, 45 or 55 but never anything above or lower because it might be too much or too little in relation to the food. Tricks Tips and Tactics you need to know Economic Element Believe it or not, a majority of your economy will come from the Domestic Element because this determines what your people will produce. Allocated Labor only effects the territory you reside in because when you move out of a territory the policies of a territory determine what that territory will produce in terms of labor and AI scr 1. Specialties - These can be bought and sold through the Market and produced by your people. There are 10 total specialties that can be produced. Each territory can only produce 1 specialty in particular. Furs, Silk, Jewelry and Textiles are among some of these that can be produced. Their value is determined by which Market you can buy and sell them from and the Rate. You can give specialties to your people as a gift to boost loyalty. 2. Rate - This is a number you see in the top right of every turn. It is a random number from turn to turn and it tends to rise and drop irrationally. It has a direct impact on the going rate within each Market. A going rate of .5 means that the costs of the goods are cut in half. Remember the terminology to buy low sell high? That's exactly what needs to be done in this game! A rate of 1.0 means that all prices are at normal. A rate of 2.0 means everything is doubled. A rate of 3.0 means prices are tripled. A key tip on this is to always try to have gold to purchase goods when the rate is really low and sell these when the rate is high, like 2.5 or higher. You might be able to turn a small purchase into a considerable profit. Always check the rate and when it's in your favor, try to earn money. 3. Market - There are 4 merchants in the market; Uigher, Chinese, Islamic and Venetian. These merchants have a home base they operate out of on each scenario. Chinese and Uigher appear in the Mongol Conquest but all of them are found on the world scenarios in the same places on each of the 3 world scenarios. These merchants have different values for each of the different goods you can buy and sell through the market. The worst thing about this is how they move from territory to territory. Sometimes you will have no merchants and sometimes you will have all 4. It's random and difficult to predict. The best use out of the market happens when you can buy and sell goods among multiple merchants. I always try to buy Silk from the Uigher or Chinese and sell Silk with the Venetian merchant no matter what the rate is. Ideally, a higher rate will reward a greater profit but even a low rate like .5 will still be fruitful when selling Silk with the Venetian merchant. This element helps provide quick cash but can't always be utilized if you're lacking in gold or merchants. I always try to buy and sell Silk or any gold earning specialties available to buy and sell at that time. Because the merchants have different values for the different goods, you will need to figure out which specialties can be bought low in one merchant and sold high in another. Sometimes you get a rate difference of .7 from buy to sell and sometimes you can earn double or more for what you paid. Also, you don't have to buy and sell in the same turn. Sometimes the rate falls in your favor at bad timing and you sacrifice some movement points to buy some goods. Waiting a few turns for a better rate can be very profitable especially when the rate jumps from .5 to 3.5. The highest rate I have ever seen is a 4.1. The last and potentially best aspect of the Market requires a great deal of gold and a very low rate. Mercenaries can be hired at a marked up rate. The best benefit of the mercenaries you hire is that it doesn't take away from your population at all. These units are better equipped than recruiting from your population so it is well worth hiring mercenaries. This also allows you to obtain some of the stronger units from foreign countries like Mongols, Samurai, Mameluke, etc. which aren't normally available in different parts of the world if you own some of those lands. Tricks Tips and Tactics You Need to Know Also focus gold toward cheap mercenaries. Whenever your market rate drops to .5 to .8 consider hiring mercenaries. They're just as good as recruiting. Don't forget to buy arms too. Generals/Personal This element of the game allows you to build a family and manage generals for a few tasks. Generals are a big influence on the game because they have loyalty and skills in certain aspects of the game. There are 4 areas that a general is ranked in; War, Politics, Leadership and Charm. War determines the general's skill in combat. Generals with an A in combat are superb warriors with increased offensive and defensive strength. Politics measures a general's abilities in governing a territory. I believe this grade represents the cost of each action. With an A grade you're ability to perform more actions. This will tie into the "Body" where you have a set number of points to expend each turn. In old age you lose points over time but your action cost remains the same. Leadership might measure training strength or abilities on the battlefield. I'm not entirely sure about this trait and how it effects the game but I've never needed it. Charm seems to have the ability to persuade enemies to give in to tribute demands, surrender or even switch sides. I've never convinced a general to switch sides even though i like to try. I have convinced enemy's to surrender when I have a considerable fighting force at my disposal. The person choice from the game's menu allows you to do several things; Make a Prince a General, Marry off a Daughter, Visit Family, Appoint Governor/Adviser and hire or fire a general. 1. The Family - Visiting the family allows you to talk with your wife and encourage offspring. If you have a son, he can grow up to become a general or if the ruler dies, I always focus on the family when there is nothing else I can do. Having 5 sons means 5 extra generals. They're always high ranking generals as well and some even have high body points to boot if the ruler ever dies. Having 5 daughters means marrying them off to your best generals. You don't want anyone to betray you if you can help it. 2. Appoint or Dismiss a General - Allows you to search through several generals in your current territory but the downside has you limited to 1 general for every action. I know there are certain awesome generals in specific territories and if you conquer that territory and they don't appear you'll need to search through the several generals or reconquer the territory to find them. Dismissing a general will fire that general from your command and they will stay in the territory you dismissed them in. I always attempt to recruit new generals especially when I know I was given a bad general upon capturing a new territory. There's always a need for more. I do dismiss bad generals and I do dismiss unloyal generals. 3. Appoint Governor or Adviser - Allows you to change the governor/adviser of another territory you control. For specific territories I will appoint an adviser with high political rank to help support investments and growth. I will do this in territories where the Governor is one of the ruler's sons, territories adjacent to enemies or territories with a high level of income. It benefits the empire when they can share the wealth or attack without being commanded to do so. Tricks Tips and Tactics you Need to Know Diplomacy This element is rather limited. You are able to forge alliances, demand tribute or demand surrender. In order for these to be successful it seems as though you need charm to be A rank and an considerable army to back you up. If you have a powerful army demanding tribute from a weak army, you'll increase the chances of taking 1/5 to 1/2 of their total gold. I've earned as much as 4000 gold from demanding tribute alone. You also increase the likeliness that your enemy will surrender. I've been able to force 6 territories controlled by a single empire to submit to me on one turn. I've also been able to force 4 different empires surrounding me to submit on back to back turns. Diplomacy only works with a powerful army and charming generals. Even if a general lacks in war or politics or leadership, there's a chance he'll be extremely useful with Charm. Never underestimate demanding surrender. You might have to demand surrender 5 times before it works once but if you do, you only gain generals, territories and strength. Forging allies works the same way except that it's only useful if nearby enemies are powerful or you don't want to fight a particular empire. Tricks Tips and Tactics you Need to Know Order This option allows the ruler to command other territories you own that you wouldn't normally command. Sometimes territories will refuse to do as you ask and other times they can't because they don't have what they need to perform the commanded tasks. This options allows you to command them to attack, send supplies or threaten another ruler. 1. Command Territory to Attack - Useful for forcing a territory to attack another, most likely weaker enemy territory. Sometimes you might command multiple territories to attack a territory they all touch just to be sure the war against that territory is won. Unfortunately, this does come with possible consequences. The enemy might defeat the invading territory and kill the attacking governor or adviser. Sometimes these are good generals that die. Upon defeat, other units can be captured and strengthen the enemy. I like to use this option whenever a territory will proclaim independence or whenever I need a troublesome territory gone, especially when one or more nearby territories are defenseless. This tool will be a matter of urgency during some games. 2. Command Territory to Send Troops - This is very useful for supplying your front lines with as many troops as possible. Doing so will prevent enemies from attacking your other territories. As your empire grows, so does your front lines. By claiming certain territories when your empire is large enough allows you to protect all your territories. This allows you to best protect them. Sometimes enemies might break through and attack 3-4 territories endangering your empire. More troops on the front lines prevents that from happening. 3. Command Territory to Send Supplies - Very useful tool similar to the Send Troops tool found above. This allows you to spread wealth and food so that less fortunate territories can provide or send these resources. 4. Command to Threaten Enemy Territory - Honestly, I never use this as it seems like a waste of time completely. This doesn't actually benefit you and it doesn't generally go anywhere. If you need to ally someone, your messenger can go anywhere. If you wanna threaten someone far away nearby your territory you can but it's up to the governor to decide which general they want to send. If they send a weaker general with no Charm, it won't work. I never need to use the Order commands unless I've conquered several territories. When the game has developed a little bit and armies are not doing anything in secure locations, I'll start focusing on the movements of troops and supplies. It isn't until later in the game that I command territories to begin attacking and only when I'm sure they can defeat the enemy I want to target. Tricks Tips and Tactics you Need to Know Policies Any time I gain ownership over a new territory I will decree a new policy for that territory, even at the start of the game. This requires an adviser to do. Policies help govern a territory while you're not in that territory. The benefit of this allows you to manage what the other territories are more likely to do. The other options in the policy tab allow you to let the adviser come up with new policies or change policies. The only one I want to focus on is the decree new policy tab. Decree New Policy - There are several things that this focuses on. Labor can be determined through a new policy, but doesn't change unless you actually change it for the territory which you reside in. Investments, Military and Stance are other options that can be changed as well. Investments includes Farming, City, Defenses or Balanced. Military determines Quality, Quantity, Arms or Balanced. Stance determines whether or not that territory will be more likely to surrender, give or attack. I always focus a new territory on producing food or gold depending on it's relation to where the enemies are nearby. I never want my territories to surrender so there's no need to have them submit by any means. The only other factor I worry about is the Arms, Quality and Quantity. This varies from territory to territory because each can be beneficial. In territories like Mongolia, I like to focus on Quality because the units produced there are most likely to be Mongols, which are arguably the most powerful units in the game. I will also have Japan focus on Quality because Samurai are arguably the most powerful as well. When certain territories are no longer on the front line, I will sometimes change some of their policies using the change policies option. This is less costly for action points since a policy is already in place. It helps manage the territory so that it might produce different units or send more resources out. Tricks Tips and Tactics you Need to Know War Preparation This is the biggest element of the game because it determines who's strong and who's weak. Over the course of the game you'll need to balance all the above elements in order to succeed in warfare. There are some times when you will need certain elements less than other elements but when it comes right down to the strategy, it's all about the war. In order to win the scenario, you need to conquer everyone. To do so, you need Resources, Units, People, Generals and Tactics. Step 1: Recruiting Units - This allows you to recruit units from within the territory you currently reside in. It costs 200 people from your population to recruit a full unit. These prices will never change and are always set how they are. The prices on the units are a general rule for their strength. Higher priced units are generally more effective in combat. All mounted units are more powerful than all infantry and siege. This option is best when you need units fast. If you go to the Bottom Right "Info" and Bottom Right again "Unit Types" you can see the unit chart. This chart lists all the units in the game and each of their strengths including spirit and mobility as well. The top symbol represents the "Near" attack. The second symbol represents the "Charge" attack. The 3rd symbol is the "Ranged" attack. The last symbol might be defense, although I am unsure. Elephants are the best in the defense symbol (The 4th). Samurai are ranked A in near attack. Archers (Egyptian Horse Archers) are ranked A in ranged. Knights are ranked A in charge. Catapults have a red A in range. Each unit has different stats and are damaged differently. I'm not totally sure how these effect each other when units attack each other, but I consider what I can recruit at the time. Use the chart to determine what's best for you. I don't even know what the red A is but I think it means it can cripple a unit's spirit. Step 2: Training - After you've recruited a new unit, it will require training. Training is measured from 0 to 100 but the lowest I've seen in training is 20. Anything below 90 is never ready for the battlefield because it's never enough. Always focus on training so that you're ready for war. Whether you are attacked or do the attacking, training is the key to victory. Step 3: Send Supplies - If you are full with supplies from a recent victory you can always send supplies to another territory you own. Anything over 9,999 will be lost so it's always better to share. Step 4: Dismiss Units - In the event that you have or had a full 20 unit army and some units are really weak, you can always dismiss these units. I believe these units will be added back into the population of your territory. Might benefit you to dismiss the units rather than use them as bait on the battlefield. Step 5: Move - This ability allows you to transfer your units, yourself and your adviser to an adjacent owned territory. This is especially useful if you are defenseless or need to take command over another territory for any reason. It's also useful in case you need to change up your position on the front line. Step 6: Spy - For 1 action point, you can look at any enemy territory to see what they have. You can see everything from units to food, gold, infrastructure and what they earn or lose that turn. You can even see their loyalty. This helps you prepare best for what's ahead. Final Step: Declaring War This is probably the most fun aspect of the game because this is where you'll be making real progress to win the game. War begins the moment you begin preparing for it. Preparing for war requires a good amount of Units, Resources, Arms, Training and Generals. Lacking in any aspect will hurt you. For example: If you can't feed all your units, you may suffer from starvation which weakens your units and makes them less effective on the battlefield. Lacking in food can be detrimental to your full force and even cut you down by half or more. Without gold, you can't fund the war itself. Without training your men won't inflict any damage. Without Arms your men can't defend themselves. Without good combat ranked generals, you're going to lose whole units. Be prepared and have plenty always! My Strategy No matter which side of the battlefield you are on (Defending or Attacking) you can always focus on the King Legion. The King Legion always has the best troops on it. With this in mind, you need to adjust your offense/defense accordingly so that you can remove the King Legion. As a defender to an incoming attack I prepare my King Legion with my worst unit and only 1 unit. I use my King Legion as a decoy so that I can have my best units on my other Legions. I use my other Legions as ambush units in hopes to draw in the enemy King Legion for a 1 hit Kill. This immediately ends the attack on you and you have a chance to capture enemy units. Captured enemy units become yours. Captured generals are yours to choose what you do with. If the enemy King Legion doesn't go near the ambushes, I try to have my Legions chase the enemy King Legion. 2 Legions are too much for 1 Legion to handle especially when it's 8 units to 4 units and usually with alternating hits. If enemies get close to your King Legion, have your legion run around the battlefield. Usually, they go for the towns and castles first so you get a fair bit of distance. As an attacker I take a similar approach to defending. This time I try to move my legions around the map so that they have a clear shot at the enemy king legion. Even if my units have to spend 6 turns going around the enemy legions, it helps to have the first hit on the King Legion. I always equip my King Legion with 1 unit and focus 2-3 other legions on the King Legion. When up against a more powerful defender either by number of units, castle defense strength or at the edge of the map, I try to focus my units to eliminate enemy legions in number without losing units. I will put the best men on my King Legion when I am up against a powerful opponent because I want to win. Even if I need to control the battle myself. In the event that you can't win the battle or you know you will take heavy loses, FLEE asap. The longer you wait to flee, the less time you have to flee. Waiting might cause you to lose a legion with 4 units or your legions will automatically flee but to the wrong nearby territory. This can be a costly mistake even if you took no damage. Tricks Tips and Tactics you Need to Know Other Strategy When your territory is next to an enemy territory with maxed out units (Meaning Full Training, Full Arms and a Very Defensive location) consider attacking that territory with the intent to plunder the nearby towns and castles if possible. This option will weaken their people's loyalty each time you attack. By dropping your enemy's loyalty they run the risk of losing resources. Less gold means less units, less arms and they can't fund their army. Less food means they'll eventually run out and starve. When they have been deprived of their food and gold, they'll be weakened. This might make things quite a bit easier even if you only took a small loss from attacking. Tricks Tips and Tactics you Need to Know One More Thing Another strategy you can use in warfare is to send a single unit onto the battlefield. Your enemy will always send their full force. When they send their full force they're going to supply their men with as much food as possible. You can still plunder the towns if you want because the enemy won't chase you. The battle will eat away at the reserved food stores. By you attacking with a single unit, you save your own food reserves and deplete your enemy's. This in turn, destroys population loyalty so beware this method as well.? Things to Note Any units damaged through a battle will automatically heal at the end of the battle. They don't take away from your population and you don't lose training or arms. Having a unit with 1 man in it will be a full unit again after the war with no further loss. You can not attack allies! If you were proposed a treaty and accepted it, you must wait the full length of the treaty. This might cause issues on some scenarios if your ruler is slowly dying and you have 1 territory left to conquer or you can't beat Mongol Conquest within the time frame you need to. Generals will eventually die. Without a steady supply of good generals you may find yourself with weaker less loyal generals later into the game. Try giving the less loyal generals no units so that if they do proclaim independence then you're not hurting later. A single unit is all you need to conquer an undefended territory. Before you attack a territory you need to spy them. If you don't you might learn the hard way that they recruited too many more units than you can handle. Be smart about it. Minimize your losses. Never mix and match powerful units with weak units if you can help it. Weaker units die quickly so when they're gone, your better units are up against 4 enemy units. They'll quickly die too when it's 4 on 2. Promote your better generals to the better territories. I recommend you place war generals near the front lines and political generals behind the front lines. This allows political governors to focus on resources while your war generals focus on units. Combine this tactic with ordering territories to move resources and changing policies so that they give resources out and you'll quickly supply a new front on the war. If there are any questions or anything I might have left out, feel free to post a comment or message me on my profile. I've been playing this game since I was like 5 and that was 18 years ago so I've spent a considerable amount of time on this game. I can help. Enjoy the game! Red indicates each different element. Light Blue highlights each key factor of each element.. Yellow highlights other things to pay attention to. This color is bleeding through the rest of the thread and causes all non-yellow text to become yellow. Each section has "Tricks Tips and Tactics" labelled on it for specifics. A New Game This guide is designed to work as any nation for any of the 4 scenarios you can play. For newer/less experienced players, I recommend you play as Temujin/Genghis Khan as he is the original Khan that conquered most of the known world. I also recommend you begin your game in the Mongol Conquest Scenario. Temujin begins with access to powerful generals which will impact the game quite a bit. Other nations lack powerful generals. All AI will not use their better generals for war so they can not be captured or persuaded to join. The reason why I recommend you begin with Mongol Conquest is because you get to choose 8 generals and an adviser to take with you to the second scenario. You must unite the Mongolian Steppes before the year 1214 in order to proceed to the second scenario. Tayan Khan would be the easiest to play on the Mongol Conquest because he begins with 2 territories. This might be the ideal choice to start but lack of generals will bite you later.?Your choice matters! Looking for a challenge? Try playing Genghis Khan Scenario or Yuan Dynasty as empires other than Mongolia. Italy, England, Japan and others provide a more difficult game-play option. Empires in Europe have Knights but they're the most expensive unit in the game. Japan has Samurai and start with a weak country but very defensive landscape. Playing as Mongolia is too easy sometimes! Internal Affairs/Domestic Element This can be the most detrimental element to any game because it effects your economy and whether or not you can recruit from your population. A lower population will produce less gold in the winter and less food throughout the year. Because units cost 200 people each, you will need to establish a higher population to support a higher number of units.?A higher population produces more gold and food. Units cost maintenance every season and they eat your food. Without a higher population you'll limit your gold and food for war ?It is absolutely essential that you focus on your population first.?There are 2 major things that you need to worry about; Loyalty and Labor. 1. Loyalty - This factor 0 to 100 represents how loyal your people are to the empire. This effects whether or not your people will revolt against you. Any loyalty below 50 is at risk of a minor revolt ?to a major revolt. Lower loyalties means more units formed by your populace. When a revolt happens, you go to war and must kill the revolt. This takes away from your population by 200 per a unit. Because you have less people you reduce your production of food and gold. Because their loyalty is lower you also lose gold and food. A higher loyalty will make the people reproduce more each year. The more people you have, the more they reproduce and the more they produce. This helps keep your people from revolting and helps provide more for your empire. In turn, this also helps build your farming and infrastructure. Increasing loyalty will boost your farming, gold income and defenses to be more precise.? Loyalty can be reduced in several ways. The first method is through war when an enemy legion plunders your towns for supplies. AI will rarely or never do this but playing against another player can be used to cripple an economy. The second method is by taking gold from your people because you are in desperate need of gold. The 3rd method is by hazard referring to Drought, Blizzard, Typhoon or Epidemic. Epidemic can be the most killer of the hazards and sometimes lingers for several seasons when spreading. The last method is by recruiting units from your population which increases the more you recruit. The only way to boost loyalty is to gift your people gold, food or a specialty you possess. I always max out my loyalty before I do anything else. 2. Labor - This is allocated through 4 options from 0 to 100%. Farming, Herding, Specialty and City are the 4 options you can reallocate your population to work. Farming or Herding seems to have specific territories where they work especially well or especially poorly. Although you might reallocate herding into farming, you may need to invest in farming in order to maximize your income for food. Farming and Herding represent how your territory will earn their food. Specialty is used to sell your manufactured goods on the market. City builds your gold income through taxation. I always allocate my labor with zero in specialty and about 50% in city. I almost always leave herding and farming how they are. Sometimes I need to allocate farming into herding or herding into farming usually 10-40% 20-30% or 25-25% in various combinations between the 2. Altering this statistic too much seems to destroy your earned food income so I always try to leave it alone. I will alter the city income sometimes to be about 40, 45 or 55 but never anything above or lower because it might be too much or too little in relation to the food. Tricks Tips and Tactics you need to know Economic Element Believe it or not, a majority of your economy will come from the Domestic Element because this determines what your people will produce. Allocated Labor only effects the territory you reside in because when you move out of a territory the policies of a territory determine what that territory will produce in terms of labor and AI scr 1. Specialties - These can be bought and sold through the Market and produced by your people. There are 10 total specialties that can be produced. Each territory can only produce 1 specialty in particular. Furs, Silk, Jewelry and Textiles are among some of these that can be produced. Their value is determined by which Market you can buy and sell them from and the Rate. You can give specialties to your people as a gift to boost loyalty. 2. Rate - This is a number you see in the top right of every turn. It is a random number from turn to turn and it tends to rise and drop irrationally. It has a direct impact on the going rate within each Market. A going rate of .5 means that the costs of the goods are cut in half. Remember the terminology to buy low sell high? That's exactly what needs to be done in this game! A rate of 1.0 means that all prices are at normal. A rate of 2.0 means everything is doubled. A rate of 3.0 means prices are tripled. A key tip on this is to always try to have gold to purchase goods when the rate is really low and sell these when the rate is high, like 2.5 or higher. You might be able to turn a small purchase into a considerable profit. Always check the rate and when it's in your favor, try to earn money. 3. Market - There are 4 merchants in the market; Uigher, Chinese, Islamic and Venetian. These merchants have a home base they operate out of on each scenario. Chinese and Uigher appear in the Mongol Conquest but all of them are found on the world scenarios in the same places on each of the 3 world scenarios. These merchants have different values for each of the different goods you can buy and sell through the market. The worst thing about this is how they move from territory to territory. Sometimes you will have no merchants and sometimes you will have all 4. It's random and difficult to predict. The best use out of the market happens when you can buy and sell goods among multiple merchants. I always try to buy Silk from the Uigher or Chinese and sell Silk with the Venetian merchant no matter what the rate is. Ideally, a higher rate will reward a greater profit but even a low rate like .5 will still be fruitful when selling Silk with the Venetian merchant. This element helps provide quick cash but can't always be utilized if you're lacking in gold or merchants. I always try to buy and sell Silk or any gold earning specialties available to buy and sell at that time. Because the merchants have different values for the different goods, you will need to figure out which specialties can be bought low in one merchant and sold high in another. Sometimes you get a rate difference of .7 from buy to sell and sometimes you can earn double or more for what you paid. Also, you don't have to buy and sell in the same turn. Sometimes the rate falls in your favor at bad timing and you sacrifice some movement points to buy some goods. Waiting a few turns for a better rate can be very profitable especially when the rate jumps from .5 to 3.5. The highest rate I have ever seen is a 4.1. The last and potentially best aspect of the Market requires a great deal of gold and a very low rate. Mercenaries can be hired at a marked up rate. The best benefit of the mercenaries you hire is that it doesn't take away from your population at all. These units are better equipped than recruiting from your population so it is well worth hiring mercenaries. This also allows you to obtain some of the stronger units from foreign countries like Mongols, Samurai, Mameluke, etc. which aren't normally available in different parts of the world if you own some of those lands. Tricks Tips and Tactics You Need to Know Also focus gold toward cheap mercenaries. Whenever your market rate drops to .5 to .8 consider hiring mercenaries. They're just as good as recruiting. Don't forget to buy arms too. Generals/Personal This element of the game allows you to build a family and manage generals for a few tasks. Generals are a big influence on the game because they have loyalty and skills in certain aspects of the game. There are 4 areas that a general is ranked in; War, Politics, Leadership and Charm. War determines the general's skill in combat. Generals with an A in combat are superb warriors with increased offensive and defensive strength. Politics measures a general's abilities in governing a territory. I believe this grade represents the cost of each action. With an A grade you're ability to perform more actions. This will tie into the "Body" where you have a set number of points to expend each turn. In old age you lose points over time but your action cost remains the same. Leadership might measure training strength or abilities on the battlefield. I'm not entirely sure about this trait and how it effects the game but I've never needed it. Charm seems to have the ability to persuade enemies to give in to tribute demands, surrender or even switch sides. I've never convinced a general to switch sides even though i like to try. I have convinced enemy's to surrender when I have a considerable fighting force at my disposal. The person choice from the game's menu allows you to do several things; Make a Prince a General, Marry off a Daughter, Visit Family, Appoint Governor/Adviser and hire or fire a general. 1. The Family - Visiting the family allows you to talk with your wife and encourage offspring. If you have a son, he can grow up to become a general or if the ruler dies, I always focus on the family when there is nothing else I can do. Having 5 sons means 5 extra generals. They're always high ranking generals as well and some even have high body points to boot if the ruler ever dies. Having 5 daughters means marrying them off to your best generals. You don't want anyone to betray you if you can help it. 2. Appoint or Dismiss a General - Allows you to search through several generals in your current territory but the downside has you limited to 1 general for every action. I know there are certain awesome generals in specific territories and if you conquer that territory and they don't appear you'll need to search through the several generals or reconquer the territory to find them. Dismissing a general will fire that general from your command and they will stay in the territory you dismissed them in. I always attempt to recruit new generals especially when I know I was given a bad general upon capturing a new territory. There's always a need for more. I do dismiss bad generals and I do dismiss unloyal generals. 3. Appoint Governor or Adviser - Allows you to change the governor/adviser of another territory you control. For specific territories I will appoint an adviser with high political rank to help support investments and growth. I will do this in territories where the Governor is one of the ruler's sons, territories adjacent to enemies or territories with a high level of income. It benefits the empire when they can share the wealth or attack without being commanded to do so. Tricks Tips and Tactics you Need to Know Diplomacy This element is rather limited. You are able to forge alliances, demand tribute or demand surrender. In order for these to be successful it seems as though you need charm to be A rank and an considerable army to back you up. If you have a powerful army demanding tribute from a weak army, you'll increase the chances of taking 1/5 to 1/2 of their total gold. I've earned as much as 4000 gold from demanding tribute alone. You also increase the likeliness that your enemy will surrender. I've been able to force 6 territories controlled by a single empire to submit to me on one turn. I've also been able to force 4 different empires surrounding me to submit on back to back turns. Diplomacy only works with a powerful army and charming generals. Even if a general lacks in war or politics or leadership, there's a chance he'll be extremely useful with Charm. Never underestimate demanding surrender. You might have to demand surrender 5 times before it works once but if you do, you only gain generals, territories and strength. Forging allies works the same way except that it's only useful if nearby enemies are powerful or you don't want to fight a particular empire. Tricks Tips and Tactics you Need to Know Order This option allows the ruler to command other territories you own that you wouldn't normally command. Sometimes territories will refuse to do as you ask and other times they can't because they don't have what they need to perform the commanded tasks. This options allows you to command them to attack, send supplies or threaten another ruler. 1. Command Territory to Attack - Useful for forcing a territory to attack another, most likely weaker enemy territory. Sometimes you might command multiple territories to attack a territory they all touch just to be sure the war against that territory is won. Unfortunately, this does come with possible consequences. The enemy might defeat the invading territory and kill the attacking governor or adviser. Sometimes these are good generals that die. Upon defeat, other units can be captured and strengthen the enemy. I like to use this option whenever a territory will proclaim independence or whenever I need a troublesome territory gone, especially when one or more nearby territories are defenseless. This tool will be a matter of urgency during some games. 2. Command Territory to Send Troops - This is very useful for supplying your front lines with as many troops as possible. Doing so will prevent enemies from attacking your other territories. As your empire grows, so does your front lines. By claiming certain territories when your empire is large enough allows you to protect all your territories. This allows you to best protect them. Sometimes enemies might break through and attack 3-4 territories endangering your empire. More troops on the front lines prevents that from happening. 3. Command Territory to Send Supplies - Very useful tool similar to the Send Troops tool found above. This allows you to spread wealth and food so that less fortunate territories can provide or send these resources. 4. Command to Threaten Enemy Territory - Honestly, I never use this as it seems like a waste of time completely. This doesn't actually benefit you and it doesn't generally go anywhere. If you need to ally someone, your messenger can go anywhere. If you wanna threaten someone far away nearby your territory you can but it's up to the governor to decide which general they want to send. If they send a weaker general with no Charm, it won't work. I never need to use the Order commands unless I've conquered several territories. When the game has developed a little bit and armies are not doing anything in secure locations, I'll start focusing on the movements of troops and supplies. It isn't until later in the game that I command territories to begin attacking and only when I'm sure they can defeat the enemy I want to target. Tricks Tips and Tactics you Need to Know Policies Any time I gain ownership over a new territory I will decree a new policy for that territory, even at the start of the game. This requires an adviser to do. Policies help govern a territory while you're not in that territory. The benefit of this allows you to manage what the other territories are more likely to do. The other options in the policy tab allow you to let the adviser come up with new policies or change policies. The only one I want to focus on is the decree new policy tab. Decree New Policy - There are several things that this focuses on. Labor can be determined through a new policy, but doesn't change unless you actually change it for the territory which you reside in. Investments, Military and Stance are other options that can be changed as well. Investments includes Farming, City, Defenses or Balanced. Military determines Quality, Quantity, Arms or Balanced. Stance determines whether or not that territory will be more likely to surrender, give or attack. I always focus a new territory on producing food or gold depending on it's relation to where the enemies are nearby. I never want my territories to surrender so there's no need to have them submit by any means. The only other factor I worry about is the Arms, Quality and Quantity. This varies from territory to territory because each can be beneficial. In territories like Mongolia, I like to focus on Quality because the units produced there are most likely to be Mongols, which are arguably the most powerful units in the game. I will also have Japan focus on Quality because Samurai are arguably the most powerful as well. When certain territories are no longer on the front line, I will sometimes change some of their policies using the change policies option. This is less costly for action points since a policy is already in place. It helps manage the territory so that it might produce different units or send more resources out. Tricks Tips and Tactics you Need to Know War Preparation This is the biggest element of the game because it determines who's strong and who's weak. Over the course of the game you'll need to balance all the above elements in order to succeed in warfare. There are some times when you will need certain elements less than other elements but when it comes right down to the strategy, it's all about the war. In order to win the scenario, you need to conquer everyone. To do so, you need Resources, Units, People, Generals and Tactics. Step 1: Recruiting Units - This allows you to recruit units from within the territory you currently reside in. It costs 200 people from your population to recruit a full unit. These prices will never change and are always set how they are. The prices on the units are a general rule for their strength. Higher priced units are generally more effective in combat. All mounted units are more powerful than all infantry and siege. This option is best when you need units fast. If you go to the Bottom Right "Info" and Bottom Right again "Unit Types" you can see the unit chart. This chart lists all the units in the game and each of their strengths including spirit and mobility as well. The top symbol represents the "Near" attack. The second symbol represents the "Charge" attack. The 3rd symbol is the "Ranged" attack. The last symbol might be defense, although I am unsure. Elephants are the best in the defense symbol (The 4th). Samurai are ranked A in near attack. Archers (Egyptian Horse Archers) are ranked A in ranged. Knights are ranked A in charge. Catapults have a red A in range. Each unit has different stats and are damaged differently. I'm not totally sure how these effect each other when units attack each other, but I consider what I can recruit at the time. Use the chart to determine what's best for you. I don't even know what the red A is but I think it means it can cripple a unit's spirit. Step 2: Training - After you've recruited a new unit, it will require training. Training is measured from 0 to 100 but the lowest I've seen in training is 20. Anything below 90 is never ready for the battlefield because it's never enough. Always focus on training so that you're ready for war. Whether you are attacked or do the attacking, training is the key to victory. Step 3: Send Supplies - If you are full with supplies from a recent victory you can always send supplies to another territory you own. Anything over 9,999 will be lost so it's always better to share. Step 4: Dismiss Units - In the event that you have or had a full 20 unit army and some units are really weak, you can always dismiss these units. I believe these units will be added back into the population of your territory. Might benefit you to dismiss the units rather than use them as bait on the battlefield. Step 5: Move - This ability allows you to transfer your units, yourself and your adviser to an adjacent owned territory. This is especially useful if you are defenseless or need to take command over another territory for any reason. It's also useful in case you need to change up your position on the front line. Step 6: Spy - For 1 action point, you can look at any enemy territory to see what they have. You can see everything from units to food, gold, infrastructure and what they earn or lose that turn. You can even see their loyalty. This helps you prepare best for what's ahead. Final Step: Declaring War This is probably the most fun aspect of the game because this is where you'll be making real progress to win the game. War begins the moment you begin preparing for it. Preparing for war requires a good amount of Units, Resources, Arms, Training and Generals. Lacking in any aspect will hurt you. For example: If you can't feed all your units, you may suffer from starvation which weakens your units and makes them less effective on the battlefield. Lacking in food can be detrimental to your full force and even cut you down by half or more. Without gold, you can't fund the war itself. Without training your men won't inflict any damage. Without Arms your men can't defend themselves. Without good combat ranked generals, you're going to lose whole units. Be prepared and have plenty always! My Strategy No matter which side of the battlefield you are on (Defending or Attacking) you can always focus on the King Legion. The King Legion always has the best troops on it. With this in mind, you need to adjust your offense/defense accordingly so that you can remove the King Legion. As a defender to an incoming attack I prepare my King Legion with my worst unit and only 1 unit. I use my King Legion as a decoy so that I can have my best units on my other Legions. I use my other Legions as ambush units in hopes to draw in the enemy King Legion for a 1 hit Kill. This immediately ends the attack on you and you have a chance to capture enemy units. Captured enemy units become yours. Captured generals are yours to choose what you do with. If the enemy King Legion doesn't go near the ambushes, I try to have my Legions chase the enemy King Legion. 2 Legions are too much for 1 Legion to handle especially when it's 8 units to 4 units and usually with alternating hits. If enemies get close to your King Legion, have your legion run around the battlefield. Usually, they go for the towns and castles first so you get a fair bit of distance. As an attacker I take a similar approach to defending. This time I try to move my legions around the map so that they have a clear shot at the enemy king legion. Even if my units have to spend 6 turns going around the enemy legions, it helps to have the first hit on the King Legion. I always equip my King Legion with 1 unit and focus 2-3 other legions on the King Legion. When up against a more powerful defender either by number of units, castle defense strength or at the edge of the map, I try to focus my units to eliminate enemy legions in number without losing units. I will put the best men on my King Legion when I am up against a powerful opponent because I want to win. Even if I need to control the battle myself. In the event that you can't win the battle or you know you will take heavy loses, FLEE asap. The longer you wait to flee, the less time you have to flee. Waiting might cause you to lose a legion with 4 units or your legions will automatically flee but to the wrong nearby territory. This can be a costly mistake even if you took no damage. Tricks Tips and Tactics you Need to Know Other Strategy When your territory is next to an enemy territory with maxed out units (Meaning Full Training, Full Arms and a Very Defensive location) consider attacking that territory with the intent to plunder the nearby towns and castles if possible. This option will weaken their people's loyalty each time you attack. By dropping your enemy's loyalty they run the risk of losing resources. Less gold means less units, less arms and they can't fund their army. Less food means they'll eventually run out and starve. When they have been deprived of their food and gold, they'll be weakened. This might make things quite a bit easier even if you only took a small loss from attacking. Tricks Tips and Tactics you Need to Know One More Thing Another strategy you can use in warfare is to send a single unit onto the battlefield. Your enemy will always send their full force. When they send their full force they're going to supply their men with as much food as possible. You can still plunder the towns if you want because the enemy won't chase you. The battle will eat away at the reserved food stores. By you attacking with a single unit, you save your own food reserves and deplete your enemy's. This in turn, destroys population loyalty so beware this method as well.? Things to Note Any units damaged through a battle will automatically heal at the end of the battle. They don't take away from your population and you don't lose training or arms. Having a unit with 1 man in it will be a full unit again after the war with no further loss. You can not attack allies! If you were proposed a treaty and accepted it, you must wait the full length of the treaty. This might cause issues on some scenarios if your ruler is slowly dying and you have 1 territory left to conquer or you can't beat Mongol Conquest within the time frame you need to. Generals will eventually die. Without a steady supply of good generals you may find yourself with weaker less loyal generals later into the game. Try giving the less loyal generals no units so that if they do proclaim independence then you're not hurting later. A single unit is all you need to conquer an undefended territory. Before you attack a territory you need to spy them. If you don't you might learn the hard way that they recruited too many more units than you can handle. Be smart about it. Minimize your losses. Never mix and match powerful units with weak units if you can help it. Weaker units die quickly so when they're gone, your better units are up against 4 enemy units. They'll quickly die too when it's 4 on 2. Promote your better generals to the better territories. I recommend you place war generals near the front lines and political generals behind the front lines. This allows political governors to focus on resources while your war generals focus on units. Combine this tactic with ordering territories to move resources and changing policies so that they give resources out and you'll quickly supply a new front on the war. If there are any questions or anything I might have left out, feel free to post a comment or message me on my profile. I've been playing this game since I was like 5 and that was 18 years ago so I've spent a considerable amount of time on this game. I can help. Enjoy the game! -------------------- |
Perma Banned
Affected by 'Laziness Syndrome'
Registered: 07-22-11
Location: Ohio, USA
Last Post: 3958 days
Last Active: 3958 days
| Tactician |
Affected by 'Laziness Syndrome'
Registered: 07-22-11
Location: Ohio, USA
Last Post: 3958 days
Last Active: 3958 days
(edited by Fireproof on 06-24-14 07:44 PM) Post Rating: 1 Liked By: MysteryMan007,
11-19-14 12:28 AM
MysteryMan007 is Offline
| ID: 1105799 | 41 Words
| ID: 1105799 | 41 Words
MysteryMan007
Level: 32
POSTS: 127/205
POST EXP: 8714
LVL EXP: 193042
CP: 3337.7
VIZ: 38786
POSTS: 127/205
POST EXP: 8714
LVL EXP: 193042
CP: 3337.7
VIZ: 38786
Likes: 1 Dislikes: 0
Fireproof : A Genghis Khan game? And this is part two? Who would have imagined! I'm shocked, amazed and thrilled at the same time. Honest to goodness I did not imagine I would see a game based off of someone like him. -------------------- |
Member
Affected by 'Laziness Syndrome'
Registered: 08-16-14
Last Post: 4182 days
Last Active: 388 days
Affected by 'Laziness Syndrome'
Registered: 08-16-14
Last Post: 4182 days
Last Active: 388 days
Post Rating: 1 Liked By: Fireproof,
11-19-14 09:47 AM
Fireproof is Offline
| ID: 1105855 | 54 Words
| ID: 1105855 | 54 Words
Fireproof
Level: 49
POSTS: 461/518
POST EXP: 219650
LVL EXP: 870099
CP: 11910.6
VIZ: 4005769
POSTS: 461/518
POST EXP: 219650
LVL EXP: 870099
CP: 11910.6
VIZ: 4005769
Likes: 1 Dislikes: 0
MysteryMan007 : Somebody sounds like a fan of history or Genghis Khan! If you haven't played the game yet, you should. It's old and very retro but if you enjoy a decent strategy game, it can be pretty fun and challenging. I only wish the AI were a little smarter and better risk takers xD -------------------- |
Perma Banned
Affected by 'Laziness Syndrome'
Registered: 07-22-11
Location: Ohio, USA
Last Post: 3958 days
Last Active: 3958 days
| Tactician |
Affected by 'Laziness Syndrome'
Registered: 07-22-11
Location: Ohio, USA
Last Post: 3958 days
Last Active: 3958 days
Post Rating: 1 Liked By: MysteryMan007,
11-19-14 12:24 PM
MysteryMan007 is Offline
| ID: 1105898 | 63 Words
| ID: 1105898 | 63 Words
MysteryMan007
Level: 32
POSTS: 130/205
POST EXP: 8714
LVL EXP: 193042
CP: 3337.7
VIZ: 38786
POSTS: 130/205
POST EXP: 8714
LVL EXP: 193042
CP: 3337.7
VIZ: 38786
Likes: 0 Dislikes: 0
Fireproof : Well, yeah, I do enjoy a wide range of game genres but I guess I am inclined toward the single-player games based on older historic time periods. To top it off it's based on a historic figure and it's a strategy game, yup you pretty much nailed it! I'm sure it's as fun as it could be for it's time and limitations. -------------------- |
Member
Affected by 'Laziness Syndrome'
Registered: 08-16-14
Last Post: 4182 days
Last Active: 388 days
Affected by 'Laziness Syndrome'
Registered: 08-16-14
Last Post: 4182 days
Last Active: 388 days
