

 User Notice
 Forum Links
Guide: Fire Emblem: Awakening - Death's Embrace (Hard mode)
This is one of my several strategy guides for getting through some of the harder DLC chapters (if the admins would allow me posting these guides, of course ;)).
This is one of my several strategy guides for getting through some of the harder DLC chapters (if the admins would allow me posting these guides, of course ;)).
Play Fire Emblem: Awakening Online

Thread Information
Views
1,120
Replies
0
Rating
0
Status
OPEN
Thread
Creator
Creator
pokepower101
01-06-14 01:02 AM
01-06-14 01:02 AM
Last
Post
Post
pokepower101
01-06-14 01:02 AM
01-06-14 01:02 AM
System
9.5
Views: 508
Today: 0
Users: 0 unique
Today: 0
Users: 0 unique
Thread Actions


Order
Fire Emblem: Awakening - Death's Embrace (Hard mode)
Game's Ratings
Overall
Graphics
Sound
Addictiveness
Depth
Story
Difficulty
Average User Score
9.5
8.6
8.6
7.8
8.4
8.6
6
01-06-14 01:02 AM
 pokepower101 is Offline
| ID: 954733 | 1008 Words
pokepower101 is Offline
| ID: 954733 | 1008 Words
 pokepower101 is Offline
| ID: 954733 | 1008 Words
pokepower101
Level: 39


POSTS: 281/289
POST EXP: 11842
LVL EXP: 376565
CP: 1042.3
VIZ: 110194

POSTS: 281/289
POST EXP: 11842
LVL EXP: 376565
CP: 1042.3
VIZ: 110194
Likes: 0 Dislikes: 0
Death's Embrace is quite possibly one of the hardest DLC maps in the entire game. As such, it deserves to be one of the DLCs that lead you on the "Path of a Grandmaster." Now, as should be obvious, there are major spoilers for those who either do not have this game or do not have this DLC chapter, so view at your own risk.
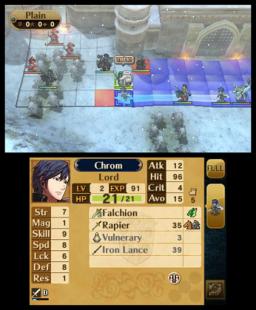
Map Summary: For this map, you bring Chrom and 11 other units trying to beat Algol under a certain amount of turns to get Est (TRIVIA: Algol is also the boss of chapter 21 in the main story). However, the center of the map is garnished with spikes that will leave any units starting on said panels with one HP, as well as any other units (enemy or ally) that remain on the panels at the end of the turn. Meanwhile, there are nine panels in the center that will fully heal all units, even if they are paired up. On top of this, several enemies pack Vengeance, so you will take severe damage if you get hit by an enemy that proc'd Vengeance if you are not prepared, so this map is VERY difficult if you go in without Limit Breaker from Rogues and Redeemers 3! Things to watch out for: As I have previously established, several units pack Vengeance, but it's mainly the Assassins, Berserkers, Warriors, and the demon soldier summoned by Algol at the start of the map. Another thing is that almost EVERY class has at least one breaker. Swordmasters, Warriors, Berserkers, and Snipers (if I remember correctly) all have Swordbreaker, Sorcerers and Heroes tend to have Bowbreaker, and Heroes will all Have Axebreaker along with the soldier near the boss. With regards to the Swordbreaker skill, however, your swordsmen will be almost useless in this map, especially if all they can use is a sword (i.e. Swordmasters). Also, reinforcements will pop up just about every single turn, so you will be under fire constantly throughout the map. Another thing to keep in mind with the Sorcerers and the Snipers is that Sorcerers can pack Mire, so they can snipe you and kill you after being bludgeoned by spikes if you can't dodge it or if your resistance isn't high enough to tank the hit, and Snipers can carry Longbow, hindering your ability to counterattack, and you pretty much need Bowbreaker to avoid damage, because every enemy has forged weapons aside from the Mire Sorcerers. Here are some skills that can help you with this map if you're having trouble (Galeforce excluded for obvious reasons (it's useful everywhere barring Double Duel)): 1. Vantage: Since several of your units are forced down to 1 HP as soon as the map starts, this skill can help you in a pinch if you are able to defeat the enemy (which you more than likely can). However, against Longbow users and Mire users, you're a sitting duck, so be wary. 2. Vengeance: You WANT your units to get this skill AND Vantage if you have any units other than the avatar and Morgan that can get it. If you have 50+ skill, this skill will activate every time (you will want to unequip other proc able skills to ensure Vengeance words every time), allowing you to punish the enemy before they can try to land a hit on you assuming you have Limit Breaker and Vantage equipped. 3. Lifetaker: If you're low on health you can sap what's left of a butchered enemy and heal half of your max HP in one fell swoop, which can save your life should you decide to keep the unit moving along the borders of the map. Keep in mind that this will lower the added damage to Vengeance and it will more than likely hinder Vantage completely if you plan to remain on the spikes to reduce enemy fire. 4. Limit Breaker: Boosted caps are always a helpful thing, right? 5. Deliverer: Considering that you have a turn limit, having a lot of extra movement is a huge boost, especially if travelling along the border. However, if both units have Galeforce at the same time any one of them has Deliverer, you can go through the spiked area and get to Algol in two turns or less. 6. Bowbreaker: Makes it easier to dodge Longbow Snipers. 7. Tomebreaker: Makes it easier to dodge Mire Sorcerers. 8. Dual Guard+: Dual guards are ESPECIALLY helpful if you're out of range of attacks that could potentially kill your units, and every extra percentage helps. 9. Dual Support+: Gives you some extra avoidance when paired with another unit (very helpful if both units are at A or S-support). Other tips: Classes with high movement, such as Paladins, are very useful in getting to Algol very quickly, and they can use lances, which is useful since no units pack Lancebreaker. They also have pretty good defenses and avoidance to either dodge or tank hits from Mire or Longbows. Dread Fighters and Sorcerers also have relatively good defense, though their resistance is better, allowing them to take in a few hits if they have more than 1 HP from using Physic or Fortify. Another thing that will save your life is having pair up units that can boost either defenses (Generals and Wyvern Lords provide big boosts in defense and Falcon Knights can well boost resistance). While higher speed and luck may help boost avoidance, all percentages are lethal, as you can easily get sucker punched by an unlucky hit, as can be seen by this video (video uploaded by shadowofchaos725 of Youtube): . That's the end of this DLC guide! I'll have more strategy guides up in the coming days, so be sure to look around. Until then, adieu! EDIT: Removed the spoiler marks. I didn't know that it would all black out if I put those. I just thought there would be a bar that said "Show Spoilers" or something like that. Oh, well. 
Image upload: 640x480 totaling 53 KB's. Map Summary: For this map, you bring Chrom and 11 other units trying to beat Algol under a certain amount of turns to get Est (TRIVIA: Algol is also the boss of chapter 21 in the main story). However, the center of the map is garnished with spikes that will leave any units starting on said panels with one HP, as well as any other units (enemy or ally) that remain on the panels at the end of the turn. Meanwhile, there are nine panels in the center that will fully heal all units, even if they are paired up. On top of this, several enemies pack Vengeance, so you will take severe damage if you get hit by an enemy that proc'd Vengeance if you are not prepared, so this map is VERY difficult if you go in without Limit Breaker from Rogues and Redeemers 3! Things to watch out for: As I have previously established, several units pack Vengeance, but it's mainly the Assassins, Berserkers, Warriors, and the demon soldier summoned by Algol at the start of the map. Another thing is that almost EVERY class has at least one breaker. Swordmasters, Warriors, Berserkers, and Snipers (if I remember correctly) all have Swordbreaker, Sorcerers and Heroes tend to have Bowbreaker, and Heroes will all Have Axebreaker along with the soldier near the boss. With regards to the Swordbreaker skill, however, your swordsmen will be almost useless in this map, especially if all they can use is a sword (i.e. Swordmasters). Also, reinforcements will pop up just about every single turn, so you will be under fire constantly throughout the map. Another thing to keep in mind with the Sorcerers and the Snipers is that Sorcerers can pack Mire, so they can snipe you and kill you after being bludgeoned by spikes if you can't dodge it or if your resistance isn't high enough to tank the hit, and Snipers can carry Longbow, hindering your ability to counterattack, and you pretty much need Bowbreaker to avoid damage, because every enemy has forged weapons aside from the Mire Sorcerers. Here are some skills that can help you with this map if you're having trouble (Galeforce excluded for obvious reasons (it's useful everywhere barring Double Duel)): 1. Vantage: Since several of your units are forced down to 1 HP as soon as the map starts, this skill can help you in a pinch if you are able to defeat the enemy (which you more than likely can). However, against Longbow users and Mire users, you're a sitting duck, so be wary. 2. Vengeance: You WANT your units to get this skill AND Vantage if you have any units other than the avatar and Morgan that can get it. If you have 50+ skill, this skill will activate every time (you will want to unequip other proc able skills to ensure Vengeance words every time), allowing you to punish the enemy before they can try to land a hit on you assuming you have Limit Breaker and Vantage equipped. 3. Lifetaker: If you're low on health you can sap what's left of a butchered enemy and heal half of your max HP in one fell swoop, which can save your life should you decide to keep the unit moving along the borders of the map. Keep in mind that this will lower the added damage to Vengeance and it will more than likely hinder Vantage completely if you plan to remain on the spikes to reduce enemy fire. 4. Limit Breaker: Boosted caps are always a helpful thing, right? 5. Deliverer: Considering that you have a turn limit, having a lot of extra movement is a huge boost, especially if travelling along the border. However, if both units have Galeforce at the same time any one of them has Deliverer, you can go through the spiked area and get to Algol in two turns or less. 6. Bowbreaker: Makes it easier to dodge Longbow Snipers. 7. Tomebreaker: Makes it easier to dodge Mire Sorcerers. 8. Dual Guard+: Dual guards are ESPECIALLY helpful if you're out of range of attacks that could potentially kill your units, and every extra percentage helps. 9. Dual Support+: Gives you some extra avoidance when paired with another unit (very helpful if both units are at A or S-support). Other tips: Classes with high movement, such as Paladins, are very useful in getting to Algol very quickly, and they can use lances, which is useful since no units pack Lancebreaker. They also have pretty good defenses and avoidance to either dodge or tank hits from Mire or Longbows. Dread Fighters and Sorcerers also have relatively good defense, though their resistance is better, allowing them to take in a few hits if they have more than 1 HP from using Physic or Fortify. Another thing that will save your life is having pair up units that can boost either defenses (Generals and Wyvern Lords provide big boosts in defense and Falcon Knights can well boost resistance). While higher speed and luck may help boost avoidance, all percentages are lethal, as you can easily get sucker punched by an unlucky hit, as can be seen by this video (video uploaded by shadowofchaos725 of Youtube): . That's the end of this DLC guide! I'll have more strategy guides up in the coming days, so be sure to look around. Until then, adieu! EDIT: Removed the spoiler marks. I didn't know that it would all black out if I put those. I just thought there would be a bar that said "Show Spoilers" or something like that. Oh, well.
Image upload: 640x480 totaling 53 KB's. ____________________ |
Member
Affected by 'Laziness Syndrome'
Registered: 05-24-10
Last Post: 4047 days
Last Active: 2992 days
Affected by 'Laziness Syndrome'
Registered: 05-24-10
Last Post: 4047 days
Last Active: 2992 days
(edited by pokepower101 on 01-06-14 11:48 PM)
