

 User Notice
 Forum Links

Thread Information
Thread Actions


Order
Digimon Racing Master Guide
01-28-23 08:25 PM
 EX Palen is Online
| ID: 1401203 | 5431 Words
EX Palen is Online
| ID: 1401203 | 5431 Words
 EX Palen is Online
| ID: 1401203 | 5431 Words
EX Palen
Spanish Davideo7
Spanish Davideo7
Level: 145


POSTS: 5932/6622
POST EXP: 1216318
LVL EXP: 37240878
CP: 196590.7
VIZ: 11505658

POSTS: 5932/6622
POST EXP: 1216318
LVL EXP: 37240878
CP: 196590.7
VIZ: 11505658
Likes: 0 Dislikes: 0
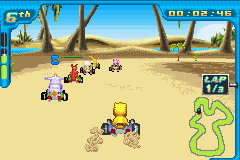
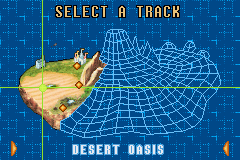
One of the things we have to thank Mario Kart for, is for having opened the can to the great genre of fantasy kart racing. Not only did it pave the way for future respected games: many franchises started putting their characters in frantic car races with eccentric power-ups inspired on the franchise itself around race tracks with incredibly varied designs, also inspired on locations of the franchise itself. A movement that was initiated in the late 90s and bloomed greatly in the 2000s, still brimming with activity nowadays without having needed to change much, a testament to just how successful the formula is. Of the many franchises that jumped the wagon, one of them was Digimon. Known for its popular anime series as well as for its venture into videogames, it was a matter of time before these creatures also took on kart racing around the Digital World they inhabit. And of course, like always, with some twists specific to this franchise. And like many others, it was a one-off venture into a different gaming genre that didn’t catch on and thus produced no sequels. Now that we’ve covered the background information, we should start getting serious. Starting off Being released for the Game Boy Advance, the game doesn’t have extremely difficult controls. Contrary to other games of its genre, it didn’t have any way of drifting, thus requiring normal turning to go around the course. It did include the ability to jump to avoid obstacles and what not, but the rest of controls are simply for accelerating, braking and using power-ups. The game includes 11 playable characters, eight of them available from the start and three more being unlockable. All protagonists from the first series anime are here, and the unlockable characters are from the three spin-offs airing after it. Not the best way to represent what was by then already a big franchise, but it’s not like it was the only time they did this. The game also includes turbo pads, which grant a nice speed boost to whomever passes over them. Several hazards exist on track, as well as rough surfaces slowing you down. Despite having a track map, the game also displays the upcoming turns as if we were in some sort of rally game, so getting familiar with the 12 tracks and their layouts is much easier. Digivolution The big twist of this game is also the most unique aspect of the franchise itself: digivolution. Characters will always start in their Rookie levels, their most known standard form, though they can digivolve into the Champion stage as the race goes on. This is done by absorbing fractal code in specific zones of the track, which are black patches with white-lined squares like you can see in the image below.  Passing over those zones fills your fractal meter, which you can see to the left of the previous image. You can see three very distinct sectors in that meter, these determine the level of your Digimon. You always start with half the second sector full, reaching the third sector will enable your Digimon to evolve. Likewise, if the meter falls back to the middle sector your Digimon will downgrade to Rookie again, and should it fall to the lowest sector, your Digimon will downgrade further into their In-Training stage. Digivolution is important because it strengthens the stats of your Digimon, thus enabling it to go faster around the track, and obviously In-Training Digimon have worse stats than their standard Rookie form. Additionally, each Digimon gains a unique power-up when the meter is fully charged to use before any power-up collected from crates, which adds a bit more of spice to the mix. You might be asking how exactly can the meter empty down. Well, using power-ups requires some fractal code which means you can de-digivolve after using one. The unique power-ups of Champion Digimon consume nearly the full third sector, so if you don’t pay attention to your meter you may find yourself de-digivolving by accident. Bumping into hazards and other Digimon, by crashing or jumping into them, also lowers your meter. Finally, being hit by an opponent’s power-up also reduces your meter significantly, so if you can manage to stay out of trouble in all senses you might remain in your fastest form. One note to be made is that the standard level for the fractal meter is halfway into the middle sector, which is the starting point in every race. Falling below that means the meter will slowly refill by itself until reaching that “safe point” again. With this, even if you fall down to the In-Training stage, you won’t spend much time in it as it automatically refills after a few seconds, but you will still lose a precious time being incredibly slow. This fractal meter means you probably won’t abuse power-ups in this game as in other ones, but there’s yet another quirk: power-ups are not kept, and every time you break a crate you can get a new one to replace the one you were holding. It can be very troublesome if you’re not used to this quirk, as you might believe you have a certain power-up when in reality you have a different one, and also because avoiding the crates on purpose isn’t precisely easy either as they’ve been mostly placed in the way of the racing line. Perhaps quirks like these are what killed the potentially good popularity this game could have bolstered. Power-ups Speaking of power-ups, better to start off with them. The game itself features seven standard power-ups, which can be collected from the crates scattered all around the track. While they can be quite simple, sometimes they can perfectly turn the tides in a race if played masterfully. Turbo Boost  The most standard power-up, the classic speed boost. Has the same effect as passing over a turbo pad, so its effects are quite brief. Fractal Boost  This power-up refills instantly your fractal meter to the top. This means immediate access to the Champion level and its specific power-up. Of course, it’s very rare to see it appear and will happen only when at the back of the field. Shield  The only defensive power-up is a shield that protects of any projectile for a few seconds, be it power-ups fired by other racers or anything track hazards launch at you. Also rare to appear, and only useful if you manage to keep it until being at the front. Bomb  The traditional power-up that’s left behind the racer for the incoming opponents. The bomb is left right in the spot and detonates itself when a full lap has passed, meaning you won’t see them piling up around the track as laps go by. Lightning Strike  Probably the deadliest power-up, because the lightning strike hits all racers ahead of you no matter the distance. Last one of the rare power-ups to appear, and only useful when at the back of the field. Energy Blast  A standard, blue-colored projectile that encases the opponent in a blue bubble for a short while before dropping them back to the racetrack. Quite common to appear, but sadly it travels in a fully straight line so you’ll have to polish your aim for it to work properly. Fire Blast  A red-colored variant of the standard Energy Blast. It’s an empowered version that tracks down the opponent right ahead of you, eliminating the need to aim and with all the other effects of the standard version. Characters    Fully balanced stats, as expected from the protagonist. Greymon’s special power-up is Nova Blast, an enhanced version of the standard Fire Blast seen above.  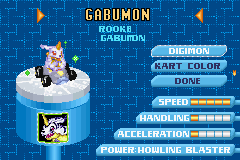  Terrible handling and acceleration, but once it gets rolling it’s almost unstoppable. Garurumon’s special power-up is Howling Blaster, another enhanced version of the standard Fire Blast.  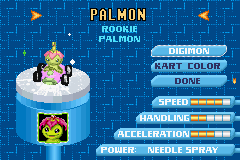  Decent handling and superior top speed, one of the powerhouses of the game. Togemon’s special power-up is Needle Spray, a variation of the standard Energy Blast in which three projectiles are fired simultaneously, one straight ahead and the other two diagonally to each side.    Handling is below average, but its acceleration is impressive. Angemon’s special power-up is Hand of Fate, a variation of the standard Lightning Strike in which only the racer right ahead of you is hit.    Best handling in the whole game, though lacks a bit of speed. Kabuterimon’s special power-up is Electric Shocker, yet another variation of the standard Fire Blast.    Incredible acceleration, but gets penalized in handling and top speed. Birdramon’s special power-up is Fire Burst, which starts as a variation of the standard Turbo Boost but apparently also has the effects of a shield for a short time afterwards.    While mostly balanced, handling shines a bit brighter than its other stats. Gatomon’s special power-up is Cat’s Eye Hypnotism, which affects only the racer ahead of you and temporarily inverts its controls.    Much better handling than its stats show and also quite fast. Ikkakumon’s special power-up is Harpoon Torpedo, another variation of the standard Energy Blast in which three projectiles are fired in quick succession.    Mostly balanced, but excels in acceleration. Growlmon’s special power-up is Pyro Blaster, a variation of the standard Lightning Strike that only affects the driver immediately ahead of you.    Quite fast and it also has nice handling. Flamedramon’s special power-up is Flame Shield, as you can guess by its name, it’s a variation of the standard Shield.   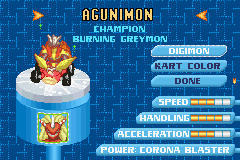 Balanced, but doesn’t have as much handling as its stats show. BurningGreymon’s special power-up is Corona Blaster, one last variation of the standard Fire Blast. Tracks Finally, the boiling point of this guide. Tracks in this game are divided into three sectors of the Digital World. The first sector is mostly a desert with a couple towns in it, the second is a coastal jungle that also covers an icy are up north, and the third one revolves around a mountainous zone and its altitude. As you can see, ambients are very varied and so will track hazards. There are also three more levels in this game, which are Boss battles. They won’t be included in this guide because they revolve around staying out of the incoming attacks and taking advantage when the boss is tired, using the same power-ups as in tracks. They are quite simple and much easier than winning races or cups, so I’ll be skipping them entirely. Desert Oasis An arid scenery to start with, not being truly an oasis but rather a pond with some trees around it. Stay away from the sand outside track limits, it slows you down and if you go too far away you may fall into a sand pit. Right after the start, we encounter a right hairpin that leads us into a left-right chicane. A short straight bending to the right has the first set of crates before a nearly 90-degrees right turn. There’s a wide fractal zone to the left before the track turns left into a short straight, crossing the pond through a natural path. After crossing you can see Chuumon going from side to side of the track, dancing at Etemon’s guitar solo, needless to say you have to avoid them and continue up ahead. We keep going right and we enter the longest straight of the track with an enormous fractal zone. After it, another smooth turn to the right to encounter the second set of crates. Another wide fractal zone is ahead as we enter a tight left-right chicane before heading to one las left dogleg to cross the finish line. Toy Town We enter the city to lap a fully-fledged circuit like if it was real life: an asphalt track with kerbs and grass/gravel runoffs in the outside, and also a wall like in early Mario Kart games to serve as solid limits and avoid turn cutting. Turbo pads make their debut here, and all along the course lay Numemon spread out which you must avoid at all costs to keep your pace going, or they’ll crash directly into your screen. Right after the start we encounter a long left hairpin, and we can already see the Numemon we’ll encounter throughout the track calmly standing by. A right bend leads to a very wide straight, with a set of crates on the left side and also a small fractal zone before a second right bend. The upcoming straight has two wide turbo pads before a smooth left bend. The next straight also has three turbo pads, this time aligned to the left and shrinking in size. A very long left hairpin follows, after which we see a fractal zone to the right. A tight right hairpin comes next, leading to the second set of crates also aligned to the left, anticipating the upcoming left bend. After it, another left bend takes us to a two-way route, a very long fractal zone on the right and a couple turbo pads on the left. A long right-left chicane follows, with a much tighter left-right-left combination following after. One last left turn, with a turbo pad on the right side, leads to the finish line. Desert Cliffs We start to get dangerous with this track, as certain sections have no run-off and directly make you fall down the cliff. You will also encounter two troublesome track hazards, and avoid the cactus in the track limits or you will be knocked back heavily. The start is located in the longest straight, which immediately after the line turns into a bridge of sorts over the canyon. It has no walls and a hole in the left side, so extreme caution here. After the bridge comes the first set of crates as we start turning left into a tight left-right chicane. We keep turning right and then a left bend leads to a short straight with a long fractal zone. We turn left for the second set of crates, and a second left turn presents a short straight with the first track hazard: a couple of Ponchomon at each side of the track passing a gigantic boulder to one another by rolling it across the track. Avoid the boulder and continue ahead to a long right hairpin. At the end of the short straight there’s a fractal zone to the right just as the track turns sharply left at the edge of the cliff. Minding the cliff to the right, we continue straight and encounter another set of crates before the track snakes a bit. The next straight has a fractal zone to the right and two more Ponchomon rolling a boulder to one another, this time in a different angle and thus being harder to avoid. After turning left leaving behind the Ponchomon, we turn right and return to the edge of the cliff before a sharp left turn returns us to the start/finish straight. Swamp Bog We’re now on a foggy swamp, on a track that twirls around heavily. Track limits in this track mean drowning in the swamp, so avoid going off-limits at all costs. You will also encounter a few track hazards and even shortcuts, so in all it will be an accident-filled lap. After the watery start, a long right hairpin leads to an enormous fractal zone. A sharp right hander takes us to a jump to cross over the track with another sharp right turn coming after, so watch your speed here if you don’t want to take a dip. A left turn takes us to a diagonal straight, surrounded by small ponds guarded by Piximon who won’t hesitate to pester you if you get too close to them. The first set of crates precedes a sharp right turn, after which a left bend takes us to another 90-degrees right turn. We now perform a tight right hairpin to take another jump and cross over the track again, landing on a very long fractal zone. A right bend precedes a never ending left turn, and after it a tight right hairpin. A short straight leads to a left turn, after which we encounter again a few Piximon not fond of intruders. You can skip this section by jumping into safe isles amidst the water, which you can encounter right before finishing the hairpin on the left side and rejoin the track bypassing the Piximon. A right turn takes us to the second set of crates, and after them just the last couple left handers which take us to the start/finish straight. It should be noted the line is quite away from the last turn, allowing for late time passes heading into the straight. Jungle Ruins Staying away from the desert, we go now to the jungle. We traverse some ruins amidst a lake, and while the track is treacherous it’s in no way as dangerous as the past two. Track hazards start to become prominent, but still avoidable with ease. A harmless stream of water crosses the track right after the finish line as we head into the first turn. This is a very elongated left turn that straights up in the last part before heading into the first set of crates and immediately after a tight left-right chicane. A left dogleg takes us to a short straight with a turbo pad on the right side and over a bridge to cross the lake. A long fractal zone can be seen ahead of the bridge on the left side even after the track turns right. A smooth right hander precedes a very tight left hairpin, with a turbo pad at the right side of its exit. The upcoming short straight ends with the second set of crates preceding a right bend which immediately after turns into a sharp left hairpin. The track tightens in the upcoming left-bending stretch as we see several Digitamamon moving from side to side to the track, which must be avoided or jumped over. Once the track widens again a right bend takes us to the last set of crates and a sharp left hairpin. It leads us to the main straight, with three turbo pads before reaching the finish line at the left, right and left sides of the track respectively. Coastline We now drive around the shore, mainly through the beach and some scattered islands. The track here has different paths to choose from, though be careful of jumping into the deep parts of the sea or skipping fractal zones or even item crates. Track hazards are extremely prominent in different ways, so having a clean drive here is nigh impossible. The main straight leads to a sharp left turn, as we start to see the chests and sand statues that serve as hazards all around the track. A left bend takes us to a tight right hairpin, with the first set of crates at its exit. A left turn takes us to the first junction of the track: the left side is a longer way but has three small fractal zones and a turbo pad right before the track unites again, while the right side consists of sandy isles you have to jump to with crates on the right ones. A short stretch leads to a sharp left-right chicane, after which a fractal zone covers the next left turn leading to another fractal zone in a second left turn. There’s a shortcut before the right turn of the chicane in the form of a sandy isle you can jump to. We now head into the last junction, with the left path having a jump and a set of crates before a right turn and rejoining the track on a left dogleg, and the right path being an immense but dangerous shortcut through a right turn and a jump over the deep water with a turbo pad awaiting in the other side. The upcoming short straight leads to a smooth left hander and onto the finish line, with one last turbo pad before it. The path is not easy, however, as several Syakomon have been washed ashore here and they will repel you if you run into them, losing an awful lot of time. Underwater We dive deep into the sea and enter an underwater research lab. The layout on itself is easy and straightforward, with track hazards unexistent save from holes on the track on almost its entirety. The downside is that grip is low, meaning you’ll slide a lot as you attempt to turn. This track is also enclosed, meaning no off-limits just a solid barrier knocking you back. After the finish line, an obstacle in the middle of the track forces to bypass it by either the left or right side before recovering the main track width in a long straight. A sharp left turn leads to another straight, at the end of which lies a set of crates. The track bends to the left for a series of 90-degrees turns, but these can be passed diagonally straight with ease thanks also to a few safe zones that widen the usable track. A left bend after the straight leads to a short straight and a sharp left turn. A very sharp right hairpin comes next, with a fractal zone on its outside enticing you to take it long risking an easy overtake on the inside. A short straight leads to a 90-degrees left turn and the upcoming straight is divided in two: the left side has two turbo pads and the right side has a set of crates. This straight leads to a sharp left turn and into another succession of turns that can be passed diagonally straight with ease. The upcoming short straight has a big fractal zone on the left side and a set of crates on the right side. One last sharp left turn leads to a very long straight, which has an erratic layout as the track tightens at several points. Staying in the middle leaves you out of harm and able to pass by the three turbo pads, before one last hole in the center preceding the finish line which can be perfectly jumped over or avoided by any side. Polar Ice Land Into snowy land we move now. There are patches of ice along the track with very low grip, which are a darker shade of blue, and with the tight turns this track has it can become quite deadly. A few track hazards along the way will make it a bit more difficult to get out of this icy arena. A smooth left bend after the start leads us to a very long right hairpin. There’s a SnowGoblimon moving from side to side in the outside, and further ahead also on the outside a set of crates, while the inside has a patch of ice that must be avoided. Once the turn is dealt with, another SnowGoblimon passing by ahead as we head into a left hairpin, staying on the outside to avoid the patch of ice. Another very tight right hairpin follows, with patches of ice in the inside and outside. On the right side after the hairpin there’s a fractal zone, and then we take a sharp turn left into a short straight. A right bend comes after it, which can be bypassed with a jump over the snow (but minding the wall to avoid excessive track cutting) and go straight into a set of crates. A sharp right hander takes us to a junction straight: the left side describes a smooth right bend with an enormous fractal zone over an equally enormous patch of ice, while the right side is fully straight with no added effects. After the junction, a right turn takes us into a long straight bending to the right. It has some obstacles along the way, and also a fractal zone over a patch of ice on the left side midway through the stretch. We approach a left hander with several SnowGoblimon patrolling the track, and after a short straight one last set of crates precedes a very tight right hairpin, which can be bypassed somewhat by jumping over the snow, and the finish line is not long after it. Volcano From snowy land to the polar opposite (pun intended), as we enter an active volcano to casually race inside it. Going off-limits is a sure fall into the lava, and track hazards like lava pools and other Digimon are omnipresent. Don’t expect an easy time here. The finish line is located in the middle of a long right turn. On the exit, we already encounter the first lava pools to either side with DemiMeramon splashing about, who will pester you if you get too close. A left bend takes us to a left hairpin, with a fractal zone on the outside, and into the first set of crates on a tightening track. A tight hairpin follows the crates, leading to yet another left hairpin. This last one has a small fractal zone on its outside. A sharp right turn comes after, with a turbo pad at the beginning to propel you into the next short straight. A sharp left hander leads to a short straight at the end of which is a set of crates, though they are quite away from the racing line as the track turns right. This right turn leads to a mine field; a short straight plagued with small lava pools. Snake your way avoiding the fiery doom and you will get to a tight left hairpin. A few more lava pools can be seen, but the major hazard comes from the Gotsumon lying on the track that will repel you if you run into them. There’s a turbo pad right after the hairpin on the left side, but only available with a very enclosed and dangerous line through the hairpin. After the hairpin comes a long calm stretch, with just a smooth left-right chicane in the middle. A big fractal zone is at the end of the stretch before the next left hairpin, which has a dangerous shortcut through the ash and lava right before reaching the fractal zone. This leads us to the long right turn where the finish line is located, with one last lava pool to the right with a DemiMeramon happily splashing about. Snocap Mountain And we’re back into snowy land again, this time atop the mountains. While the track is generally very wide, it has tight sections and sure falls over the several bridges. It also has side paths which pose a very high risk of falling down, and while there are very little track hazards they can be very troublesome. After the start we’re already welcomed by a sharp right turn. It then becomes a very long left hander before another sharp right hander, essentially being a detour from a standard straight path from the finish line. We now encounter a narrow and wall-less bridge over the cliff leading to a short straight, there’s an alternate path to the bridge via a turbo pad on the left and timing correctly the massive jump over the cliff, if successful you land on a big fractal zone before rejoining the track. As the track turns sharply right we encounter the first set of crates, then the track tightens for the upcoming left hairpin with a small fractal zone in the outside. A short straight leads to a 90-degrees right turn, after which comes a snaking road with a few Mojyamon on the sides launching snowballs behind them which will freeze you if hit. Leaving behind the hazards, a sharp right turn takes us into a very tight left-right chicane. After it, a very sharp left turn takes us into a very long right turn over the cliff, with a set of crates in the middle and a long fractal zone near its end. This section can be bypassed via a broken bridge over the cliff you can jump to before the sharp left turn. A short straight leads to a sharp left turn, with a sharp right turn coming right after it. The right turn then elongates a bit before a set of crates marks the start of a straight bridge over the cliff again, this time with no alternate ways. One last 90-degrees right hander takes us back to the finish line. The Caves From atop the mountain to its very bottom. This abandoned mine may not pose a challenge with its layout, but once again it’s an enclosed road and filled with pitch-black holes that guarantee a long fall. Plus, hazards in this track are very troublesome per se, so don’t let an easy layout fool you. Shortly after the start, we face a 90-degrees right turn with a big fractal zone in the outside wall. A 90-degrees left hander leads to a very short straight with the first pitfall to be avoided through a timed jump. A succession of turns which can be tackled as a diagonal straight comes right after, and then we tackle a right turn to get into the danger zone. A short straight with holes on either side and a set of crates in the center follows, before a chicane takes us to the other hazard of the track: mine carts. We see one moving side to side before a left turn, where there’s another cart on the outside, technically guarding a set of crates near the outside wall before tackling another left turn. Another pitfall we must jump over, and now an obstacle in the center that must be bypassed by either side, with the right path having a set of crates with a cart going from side to side and the left path having a pitfall we must jump over. Rejoining the track, we have an irregular stretch snaking from side to side, with a small fractal zone seen to the left and another one further ahead to the right, a few pitfalls we have to avoid and one needing to jump, and finally the lat part of the track. We now cross the tracks of two mine carts going from side to side to tackle a tight left hairpin taken as two 90-degrees left turns. A small fractal zone is located in the outside of the second one, and then we have a decent stretch before the line for late time passes. There’s a useful but risky shortcut by turning left where the cart tracks are though it’s also much tighter, and still there’s some room for late passes before the finish line. Cloud Kingdom And once again an extreme change, from underground to the clouds above. Needless to say, off-limits here means falling down to the ground. The layout itself is relatively easy, just that the absence of walls and the holes around the track make it very tricky. Track hazards are almost unexistent, so you should have clean laps here more easily than in most other tracks. After a short straight, we face the first smooth left hander. A set of crates is right after it, and in the upcoming straight we face two jumps to save voids in the track. Another smooth left hander leads to a small fractal zone that has to be accessed jumping over a hole, or otherwise said hole can be passed by either side without trouble. The next left hander is a bit sharper, and leads to a relatively difficult right hairpin with a set of crates in the middle. After it, a sharp left hander leads to a smooth right hander as we enter the back stretch. There’s a section were a few Opossumon float by the side, attacking you with some kind of projectile in an attempt to slow you down, but it’s very rare to get hit by these. A long left turn comes after the stretch, with a set of crates in the middle and a fractal zone right after it, but mind the hole in the middle to fully get it or stay on the inside away from danger. A right turn takes us to a tight left hairpin, and one last right bend sets us for the long main straight. A couple of jumps like those at the start are still ahead of us, and the stretch before the finish line has a long fractal zone to the left. One of the things we have to thank Mario Kart for, is for having opened the can to the great genre of fantasy kart racing. Not only did it pave the way for future respected games: many franchises started putting their characters in frantic car races with eccentric power-ups inspired on the franchise itself around race tracks with incredibly varied designs, also inspired on locations of the franchise itself. A movement that was initiated in the late 90s and bloomed greatly in the 2000s, still brimming with activity nowadays without having needed to change much, a testament to just how successful the formula is. Of the many franchises that jumped the wagon, one of them was Digimon. Known for its popular anime series as well as for its venture into videogames, it was a matter of time before these creatures also took on kart racing around the Digital World they inhabit. And of course, like always, with some twists specific to this franchise. And like many others, it was a one-off venture into a different gaming genre that didn’t catch on and thus produced no sequels. Now that we’ve covered the background information, we should start getting serious. Starting off Being released for the Game Boy Advance, the game doesn’t have extremely difficult controls. Contrary to other games of its genre, it didn’t have any way of drifting, thus requiring normal turning to go around the course. It did include the ability to jump to avoid obstacles and what not, but the rest of controls are simply for accelerating, braking and using power-ups. The game includes 11 playable characters, eight of them available from the start and three more being unlockable. All protagonists from the first series anime are here, and the unlockable characters are from the three spin-offs airing after it. Not the best way to represent what was by then already a big franchise, but it’s not like it was the only time they did this. The game also includes turbo pads, which grant a nice speed boost to whomever passes over them. Several hazards exist on track, as well as rough surfaces slowing you down. Despite having a track map, the game also displays the upcoming turns as if we were in some sort of rally game, so getting familiar with the 12 tracks and their layouts is much easier. Digivolution The big twist of this game is also the most unique aspect of the franchise itself: digivolution. Characters will always start in their Rookie levels, their most known standard form, though they can digivolve into the Champion stage as the race goes on. This is done by absorbing fractal code in specific zones of the track, which are black patches with white-lined squares like you can see in the image below. Passing over those zones fills your fractal meter, which you can see to the left of the previous image. You can see three very distinct sectors in that meter, these determine the level of your Digimon. You always start with half the second sector full, reaching the third sector will enable your Digimon to evolve. Likewise, if the meter falls back to the middle sector your Digimon will downgrade to Rookie again, and should it fall to the lowest sector, your Digimon will downgrade further into their In-Training stage. Digivolution is important because it strengthens the stats of your Digimon, thus enabling it to go faster around the track, and obviously In-Training Digimon have worse stats than their standard Rookie form. Additionally, each Digimon gains a unique power-up when the meter is fully charged to use before any power-up collected from crates, which adds a bit more of spice to the mix. You might be asking how exactly can the meter empty down. Well, using power-ups requires some fractal code which means you can de-digivolve after using one. The unique power-ups of Champion Digimon consume nearly the full third sector, so if you don’t pay attention to your meter you may find yourself de-digivolving by accident. Bumping into hazards and other Digimon, by crashing or jumping into them, also lowers your meter. Finally, being hit by an opponent’s power-up also reduces your meter significantly, so if you can manage to stay out of trouble in all senses you might remain in your fastest form. One note to be made is that the standard level for the fractal meter is halfway into the middle sector, which is the starting point in every race. Falling below that means the meter will slowly refill by itself until reaching that “safe point” again. With this, even if you fall down to the In-Training stage, you won’t spend much time in it as it automatically refills after a few seconds, but you will still lose a precious time being incredibly slow. This fractal meter means you probably won’t abuse power-ups in this game as in other ones, but there’s yet another quirk: power-ups are not kept, and every time you break a crate you can get a new one to replace the one you were holding. It can be very troublesome if you’re not used to this quirk, as you might believe you have a certain power-up when in reality you have a different one, and also because avoiding the crates on purpose isn’t precisely easy either as they’ve been mostly placed in the way of the racing line. Perhaps quirks like these are what killed the potentially good popularity this game could have bolstered. Power-ups Speaking of power-ups, better to start off with them. The game itself features seven standard power-ups, which can be collected from the crates scattered all around the track. While they can be quite simple, sometimes they can perfectly turn the tides in a race if played masterfully. Turbo Boost The most standard power-up, the classic speed boost. Has the same effect as passing over a turbo pad, so its effects are quite brief. Fractal Boost This power-up refills instantly your fractal meter to the top. This means immediate access to the Champion level and its specific power-up. Of course, it’s very rare to see it appear and will happen only when at the back of the field. Shield The only defensive power-up is a shield that protects of any projectile for a few seconds, be it power-ups fired by other racers or anything track hazards launch at you. Also rare to appear, and only useful if you manage to keep it until being at the front. Bomb The traditional power-up that’s left behind the racer for the incoming opponents. The bomb is left right in the spot and detonates itself when a full lap has passed, meaning you won’t see them piling up around the track as laps go by. Lightning Strike Probably the deadliest power-up, because the lightning strike hits all racers ahead of you no matter the distance. Last one of the rare power-ups to appear, and only useful when at the back of the field. Energy Blast A standard, blue-colored projectile that encases the opponent in a blue bubble for a short while before dropping them back to the racetrack. Quite common to appear, but sadly it travels in a fully straight line so you’ll have to polish your aim for it to work properly. Fire Blast A red-colored variant of the standard Energy Blast. It’s an empowered version that tracks down the opponent right ahead of you, eliminating the need to aim and with all the other effects of the standard version. Characters Fully balanced stats, as expected from the protagonist. Greymon’s special power-up is Nova Blast, an enhanced version of the standard Fire Blast seen above. Terrible handling and acceleration, but once it gets rolling it’s almost unstoppable. Garurumon’s special power-up is Howling Blaster, another enhanced version of the standard Fire Blast. Decent handling and superior top speed, one of the powerhouses of the game. Togemon’s special power-up is Needle Spray, a variation of the standard Energy Blast in which three projectiles are fired simultaneously, one straight ahead and the other two diagonally to each side. Handling is below average, but its acceleration is impressive. Angemon’s special power-up is Hand of Fate, a variation of the standard Lightning Strike in which only the racer right ahead of you is hit. Best handling in the whole game, though lacks a bit of speed. Kabuterimon’s special power-up is Electric Shocker, yet another variation of the standard Fire Blast. Incredible acceleration, but gets penalized in handling and top speed. Birdramon’s special power-up is Fire Burst, which starts as a variation of the standard Turbo Boost but apparently also has the effects of a shield for a short time afterwards. While mostly balanced, handling shines a bit brighter than its other stats. Gatomon’s special power-up is Cat’s Eye Hypnotism, which affects only the racer ahead of you and temporarily inverts its controls. Much better handling than its stats show and also quite fast. Ikkakumon’s special power-up is Harpoon Torpedo, another variation of the standard Energy Blast in which three projectiles are fired in quick succession. Mostly balanced, but excels in acceleration. Growlmon’s special power-up is Pyro Blaster, a variation of the standard Lightning Strike that only affects the driver immediately ahead of you. Quite fast and it also has nice handling. Flamedramon’s special power-up is Flame Shield, as you can guess by its name, it’s a variation of the standard Shield. Balanced, but doesn’t have as much handling as its stats show. BurningGreymon’s special power-up is Corona Blaster, one last variation of the standard Fire Blast. Tracks Finally, the boiling point of this guide. Tracks in this game are divided into three sectors of the Digital World. The first sector is mostly a desert with a couple towns in it, the second is a coastal jungle that also covers an icy are up north, and the third one revolves around a mountainous zone and its altitude. As you can see, ambients are very varied and so will track hazards. There are also three more levels in this game, which are Boss battles. They won’t be included in this guide because they revolve around staying out of the incoming attacks and taking advantage when the boss is tired, using the same power-ups as in tracks. They are quite simple and much easier than winning races or cups, so I’ll be skipping them entirely. Desert Oasis An arid scenery to start with, not being truly an oasis but rather a pond with some trees around it. Stay away from the sand outside track limits, it slows you down and if you go too far away you may fall into a sand pit. Right after the start, we encounter a right hairpin that leads us into a left-right chicane. A short straight bending to the right has the first set of crates before a nearly 90-degrees right turn. There’s a wide fractal zone to the left before the track turns left into a short straight, crossing the pond through a natural path. After crossing you can see Chuumon going from side to side of the track, dancing at Etemon’s guitar solo, needless to say you have to avoid them and continue up ahead. We keep going right and we enter the longest straight of the track with an enormous fractal zone. After it, another smooth turn to the right to encounter the second set of crates. Another wide fractal zone is ahead as we enter a tight left-right chicane before heading to one las left dogleg to cross the finish line. Toy Town We enter the city to lap a fully-fledged circuit like if it was real life: an asphalt track with kerbs and grass/gravel runoffs in the outside, and also a wall like in early Mario Kart games to serve as solid limits and avoid turn cutting. Turbo pads make their debut here, and all along the course lay Numemon spread out which you must avoid at all costs to keep your pace going, or they’ll crash directly into your screen. Right after the start we encounter a long left hairpin, and we can already see the Numemon we’ll encounter throughout the track calmly standing by. A right bend leads to a very wide straight, with a set of crates on the left side and also a small fractal zone before a second right bend. The upcoming straight has two wide turbo pads before a smooth left bend. The next straight also has three turbo pads, this time aligned to the left and shrinking in size. A very long left hairpin follows, after which we see a fractal zone to the right. A tight right hairpin comes next, leading to the second set of crates also aligned to the left, anticipating the upcoming left bend. After it, another left bend takes us to a two-way route, a very long fractal zone on the right and a couple turbo pads on the left. A long right-left chicane follows, with a much tighter left-right-left combination following after. One last left turn, with a turbo pad on the right side, leads to the finish line. Desert Cliffs We start to get dangerous with this track, as certain sections have no run-off and directly make you fall down the cliff. You will also encounter two troublesome track hazards, and avoid the cactus in the track limits or you will be knocked back heavily. The start is located in the longest straight, which immediately after the line turns into a bridge of sorts over the canyon. It has no walls and a hole in the left side, so extreme caution here. After the bridge comes the first set of crates as we start turning left into a tight left-right chicane. We keep turning right and then a left bend leads to a short straight with a long fractal zone. We turn left for the second set of crates, and a second left turn presents a short straight with the first track hazard: a couple of Ponchomon at each side of the track passing a gigantic boulder to one another by rolling it across the track. Avoid the boulder and continue ahead to a long right hairpin. At the end of the short straight there’s a fractal zone to the right just as the track turns sharply left at the edge of the cliff. Minding the cliff to the right, we continue straight and encounter another set of crates before the track snakes a bit. The next straight has a fractal zone to the right and two more Ponchomon rolling a boulder to one another, this time in a different angle and thus being harder to avoid. After turning left leaving behind the Ponchomon, we turn right and return to the edge of the cliff before a sharp left turn returns us to the start/finish straight. Swamp Bog We’re now on a foggy swamp, on a track that twirls around heavily. Track limits in this track mean drowning in the swamp, so avoid going off-limits at all costs. You will also encounter a few track hazards and even shortcuts, so in all it will be an accident-filled lap. After the watery start, a long right hairpin leads to an enormous fractal zone. A sharp right hander takes us to a jump to cross over the track with another sharp right turn coming after, so watch your speed here if you don’t want to take a dip. A left turn takes us to a diagonal straight, surrounded by small ponds guarded by Piximon who won’t hesitate to pester you if you get too close to them. The first set of crates precedes a sharp right turn, after which a left bend takes us to another 90-degrees right turn. We now perform a tight right hairpin to take another jump and cross over the track again, landing on a very long fractal zone. A right bend precedes a never ending left turn, and after it a tight right hairpin. A short straight leads to a left turn, after which we encounter again a few Piximon not fond of intruders. You can skip this section by jumping into safe isles amidst the water, which you can encounter right before finishing the hairpin on the left side and rejoin the track bypassing the Piximon. A right turn takes us to the second set of crates, and after them just the last couple left handers which take us to the start/finish straight. It should be noted the line is quite away from the last turn, allowing for late time passes heading into the straight. Jungle Ruins Staying away from the desert, we go now to the jungle. We traverse some ruins amidst a lake, and while the track is treacherous it’s in no way as dangerous as the past two. Track hazards start to become prominent, but still avoidable with ease. A harmless stream of water crosses the track right after the finish line as we head into the first turn. This is a very elongated left turn that straights up in the last part before heading into the first set of crates and immediately after a tight left-right chicane. A left dogleg takes us to a short straight with a turbo pad on the right side and over a bridge to cross the lake. A long fractal zone can be seen ahead of the bridge on the left side even after the track turns right. A smooth right hander precedes a very tight left hairpin, with a turbo pad at the right side of its exit. The upcoming short straight ends with the second set of crates preceding a right bend which immediately after turns into a sharp left hairpin. The track tightens in the upcoming left-bending stretch as we see several Digitamamon moving from side to side to the track, which must be avoided or jumped over. Once the track widens again a right bend takes us to the last set of crates and a sharp left hairpin. It leads us to the main straight, with three turbo pads before reaching the finish line at the left, right and left sides of the track respectively. Coastline We now drive around the shore, mainly through the beach and some scattered islands. The track here has different paths to choose from, though be careful of jumping into the deep parts of the sea or skipping fractal zones or even item crates. Track hazards are extremely prominent in different ways, so having a clean drive here is nigh impossible. The main straight leads to a sharp left turn, as we start to see the chests and sand statues that serve as hazards all around the track. A left bend takes us to a tight right hairpin, with the first set of crates at its exit. A left turn takes us to the first junction of the track: the left side is a longer way but has three small fractal zones and a turbo pad right before the track unites again, while the right side consists of sandy isles you have to jump to with crates on the right ones. A short stretch leads to a sharp left-right chicane, after which a fractal zone covers the next left turn leading to another fractal zone in a second left turn. There’s a shortcut before the right turn of the chicane in the form of a sandy isle you can jump to. We now head into the last junction, with the left path having a jump and a set of crates before a right turn and rejoining the track on a left dogleg, and the right path being an immense but dangerous shortcut through a right turn and a jump over the deep water with a turbo pad awaiting in the other side. The upcoming short straight leads to a smooth left hander and onto the finish line, with one last turbo pad before it. The path is not easy, however, as several Syakomon have been washed ashore here and they will repel you if you run into them, losing an awful lot of time. Underwater We dive deep into the sea and enter an underwater research lab. The layout on itself is easy and straightforward, with track hazards unexistent save from holes on the track on almost its entirety. The downside is that grip is low, meaning you’ll slide a lot as you attempt to turn. This track is also enclosed, meaning no off-limits just a solid barrier knocking you back. After the finish line, an obstacle in the middle of the track forces to bypass it by either the left or right side before recovering the main track width in a long straight. A sharp left turn leads to another straight, at the end of which lies a set of crates. The track bends to the left for a series of 90-degrees turns, but these can be passed diagonally straight with ease thanks also to a few safe zones that widen the usable track. A left bend after the straight leads to a short straight and a sharp left turn. A very sharp right hairpin comes next, with a fractal zone on its outside enticing you to take it long risking an easy overtake on the inside. A short straight leads to a 90-degrees left turn and the upcoming straight is divided in two: the left side has two turbo pads and the right side has a set of crates. This straight leads to a sharp left turn and into another succession of turns that can be passed diagonally straight with ease. The upcoming short straight has a big fractal zone on the left side and a set of crates on the right side. One last sharp left turn leads to a very long straight, which has an erratic layout as the track tightens at several points. Staying in the middle leaves you out of harm and able to pass by the three turbo pads, before one last hole in the center preceding the finish line which can be perfectly jumped over or avoided by any side. Polar Ice Land Into snowy land we move now. There are patches of ice along the track with very low grip, which are a darker shade of blue, and with the tight turns this track has it can become quite deadly. A few track hazards along the way will make it a bit more difficult to get out of this icy arena. A smooth left bend after the start leads us to a very long right hairpin. There’s a SnowGoblimon moving from side to side in the outside, and further ahead also on the outside a set of crates, while the inside has a patch of ice that must be avoided. Once the turn is dealt with, another SnowGoblimon passing by ahead as we head into a left hairpin, staying on the outside to avoid the patch of ice. Another very tight right hairpin follows, with patches of ice in the inside and outside. On the right side after the hairpin there’s a fractal zone, and then we take a sharp turn left into a short straight. A right bend comes after it, which can be bypassed with a jump over the snow (but minding the wall to avoid excessive track cutting) and go straight into a set of crates. A sharp right hander takes us to a junction straight: the left side describes a smooth right bend with an enormous fractal zone over an equally enormous patch of ice, while the right side is fully straight with no added effects. After the junction, a right turn takes us into a long straight bending to the right. It has some obstacles along the way, and also a fractal zone over a patch of ice on the left side midway through the stretch. We approach a left hander with several SnowGoblimon patrolling the track, and after a short straight one last set of crates precedes a very tight right hairpin, which can be bypassed somewhat by jumping over the snow, and the finish line is not long after it. Volcano From snowy land to the polar opposite (pun intended), as we enter an active volcano to casually race inside it. Going off-limits is a sure fall into the lava, and track hazards like lava pools and other Digimon are omnipresent. Don’t expect an easy time here. The finish line is located in the middle of a long right turn. On the exit, we already encounter the first lava pools to either side with DemiMeramon splashing about, who will pester you if you get too close. A left bend takes us to a left hairpin, with a fractal zone on the outside, and into the first set of crates on a tightening track. A tight hairpin follows the crates, leading to yet another left hairpin. This last one has a small fractal zone on its outside. A sharp right turn comes after, with a turbo pad at the beginning to propel you into the next short straight. A sharp left hander leads to a short straight at the end of which is a set of crates, though they are quite away from the racing line as the track turns right. This right turn leads to a mine field; a short straight plagued with small lava pools. Snake your way avoiding the fiery doom and you will get to a tight left hairpin. A few more lava pools can be seen, but the major hazard comes from the Gotsumon lying on the track that will repel you if you run into them. There’s a turbo pad right after the hairpin on the left side, but only available with a very enclosed and dangerous line through the hairpin. After the hairpin comes a long calm stretch, with just a smooth left-right chicane in the middle. A big fractal zone is at the end of the stretch before the next left hairpin, which has a dangerous shortcut through the ash and lava right before reaching the fractal zone. This leads us to the long right turn where the finish line is located, with one last lava pool to the right with a DemiMeramon happily splashing about. Snocap Mountain And we’re back into snowy land again, this time atop the mountains. While the track is generally very wide, it has tight sections and sure falls over the several bridges. It also has side paths which pose a very high risk of falling down, and while there are very little track hazards they can be very troublesome. After the start we’re already welcomed by a sharp right turn. It then becomes a very long left hander before another sharp right hander, essentially being a detour from a standard straight path from the finish line. We now encounter a narrow and wall-less bridge over the cliff leading to a short straight, there’s an alternate path to the bridge via a turbo pad on the left and timing correctly the massive jump over the cliff, if successful you land on a big fractal zone before rejoining the track. As the track turns sharply right we encounter the first set of crates, then the track tightens for the upcoming left hairpin with a small fractal zone in the outside. A short straight leads to a 90-degrees right turn, after which comes a snaking road with a few Mojyamon on the sides launching snowballs behind them which will freeze you if hit. Leaving behind the hazards, a sharp right turn takes us into a very tight left-right chicane. After it, a very sharp left turn takes us into a very long right turn over the cliff, with a set of crates in the middle and a long fractal zone near its end. This section can be bypassed via a broken bridge over the cliff you can jump to before the sharp left turn. A short straight leads to a sharp left turn, with a sharp right turn coming right after it. The right turn then elongates a bit before a set of crates marks the start of a straight bridge over the cliff again, this time with no alternate ways. One last 90-degrees right hander takes us back to the finish line. The Caves From atop the mountain to its very bottom. This abandoned mine may not pose a challenge with its layout, but once again it’s an enclosed road and filled with pitch-black holes that guarantee a long fall. Plus, hazards in this track are very troublesome per se, so don’t let an easy layout fool you. Shortly after the start, we face a 90-degrees right turn with a big fractal zone in the outside wall. A 90-degrees left hander leads to a very short straight with the first pitfall to be avoided through a timed jump. A succession of turns which can be tackled as a diagonal straight comes right after, and then we tackle a right turn to get into the danger zone. A short straight with holes on either side and a set of crates in the center follows, before a chicane takes us to the other hazard of the track: mine carts. We see one moving side to side before a left turn, where there’s another cart on the outside, technically guarding a set of crates near the outside wall before tackling another left turn. Another pitfall we must jump over, and now an obstacle in the center that must be bypassed by either side, with the right path having a set of crates with a cart going from side to side and the left path having a pitfall we must jump over. Rejoining the track, we have an irregular stretch snaking from side to side, with a small fractal zone seen to the left and another one further ahead to the right, a few pitfalls we have to avoid and one needing to jump, and finally the lat part of the track. We now cross the tracks of two mine carts going from side to side to tackle a tight left hairpin taken as two 90-degrees left turns. A small fractal zone is located in the outside of the second one, and then we have a decent stretch before the line for late time passes. There’s a useful but risky shortcut by turning left where the cart tracks are though it’s also much tighter, and still there’s some room for late passes before the finish line. Cloud Kingdom And once again an extreme change, from underground to the clouds above. Needless to say, off-limits here means falling down to the ground. The layout itself is relatively easy, just that the absence of walls and the holes around the track make it very tricky. Track hazards are almost unexistent, so you should have clean laps here more easily than in most other tracks. After a short straight, we face the first smooth left hander. A set of crates is right after it, and in the upcoming straight we face two jumps to save voids in the track. Another smooth left hander leads to a small fractal zone that has to be accessed jumping over a hole, or otherwise said hole can be passed by either side without trouble. The next left hander is a bit sharper, and leads to a relatively difficult right hairpin with a set of crates in the middle. After it, a sharp left hander leads to a smooth right hander as we enter the back stretch. There’s a section were a few Opossumon float by the side, attacking you with some kind of projectile in an attempt to slow you down, but it’s very rare to get hit by these. A long left turn comes after the stretch, with a set of crates in the middle and a fractal zone right after it, but mind the hole in the middle to fully get it or stay on the inside away from danger. A right turn takes us to a tight left hairpin, and one last right bend sets us for the long main straight. A couple of jumps like those at the start are still ahead of us, and the stretch before the finish line has a long fractal zone to the left. -------------------- |
Administrator
Site Staff Manager, Content Writer, Console Manager
Affected by 'Carpal Tunnel Syndrome'
Registered: 07-03-13
Location: Barcelona, Spain
Last Post: 3 min.
Last Active: 3 min.
Site Staff Manager, Content Writer, Console Manager
| Vizzed #1 Hardstyle fan |
Affected by 'Carpal Tunnel Syndrome'
Registered: 07-03-13
Location: Barcelona, Spain
Last Post: 3 min.
Last Active: 3 min.
