

 User Notice
 Forum Links
Thread Information
Thread Actions


Order
GBA Character Movelist
Game's Ratings
Overall
Graphics
Sound
Addictiveness
Depth
Story
Difficulty
Average User Score
7.2
9
7
6
5
4
9
07-29-21 05:32 PM
 EX Palen is Offline
| ID: 1392230 | 6471 Words
EX Palen is Offline
| ID: 1392230 | 6471 Words
 EX Palen is Offline
| ID: 1392230 | 6471 Words
EX Palen
Spanish Davideo7
Spanish Davideo7
Level: 144


POSTS: 5654/6556
POST EXP: 1205183
LVL EXP: 36547548
CP: 196175.5
VIZ: 11466293

POSTS: 5654/6556
POST EXP: 1205183
LVL EXP: 36547548
CP: 196175.5
VIZ: 11466293
Likes: 0 Dislikes: 0
While Gundam videogames aren’t rare, in the first decades of life of the franchise said games were basically released in Japan. It took quite some time before localizations happened, and also due to their nature most of the Gundam videogames were released for the more powerful PCs of the time rather than the main consoles from Sega, Nintendo and the like.
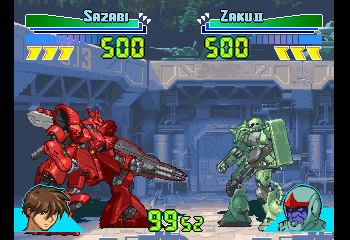
While I can’t say for sure this was one of the first localized game, I can tell you it’s basically a remake of a game exclusive to Japan during the last years of the 90s. The remake included a big change, which is the inclusion of the anime characters piloting their suits, the original game had entirely new characters at their helms, sometimes quite awkward creatures. After all, if you want to promote and/or entice more people to follow the franchise, what better way than this to not confuse fans any further? This game features 19 characters, each with its own weaponry and characteristics. Entries are very varied and from several anime spinoffs, and the passing of time in the franchise can clearly be seen as more modern characters have more advanced weaponry as well as more equipment. 12 of those characters are available from the start, 4 are unlockable bosses in the story mode and the remaining 3 are simply hidden characters to please fans of the franchise. BASICS Like any one-on-one fighting game, the characters have their own attacks, stats and gauges. The first one will be analyzed in detail below, the second one doesn’t have much to say if it wasn’t for a few exceptions, but the third one is indeed important. There are four gauges to pay attention to. First off are the health bars, which are three and of different colors so the player can follow its remaining health. Below them the remaining gauges can be seen. The three “1” close to the edge of the screen is the Mega Special gauge, meaning the suit has access to up to three attacks of such kind in the battle. The blue scaled bar right below the health bars is the boost gauge, which fills over time as the character boosts, and when it reaches its limit it barely drops to the ground. Finally, the “500” seen on the other edge is the Energy gauge, which is used by certain attacks of each suit and once it runs out said attacks are left unavailable (the attack goes through but doesn’t have “ammunition” to rely on and so it fails). Beyond this information, all we need to add are the commands. As any fighting game, the moves are triggered by combining buttons and directions. This time, however, to make things easier I’ll simply go with directions rather than using expressions like half circle and so on, basically because through my experience sometimes it’s better to go one button at a time rather than wanting to pull off the combo quickly. These are the symbols that will go after the attack’s name (sometimes improvised by me depending on what they are, sometimes “officially” named). -forward, back, down, up: these will be the directions used, no shortenings or whatever. -Square: Weak Punch. -Triangle: Heavy Punch. -X: Weak Kick. -Circle: Heavy Kick. -Punch and Kick: These signal whether an attack is performed with any of the punch or kick buttons. Most of the time makes no difference which one is used, exceptions will be listed (specially in attacks which are energy-consuming). -Mega Specials: this one-of-a-kind attack is always performed the same way, with down, forward, down forward and any of the punch buttons. The background turns dark as a special sound and voice are heard, and the attack is quickly performed. Blocking these is quite hard as they can catch you off-guard easily, so be extra careful and pay attention to the gauges. -(C): Means the attack consumes energy, the exact amount will of course be listed. -(G): Means the attack can only be performed on the ground, not while jumping or boosting. -(U): Means the attack is unblockable. The MC will also shout the phrase “You can’t defend” whenever such an attack is unleashed. With this out of the way, time to get into business! Ball Every game has some sort of bluff character, and in this case such “honor” befalls over Ball. It’s basically a worker pod which has been given a weapon, like if it was an armored infantry unit. Of course, it lacks defensive and offensive power, not sure one is worse, doesn’t have many attacks and it’s not like its small size will be of any help. Besides its big beam rifle, the Ball only incorporates construction equipment as its weapons, like a jackhammer. It also lacks a Mega Special, as it’s not battle oriented. Good luck winning a fight with this little guy, that’s basically the toughest challenge in this game. I can’t let slide the fact that the MC states “You’re Gonna Die!” when Ball pulls out some attacks, yet it deals so little damage. Those lines aren’t exclusive to this character, in fact the only others to use it are sub-bosses on really damaging attacks, but the bluff on this character is heavy in all aspects. Beam Cannon: down, forward + punch (C) 1/3 shots, 100 energy each. Great damage, but absurdly high consumption Jackhammer: down, back + punch Pulls out a jackhammer to attack at close range. Decent damage Rising Spin: down, back + kick Rotates its rifle as it jumps forward. Quite nice reach, though not very damaging Hammer Down: Triangle (in the air) Pulls out a hammer and strikes the opponent. Damage isn’t very great. Gundam RX78-2 Back to basics with this one, as we’re presented with the very first titular Gundam of the series, the legendary RX78-2. The one that started it all clearly shows its age when paired against suits created for later spinoffs, but nonetheless it deserves its spot in games like this. It’s weaponry is heavily limited, only the beam rifle and the beam sword that became the trademark weapons of almost any suit that followed it. A young Amuro Ray is at the helm of this legend, which fended off against at least two other suits seen below. It hasn’t been treated well in this game with so many limitations, but we can at least see why it was superior. Beam Rifle: down, forward + punch (C) 1/3 shots, 40 energy each. Highly consuming, but the damage when shooting more than once is worth it Beam Saber: forward, down, back + punch (G,U) Standard up-down swing, damage is still below the rest of its kind Charged Shield Uppercut: forward, down, forward + punch (C) (G) Jumps upwards with its shield, and if it connects, shoots four times its rifle downwards, 30 energy for each shot. Damage is decent, but plays a lot on consumption. Sky Kick: right + Circle (in the air) A downwards taekwondo-like swing with its leg, decent damage Rising Kick: down + Circle Jumps forward to deliver a knee kick, standard damage Psycho Gundam Probably the most broken character in the entire game, quite expected from a secret boss. Despite its gargantuan size it’s still a mobile suit, though of course it presents some drawbacks. Its movement is quite slow, though its thrusters are still powerful enough to enable a decent flight. On the other hand, it has increased defense and doesn’t flinch when hit, and it’s even able to block mid-attack. Of course, it also has increased reach and raw power. This mighty combination is what makes the Psycho Gundam so broken. As for its weaponry, the cannons on its shoulder are excessively powerful. Its beam saber is also very huge, and saving the best for last, it has mega particle cannons scattered all across its body. Quite inexplicably is that this suit, exclusively designed for this game series, is given to Valder Farkill, someone whose main suit is present in the game precisely as the last boss. It wouldn’t have been that strange to see this Gundam piloted by a fictional pilot, but whatever, at least the mistake was corrected somehow in the game’s sequel. Shoulder Cannons: down, forward + punch (C) 6/10 shots, 10 energy each. Standard damage and quick to pull off Beam Saber: forward, down, back + punch (U) Forms a sword from its wristband and performs an upwards slash. Wide range and devastating damage, slightly more than half a life bar Giant Uppercut: forward, down, forward + punch (G) Standard jumping uppercut, though damage is simply excessive: can almost deplete a full health bar if all hits connect Falling Fists: down + Triangle (in the air) Falls down fists first, can stuck itself if it fails but if it connects deals decent damage Mega Special - Mega Cannon Scatter Shot Shoots a beam from all its cannons, starting from the bottom and going up. Last hits are sure to miss most of the time, but still lands heavy damage, over half a life bar with ease Big Zam The first Mobile Armor of the game. This one looks a bit grotesque, with heavy legs but no arms whatsoever, though it makes up for it with extreme weaponry at its disposal. The Big Zam never flinches when attacked and it’s unable to block or turn back, though the latter is hardly an issue with this bad guy. It has heavily increased defense, possibly adduced to its size and mass, and speaking of the latter it also affects the power of its thrusters, though it can still somewhat fly around if wanted. Now, for its weaponry. Its main weapon is a large Mega Particle Cannon mounted on its front, it also has a set of homing missiles capable of being fired from the lower part of its torso, and more importantly several lasers lined up along its torso so it can fire at almost any direction. Each of this attacks delivers heavy damage, which coupled with its overwhelming presence makes it a force to be reckoned with. Homing Missiles: down, forward + punch (C) 5 shots, 10 energy each. Extreme damage. Same attack with weak and strong punch, so very overpowered. Air lasers: Triangle Five scattering lasers that aim diagonally upwards. Kind of useless, very rarely will an enemy be above its head. Ground Lasers: Square Two lasers aiming diagonally down. Delivers heavy damage Walking Attack: Hold forward Simply by walking towards the target is as if it kicked it. No joke, the damage is so heavy you can defeat an undamaged enemy in 10 steps Backwards Kick: back + X Useful since it can’t turn back, but damage is not great Boost Tackle: down + Circle Doesn’t move too much, but its massive weight means the hit is quite heavy. Heavy Stomp: Circle (in the air) Dives down to stomp its enemy with both feet. Very decent damage, though this guy will rarely be in the air Jumping Knee: down + Triangle Jumps a bit forward for decent damage. Strange attack, rarely used given its arsenal Mega Special - Mega Particle Cannon Unveils its frontal cannon to shoot a massive beam. Delivers a ton of hits and depletes more than a full health bar Zeong Zeong has no legs, meaning the kick attacks instead unleash two rocket thrusters. It stays hovering around, meaning it still has the same flight capabilities as any other suit. Its arms are extendable, and it also has cannons on its fingertips as well as on its chest and head, as seen in its mega special. Its curious build makes it an easy target even on the ground, so it’s quite exposed to attacks. This is one of two suits piloted by Char Aznable, a recurring antagonist/protagonist of the series in its initial spinoffs. It was probably one of the least used as it could only be used once due to being incomplete (hence its lack of legs) and used “out of desperation” by Char to enter the battlefield. His younger avatar denotes the chronological setting of this suit. Hand Beam: down, forward + punch (C) 6/12 shots, 10 energy each. Shot from its fingers, three shots each time. Decent damage Punch Rush: down, back + punch First hit must connect to unleash the full attack. Short range, but severe damage of nearly half a life bar Energy Blast: forward, down, back + punch (U) Covers its hand in energy and swings it vertically like a sword. Severe damage just like before Vertical Punch: back + Triangle (G) Aims upwards, so only hits enemies jumping or flying directly over it. An unexpected trump card, but not very useful in most situations Sweep Punch: down + Triangle (in the air) Extends its punch and performs a semi-circle downwards. Deals just one hit, but decent damage for its reach Mega Special - Psycommu Attack Unleashes its fists while it fires several shots from its mouth. The shots deal very little damage, the bulk is done with the flying fists. Capable of depleting more than a full health bar if combining both, so better perform it at mid range at most. Sazabi Char returns as a more mature and skilled pilot in the Sazabi. This suit was specifically built for him as he returned to his antagonistic ways, and as shown from its extensive weaponry, was designed to be a front leader. This suit is well-equipped for both long range and hand-to-hand combat. Besides its main beam rifle it also has a scattering mega particle cannon built into it and it’s also equipped with a set of funnels. It also equips a beam tomahawk as its main combat weapon, contrary to most other characters which use sabers. Beam Shot Rifle: down, forward + punch (C) 3/5 shots, 30 energy each. Shoots them in a scatter shot rather than straight. Nice damage if all hits can connect Beam Axe: forward, down, back + punch (G,U) Standard unblockable attack, but uses an axe instead of a sword and performs two consecutive slashes, though doesn’t deal increased damage despite the greater range Funnel Dispatch: back, down, forward + punch Dispatches three funnels, bigger than standard, which float around it. Funnel Attack (after funnel dispatch): down, forward + punch Two shots from each funnel means six total hits. Not bad damage. Spin Kick: down, back + kick Performs a front somersault on the spot to knock down the enemy. Hover Slide Kick: down + Circle (G) Dashes a bit forward for a low kick that knocks down the opponent Arrowback Kick: down + Circle (on air) Drops diagonally backwards, so it’s only helpful when you jump or fly past the enemy. Mega Special - Beam Shot Flush Shoots a scatter shot from the scattering mega particle cannon on its skirt armor. Can deliver a lot of hits up close and is capable of depleting a full health bar if all hits connect. Qubeley A somewhat awkward looking suit, with those big “shoulders”. Still, the Qubeley is a perfectly usable character with several moves to its name, and agile enough to tackle anyone up close. Its armament is very basic. It has beam guns mounted on its palms, it equips a beam sword and it’s also loaded with a standard set of funnels, giving it a few chances at a distance besides its up close superiority. A fun fact is that, chronologically speaking, this was the first mobile suit to actually be able to use funnels, which explains its rather small size compared to other users of the same weapon. Beam Gun: down, forward + punch (C) 2/4 hits, 40 energy each. Standard damage. Beam Saber: forward, down, back + punch (G,U) Standard downwards slash and also standard damage. Double Jumping Kick: down, forward + kick (G) Quite simply a double jumping kick. Nice damage. Somersault Kick: down, forward + kick (while in the air) The double jumping kick turns into a back somersault while on the air. Damage seems to increase slightly. Jumping Rush Kick: down, back + kick Jumps and then thrusts with its leg forward to cover almost the whole screen. Damage is standard, though. Funnel Dispatch: back, down, forward + punch Dispatches three funnels which float around it. Funnel Attack (after funnel dispatch): down, forward + punch Two shots from each funnel means six total hits. Nice damage. Scorpion Kick: back + kick (G) Attacks upwards from behind, so kind of useless. Mega Special – All-Out Funnel Attack Dispatches twelve funnels in quick succession, which fire almost right away to bombard the opponent. Depletes a bit more than half a health bar. Quin Mantha The Quin Mantha is bigger than most other suits, which means it has increased range and attack, almost making it kind of a sub-boss. However, it seems its defense hasn’t been modified that much, which coupled with its height mean it can take on most attacks that would miss regular-sized suits. The Quin Mantha equips several particle guns, most notably on its palms and on its shoulders (only one of the last is visible at a time). It also sports a massive beam saber, and is equipped with a set of funnels which are noticeably more powerful than average. This gives it an incredible advantage at long range, while its greater reach due to its size means its melee attacks are a force to be reckoned with. Beam Launcher: down, forward + punch (C) 3/6 shots, 20 energy each, one round of 3 shots with each palm. Deals nice damage. Beam Shower: down, back + punch Jumps slightly and shoots a scatter shot from its shoulder Funnel Dispatch: back, down, forward + punch Dispatches four small funnels, which remain flying around it Funnel Attack (after funnel dispatch): down, forward + punch Two shots from each funnel, meaning eight hits total. Severe combined damage Beam Saber: forward, down, back + punch (U) Standard attack but backhand, great range and severe damage Tackle: forward + Circle Moves forward a bit in a semi-crouched stance. Deals severe damage in a single hit Triple Punch: Triangle First attacks with its left punch, then with both at the same time. Depletes more than half a life bar Elbow Drop: forward + Triangle Performed with both its arms, decent range without moving and more than decent damage Body Press: down + Triangle (in the air) Dives down belly first, hitting with any part of its massive body. Decent damage Mega Special - Mega Beam Cannon Shoots several beams from its shoulder. Works somewhat like an scatter shot, so needs to be performed quite close to the enemy for all the hits to connect, even more due to its greater than average height. Capable of depleting almost an entire health bar if all hits connect Zaku II We’ve seen the legendary protagonist that started it all, but of course it had a rival to beat. This rival was the Zaku II, a common archenemy found in several Gundam iterations which formed the basis of the rival armies for most of the series beginning. The Zaku is equipped with a machine gun as its primary weapon, though it also has cracker grenades as an optional weapon and of course the heat tomahawk, probably an ancestor to the more advanced beam sabers we’d see later on after its usage by the RX78-2. It’s to be noted that the Zaku II is quite agile, even if it doesn’t have that many attacks at its disposal. The downside is that it’s quite vulnerable to attacks, with noticeably lower defense compared to the rest of the field. Zaku Machine Gun: down, forward + punch (C) 5/10 shots, 10 energy each. Standard damage Cracker Grenades: down, back + punch Short range projectile attack, three grenades that explode shortly after launch. Decent damage and kind of protects from incoming projectiles Heat Hawk: forward, down, back + punch (U) Standard unblockable attack, but uses an axe instead of a sword. Damage is also standard Rising Tackle: down, forward + kick A diagonally upwards tackle with the help of its thrusters, decent damage Shoulder Tackle: forward + Circle (G) Moves forward a bit in a crouching position, standard damage Mega Special - Cracker Special A more powerful and continuous version of the standard attack. Delivers a lot of hits, but not as much damage. Z Gundam Ah, the letter Z and the anime have a long history xD. Anyway, this Gundam was specifically developed to be used both on earth and on space, by having a special Waverider form. This was achieved in part by Kamiru Bidan, who besides being its main pilot also gave in some ideas to finish up its design. The Z Gundam isn’t heavily loaded with weapons, it only has its beam rifle and the beam sword. It barely has any attacks besides that, so variety isn’t a word that can describe its moveset. A protagonist which could have been given a bit more game, in my opinion. Beam Rifle: down, forward + punch (C) 1/3 hits, 40 energy each. Standard damage. Beam Saber: forward, down, back + punch (G,U) Standard downwards slash and also standard damage. Somersault Kick: down, back + kick Performs a back somersault to then connect a powerful arrow kick. Can be done on air for greater range. Hyper Dash: down, forward + kick Movement attack, advances while crouched. Can’t be connected with any attack, so kind of useless. Mega Special – Waverider Attack Delivers a normal punch up close, then transforms into its Waverider form and soars vertically up to the sky. Depletes 75% of a full health bar, but of course tough to connect for being up close. Full Armor ZZ Gundam As the name implies, this evolution of the ZZ Gundam is heavily armored for increased defense, though that extra armor came loaded with more weapons as well. This made the ZZ Gundam a very powerful suit, though indeed its mobility appears to be somewhat hampered due to the added bulk. The twin rifle built into its right forearm already lets us witness a glimpse of its powerful arsenal. It also equips the standard beam saber, a missile launcher on its back and, uniquely to suits of this size, a particle cannon built in its waist, though its effectiveness is of course reduced because of the suit’s energy output. Mega Beam Cannon: forward, down + punch (C) 1/3 shots, 50 energy each. Highly consuming, and while damage is high it isn’t severe Missile Barrage: down, back + punch Shoots missiles from its back. They have vague homing capabilities. Damage isn’t very great even when all make impact. Beam Saber: forward, down, back + punch (U) Standard downwards attack, damage is nice and range is above average Knee Lift Shot: down, forward + kick (C) 2 shots, 50 energy each. First hit, performed up-close with the knee, must connect for the rifle to shoot. Damage is quite heavy, more than half a life bar, but once again heavily consuming Particle Cannon: Circle Shoots a small particle cannon beam for little damage. Can be done on air for same effects while still firing straight. Guard Punch: Back + punch Strikes vertically and almost without range, so unless the enemy is jumping or flying right above your head it won’t connect Mega Special - Hyper Mega Particle Cannon A bigger and more powerful version of the standard attack. Deals a lot of hits but not that much damage, strangely it can deal noticeably more damage with gauge-consuming attacks The O The antagonist of the Z Gundam era, The O is actually an interesting piece. It has very thick armor, which gives it an extra bit of defense, and its attacks are quite unpredictable. A tricky character to use, and deadly in the appropriate hands. For armament, besides the main rifle, The O has a total of four beam swords equipped, making it excellent at close range. Not only that, but it also includes a pair of hidden sub-arms to unexpectedly attack its opponents, which also explain why it has so many beam swords at its disposal. You better take some distance off this guy, if you can, otherwise it will destroy you right before the armor of its legs. Beam Rifle: down, forward + punch (C) 3/5 hits, 25 energy each. Quite odd numbers, be careful with that. Sub-Arm Sword Rush: down, back + punch Reveals its sub-arms and performs several swings with the two beam swords they can wield. Nice damage, though blockable despite being a beam sword. Beam Sword: forward, down, back + punch (G,U) Instead of the standard slash, this attack performs an upwards swing stopping at mid height. Severe damage despite that, around half a life bar. Rifle Tackle: down, forward + kick Performs a normal tackle with its rifle up front. Quite nice damage, though reach could be greater. Sub-Arm Low: forward + square Extends its sub-arms at the opponent’s feet, standard damage. Anti-Air Sub-Arm: back + triangle Same attack as before but aiming at a jumping enemy. Sub-Arm Sweep: down + square (while in the air) Same attack again, but this time aiming low from the air. Rifle Smash: forward + triangle Performs a downwards swing grabbing the rifle by its front. Severe damage, also knocks down the opponent. Mega Special – Beam Sword Dance Once it’s triggered, for the next few seconds, every standard punch or kick attack will turn into a swing of its main beam sword, as damaging as its normal unblockable attack and keeping its properties. The standard attack is the usual downwards swing, but on the air and crouched the swing turns upwards like in the normal attack. Can be devastating and deplete almost two life bars if the opponent is careless. The remaining special attacks can still be used if needed be. Wing Gundam An evolution of the original model, this suit became the titular one to be used during the anime. While its appearance is relatively simple compared to its ancestor, it was stated to be more well-balanced and superior in combat. In game, this Wing Gundam is in fact a recycled Z Gundam, using a modified sprite and exactly the same movelist. Why the protagonist’s titular suit was treated so badly in a game focusing mostly on its anime rather than the other spinoffs, is something that defies all logic. Luckily the sequel did a very good job at clearing the Wing Gundam’s name by including its ancestor instead and providing a magnificent character. Beam Rifle: down, forward + punch (C) 1/3 hits, 40 energy each. Nice damage. Beam Saber: forward, down, back + punch (G,U) Standard downwards slash and also standard damage. Somersault Kick: down, back + kick Performs a back somersault to then connect a powerful arrow kick. Can be done on air for greater range. Hyper Dash: down, forward + kick Movement attack, advances while crouched. Can’t be connected with any attack, so kind of useless. Mega Special – Bird Mode Attack Delivers a normal punch up close, then transforms into a Bird Mode form and soars vertically up to the sky. Depletes 75% of a full health bar, but of course tough to connect for being up close. Acguy This small guy shouldn’t fool you by its size. It’s extremely agile in terms of running and such, and it’s also well equipped. Both its arms are equipped with Iron Nails, a claw-like melee weapon of devastating damage, and it also has a machine gun mounted on its right arm. The Acguy’s strength relies on keeping itself moving, and with it evading incoming attacks and getting out of sight of the enemy suits. It can be quite painful to face given its agility, but the very limited number of attacks it has can make it predictable on the long run. Also, it’s quite fragile compared to the rest of the field, so better to stay out of harm. Acguy Machine Gun: down, forward + punch (C) 4/8 shots, 10 energy each, not very damaging Jump Uppercut: forward, down, forward + punch Performs the traditional uppercut seen in fighting videogames. Standard damage Claw Rush: down, back + punch Extends its arm and a retractable claw to attack. Decent damage Drill Claw: forward, down, back + punch (U) Extends its claws and jumps forward. Medium reach despite its small size, and heavy damage Scorpion Kick: forward + Circle An acrobatic attack that doesn’t deal more damage than standard Mega Special - Acguy Rolling Maximum Rolls around in the ground, covering twice the screen length. Easily avoidable, and also not very damaging. Hygogg This strange-looking suit sports a wider reach than usual thanks to its long arms, and also displays great agility with its thrusters. It is also quite loaded with armament, so mastering this guy can make it a mainstay in any worthy team. The Hygogg is equipped with a gatling gun on its arm, and counts with torpedoes stored on “capsules” on its head. It can also produce a beam saber from its palm. Other than that, it relies on its greater reach and melee attacks, which are not to be underestimated. Hand Machine Gun: down, forward + punch (C) 4/8 shots, 10 energy each, standard damage Homing Missiles: down, back + punch Launched from one of the “capsules” on its back, decent damage though not very advanced homing capabilities Hand Burners: forward, down, back + punch (U) Extends its arm with a beam saber erupting from its palm, then retracts it while damaging the opponent for decent damage Jumping Tackle: down, forward + kick Jumps diagonally a decent distance for equally decent damage despite not knocking down the opponent Tackle: forward + Circle Moves forward a bit in a crouching position, standard damage Arrow Kick: circle (in the air) Drops diagonally down, standard damage Mega Special - Hell Burner Rush Extends its arms several times. Depletes more than half a life bar, but it has medium reach and doesn’t knock down the opponent despite sending it slightly flying. GPO2A – Physalis Here we see the first attempt at making a Gundam with excessive power. The Physalis is not only bigger than usual, sporting a big shield, it also has armament which could bring down an entire fleet by itself. The Physalis equips a nuclear bazooka. Yep, nuclear. That alone should tell you just how powerful the weapon is. Other than that, it equips the regular beam saber, and of course sports its trademark shield which can also be used for damaging purposes. Its agility is greatly hampered by its thick armor, but it also gives it high defense. First appearance of Anavel Gato in the game. He seized this suit for evil purposes given its extreme power, but ultimately lost it in battle and switched to something even more extreme, as we’ll see below. Surely not someone to take defeats easily, huh? Hyper Bazooka: down, forward + punch (C) 1/2 shots, 30 energy each. Highly damaging with not so heavy consumption. Bazooka Rain: down, back + punch (G) Shoots upwards, and then scatters into several mini-shots that rain down upon the opponent, dealing severe damage despite a short charging time. Can also be used as anti-air, in which case delivers all hits and thus reduces a full health bar Beam Saber: forward, down, back + punch (G,U) Performs a semicircle using an upwards swing, depletes almost half a life bar Shield Buster: down, forward + kick Ascends vertically charging with its shield, severe damage Shield Smash: forward + Triangle (G) A downwards swing of its shield, standard damage Shield Tackle: down + X (G) Moves forward a bit while crouched, standard damage Shield Turn: down + Triangle (in the air) A downwards swing of its shield, nice damage Mega Special - Atomic Bazooka Shoots upwards to create a massive explosion in the air that lasts for a few seconds. Won’t hit an opposing suit of average size, so while it does deliver nice damage it will hardly connect enough hits Neue Ziel The second Mobile Armor in the game. This one is special in that it’s constantly flying, meaning it can move in all directions and reach everywhere on the screen, making it deadly. As a sub-boss it has superior stats, though its great power also comes with drawbacks attempting to compensate such excess. First of all, the Neue Ziel is unable to block and only when overheating does it flinch, meaning this guy will always be taking attacks head on and surviving them thanks to its strong defense while retaliating. As for weaponry, it uses its claw-arms for melee attacks, while it utilizes its missile launchers as well as its hand cannons for long range, saving its massive mega particle cannon for its mega special attack. And while being a Mobile Armor it can’t turn back, the Neue Ziel achieves this with the Rushing Tackle attack, said attack won’t be triggered if the opponent is behind, the armor will simply blast through the screen and reappear facing its opponent once more. Second and last appearance of Anavel Gato, making it the only character to pilot both types of suit. He obtained this spatial fighter in the latter part of his appearance in the anime, after having to retreat once his Gundam was destroyed in battle, using it to the last of his strength with all its powerful might. Hand Lasers: down, forward + punch (C) 3/6 shots, 10 energy each, heavily damaging Homing Missiles: down, back + punch Three small missiles are shot, not very damaging Hand Beam Saber: forward, back, down + punch (U) Extends a special arm to do an upwards swing. Doesn’t hit up-close for being slightly separated from the body Rushing Tackle: down, forward + kick Even though it doesn’t have great range, it can deplete way more than half a life bar Mega Special - Mega Particle Cannon Launched in a scatter trajectory, starts horizontally then moves down and then goes up. Extremely damaging, but unable to land most hits for its trajectory and its size. Hydra Gundam The “boss” Gundam, so to speak, created to be a high speed fighter. It indeed displays enormous agility and flight capabilities, and despite being a boss doesn’t have increased stats, but is its armament which should really instigate fear into its opponents. The Buster Gun attached to its right shoulder is capable of firing quickly, and its shoulder claw extensions can also fire lasers of their own. It of course sports a beam saber, and more importantly, it has a special shield which blocks projectile attacks, meaning it has increased means of defense against its competitors. Following what I stated with the Psycho Gundam before, the Hydra Gundam is piloted by Treize Kushrenada instead of this suit’s usual pilot. My theory is that Treize’s ideals, personality and character fitted better for the role of final boss but he never piloted a suit that could be placed beyond the already seen bosses (and also Mobile Suit Gundam Wing was very popular at the time of this game’s release in the US, since he’s the main antagonist from that series it’s only natural for him to “reprise” that role) Beam Cannon: down, forward + punch (C) 2/5 shots, 15 energy each. Average damage, though quick to pull out. Double Hydra Laser: down, back + punch (G) Shoots two twin laser beams from its shoulder extensions, decent damage. Beam Saber Double Slash: forward, down, back + punch (U) Performs an upwards swing immediately followed by the standard downwards swing. Augmented damage for the double movement, which is also quicker than other unblockable attacks seen Flip Kick: forward + Circle Performs a front somersault standing on its shoulder extensions, decent damage but doesn’t knock down the opponent Arrow Kick: Circle (in the air) Drops down diagonally, decent damage but doesn’t knock down the opponent Mega Special - Hydra Punch Rush Performs a kinetic combo, where it delivers several punches and kicks to end with an upwards vertical slash from its unblockable beam sword. Depletes more than half a health bar if all hits connect. Nu Gundam An evolution of the original Gundam, partly designed as well by its now experienced pilot. While it trades a bit of variety for more offensive and defensive might, the Nu Gundam is a classic heavy hitter with an equal dose of long range and close combat attacks. Besides the standard beam rifle, which is already powerful on its own, the Nu Gundam equips the traditional beam saber and a unique quirk of its own. We’ve seen other suits equip funnels, but in the Nu Gundam’s case the funnels are actually very big and can also be used for physical attacks as they’re attached to the suit itself instead of “sheathed”. However, being a guest character, the Nu Gundam still gets no Mega Special and thus its effectiveness is greatly reduced. This is the second suit piloted by the legendary Amuro Ray, now much more mature and with extensive experience as a pilot. This suit was used to battle Char Aznable once again in his Sazabi, as we can see from the more mature character portraits. Beam Rifle: down, forward + punch (C) 1/3 shots, 40 energy each. Severe damage. Beam Saber: forward, down, back + punch (G,U) Standard unblockable attack, with slightly greater range than usual and above standard damage Funnel Dispatch: back, down, forward + punch Deploys three funnels attached to its back, they’re very big but they aren’t destroyable like the other funnels Funnel Attack (after funnel dispatch): down, forward + punch Single shot for each funnel, meaning three total shots. Contrary to other attacks, these funnels do not close in on the enemy and stay besides the suit, and so their beam can sometimes miss against standard-sized enemies. They also deal severe damage, nearly half a life bar Jumping Knee: down, forward + kick A simple jump like an uppercut but attacking with its knee instead. Standard damage and doesn’t knock out the opponent. While I can’t say for sure this was one of the first localized game, I can tell you it’s basically a remake of a game exclusive to Japan during the last years of the 90s. The remake included a big change, which is the inclusion of the anime characters piloting their suits, the original game had entirely new characters at their helms, sometimes quite awkward creatures. After all, if you want to promote and/or entice more people to follow the franchise, what better way than this to not confuse fans any further? This game features 19 characters, each with its own weaponry and characteristics. Entries are very varied and from several anime spinoffs, and the passing of time in the franchise can clearly be seen as more modern characters have more advanced weaponry as well as more equipment. 12 of those characters are available from the start, 4 are unlockable bosses in the story mode and the remaining 3 are simply hidden characters to please fans of the franchise. BASICS Like any one-on-one fighting game, the characters have their own attacks, stats and gauges. The first one will be analyzed in detail below, the second one doesn’t have much to say if it wasn’t for a few exceptions, but the third one is indeed important. There are four gauges to pay attention to. First off are the health bars, which are three and of different colors so the player can follow its remaining health. Below them the remaining gauges can be seen. The three “1” close to the edge of the screen is the Mega Special gauge, meaning the suit has access to up to three attacks of such kind in the battle. The blue scaled bar right below the health bars is the boost gauge, which fills over time as the character boosts, and when it reaches its limit it barely drops to the ground. Finally, the “500” seen on the other edge is the Energy gauge, which is used by certain attacks of each suit and once it runs out said attacks are left unavailable (the attack goes through but doesn’t have “ammunition” to rely on and so it fails). Beyond this information, all we need to add are the commands. As any fighting game, the moves are triggered by combining buttons and directions. This time, however, to make things easier I’ll simply go with directions rather than using expressions like half circle and so on, basically because through my experience sometimes it’s better to go one button at a time rather than wanting to pull off the combo quickly. These are the symbols that will go after the attack’s name (sometimes improvised by me depending on what they are, sometimes “officially” named). -forward, back, down, up: these will be the directions used, no shortenings or whatever. -Square: Weak Punch. -Triangle: Heavy Punch. -X: Weak Kick. -Circle: Heavy Kick. -Punch and Kick: These signal whether an attack is performed with any of the punch or kick buttons. Most of the time makes no difference which one is used, exceptions will be listed (specially in attacks which are energy-consuming). -Mega Specials: this one-of-a-kind attack is always performed the same way, with down, forward, down forward and any of the punch buttons. The background turns dark as a special sound and voice are heard, and the attack is quickly performed. Blocking these is quite hard as they can catch you off-guard easily, so be extra careful and pay attention to the gauges. -(C): Means the attack consumes energy, the exact amount will of course be listed. -(G): Means the attack can only be performed on the ground, not while jumping or boosting. -(U): Means the attack is unblockable. The MC will also shout the phrase “You can’t defend” whenever such an attack is unleashed. With this out of the way, time to get into business! Ball Every game has some sort of bluff character, and in this case such “honor” befalls over Ball. It’s basically a worker pod which has been given a weapon, like if it was an armored infantry unit. Of course, it lacks defensive and offensive power, not sure one is worse, doesn’t have many attacks and it’s not like its small size will be of any help. Besides its big beam rifle, the Ball only incorporates construction equipment as its weapons, like a jackhammer. It also lacks a Mega Special, as it’s not battle oriented. Good luck winning a fight with this little guy, that’s basically the toughest challenge in this game. I can’t let slide the fact that the MC states “You’re Gonna Die!” when Ball pulls out some attacks, yet it deals so little damage. Those lines aren’t exclusive to this character, in fact the only others to use it are sub-bosses on really damaging attacks, but the bluff on this character is heavy in all aspects. Beam Cannon: down, forward + punch (C) 1/3 shots, 100 energy each. Great damage, but absurdly high consumption Jackhammer: down, back + punch Pulls out a jackhammer to attack at close range. Decent damage Rising Spin: down, back + kick Rotates its rifle as it jumps forward. Quite nice reach, though not very damaging Hammer Down: Triangle (in the air) Pulls out a hammer and strikes the opponent. Damage isn’t very great. Gundam RX78-2 Back to basics with this one, as we’re presented with the very first titular Gundam of the series, the legendary RX78-2. The one that started it all clearly shows its age when paired against suits created for later spinoffs, but nonetheless it deserves its spot in games like this. It’s weaponry is heavily limited, only the beam rifle and the beam sword that became the trademark weapons of almost any suit that followed it. A young Amuro Ray is at the helm of this legend, which fended off against at least two other suits seen below. It hasn’t been treated well in this game with so many limitations, but we can at least see why it was superior. Beam Rifle: down, forward + punch (C) 1/3 shots, 40 energy each. Highly consuming, but the damage when shooting more than once is worth it Beam Saber: forward, down, back + punch (G,U) Standard up-down swing, damage is still below the rest of its kind Charged Shield Uppercut: forward, down, forward + punch (C) (G) Jumps upwards with its shield, and if it connects, shoots four times its rifle downwards, 30 energy for each shot. Damage is decent, but plays a lot on consumption. Sky Kick: right + Circle (in the air) A downwards taekwondo-like swing with its leg, decent damage Rising Kick: down + Circle Jumps forward to deliver a knee kick, standard damage Psycho Gundam Probably the most broken character in the entire game, quite expected from a secret boss. Despite its gargantuan size it’s still a mobile suit, though of course it presents some drawbacks. Its movement is quite slow, though its thrusters are still powerful enough to enable a decent flight. On the other hand, it has increased defense and doesn’t flinch when hit, and it’s even able to block mid-attack. Of course, it also has increased reach and raw power. This mighty combination is what makes the Psycho Gundam so broken. As for its weaponry, the cannons on its shoulder are excessively powerful. Its beam saber is also very huge, and saving the best for last, it has mega particle cannons scattered all across its body. Quite inexplicably is that this suit, exclusively designed for this game series, is given to Valder Farkill, someone whose main suit is present in the game precisely as the last boss. It wouldn’t have been that strange to see this Gundam piloted by a fictional pilot, but whatever, at least the mistake was corrected somehow in the game’s sequel. Shoulder Cannons: down, forward + punch (C) 6/10 shots, 10 energy each. Standard damage and quick to pull off Beam Saber: forward, down, back + punch (U) Forms a sword from its wristband and performs an upwards slash. Wide range and devastating damage, slightly more than half a life bar Giant Uppercut: forward, down, forward + punch (G) Standard jumping uppercut, though damage is simply excessive: can almost deplete a full health bar if all hits connect Falling Fists: down + Triangle (in the air) Falls down fists first, can stuck itself if it fails but if it connects deals decent damage Mega Special - Mega Cannon Scatter Shot Shoots a beam from all its cannons, starting from the bottom and going up. Last hits are sure to miss most of the time, but still lands heavy damage, over half a life bar with ease Big Zam The first Mobile Armor of the game. This one looks a bit grotesque, with heavy legs but no arms whatsoever, though it makes up for it with extreme weaponry at its disposal. The Big Zam never flinches when attacked and it’s unable to block or turn back, though the latter is hardly an issue with this bad guy. It has heavily increased defense, possibly adduced to its size and mass, and speaking of the latter it also affects the power of its thrusters, though it can still somewhat fly around if wanted. Now, for its weaponry. Its main weapon is a large Mega Particle Cannon mounted on its front, it also has a set of homing missiles capable of being fired from the lower part of its torso, and more importantly several lasers lined up along its torso so it can fire at almost any direction. Each of this attacks delivers heavy damage, which coupled with its overwhelming presence makes it a force to be reckoned with. Homing Missiles: down, forward + punch (C) 5 shots, 10 energy each. Extreme damage. Same attack with weak and strong punch, so very overpowered. Air lasers: Triangle Five scattering lasers that aim diagonally upwards. Kind of useless, very rarely will an enemy be above its head. Ground Lasers: Square Two lasers aiming diagonally down. Delivers heavy damage Walking Attack: Hold forward Simply by walking towards the target is as if it kicked it. No joke, the damage is so heavy you can defeat an undamaged enemy in 10 steps Backwards Kick: back + X Useful since it can’t turn back, but damage is not great Boost Tackle: down + Circle Doesn’t move too much, but its massive weight means the hit is quite heavy. Heavy Stomp: Circle (in the air) Dives down to stomp its enemy with both feet. Very decent damage, though this guy will rarely be in the air Jumping Knee: down + Triangle Jumps a bit forward for decent damage. Strange attack, rarely used given its arsenal Mega Special - Mega Particle Cannon Unveils its frontal cannon to shoot a massive beam. Delivers a ton of hits and depletes more than a full health bar Zeong Zeong has no legs, meaning the kick attacks instead unleash two rocket thrusters. It stays hovering around, meaning it still has the same flight capabilities as any other suit. Its arms are extendable, and it also has cannons on its fingertips as well as on its chest and head, as seen in its mega special. Its curious build makes it an easy target even on the ground, so it’s quite exposed to attacks. This is one of two suits piloted by Char Aznable, a recurring antagonist/protagonist of the series in its initial spinoffs. It was probably one of the least used as it could only be used once due to being incomplete (hence its lack of legs) and used “out of desperation” by Char to enter the battlefield. His younger avatar denotes the chronological setting of this suit. Hand Beam: down, forward + punch (C) 6/12 shots, 10 energy each. Shot from its fingers, three shots each time. Decent damage Punch Rush: down, back + punch First hit must connect to unleash the full attack. Short range, but severe damage of nearly half a life bar Energy Blast: forward, down, back + punch (U) Covers its hand in energy and swings it vertically like a sword. Severe damage just like before Vertical Punch: back + Triangle (G) Aims upwards, so only hits enemies jumping or flying directly over it. An unexpected trump card, but not very useful in most situations Sweep Punch: down + Triangle (in the air) Extends its punch and performs a semi-circle downwards. Deals just one hit, but decent damage for its reach Mega Special - Psycommu Attack Unleashes its fists while it fires several shots from its mouth. The shots deal very little damage, the bulk is done with the flying fists. Capable of depleting more than a full health bar if combining both, so better perform it at mid range at most. Sazabi Char returns as a more mature and skilled pilot in the Sazabi. This suit was specifically built for him as he returned to his antagonistic ways, and as shown from its extensive weaponry, was designed to be a front leader. This suit is well-equipped for both long range and hand-to-hand combat. Besides its main beam rifle it also has a scattering mega particle cannon built into it and it’s also equipped with a set of funnels. It also equips a beam tomahawk as its main combat weapon, contrary to most other characters which use sabers. Beam Shot Rifle: down, forward + punch (C) 3/5 shots, 30 energy each. Shoots them in a scatter shot rather than straight. Nice damage if all hits can connect Beam Axe: forward, down, back + punch (G,U) Standard unblockable attack, but uses an axe instead of a sword and performs two consecutive slashes, though doesn’t deal increased damage despite the greater range Funnel Dispatch: back, down, forward + punch Dispatches three funnels, bigger than standard, which float around it. Funnel Attack (after funnel dispatch): down, forward + punch Two shots from each funnel means six total hits. Not bad damage. Spin Kick: down, back + kick Performs a front somersault on the spot to knock down the enemy. Hover Slide Kick: down + Circle (G) Dashes a bit forward for a low kick that knocks down the opponent Arrowback Kick: down + Circle (on air) Drops diagonally backwards, so it’s only helpful when you jump or fly past the enemy. Mega Special - Beam Shot Flush Shoots a scatter shot from the scattering mega particle cannon on its skirt armor. Can deliver a lot of hits up close and is capable of depleting a full health bar if all hits connect. Qubeley A somewhat awkward looking suit, with those big “shoulders”. Still, the Qubeley is a perfectly usable character with several moves to its name, and agile enough to tackle anyone up close. Its armament is very basic. It has beam guns mounted on its palms, it equips a beam sword and it’s also loaded with a standard set of funnels, giving it a few chances at a distance besides its up close superiority. A fun fact is that, chronologically speaking, this was the first mobile suit to actually be able to use funnels, which explains its rather small size compared to other users of the same weapon. Beam Gun: down, forward + punch (C) 2/4 hits, 40 energy each. Standard damage. Beam Saber: forward, down, back + punch (G,U) Standard downwards slash and also standard damage. Double Jumping Kick: down, forward + kick (G) Quite simply a double jumping kick. Nice damage. Somersault Kick: down, forward + kick (while in the air) The double jumping kick turns into a back somersault while on the air. Damage seems to increase slightly. Jumping Rush Kick: down, back + kick Jumps and then thrusts with its leg forward to cover almost the whole screen. Damage is standard, though. Funnel Dispatch: back, down, forward + punch Dispatches three funnels which float around it. Funnel Attack (after funnel dispatch): down, forward + punch Two shots from each funnel means six total hits. Nice damage. Scorpion Kick: back + kick (G) Attacks upwards from behind, so kind of useless. Mega Special – All-Out Funnel Attack Dispatches twelve funnels in quick succession, which fire almost right away to bombard the opponent. Depletes a bit more than half a health bar. Quin Mantha The Quin Mantha is bigger than most other suits, which means it has increased range and attack, almost making it kind of a sub-boss. However, it seems its defense hasn’t been modified that much, which coupled with its height mean it can take on most attacks that would miss regular-sized suits. The Quin Mantha equips several particle guns, most notably on its palms and on its shoulders (only one of the last is visible at a time). It also sports a massive beam saber, and is equipped with a set of funnels which are noticeably more powerful than average. This gives it an incredible advantage at long range, while its greater reach due to its size means its melee attacks are a force to be reckoned with. Beam Launcher: down, forward + punch (C) 3/6 shots, 20 energy each, one round of 3 shots with each palm. Deals nice damage. Beam Shower: down, back + punch Jumps slightly and shoots a scatter shot from its shoulder Funnel Dispatch: back, down, forward + punch Dispatches four small funnels, which remain flying around it Funnel Attack (after funnel dispatch): down, forward + punch Two shots from each funnel, meaning eight hits total. Severe combined damage Beam Saber: forward, down, back + punch (U) Standard attack but backhand, great range and severe damage Tackle: forward + Circle Moves forward a bit in a semi-crouched stance. Deals severe damage in a single hit Triple Punch: Triangle First attacks with its left punch, then with both at the same time. Depletes more than half a life bar Elbow Drop: forward + Triangle Performed with both its arms, decent range without moving and more than decent damage Body Press: down + Triangle (in the air) Dives down belly first, hitting with any part of its massive body. Decent damage Mega Special - Mega Beam Cannon Shoots several beams from its shoulder. Works somewhat like an scatter shot, so needs to be performed quite close to the enemy for all the hits to connect, even more due to its greater than average height. Capable of depleting almost an entire health bar if all hits connect Zaku II We’ve seen the legendary protagonist that started it all, but of course it had a rival to beat. This rival was the Zaku II, a common archenemy found in several Gundam iterations which formed the basis of the rival armies for most of the series beginning. The Zaku is equipped with a machine gun as its primary weapon, though it also has cracker grenades as an optional weapon and of course the heat tomahawk, probably an ancestor to the more advanced beam sabers we’d see later on after its usage by the RX78-2. It’s to be noted that the Zaku II is quite agile, even if it doesn’t have that many attacks at its disposal. The downside is that it’s quite vulnerable to attacks, with noticeably lower defense compared to the rest of the field. Zaku Machine Gun: down, forward + punch (C) 5/10 shots, 10 energy each. Standard damage Cracker Grenades: down, back + punch Short range projectile attack, three grenades that explode shortly after launch. Decent damage and kind of protects from incoming projectiles Heat Hawk: forward, down, back + punch (U) Standard unblockable attack, but uses an axe instead of a sword. Damage is also standard Rising Tackle: down, forward + kick A diagonally upwards tackle with the help of its thrusters, decent damage Shoulder Tackle: forward + Circle (G) Moves forward a bit in a crouching position, standard damage Mega Special - Cracker Special A more powerful and continuous version of the standard attack. Delivers a lot of hits, but not as much damage. Z Gundam Ah, the letter Z and the anime have a long history xD. Anyway, this Gundam was specifically developed to be used both on earth and on space, by having a special Waverider form. This was achieved in part by Kamiru Bidan, who besides being its main pilot also gave in some ideas to finish up its design. The Z Gundam isn’t heavily loaded with weapons, it only has its beam rifle and the beam sword. It barely has any attacks besides that, so variety isn’t a word that can describe its moveset. A protagonist which could have been given a bit more game, in my opinion. Beam Rifle: down, forward + punch (C) 1/3 hits, 40 energy each. Standard damage. Beam Saber: forward, down, back + punch (G,U) Standard downwards slash and also standard damage. Somersault Kick: down, back + kick Performs a back somersault to then connect a powerful arrow kick. Can be done on air for greater range. Hyper Dash: down, forward + kick Movement attack, advances while crouched. Can’t be connected with any attack, so kind of useless. Mega Special – Waverider Attack Delivers a normal punch up close, then transforms into its Waverider form and soars vertically up to the sky. Depletes 75% of a full health bar, but of course tough to connect for being up close. Full Armor ZZ Gundam As the name implies, this evolution of the ZZ Gundam is heavily armored for increased defense, though that extra armor came loaded with more weapons as well. This made the ZZ Gundam a very powerful suit, though indeed its mobility appears to be somewhat hampered due to the added bulk. The twin rifle built into its right forearm already lets us witness a glimpse of its powerful arsenal. It also equips the standard beam saber, a missile launcher on its back and, uniquely to suits of this size, a particle cannon built in its waist, though its effectiveness is of course reduced because of the suit’s energy output. Mega Beam Cannon: forward, down + punch (C) 1/3 shots, 50 energy each. Highly consuming, and while damage is high it isn’t severe Missile Barrage: down, back + punch Shoots missiles from its back. They have vague homing capabilities. Damage isn’t very great even when all make impact. Beam Saber: forward, down, back + punch (U) Standard downwards attack, damage is nice and range is above average Knee Lift Shot: down, forward + kick (C) 2 shots, 50 energy each. First hit, performed up-close with the knee, must connect for the rifle to shoot. Damage is quite heavy, more than half a life bar, but once again heavily consuming Particle Cannon: Circle Shoots a small particle cannon beam for little damage. Can be done on air for same effects while still firing straight. Guard Punch: Back + punch Strikes vertically and almost without range, so unless the enemy is jumping or flying right above your head it won’t connect Mega Special - Hyper Mega Particle Cannon A bigger and more powerful version of the standard attack. Deals a lot of hits but not that much damage, strangely it can deal noticeably more damage with gauge-consuming attacks The O The antagonist of the Z Gundam era, The O is actually an interesting piece. It has very thick armor, which gives it an extra bit of defense, and its attacks are quite unpredictable. A tricky character to use, and deadly in the appropriate hands. For armament, besides the main rifle, The O has a total of four beam swords equipped, making it excellent at close range. Not only that, but it also includes a pair of hidden sub-arms to unexpectedly attack its opponents, which also explain why it has so many beam swords at its disposal. You better take some distance off this guy, if you can, otherwise it will destroy you right before the armor of its legs. Beam Rifle: down, forward + punch (C) 3/5 hits, 25 energy each. Quite odd numbers, be careful with that. Sub-Arm Sword Rush: down, back + punch Reveals its sub-arms and performs several swings with the two beam swords they can wield. Nice damage, though blockable despite being a beam sword. Beam Sword: forward, down, back + punch (G,U) Instead of the standard slash, this attack performs an upwards swing stopping at mid height. Severe damage despite that, around half a life bar. Rifle Tackle: down, forward + kick Performs a normal tackle with its rifle up front. Quite nice damage, though reach could be greater. Sub-Arm Low: forward + square Extends its sub-arms at the opponent’s feet, standard damage. Anti-Air Sub-Arm: back + triangle Same attack as before but aiming at a jumping enemy. Sub-Arm Sweep: down + square (while in the air) Same attack again, but this time aiming low from the air. Rifle Smash: forward + triangle Performs a downwards swing grabbing the rifle by its front. Severe damage, also knocks down the opponent. Mega Special – Beam Sword Dance Once it’s triggered, for the next few seconds, every standard punch or kick attack will turn into a swing of its main beam sword, as damaging as its normal unblockable attack and keeping its properties. The standard attack is the usual downwards swing, but on the air and crouched the swing turns upwards like in the normal attack. Can be devastating and deplete almost two life bars if the opponent is careless. The remaining special attacks can still be used if needed be. Wing Gundam An evolution of the original model, this suit became the titular one to be used during the anime. While its appearance is relatively simple compared to its ancestor, it was stated to be more well-balanced and superior in combat. In game, this Wing Gundam is in fact a recycled Z Gundam, using a modified sprite and exactly the same movelist. Why the protagonist’s titular suit was treated so badly in a game focusing mostly on its anime rather than the other spinoffs, is something that defies all logic. Luckily the sequel did a very good job at clearing the Wing Gundam’s name by including its ancestor instead and providing a magnificent character. Beam Rifle: down, forward + punch (C) 1/3 hits, 40 energy each. Nice damage. Beam Saber: forward, down, back + punch (G,U) Standard downwards slash and also standard damage. Somersault Kick: down, back + kick Performs a back somersault to then connect a powerful arrow kick. Can be done on air for greater range. Hyper Dash: down, forward + kick Movement attack, advances while crouched. Can’t be connected with any attack, so kind of useless. Mega Special – Bird Mode Attack Delivers a normal punch up close, then transforms into a Bird Mode form and soars vertically up to the sky. Depletes 75% of a full health bar, but of course tough to connect for being up close. Acguy This small guy shouldn’t fool you by its size. It’s extremely agile in terms of running and such, and it’s also well equipped. Both its arms are equipped with Iron Nails, a claw-like melee weapon of devastating damage, and it also has a machine gun mounted on its right arm. The Acguy’s strength relies on keeping itself moving, and with it evading incoming attacks and getting out of sight of the enemy suits. It can be quite painful to face given its agility, but the very limited number of attacks it has can make it predictable on the long run. Also, it’s quite fragile compared to the rest of the field, so better to stay out of harm. Acguy Machine Gun: down, forward + punch (C) 4/8 shots, 10 energy each, not very damaging Jump Uppercut: forward, down, forward + punch Performs the traditional uppercut seen in fighting videogames. Standard damage Claw Rush: down, back + punch Extends its arm and a retractable claw to attack. Decent damage Drill Claw: forward, down, back + punch (U) Extends its claws and jumps forward. Medium reach despite its small size, and heavy damage Scorpion Kick: forward + Circle An acrobatic attack that doesn’t deal more damage than standard Mega Special - Acguy Rolling Maximum Rolls around in the ground, covering twice the screen length. Easily avoidable, and also not very damaging. Hygogg This strange-looking suit sports a wider reach than usual thanks to its long arms, and also displays great agility with its thrusters. It is also quite loaded with armament, so mastering this guy can make it a mainstay in any worthy team. The Hygogg is equipped with a gatling gun on its arm, and counts with torpedoes stored on “capsules” on its head. It can also produce a beam saber from its palm. Other than that, it relies on its greater reach and melee attacks, which are not to be underestimated. Hand Machine Gun: down, forward + punch (C) 4/8 shots, 10 energy each, standard damage Homing Missiles: down, back + punch Launched from one of the “capsules” on its back, decent damage though not very advanced homing capabilities Hand Burners: forward, down, back + punch (U) Extends its arm with a beam saber erupting from its palm, then retracts it while damaging the opponent for decent damage Jumping Tackle: down, forward + kick Jumps diagonally a decent distance for equally decent damage despite not knocking down the opponent Tackle: forward + Circle Moves forward a bit in a crouching position, standard damage Arrow Kick: circle (in the air) Drops diagonally down, standard damage Mega Special - Hell Burner Rush Extends its arms several times. Depletes more than half a life bar, but it has medium reach and doesn’t knock down the opponent despite sending it slightly flying. GPO2A – Physalis Here we see the first attempt at making a Gundam with excessive power. The Physalis is not only bigger than usual, sporting a big shield, it also has armament which could bring down an entire fleet by itself. The Physalis equips a nuclear bazooka. Yep, nuclear. That alone should tell you just how powerful the weapon is. Other than that, it equips the regular beam saber, and of course sports its trademark shield which can also be used for damaging purposes. Its agility is greatly hampered by its thick armor, but it also gives it high defense. First appearance of Anavel Gato in the game. He seized this suit for evil purposes given its extreme power, but ultimately lost it in battle and switched to something even more extreme, as we’ll see below. Surely not someone to take defeats easily, huh? Hyper Bazooka: down, forward + punch (C) 1/2 shots, 30 energy each. Highly damaging with not so heavy consumption. Bazooka Rain: down, back + punch (G) Shoots upwards, and then scatters into several mini-shots that rain down upon the opponent, dealing severe damage despite a short charging time. Can also be used as anti-air, in which case delivers all hits and thus reduces a full health bar Beam Saber: forward, down, back + punch (G,U) Performs a semicircle using an upwards swing, depletes almost half a life bar Shield Buster: down, forward + kick Ascends vertically charging with its shield, severe damage Shield Smash: forward + Triangle (G) A downwards swing of its shield, standard damage Shield Tackle: down + X (G) Moves forward a bit while crouched, standard damage Shield Turn: down + Triangle (in the air) A downwards swing of its shield, nice damage Mega Special - Atomic Bazooka Shoots upwards to create a massive explosion in the air that lasts for a few seconds. Won’t hit an opposing suit of average size, so while it does deliver nice damage it will hardly connect enough hits Neue Ziel The second Mobile Armor in the game. This one is special in that it’s constantly flying, meaning it can move in all directions and reach everywhere on the screen, making it deadly. As a sub-boss it has superior stats, though its great power also comes with drawbacks attempting to compensate such excess. First of all, the Neue Ziel is unable to block and only when overheating does it flinch, meaning this guy will always be taking attacks head on and surviving them thanks to its strong defense while retaliating. As for weaponry, it uses its claw-arms for melee attacks, while it utilizes its missile launchers as well as its hand cannons for long range, saving its massive mega particle cannon for its mega special attack. And while being a Mobile Armor it can’t turn back, the Neue Ziel achieves this with the Rushing Tackle attack, said attack won’t be triggered if the opponent is behind, the armor will simply blast through the screen and reappear facing its opponent once more. Second and last appearance of Anavel Gato, making it the only character to pilot both types of suit. He obtained this spatial fighter in the latter part of his appearance in the anime, after having to retreat once his Gundam was destroyed in battle, using it to the last of his strength with all its powerful might. Hand Lasers: down, forward + punch (C) 3/6 shots, 10 energy each, heavily damaging Homing Missiles: down, back + punch Three small missiles are shot, not very damaging Hand Beam Saber: forward, back, down + punch (U) Extends a special arm to do an upwards swing. Doesn’t hit up-close for being slightly separated from the body Rushing Tackle: down, forward + kick Even though it doesn’t have great range, it can deplete way more than half a life bar Mega Special - Mega Particle Cannon Launched in a scatter trajectory, starts horizontally then moves down and then goes up. Extremely damaging, but unable to land most hits for its trajectory and its size. Hydra Gundam The “boss” Gundam, so to speak, created to be a high speed fighter. It indeed displays enormous agility and flight capabilities, and despite being a boss doesn’t have increased stats, but is its armament which should really instigate fear into its opponents. The Buster Gun attached to its right shoulder is capable of firing quickly, and its shoulder claw extensions can also fire lasers of their own. It of course sports a beam saber, and more importantly, it has a special shield which blocks projectile attacks, meaning it has increased means of defense against its competitors. Following what I stated with the Psycho Gundam before, the Hydra Gundam is piloted by Treize Kushrenada instead of this suit’s usual pilot. My theory is that Treize’s ideals, personality and character fitted better for the role of final boss but he never piloted a suit that could be placed beyond the already seen bosses (and also Mobile Suit Gundam Wing was very popular at the time of this game’s release in the US, since he’s the main antagonist from that series it’s only natural for him to “reprise” that role) Beam Cannon: down, forward + punch (C) 2/5 shots, 15 energy each. Average damage, though quick to pull out. Double Hydra Laser: down, back + punch (G) Shoots two twin laser beams from its shoulder extensions, decent damage. Beam Saber Double Slash: forward, down, back + punch (U) Performs an upwards swing immediately followed by the standard downwards swing. Augmented damage for the double movement, which is also quicker than other unblockable attacks seen Flip Kick: forward + Circle Performs a front somersault standing on its shoulder extensions, decent damage but doesn’t knock down the opponent Arrow Kick: Circle (in the air) Drops down diagonally, decent damage but doesn’t knock down the opponent Mega Special - Hydra Punch Rush Performs a kinetic combo, where it delivers several punches and kicks to end with an upwards vertical slash from its unblockable beam sword. Depletes more than half a health bar if all hits connect. Nu Gundam An evolution of the original Gundam, partly designed as well by its now experienced pilot. While it trades a bit of variety for more offensive and defensive might, the Nu Gundam is a classic heavy hitter with an equal dose of long range and close combat attacks. Besides the standard beam rifle, which is already powerful on its own, the Nu Gundam equips the traditional beam saber and a unique quirk of its own. We’ve seen other suits equip funnels, but in the Nu Gundam’s case the funnels are actually very big and can also be used for physical attacks as they’re attached to the suit itself instead of “sheathed”. However, being a guest character, the Nu Gundam still gets no Mega Special and thus its effectiveness is greatly reduced. This is the second suit piloted by the legendary Amuro Ray, now much more mature and with extensive experience as a pilot. This suit was used to battle Char Aznable once again in his Sazabi, as we can see from the more mature character portraits. Beam Rifle: down, forward + punch (C) 1/3 shots, 40 energy each. Severe damage. Beam Saber: forward, down, back + punch (G,U) Standard unblockable attack, with slightly greater range than usual and above standard damage Funnel Dispatch: back, down, forward + punch Deploys three funnels attached to its back, they’re very big but they aren’t destroyable like the other funnels Funnel Attack (after funnel dispatch): down, forward + punch Single shot for each funnel, meaning three total shots. Contrary to other attacks, these funnels do not close in on the enemy and stay besides the suit, and so their beam can sometimes miss against standard-sized enemies. They also deal severe damage, nearly half a life bar Jumping Knee: down, forward + kick A simple jump like an uppercut but attacking with its knee instead. Standard damage and doesn’t knock out the opponent. -------------------- |
Administrator
Site Staff Manager, Content Writer, Console Manager
Affected by 'Carpal Tunnel Syndrome'
Registered: 07-03-13
Location: Barcelona, Spain
Last Post: 6 hours
Last Active: 6 hours
Site Staff Manager, Content Writer, Console Manager
| Vizzed #1 Hardstyle fan |
Affected by 'Carpal Tunnel Syndrome'
Registered: 07-03-13
Location: Barcelona, Spain
Last Post: 6 hours
Last Active: 6 hours
