

 User Notice
 Forum Links
Guide: Hudson Hawk
The guide that nobody's been waiting for XD
The guide that nobody's been waiting for XD
Play Hudson Hawk Online


Thread Information
Thread Actions


Order
Hudson Hawk
Game's Ratings
Overall
Graphics
Sound
Addictiveness
Depth
Story
Difficulty
Average User Score
8.2
7
4
8
1
2
1
07-27-15 03:03 PM
 MattyIce is Offline
| ID: 1190460 | 6985 Words
MattyIce is Offline
| ID: 1190460 | 6985 Words
 MattyIce is Offline
| ID: 1190460 | 6985 Words
MattyIce
Level: 86


POSTS: 1228/1885
POST EXP: 233661
LVL EXP: 5964953
CP: 9021.0
VIZ: 1163681

POSTS: 1228/1885
POST EXP: 233661
LVL EXP: 5964953
CP: 9021.0
VIZ: 1163681
Likes: 2 Dislikes: 0
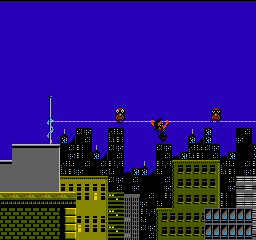
INTRODUCTION Ah yes, Hudson Hawk. Your character, Eddie Hawk, is one of the best cat burglars on the planet. However, a fiendish couple has ordered him to steal two of Leonardo da Vinci's most prized works. One is located in Rutherford's, which is a heavily guarded auction house, and the other rests in a vault that's inside the Vatican! This evil couple is trying to rebuild da Vinci's Alchemy Project that involves a machine that creates gold. Its good for them of course, but it makes for a disaster for the rest of the world's economy. They need Hawk's help to do so, and they intend to kill his best friend if Hawk does not comply. We need you to help the Hawk save his friend, and maybe steal one of the key components of the machine to save the world from financial trouble. I have to be honest with you here...the very first time that I played this game, I played it for all of 3 minutes before I gave up on it and played something else on the NES. It will probably take rookies who have never played this game before some time to get used to the controls, as they seem a little off. The running and jumping just doesn't seem all that smooth as most other NES games do. I recommend you practice playing on the first part of the first level on the rooftop. Try to get used to the "off" controls I mentioned earlier, and hopefully you'll see what I'm talking about. You don't have to go through the entire level to practice though. Just practice running around and jumping on the tables with the umbrellas on them. After you feel like you're ready, restart the game so you have a fresh slate to start with. There are a total of 3 levels in this game. Before you begin each one, you are given a brief descr With all of that said, let us officially begin this journey to save the world...'s economy! WALKTHROUGH LEVEL 1 Before you actually start, keep in mind that this is absolutely not a game that you can just coast your way through. There are plenty of traps and a bunch of levers that you will have to switch on and off in order to get to the next part of the level. But of course you have me, so I will tell you about every single trap and every single enemy so you can hopefully get through this with as little damage as possible. If you have to, I recommend you read ahead a little bit so you can expect the many traps that are in this game. Anyways, the first level has the following briefing statement: "HAWK, YOUR FIRST TASK IS TO ENTER RUTHERFORD'S AUCTION HOUSE. AVOIDING THE HIGH SECURITY SYSTEM, MAKE YOUR WAY TO THE 7TH FLOOR, WHERE YOU WILL FIND THE SAFE. OPEN THE SAFE AND RETRIEVE LEONARDO DA VINCI'S PRICELESS HORSE SCULPTURE, THE SFORZA. GOOD LUCK..." So you begin on a rooftop. You immediately see a big, black dog coming at you from the right. You can either jump on the tables with the umbrellas on them and avoid the dog completely, or you can stun the dog with one of your softballs and just run past him (because there is no way to kill it). If you try to go around him and he gets you, he will drag you all the way to the edge of the roof and throw you down to the ground level, where you'll have to go through the door and do the whole thing all over again. Go to the right and jump across the tables, then jump onto the ledge when you come to it. You will notice a wire that goes to the other building on the other side. You have to simply stand underneath it and press the A button to jump and Hawk will automatically grab the wire. Throw some softballs at the two owls you come across to get them out of the way to reach the other side. Head to the right and you'll see a lift with a gold crate next to it. You have to get on the other side of the crate and push it back to the left until its on the lift. Now stand on the lift with the crate next to you and press Up on the D-Pad. I can show you about what it should look like in the next two before and after screenshots here.   After the lift takes you up, push the crate to the right just a little bit, but don't push it all the way off the ledge just yet. Go back and take the lift down again, and go to the right until you see a second golden crate. Do yourself a big favor first and stun this other little brown dog that you will eventually see on the right, and stun him with a softball. Then, run up to him quickly while he's still stunned and punch him off the screen by holding down the B button. After that, push the second crate to the left until its just under where you left the first crate. Don't place it directly under the first crate...place it just enough to where you'll be able to stack the two. Now take the lift back up and push the first crate off the ledge so it lands on the second crate. Now push the two crates over to the windows. You should now be able to jump on the crates so you can jump up to the windows. Obviously, you'll want to stand in front of the only window that is open and enter it by pressing Up on the D-Pad. RUTHERFORD'S AUCTION HOUSE You are now inside the Rutherford's Auction House that you heard about in your briefing at the very beginning of the mission. Your next step is to get to the 7th floor, while trying to avoid this high security system. Once you enter the building, take a minute and notice the pattern of the security laser. You will see a bunch of these throughout the game, and they all have the same pattern. The first thing you should do here is while avoiding the security laser, push the orange crate up against the yellow wall. If you push it too close to the wall then the crate will move back to its original position, so just try to get it as close as you can to the wall. Before you jump over the wall, make sure to throw a softball at the orange guard on the bike to get rid of him. You'll have to do it by first jumping, and then press the B button to throw the softball at the peak of your jump. Once you get over the wall, you'll see a yellow ramp before an even bigger yellow wall. Simply jump onto the ramp to bounce over the wall. After you grab the silver coin, this next part will be somewhat tricky. You will see on the floor in front of you that every other tile will be striped. If you step on any of these striped tiles, you will set off an alarm that increases the speed of the security lasers and it will also make more guards appear for a while. There's no way to turn off the alarm once you set it on, so you'll just have to wait until it goes off on its own. When you start jumping over the striped tiles, after your second jump toss a softball before going any further to get rid of the guard. After you jump over all the striped tiles, you'll notice two more kinds of triggers that set off the alarm. The first one is a small, gray alarm panel that you can just crawl under by pressing Down on the D-Pad. The next one is a yellow alarm panel that you can either crawl under (even though it doesn't look like you can, but I promise the alarm won't set off if you do) or jump over it. After that, you'll see another orange crate. Walk up to the crate and throw a softball when you get to it to take out another guard. Push the crate to the right until it gets right before another gray alarm panel. Then jump on the crate, and jump up to grab the wire and make your way across to the other side. If you fall down the hole it will take you all the way back to the beginning of the auction house, so be careful not to. After you get across the chasm, drop down from the wire and immediately throw a softball to dispose of another guard. Make your way past the orange door and you'll notice another security laser that slightly faster than the first one you encountered. Carefully get past the laser and grab the coins on the other side. Continue to the right and press Up when you get to the elevator that takes you down to the 10th floor. When you get to the 10th floor, make sure to immediately duck as you'll see a new enemy that's trying to shoot you. Crawl over to the chair and also make a note of the security laser here. You have to try to bounce on the chair to get across the chasm and throw a softball while you're in the air to get rid of the enemy, all while avoiding the security laser. It might take you a couple tries to do successfully but luckily this might be the hardest part in the game, to be honest. Anyway, when you get past the laser, you'll see yet another orange crate that you'll have to push to the left against the yellow wall. Crawl under the gray panels and before you drop down, you'll need to throw two softballs at the guard with a broom...the janitor. Continue to the left, grab the coin, and jump over the single striped tile. After you get over the tile, you'll need to throw two more softballs at a kid with a camera to dispose of him. Crawl under the gray and yellow alarm panels and you'll come to another orange crate that you'll have to push to the left against the yellow wall again. Get over the wall and continue left until you get to another chair. Bounce on the chair to get over the striped tiles and immediately duck (press the Down button on the D-Pad) when you land. There will be another enemy with a gun, so throw a softball at him while you're still on the ground. Then carefully get past the security laser, and continue to the left until you get to what looks like a small, yellow window. Its actually a chute that you need to go down, so press Up to go down it, oddly enough. You'll see Hawk riding down a whole bunch of chutes and when you finally get to the bottom, grab the many coins that are down there, climb up the ladder, and move one screen to the right. Here, try to notice the pattern of the smoke jets and carefully get past the first two and go up the ladder to the next screen, but do it slowly as 2 more smoke jets will be waiting for you at the top. Again, carefully get past the jets as you make your way up the ladder. When you get to the top, don't even touch that spinning fan because it results in an instant death. Instead, look to the right and throw a softball at the switch to disable some electric nodes that are in the basement. I made two more before and after screenshots to show you what the switch should look like.   Go back down the ladder, and head to the right when you get to the bottom. Go past the smoke jet and continue to the right. This is the area where the electric nodes would still be on if you haven't flipped the switch properly that you just came across. If you did it correctly then they should be off and you should be able to go to the right and climb the ladder. When you get to the top, get off the ladder and move carefully past the 2 smoke jets. Before you go up the next ladder, make sure you flip the switch just like you did the one next to the big fan. After that, fall down the hole instead of going up the ladder that's right there. Instead, head to the left, back across the same smoke jet again, and go up the same ladder. This time, you'll notice the big fan is no longer spinning anymore. Head all the way to the left one screen. Here, you'll want to go up this huge ladder two screens, while of course trying to avoid the smoke jets. When you finally get to the top, go to the right one screen. Jump up and grab the red bar to go over the electric nodes. When you get off on the other side, head past the smoke jet until you come to another set of electric nodes. You have to be extremely quick here, but here's the easiest way to do this. Get as close as you can to the electric nodes without touching them, then face away from them to the left. Toss a softball at the switch to flip it and turn the electric nodes off. They'll only be off for two seconds so you have to quickly jump across them, and don't worry about the coins if you don't get them. Continue to the right, past the smoke jet, until you get to the blue squares. You simply need to go down one screen. Now head down to the blue square that's right underneath the yellow switch. You have to be quick here again, because this switch temporarily turns off the big fan on the right. So immediately after you throw a softball to flip the switch, get to the bottom and run like hell past the smoke jet and past the fan as fast as you can. Grab the coins after you've done that, and head down the ladder one screen. Whenever you're ready, throw another softball at the switch to turn off the electric nodes and be quick about heading down and back to the right across them. Head down one more screen, crawl to the left, and be very careful about getting across the battery of smoke jets here, and go to the right one screen. Here, crawl under the gray alarm panel and toss a softball at the orange guard on the bike while you avoid the security laser. On the other side of the laser, you'll have to crawl under another gray panel until you come to a couch. You have to bounce on the couch to get on top of the yellow bureau. Next, toss a softball to get rid of the guard and continue your way to the right. There's not too much for a little bit as you'll just need to get past a bunch of gray and yellow alarm panels. When you get to the next security laser, carefully get past it and carefully crawl under another gray alarm panel. There is another security laser right past it, so get by it carefully and head down the elevator to the 8th floor. After you exit the elevator, quickly duck and toss a softball at the enemy with the gun to dispose of him. Bounce on the couch to get over the striped floor tiles. You'll come across some more striped tiles that you have to do some more creative jumping to get past and once you do, keep heading to the left. When you get to some orange doors, throw a softball at the security guard. Push the orange crate up against the wall to the left and jump on the wall. Simply jump over the chasm to get to the other side and continue to the left. You'll have to use another orange crate to get over yet another yellow wall, and throw a softball at another security guard. Here, get past the yellow alarm panel and crawl under the gray alarm panel. While still crawling, throw a softball to eliminate the security guard and push Up on the D-Pad at the last orange door that you see to get to the next room. In this room, throw a softball at the orange guard on the bike and crawl under the many gray panels. Bounce on the chair, over the striped floor tiles, to the other chair but carefully pull back to the left so you'll land just before the orange door. You should have enough time to immediately toss a softball at the security guard to get rid of him. Continue making your way to the right until you get to a wire. Jump up to grab the wire and move across the chasm. If you happen to fall here, then it will take you all the way back to when you went down the chute, so be very careful. When you get to the other side, go over the big pile of yellow boxes and toss a softball at the orange guard on the bike. You'll eventually see an elevator. However, you cannot enter this one. So be mindful of the security laser right here and slowly move past it. Throw another softball at the security guard. The next time you see a security laser, there will be another one right past it. So familiarize yourself with the laser's patterns and press Up in the window that's underneath the second laser to enter the gallery. Immediately toss a softball at the security guard to the right. As a matter of fact, keep throwing softballs and never stop. As long as you keep an eye on the security lasers, there will be 3 or 4 security guards here and they won't bother you at all as long as you keep throwing softballs at them. Just keep in mind that the third security laser that you come across will be just a little bit faster than the other two. After you get past the third security laser, you will be rewarded with a plethora of coins. Just move back and forth, grabbing all the coins as they spawn, until they don't spawn anymore. Da Vinci's painting will start to flash after you've got all the silver coins, and all you have to do is punch it to open the safe. The actual sculpture will be inside the safe when you open it. That's it for level 1 and its now time to move on. LEVEL 2 Here is the mission briefing for the second level: "HAWK, YOUR NEXT TASK IS TO RETRIEVE LEONARDO DA VINCI'S SKETCHBOOK, THE CODEX. THIS YOU WILL FIND DISPLAYED IN THE VATICAN HALLS. BEWARE THIS IS A VALUED POSSESSION AND HEAVILY GUARDED." You start level 2 off right in front of a big orange block that you can't even jump over. So you have to go left, off the platform, and go right up the stairs and grab the coin on the orange boxes. You'll see a new enemy on a pogo stick. You have to stun him with a softball first, then quickly run up to him and punch him by holding the B button while he's still stunned. Climb over the pile of orange boxes and you have to hit this next new enemy with two softballs to dispose of him. Then, you have to push the golden crate to the ground floor and push it some ways to the right and get it on the lift. Take the lift with the crate on it up and push the crate to the right, right next to another pile of orange boxes. This time, you have to climb all the way up to the upper level and throw two softballs at another enemy at the top. Walk to the right and duck when you get to the small gap. There will be a woman in a red dress throwing projectiles at you, so quickly get rid of her with two softballs. Jump over the gap and continue to the right and grab the wire. Make your way across the big gap and go down onto the orange boxes when you get to the other side. Jump on the trampoline to get over the next set of orange boxes. On the other side of the NEXT set of boxes, there will be another woman enemy. You know what to do here. After you defeat her, push the golden crate to the ground and push it to the right to the lift. Go up the lift and push the crate directly underneath the ladder so you can jump on the crate and jump to the ladder. Take the ladder up to the next screen. Here is one of the more difficult and annoying parts of the game...a maze. This maze is directly under the Vatican building. You'll encounter a bunch of hazards down here and they all take away your health. You'll see invincible bouncing balls, spears that move in just about every direction, exhaust vents, poison drips, and guys that throw bombs at you. Hopefully we'll be able to get through this with very little damage as possible, so lets begin. I will tell you the quickest and easiest way through this thing. You'll start by heading right and go down the first ladder you see. Pass by the 3 exhaust vents and make sure that the exhaust doesn't even touch you and go up the ladder on the right to the next screen. Here, you need to quickly make your way up the 2 ladders while avoiding the red bouncing ball. When you get to the top of the second ladder, head to the left. You'll eventually run into your first enemy that throws bombs at you. He looks like he's on a wheelbarrow, so we'll call him a wheelbarrow enemy. Right when you see him, toss a softball at him to stun him before he even has a chance to throw a bomb at you. If he throws a bomb, try to quickly jump over it before it explodes. When you stun him, you'll have to punch him while he's stunned to eliminate him. After that, head all the way to the left avoiding the exhaust vent and go up the ladder one screen. When you get to the top, go to the right past the exhaust vent and start crawling. These are the poison drips and as long as you go past them without dripping on you, then you should be fine. Continue to the right and go up the ladder when you see it. Jump to the right at the top while avoiding the spear. Go up the first ladder one screen, and don't even worry about that wheelbarrow enemy. Climb up the rest of the ladder and carefully jump off to the right. Here, you'll have to cross the wire while avoiding 2 exhaust vents and 2 poison drips. After you have done that, take the lift down one screen and take the very bottom exit and climb the ladder down another screen. Finish taking the ladder down all the way to the bottom and this time, you'll have to cross another wire but with 3 spears poking at you. Cross this wire very cautiously and stop when you get to the ladder. You'll notice a poison drip here, so quickly climb up the ladder and get off in between drips. Take the next ladder up one screen. Get off in the opening and don't worry about the switch. Cross another set of 3 spears carefully. This next part gets a little tricky. You have to quickly go up the ladder and first stun the wheelbarrow enemy, then punch him to dispose of him all while still trying to avoid the poison drips. You probably won't do this without taking some kind of damage, so just try to keep it to a minimum as best you can. Take the ladder up one screen when you get to it, but don't go too fast as there's a spear pointing directly at you when you get to the top of the ladder. While avoiding the spear, get off the ladder to the left and avoid the exhaust vent and climb the ladder up. Head to the right, past another spear, and you can choose to go down the ladder and get the coins, but its optional. Kill the final enemy while avoiding the poison drips and go through the hole at the end that leads to the rooftop. Now you have to be very cautious and not go too fast in this area as well. I suggest you keep going along the very top, and try not to go down unless you absolutely must. Keep going to the right across the rooftop until you get to the wire. You may have to kill one or two enemies along the way, but they shouldn't give you too much trouble. Just keep in mind that the enemies on the top that you do come across take about a full second to completely explode after you've hit them with a softball, so be careful of that. When you get to the wire, make your way across the chasm and if the flying enemy gives you any trouble, remember you can still throw softballs at it while you are still hanging. When you get to the other side, immediately throw one more softball at the enemy that explodes when you hit it and go through the opening in the building. THE VATICAN BUILDING You are now officially inside the Vatican building and its crawling with all kinds of enemies and alarm traps to stop you from getting da Vinci's codex. Lets start by killing the first enemy while avoiding the striped floor tiles. Go to the right and grab the coins while avoiding some more striped tiles. You'll encounter a new enemy here, and it seems to be on some kind of mini tank that shoots at you, but you get rid of him the same way by first throwing a softball at him to stun him, then punch him off the screen. After you jump over the next set of striped tiles, you'll see another enemy that throws bombs at you. After that, you'll see another mini tank guy and then a second mini tank guy after that. So you'll see a total of 3 more enemies before you finally get to the ladder and go down to the next level. Now you get to do the exact same thing you just did, except you're going the other direction. I should also point out that the panels on this level do not set off the alarm, but they do spring you back up to the first floor like a trampoline if you hit them. Then, you'll have to do the first floor all over again, so we definitely do NOT want that to happen. Immediately after you jump over the first panel, throw a softball even if you don't see the enemy yet but there is one here, believe me. After you defeat the mini tank guy, jump over the striped tile and kill the wheelbarrow enemy. Jump over the panel and the next striped tile to get to another enemy. After you've cleared that enemy, go all the way to the left until you get to the ladder and go down it. This time, you have to leap from platform to platform while killing the same enemies that you've just encountered and avoiding the electric nodes that are in between each platform. Keep going right until you get to the ladder and climb it down to the next screen. Here, you'll notice the floor tiles are gray, which means the colored tiles are traps that make you spring up on top of the bookcases, and you'll have to do the previous part all over again. So be sure to make running jumps over those colored tiles and kill the same enemies in the same way you did on the previous floor. Make your way to the left as far as you can until you get to the ladder and climb it down. This is the last part in retrieving da Vinci's codex. The codex is at the end of this hallway. There's only two things you have to keep in mind here. One is to try your very best to stay off the floor. If you happen to fall off one of the platforms, quickly jump onto another platform to stay off the floor because the longer you're on the floor, a gate comes down to protect the codex and you won't be able to get it. If the gate comes down all the way, it results in a restart of the level and a loss of a life. The other thing to keep in mind is to observe the pattern of the blinking white lights. They cause some damage if you hit one, so be careful. Just try to figure out an easy way to jump from platform to platform without touching the floor or any of the blinking lights. My only suggestion is that you kill the jumping enemy with the knife with two softballs as quickly as possible because getting rid of him will obviously make it a whole lot easier for you. Once you make it to the codex, all you have to do is walk over and touch it if the gate isn't closed yet. You'll move on to the third and final level after you've done that. LEVEL 3 Finally, the third level! Here is the mission briefing: "HAWK, YOUR FINAL TASK IS TO ENTER LEONARDO DA VINCI'S CASTLE IN SEARCH OF THE MIRRORED CRYSTAL. OBTAINING THIS CRYSTAL IS THE ONLY WAY OF DESTROYING THE GOLD MACHINE AND THE ALCHEMY PROJECT!! THE ECONOMIC FATE OF THE WORLD IS IN YOUR HANDS." At the starting point, make your way to the right until you see a new enemy that appears to be floating with balloons that comes at you and shoots bullets. Quickly dispose of him before he even has a chance to shoot at you by throwing two softballs at him. When you come to the ladder, you have to crawl to the base because of the flame that shoots at you. Climb up the ladder while avoiding the flames, and go left when you get to the top. Now it seems like you have to make an impossible jump to get to the next platform. Well...you don't. If you jump in between the two platforms, an invisible platform will appear and then you can easily jump to the next platform. Repeat this process once more as you'll experience a second invisible platform. Keep jumping your way to the left until you see a lift and take it to the top. You need to make a series of jumps back to the right and when you see the ladder, climb it up one screen. You have to be quick at this next part because there is a guy directly above you that throws garbage out of his window. If you look to you immediate left there is a blue post with a couple horizontal bars on it. Jump on one of those bars, and jump to the platform to the left while trying to avoid the flame. Keep jumping platforms to the left until you get to a wire with a weird looking enemy that's on it already. This guy will take a whopping 4 softballs to completely get rid of it. Start across the wire and be mindful of another guy dropping some garbage from his window. When you get to the ladder, climb it up and run over to the enemy. All you have to do is punch him to eliminate him. Make your way to the right and punch another guy throwing garbage. Then, take the lift up to the very top tier and run all the way back to the left to the next screen. You'll immediately notice another weird looking enemy underneath you, and another guy floating on balloons that shoots at you. Kill the floating enemy as soon as possible. Remember, he takes two softballs to kill completely. Then drop down and kill the weird catlike enemy that takes two more softballs. Carefully jump your way up the small platforms to the left to the very top where the wire is. Its no big deal if you fall while trying to go up the platforms because you don't lose any lives or energy. But the two enemies will respawn, and you'll have to deal with them again. When you get to the top, go left and grab the wire. Don't drop down because there is nothing for you down there. Just make your way across the wire, and kill the weird looking enemy with 4 softballs. When you drop off the wire, kill the catlike enemy with two softballs. Take the hanging wire down to the bottom and make your way to the left while avoiding the two garbage throwers. Jump your way up some more small platforms all the way to the top where the ladder is. Before you take the ladder up to the next screen, know that there will be two floating enemies on balloons. Just keep climbing all the way up without trying to kill them because they can't hurt you if you don't give them a chance to shoot at you. Climb up the ladder to the next screen. First, take out the floating enemy with two softballs while you're still on the ladder. When you go to the right, you'll see another catlike enemy. You can choose to fight it head on and take it out with a couple softballs, or you can avoid it altogether by crawling under everything. Keep making your way to the right, avoiding the guys throwing garbage out their windows, until you get to another catlike enemy. It seems like a little deja vu here, but again you can choose to kill the enemy or crawl under it. After you avoid a couple more garbage throwers, move the golden crate under the ladder so you can jump on the crate to the ladder, and climb it up to the next screen. Here, you will notice (of all things) a guy hitting tennis balls. They come from the left and he hits them in the direction of which they came. You'll need to go left, avoiding the balls as you go. You have to alternate crawling and jumping over the balls until you get to the machine that is firing them at you. When you get past the machine, you won't be done with the tennis balls just yet. As you make your way left, you'll notice balls randomly falling from the sky. Those are from the guy who hits them, who you saw when you first climbed the ladder in the beginning. Go as far left as you can go, and kill the floating enemy at the end. Here, you need to jump onto the wooden platforms and make your way up and to the right while still avoiding the tennis balls. You'll eventually come to a kangaroo hopping around. You can easily dispose of it with two softballs. Continue to the right until you get to a small lift, then take it up to the next screen. You will see another kangaroo jumping around at the top of the screen. I recommend we take care of him first before we can move on. To do that, you need to stand on one of the higher platforms on the left, and you'll need to combine jumping and throwing softballs at the peak of your jump to be able to hit it. You'll be able to dispose of it without even reaching the level that its on yet. Now keep heading to the left as you platform jump, and take the lift up when you get to it. Kill another floating enemy with two softballs and run back to the right where the kangaroo was originally. Take the lift up to the window and press Up to enter it. MIRRORED CRYSTAL BUILDING The first thing you should do inside this building is kill the 2 enemies to the right with two softballs each. Go over to the ladder that's farthest to the right and climb it. Push the golden crate off the side to the left, then push it over to the lift. Ride up the lift with the crate still beside you. Then push the crate some more to the left and repeat what you just did by taking the second lift up with the crate next to you. You have to kill the rat here by first stunning it with a softball and then you have to squash it like a bug by simply stepping on it to eliminate it. Push the crate to the right until you get to the higher platform with the doorway on it. Jump on the crate so you can jump to the higher platform and make your way over to the doorway, and press Up to enter it. This is the final room of the game, and its actually very simple for it being the last part. First, you should fall all the way to the bottom floor and walk all the way to the right. When you get to the switch, flip it with a softball. You'll notice that this will turn the smoke jet off that is in front of the door at the top of the screen. Go all the way back to the left and climb the ladder while avoiding another smoke jet, and climb the second ladder to get to the wire. After you get across it, climb down the ladder that's right there, but don't climb it down all the way. While you're still on the ladder, you have to jump to the small platform on the right. From here, jump to the ladder on the right and climb it but don't flip the switch just yet. Once you flip the switch, you have to be very quick about the next part, so here's what you need to do. You need to flip the switch with a softball while you're still on the ladder. Then drop down to the floor and run past the machine back to the left. Climb the ladder quickly while avoiding the smoke jet and get all the way up to the wire so you can cross it again. This time, climb all the way down the ladder on the other side. You should still have enough time to easily get the crystal and to do so, you have to control your jump just ever so slightly to the left to get it. The machine will stop moving after you've got the crystal. You now have to get to that door in the upper right corner of the screen. Again, simply go to the ladder on the left and climb up all the way to the wire. Cross the wire, and jump to the right to the area with the door. Flip the switch with a softball and the door will open. Hawk will automatically enter the doorway and he'll be congratulated on getting the Mirrored Crystal. And I congratulate you on finally saving the world from economic ruin! CONCLUSION Even though Hawk is the good guy in this game, he still had to steal some very valuable items to save the world. So I guess you could say that he was stealing for the better. He foiled the evil couple's plan to ruin the world's economy and he destroyed the gold machine. Well...he didn't actually "destroy" it. All he does is steal the most important part of the gold machine so it can't work without it. However, it would've been pretty cool, in my opinion, if the game would have allowed you to just completely trash the thing. But anyways, just sit back and know that you saved the world, and we'll just leave it at that. Thanks for reading! Ah yes, Hudson Hawk. Your character, Eddie Hawk, is one of the best cat burglars on the planet. However, a fiendish couple has ordered him to steal two of Leonardo da Vinci's most prized works. One is located in Rutherford's, which is a heavily guarded auction house, and the other rests in a vault that's inside the Vatican! This evil couple is trying to rebuild da Vinci's Alchemy Project that involves a machine that creates gold. Its good for them of course, but it makes for a disaster for the rest of the world's economy. They need Hawk's help to do so, and they intend to kill his best friend if Hawk does not comply. We need you to help the Hawk save his friend, and maybe steal one of the key components of the machine to save the world from financial trouble. I have to be honest with you here...the very first time that I played this game, I played it for all of 3 minutes before I gave up on it and played something else on the NES. It will probably take rookies who have never played this game before some time to get used to the controls, as they seem a little off. The running and jumping just doesn't seem all that smooth as most other NES games do. I recommend you practice playing on the first part of the first level on the rooftop. Try to get used to the "off" controls I mentioned earlier, and hopefully you'll see what I'm talking about. You don't have to go through the entire level to practice though. Just practice running around and jumping on the tables with the umbrellas on them. After you feel like you're ready, restart the game so you have a fresh slate to start with. There are a total of 3 levels in this game. Before you begin each one, you are given a brief descr With all of that said, let us officially begin this journey to save the world...'s economy! WALKTHROUGH LEVEL 1 Before you actually start, keep in mind that this is absolutely not a game that you can just coast your way through. There are plenty of traps and a bunch of levers that you will have to switch on and off in order to get to the next part of the level. But of course you have me, so I will tell you about every single trap and every single enemy so you can hopefully get through this with as little damage as possible. If you have to, I recommend you read ahead a little bit so you can expect the many traps that are in this game. Anyways, the first level has the following briefing statement: "HAWK, YOUR FIRST TASK IS TO ENTER RUTHERFORD'S AUCTION HOUSE. AVOIDING THE HIGH SECURITY SYSTEM, MAKE YOUR WAY TO THE 7TH FLOOR, WHERE YOU WILL FIND THE SAFE. OPEN THE SAFE AND RETRIEVE LEONARDO DA VINCI'S PRICELESS HORSE SCULPTURE, THE SFORZA. GOOD LUCK..." So you begin on a rooftop. You immediately see a big, black dog coming at you from the right. You can either jump on the tables with the umbrellas on them and avoid the dog completely, or you can stun the dog with one of your softballs and just run past him (because there is no way to kill it). If you try to go around him and he gets you, he will drag you all the way to the edge of the roof and throw you down to the ground level, where you'll have to go through the door and do the whole thing all over again. Go to the right and jump across the tables, then jump onto the ledge when you come to it. You will notice a wire that goes to the other building on the other side. You have to simply stand underneath it and press the A button to jump and Hawk will automatically grab the wire. Throw some softballs at the two owls you come across to get them out of the way to reach the other side. Head to the right and you'll see a lift with a gold crate next to it. You have to get on the other side of the crate and push it back to the left until its on the lift. Now stand on the lift with the crate next to you and press Up on the D-Pad. I can show you about what it should look like in the next two before and after screenshots here. After the lift takes you up, push the crate to the right just a little bit, but don't push it all the way off the ledge just yet. Go back and take the lift down again, and go to the right until you see a second golden crate. Do yourself a big favor first and stun this other little brown dog that you will eventually see on the right, and stun him with a softball. Then, run up to him quickly while he's still stunned and punch him off the screen by holding down the B button. After that, push the second crate to the left until its just under where you left the first crate. Don't place it directly under the first crate...place it just enough to where you'll be able to stack the two. Now take the lift back up and push the first crate off the ledge so it lands on the second crate. Now push the two crates over to the windows. You should now be able to jump on the crates so you can jump up to the windows. Obviously, you'll want to stand in front of the only window that is open and enter it by pressing Up on the D-Pad. RUTHERFORD'S AUCTION HOUSE You are now inside the Rutherford's Auction House that you heard about in your briefing at the very beginning of the mission. Your next step is to get to the 7th floor, while trying to avoid this high security system. Once you enter the building, take a minute and notice the pattern of the security laser. You will see a bunch of these throughout the game, and they all have the same pattern. The first thing you should do here is while avoiding the security laser, push the orange crate up against the yellow wall. If you push it too close to the wall then the crate will move back to its original position, so just try to get it as close as you can to the wall. Before you jump over the wall, make sure to throw a softball at the orange guard on the bike to get rid of him. You'll have to do it by first jumping, and then press the B button to throw the softball at the peak of your jump. Once you get over the wall, you'll see a yellow ramp before an even bigger yellow wall. Simply jump onto the ramp to bounce over the wall. After you grab the silver coin, this next part will be somewhat tricky. You will see on the floor in front of you that every other tile will be striped. If you step on any of these striped tiles, you will set off an alarm that increases the speed of the security lasers and it will also make more guards appear for a while. There's no way to turn off the alarm once you set it on, so you'll just have to wait until it goes off on its own. When you start jumping over the striped tiles, after your second jump toss a softball before going any further to get rid of the guard. After you jump over all the striped tiles, you'll notice two more kinds of triggers that set off the alarm. The first one is a small, gray alarm panel that you can just crawl under by pressing Down on the D-Pad. The next one is a yellow alarm panel that you can either crawl under (even though it doesn't look like you can, but I promise the alarm won't set off if you do) or jump over it. After that, you'll see another orange crate. Walk up to the crate and throw a softball when you get to it to take out another guard. Push the crate to the right until it gets right before another gray alarm panel. Then jump on the crate, and jump up to grab the wire and make your way across to the other side. If you fall down the hole it will take you all the way back to the beginning of the auction house, so be careful not to. After you get across the chasm, drop down from the wire and immediately throw a softball to dispose of another guard. Make your way past the orange door and you'll notice another security laser that slightly faster than the first one you encountered. Carefully get past the laser and grab the coins on the other side. Continue to the right and press Up when you get to the elevator that takes you down to the 10th floor. When you get to the 10th floor, make sure to immediately duck as you'll see a new enemy that's trying to shoot you. Crawl over to the chair and also make a note of the security laser here. You have to try to bounce on the chair to get across the chasm and throw a softball while you're in the air to get rid of the enemy, all while avoiding the security laser. It might take you a couple tries to do successfully but luckily this might be the hardest part in the game, to be honest. Anyway, when you get past the laser, you'll see yet another orange crate that you'll have to push to the left against the yellow wall. Crawl under the gray panels and before you drop down, you'll need to throw two softballs at the guard with a broom...the janitor. Continue to the left, grab the coin, and jump over the single striped tile. After you get over the tile, you'll need to throw two more softballs at a kid with a camera to dispose of him. Crawl under the gray and yellow alarm panels and you'll come to another orange crate that you'll have to push to the left against the yellow wall again. Get over the wall and continue left until you get to another chair. Bounce on the chair to get over the striped tiles and immediately duck (press the Down button on the D-Pad) when you land. There will be another enemy with a gun, so throw a softball at him while you're still on the ground. Then carefully get past the security laser, and continue to the left until you get to what looks like a small, yellow window. Its actually a chute that you need to go down, so press Up to go down it, oddly enough. You'll see Hawk riding down a whole bunch of chutes and when you finally get to the bottom, grab the many coins that are down there, climb up the ladder, and move one screen to the right. Here, try to notice the pattern of the smoke jets and carefully get past the first two and go up the ladder to the next screen, but do it slowly as 2 more smoke jets will be waiting for you at the top. Again, carefully get past the jets as you make your way up the ladder. When you get to the top, don't even touch that spinning fan because it results in an instant death. Instead, look to the right and throw a softball at the switch to disable some electric nodes that are in the basement. I made two more before and after screenshots to show you what the switch should look like. Go back down the ladder, and head to the right when you get to the bottom. Go past the smoke jet and continue to the right. This is the area where the electric nodes would still be on if you haven't flipped the switch properly that you just came across. If you did it correctly then they should be off and you should be able to go to the right and climb the ladder. When you get to the top, get off the ladder and move carefully past the 2 smoke jets. Before you go up the next ladder, make sure you flip the switch just like you did the one next to the big fan. After that, fall down the hole instead of going up the ladder that's right there. Instead, head to the left, back across the same smoke jet again, and go up the same ladder. This time, you'll notice the big fan is no longer spinning anymore. Head all the way to the left one screen. Here, you'll want to go up this huge ladder two screens, while of course trying to avoid the smoke jets. When you finally get to the top, go to the right one screen. Jump up and grab the red bar to go over the electric nodes. When you get off on the other side, head past the smoke jet until you come to another set of electric nodes. You have to be extremely quick here, but here's the easiest way to do this. Get as close as you can to the electric nodes without touching them, then face away from them to the left. Toss a softball at the switch to flip it and turn the electric nodes off. They'll only be off for two seconds so you have to quickly jump across them, and don't worry about the coins if you don't get them. Continue to the right, past the smoke jet, until you get to the blue squares. You simply need to go down one screen. Now head down to the blue square that's right underneath the yellow switch. You have to be quick here again, because this switch temporarily turns off the big fan on the right. So immediately after you throw a softball to flip the switch, get to the bottom and run like hell past the smoke jet and past the fan as fast as you can. Grab the coins after you've done that, and head down the ladder one screen. Whenever you're ready, throw another softball at the switch to turn off the electric nodes and be quick about heading down and back to the right across them. Head down one more screen, crawl to the left, and be very careful about getting across the battery of smoke jets here, and go to the right one screen. Here, crawl under the gray alarm panel and toss a softball at the orange guard on the bike while you avoid the security laser. On the other side of the laser, you'll have to crawl under another gray panel until you come to a couch. You have to bounce on the couch to get on top of the yellow bureau. Next, toss a softball to get rid of the guard and continue your way to the right. There's not too much for a little bit as you'll just need to get past a bunch of gray and yellow alarm panels. When you get to the next security laser, carefully get past it and carefully crawl under another gray alarm panel. There is another security laser right past it, so get by it carefully and head down the elevator to the 8th floor. After you exit the elevator, quickly duck and toss a softball at the enemy with the gun to dispose of him. Bounce on the couch to get over the striped floor tiles. You'll come across some more striped tiles that you have to do some more creative jumping to get past and once you do, keep heading to the left. When you get to some orange doors, throw a softball at the security guard. Push the orange crate up against the wall to the left and jump on the wall. Simply jump over the chasm to get to the other side and continue to the left. You'll have to use another orange crate to get over yet another yellow wall, and throw a softball at another security guard. Here, get past the yellow alarm panel and crawl under the gray alarm panel. While still crawling, throw a softball to eliminate the security guard and push Up on the D-Pad at the last orange door that you see to get to the next room. In this room, throw a softball at the orange guard on the bike and crawl under the many gray panels. Bounce on the chair, over the striped floor tiles, to the other chair but carefully pull back to the left so you'll land just before the orange door. You should have enough time to immediately toss a softball at the security guard to get rid of him. Continue making your way to the right until you get to a wire. Jump up to grab the wire and move across the chasm. If you happen to fall here, then it will take you all the way back to when you went down the chute, so be very careful. When you get to the other side, go over the big pile of yellow boxes and toss a softball at the orange guard on the bike. You'll eventually see an elevator. However, you cannot enter this one. So be mindful of the security laser right here and slowly move past it. Throw another softball at the security guard. The next time you see a security laser, there will be another one right past it. So familiarize yourself with the laser's patterns and press Up in the window that's underneath the second laser to enter the gallery. Immediately toss a softball at the security guard to the right. As a matter of fact, keep throwing softballs and never stop. As long as you keep an eye on the security lasers, there will be 3 or 4 security guards here and they won't bother you at all as long as you keep throwing softballs at them. Just keep in mind that the third security laser that you come across will be just a little bit faster than the other two. After you get past the third security laser, you will be rewarded with a plethora of coins. Just move back and forth, grabbing all the coins as they spawn, until they don't spawn anymore. Da Vinci's painting will start to flash after you've got all the silver coins, and all you have to do is punch it to open the safe. The actual sculpture will be inside the safe when you open it. That's it for level 1 and its now time to move on. LEVEL 2 Here is the mission briefing for the second level: "HAWK, YOUR NEXT TASK IS TO RETRIEVE LEONARDO DA VINCI'S SKETCHBOOK, THE CODEX. THIS YOU WILL FIND DISPLAYED IN THE VATICAN HALLS. BEWARE THIS IS A VALUED POSSESSION AND HEAVILY GUARDED." You start level 2 off right in front of a big orange block that you can't even jump over. So you have to go left, off the platform, and go right up the stairs and grab the coin on the orange boxes. You'll see a new enemy on a pogo stick. You have to stun him with a softball first, then quickly run up to him and punch him by holding the B button while he's still stunned. Climb over the pile of orange boxes and you have to hit this next new enemy with two softballs to dispose of him. Then, you have to push the golden crate to the ground floor and push it some ways to the right and get it on the lift. Take the lift with the crate on it up and push the crate to the right, right next to another pile of orange boxes. This time, you have to climb all the way up to the upper level and throw two softballs at another enemy at the top. Walk to the right and duck when you get to the small gap. There will be a woman in a red dress throwing projectiles at you, so quickly get rid of her with two softballs. Jump over the gap and continue to the right and grab the wire. Make your way across the big gap and go down onto the orange boxes when you get to the other side. Jump on the trampoline to get over the next set of orange boxes. On the other side of the NEXT set of boxes, there will be another woman enemy. You know what to do here. After you defeat her, push the golden crate to the ground and push it to the right to the lift. Go up the lift and push the crate directly underneath the ladder so you can jump on the crate and jump to the ladder. Take the ladder up to the next screen. Here is one of the more difficult and annoying parts of the game...a maze. This maze is directly under the Vatican building. You'll encounter a bunch of hazards down here and they all take away your health. You'll see invincible bouncing balls, spears that move in just about every direction, exhaust vents, poison drips, and guys that throw bombs at you. Hopefully we'll be able to get through this with very little damage as possible, so lets begin. I will tell you the quickest and easiest way through this thing. You'll start by heading right and go down the first ladder you see. Pass by the 3 exhaust vents and make sure that the exhaust doesn't even touch you and go up the ladder on the right to the next screen. Here, you need to quickly make your way up the 2 ladders while avoiding the red bouncing ball. When you get to the top of the second ladder, head to the left. You'll eventually run into your first enemy that throws bombs at you. He looks like he's on a wheelbarrow, so we'll call him a wheelbarrow enemy. Right when you see him, toss a softball at him to stun him before he even has a chance to throw a bomb at you. If he throws a bomb, try to quickly jump over it before it explodes. When you stun him, you'll have to punch him while he's stunned to eliminate him. After that, head all the way to the left avoiding the exhaust vent and go up the ladder one screen. When you get to the top, go to the right past the exhaust vent and start crawling. These are the poison drips and as long as you go past them without dripping on you, then you should be fine. Continue to the right and go up the ladder when you see it. Jump to the right at the top while avoiding the spear. Go up the first ladder one screen, and don't even worry about that wheelbarrow enemy. Climb up the rest of the ladder and carefully jump off to the right. Here, you'll have to cross the wire while avoiding 2 exhaust vents and 2 poison drips. After you have done that, take the lift down one screen and take the very bottom exit and climb the ladder down another screen. Finish taking the ladder down all the way to the bottom and this time, you'll have to cross another wire but with 3 spears poking at you. Cross this wire very cautiously and stop when you get to the ladder. You'll notice a poison drip here, so quickly climb up the ladder and get off in between drips. Take the next ladder up one screen. Get off in the opening and don't worry about the switch. Cross another set of 3 spears carefully. This next part gets a little tricky. You have to quickly go up the ladder and first stun the wheelbarrow enemy, then punch him to dispose of him all while still trying to avoid the poison drips. You probably won't do this without taking some kind of damage, so just try to keep it to a minimum as best you can. Take the ladder up one screen when you get to it, but don't go too fast as there's a spear pointing directly at you when you get to the top of the ladder. While avoiding the spear, get off the ladder to the left and avoid the exhaust vent and climb the ladder up. Head to the right, past another spear, and you can choose to go down the ladder and get the coins, but its optional. Kill the final enemy while avoiding the poison drips and go through the hole at the end that leads to the rooftop. Now you have to be very cautious and not go too fast in this area as well. I suggest you keep going along the very top, and try not to go down unless you absolutely must. Keep going to the right across the rooftop until you get to the wire. You may have to kill one or two enemies along the way, but they shouldn't give you too much trouble. Just keep in mind that the enemies on the top that you do come across take about a full second to completely explode after you've hit them with a softball, so be careful of that. When you get to the wire, make your way across the chasm and if the flying enemy gives you any trouble, remember you can still throw softballs at it while you are still hanging. When you get to the other side, immediately throw one more softball at the enemy that explodes when you hit it and go through the opening in the building. THE VATICAN BUILDING You are now officially inside the Vatican building and its crawling with all kinds of enemies and alarm traps to stop you from getting da Vinci's codex. Lets start by killing the first enemy while avoiding the striped floor tiles. Go to the right and grab the coins while avoiding some more striped tiles. You'll encounter a new enemy here, and it seems to be on some kind of mini tank that shoots at you, but you get rid of him the same way by first throwing a softball at him to stun him, then punch him off the screen. After you jump over the next set of striped tiles, you'll see another enemy that throws bombs at you. After that, you'll see another mini tank guy and then a second mini tank guy after that. So you'll see a total of 3 more enemies before you finally get to the ladder and go down to the next level. Now you get to do the exact same thing you just did, except you're going the other direction. I should also point out that the panels on this level do not set off the alarm, but they do spring you back up to the first floor like a trampoline if you hit them. Then, you'll have to do the first floor all over again, so we definitely do NOT want that to happen. Immediately after you jump over the first panel, throw a softball even if you don't see the enemy yet but there is one here, believe me. After you defeat the mini tank guy, jump over the striped tile and kill the wheelbarrow enemy. Jump over the panel and the next striped tile to get to another enemy. After you've cleared that enemy, go all the way to the left until you get to the ladder and go down it. This time, you have to leap from platform to platform while killing the same enemies that you've just encountered and avoiding the electric nodes that are in between each platform. Keep going right until you get to the ladder and climb it down to the next screen. Here, you'll notice the floor tiles are gray, which means the colored tiles are traps that make you spring up on top of the bookcases, and you'll have to do the previous part all over again. So be sure to make running jumps over those colored tiles and kill the same enemies in the same way you did on the previous floor. Make your way to the left as far as you can until you get to the ladder and climb it down. This is the last part in retrieving da Vinci's codex. The codex is at the end of this hallway. There's only two things you have to keep in mind here. One is to try your very best to stay off the floor. If you happen to fall off one of the platforms, quickly jump onto another platform to stay off the floor because the longer you're on the floor, a gate comes down to protect the codex and you won't be able to get it. If the gate comes down all the way, it results in a restart of the level and a loss of a life. The other thing to keep in mind is to observe the pattern of the blinking white lights. They cause some damage if you hit one, so be careful. Just try to figure out an easy way to jump from platform to platform without touching the floor or any of the blinking lights. My only suggestion is that you kill the jumping enemy with the knife with two softballs as quickly as possible because getting rid of him will obviously make it a whole lot easier for you. Once you make it to the codex, all you have to do is walk over and touch it if the gate isn't closed yet. You'll move on to the third and final level after you've done that. LEVEL 3 Finally, the third level! Here is the mission briefing: "HAWK, YOUR FINAL TASK IS TO ENTER LEONARDO DA VINCI'S CASTLE IN SEARCH OF THE MIRRORED CRYSTAL. OBTAINING THIS CRYSTAL IS THE ONLY WAY OF DESTROYING THE GOLD MACHINE AND THE ALCHEMY PROJECT!! THE ECONOMIC FATE OF THE WORLD IS IN YOUR HANDS." At the starting point, make your way to the right until you see a new enemy that appears to be floating with balloons that comes at you and shoots bullets. Quickly dispose of him before he even has a chance to shoot at you by throwing two softballs at him. When you come to the ladder, you have to crawl to the base because of the flame that shoots at you. Climb up the ladder while avoiding the flames, and go left when you get to the top. Now it seems like you have to make an impossible jump to get to the next platform. Well...you don't. If you jump in between the two platforms, an invisible platform will appear and then you can easily jump to the next platform. Repeat this process once more as you'll experience a second invisible platform. Keep jumping your way to the left until you see a lift and take it to the top. You need to make a series of jumps back to the right and when you see the ladder, climb it up one screen. You have to be quick at this next part because there is a guy directly above you that throws garbage out of his window. If you look to you immediate left there is a blue post with a couple horizontal bars on it. Jump on one of those bars, and jump to the platform to the left while trying to avoid the flame. Keep jumping platforms to the left until you get to a wire with a weird looking enemy that's on it already. This guy will take a whopping 4 softballs to completely get rid of it. Start across the wire and be mindful of another guy dropping some garbage from his window. When you get to the ladder, climb it up and run over to the enemy. All you have to do is punch him to eliminate him. Make your way to the right and punch another guy throwing garbage. Then, take the lift up to the very top tier and run all the way back to the left to the next screen. You'll immediately notice another weird looking enemy underneath you, and another guy floating on balloons that shoots at you. Kill the floating enemy as soon as possible. Remember, he takes two softballs to kill completely. Then drop down and kill the weird catlike enemy that takes two more softballs. Carefully jump your way up the small platforms to the left to the very top where the wire is. Its no big deal if you fall while trying to go up the platforms because you don't lose any lives or energy. But the two enemies will respawn, and you'll have to deal with them again. When you get to the top, go left and grab the wire. Don't drop down because there is nothing for you down there. Just make your way across the wire, and kill the weird looking enemy with 4 softballs. When you drop off the wire, kill the catlike enemy with two softballs. Take the hanging wire down to the bottom and make your way to the left while avoiding the two garbage throwers. Jump your way up some more small platforms all the way to the top where the ladder is. Before you take the ladder up to the next screen, know that there will be two floating enemies on balloons. Just keep climbing all the way up without trying to kill them because they can't hurt you if you don't give them a chance to shoot at you. Climb up the ladder to the next screen. First, take out the floating enemy with two softballs while you're still on the ladder. When you go to the right, you'll see another catlike enemy. You can choose to fight it head on and take it out with a couple softballs, or you can avoid it altogether by crawling under everything. Keep making your way to the right, avoiding the guys throwing garbage out their windows, until you get to another catlike enemy. It seems like a little deja vu here, but again you can choose to kill the enemy or crawl under it. After you avoid a couple more garbage throwers, move the golden crate under the ladder so you can jump on the crate to the ladder, and climb it up to the next screen. Here, you will notice (of all things) a guy hitting tennis balls. They come from the left and he hits them in the direction of which they came. You'll need to go left, avoiding the balls as you go. You have to alternate crawling and jumping over the balls until you get to the machine that is firing them at you. When you get past the machine, you won't be done with the tennis balls just yet. As you make your way left, you'll notice balls randomly falling from the sky. Those are from the guy who hits them, who you saw when you first climbed the ladder in the beginning. Go as far left as you can go, and kill the floating enemy at the end. Here, you need to jump onto the wooden platforms and make your way up and to the right while still avoiding the tennis balls. You'll eventually come to a kangaroo hopping around. You can easily dispose of it with two softballs. Continue to the right until you get to a small lift, then take it up to the next screen. You will see another kangaroo jumping around at the top of the screen. I recommend we take care of him first before we can move on. To do that, you need to stand on one of the higher platforms on the left, and you'll need to combine jumping and throwing softballs at the peak of your jump to be able to hit it. You'll be able to dispose of it without even reaching the level that its on yet. Now keep heading to the left as you platform jump, and take the lift up when you get to it. Kill another floating enemy with two softballs and run back to the right where the kangaroo was originally. Take the lift up to the window and press Up to enter it. MIRRORED CRYSTAL BUILDING The first thing you should do inside this building is kill the 2 enemies to the right with two softballs each. Go over to the ladder that's farthest to the right and climb it. Push the golden crate off the side to the left, then push it over to the lift. Ride up the lift with the crate still beside you. Then push the crate some more to the left and repeat what you just did by taking the second lift up with the crate next to you. You have to kill the rat here by first stunning it with a softball and then you have to squash it like a bug by simply stepping on it to eliminate it. Push the crate to the right until you get to the higher platform with the doorway on it. Jump on the crate so you can jump to the higher platform and make your way over to the doorway, and press Up to enter it. This is the final room of the game, and its actually very simple for it being the last part. First, you should fall all the way to the bottom floor and walk all the way to the right. When you get to the switch, flip it with a softball. You'll notice that this will turn the smoke jet off that is in front of the door at the top of the screen. Go all the way back to the left and climb the ladder while avoiding another smoke jet, and climb the second ladder to get to the wire. After you get across it, climb down the ladder that's right there, but don't climb it down all the way. While you're still on the ladder, you have to jump to the small platform on the right. From here, jump to the ladder on the right and climb it but don't flip the switch just yet. Once you flip the switch, you have to be very quick about the next part, so here's what you need to do. You need to flip the switch with a softball while you're still on the ladder. Then drop down to the floor and run past the machine back to the left. Climb the ladder quickly while avoiding the smoke jet and get all the way up to the wire so you can cross it again. This time, climb all the way down the ladder on the other side. You should still have enough time to easily get the crystal and to do so, you have to control your jump just ever so slightly to the left to get it. The machine will stop moving after you've got the crystal. You now have to get to that door in the upper right corner of the screen. Again, simply go to the ladder on the left and climb up all the way to the wire. Cross the wire, and jump to the right to the area with the door. Flip the switch with a softball and the door will open. Hawk will automatically enter the doorway and he'll be congratulated on getting the Mirrored Crystal. And I congratulate you on finally saving the world from economic ruin! CONCLUSION Even though Hawk is the good guy in this game, he still had to steal some very valuable items to save the world. So I guess you could say that he was stealing for the better. He foiled the evil couple's plan to ruin the world's economy and he destroyed the gold machine. Well...he didn't actually "destroy" it. All he does is steal the most important part of the gold machine so it can't work without it. However, it would've been pretty cool, in my opinion, if the game would have allowed you to just completely trash the thing. But anyways, just sit back and know that you saved the world, and we'll just leave it at that. Thanks for reading! |
Trusted Member
Affected by 'Laziness Syndrome'
Registered: 06-02-11
Location: Atlanta, GA
Last Post: 51 days
Last Active: 51 days
| #1 Los Angeles Chargers and Michigan fan! #BOLTUP #GOBLUE |
Affected by 'Laziness Syndrome'
Registered: 06-02-11
Location: Atlanta, GA
Last Post: 51 days
Last Active: 51 days
07-27-15 05:20 PM
 EX Palen is Offline
| ID: 1190521 | 106 Words
EX Palen is Offline
| ID: 1190521 | 106 Words
 EX Palen is Offline
| ID: 1190521 | 106 Words
EX Palen
Spanish Davideo7
Spanish Davideo7
Level: 142

POSTS: 739/6432
POST EXP: 1174559
LVL EXP: 34796570
CP: 194993.7
VIZ: 11353727

POSTS: 739/6432
POST EXP: 1174559
LVL EXP: 34796570
CP: 194993.7
VIZ: 11353727
Likes: 1 Dislikes: 0
Very nice job, man! It's rare to see screenshots in a guide, so seeing you took the time to add them greatly increases the quality of the guide. If I may say something, I would recommend disabling your layout. Not only because it's a pain to scroll down through nearly 7k words, but also because the screenshots are displayed one above the other with your layout active, and one besides the other when it's disabled, like it is now in new replies. I'm amazed to see you made so many words for such a short game. You have great potential, buddy. Keep up the good work! If I may say something, I would recommend disabling your layout. Not only because it's a pain to scroll down through nearly 7k words, but also because the screenshots are displayed one above the other with your layout active, and one besides the other when it's disabled, like it is now in new replies. I'm amazed to see you made so many words for such a short game. You have great potential, buddy. Keep up the good work! |
Administrator
Site Staff Manager, Content Writer, Console Manager
Affected by 'Laziness Syndrome'
Registered: 07-03-13
Location: Barcelona, Spain
Last Post: 2 days
Last Active: 1 day
Site Staff Manager, Content Writer, Console Manager
| Vizzed #1 Hardstyle fan |
Affected by 'Laziness Syndrome'
Registered: 07-03-13
Location: Barcelona, Spain
Last Post: 2 days
Last Active: 1 day
Post Rating: 1 Liked By: MattyIce,
07-27-15 05:28 PM
MattyIce is Offline
| ID: 1190524 | 26 Words
MattyIce is Offline
| ID: 1190524 | 26 Words
MattyIce
Level: 86
POSTS: 1230/1885
POST EXP: 233661
LVL EXP: 5964953
CP: 9021.0
VIZ: 1163681
POSTS: 1230/1885
POST EXP: 233661
LVL EXP: 5964953
CP: 9021.0
VIZ: 1163681
Likes: 0 Dislikes: 0
Trusted Member
Affected by 'Laziness Syndrome'
Registered: 06-02-11
Location: Atlanta, GA
Last Post: 51 days
Last Active: 51 days
| #1 Los Angeles Chargers and Michigan fan! #BOLTUP #GOBLUE |
Affected by 'Laziness Syndrome'
Registered: 06-02-11
Location: Atlanta, GA
Last Post: 51 days
Last Active: 51 days
