

 User Notice
 Forum Links
Play Beyond Good and Evil Online

Thread Information
Thread Actions


Order
Beyond Good and Evil Walkthrough Part 3
Game's Ratings
Overall
Graphics
Sound
Addictiveness
Depth
Story
Difficulty
Average User Score
8.5
8
8
7
6
8
7
06-16-14 11:07 AM
 Eniitan is Offline
| ID: 1036742 | 6423 Words
Eniitan is Offline
| ID: 1036742 | 6423 Words
 Eniitan is Offline
| ID: 1036742 | 6423 Words
Eniitan
Level: 177


POSTS: 1956/10522
POST EXP: 959649
LVL EXP: 74417476
CP: 55415.9
VIZ: 2632526

POSTS: 1956/10522
POST EXP: 959649
LVL EXP: 74417476
CP: 55415.9
VIZ: 2632526
Likes: 2 Dislikes: 0
Hello this is my 3rd part of this walkthrough. Boy did it take long to do...anyways its because I was making decisions and whatnot with it. So I hope this helps you. ^-^ Beyond Good and Evil Walkthrough part 3 Make sure you save the game before going on like I said in my last part of my walkthrough 2. So kick down the boxes and take the crystals. There are some traps on the floor so make sure that you clear them by using the hand disk. Once cleared move onto the next area, and be careful as you would get ambushed. These things are annoying to deal with so use double H’s action button to stop them from moving so that you can hit them. When you have dealt with them kick down the boxes and climb up on the ledge. Get double H to hit the electrical box for as the barrier is blocking your way. Jade will duck again meaning there are guards near. And she is right, as there are 3 guards in this next room. 2 of them are standing so they won’t turn around. While the other one is walking back and forth. There are some shadows for you to hide in. So if you can’t be bothered to attack them then just sneak through. The guard that is walking when he walks back follow him but not too close then hide in the shadows. When he walks back then sneak on, but remember do this with good timing and you won’t get caught. When you do manage to sneak proceed onto the next place. In this small place will be some crystal boxes and a save point. Save the game and then continue on. There will be one guard in this place, sadly he won’t move so you have to find a way to hit his tank. Let me show you a way if you are not sure how too. So heres some pictures  < That's where the guard is as I circled him, I pointed the arrow straight for a reason. < That's where the guard is as I circled him, I pointed the arrow straight for a reason. < Keep on going straight until you are in this corner. < Keep on going straight until you are in this corner. < Toggle the camera view to suit your needs. Then when you are ready hit his tank. < Toggle the camera view to suit your needs. Then when you are ready hit his tank.When you go on there will be some red bars blocking your way .There is a switch on your right so use your key and the barrier will disappear. You’re now close to the central hall as you can see. There will be a vending machine nearby so take when you need before going on. There will be another one guard in this area. And this time the guard will be turning around. So that gives you a chance to use the hand disk on him. So go on when you have done that. And use your key again to open the door for you. There will be some more crates for you to kick on. On your right will be a fuse socket and you will need to fine one. You will be in a place to take your last picture for the east area. There will be two guards as there will be a close up scene to show you of what you need to do. Take out the guards. And take the fuse you should see a small path bellow to crouch, so that you can take a better picture of it. That will be another full report done in the east wing. So the last place is at the surveillance room. Go back there and now that you are on the other side double H can help you. For this one I will show you some pictures of what you need to do. But firstly this is what you have to do. Save the game and near the save point to your left you should see metal things and whatnot climb on there. If you still don’t know what I mean then I will show you.  < When you are in the surveillance room. This is what you need to jump on as I said it is near the save point and to your left when saving the game. < When you are in the surveillance room. This is what you need to jump on as I said it is near the save point and to your left when saving the game. < When you jump up this is what it should look like. I did some arrows to guide you the way. < When you jump up this is what it should look like. I did some arrows to guide you the way. < Once on top of the gate get double H to press the switch and it will go up. < Once on top of the gate get double H to press the switch and it will go up. < Go to the right first as I said there's a room there. < Go to the right first as I said there's a room there.Ok now that I have shown you the last picture I pointed was to the right for a reason. And I will explain. Go to the right there is another small room there. Its filled with rats so watch out. Kick those rats and on top you should see a hand switch use the hand disk on it. And an animal in the corner should appear. Take a picture of it and then go back to where you was. And this time climb up on the ledge. And you should appear here.  < When back on track from coming out from the other room this is your next path to go to. < When back on track from coming out from the other room this is your next path to go to.So when you do you should be in the *trolley entrance.* from where you are start to descend and again there will be an enemy waiting for you which is another *Cyclopius* attack and hit it into the barrier. And go through the barrier there will be a stand box on your left containing something’s. Then go out of the room. This will lead you back to the surveillance room. So make sure double H follows you and then head back. Push the big box that is there and climb onto it and proceed on. There will be a door blocked with some bars. Get double H to knock it down. Mind you there is a guard there. No need to sneak as it isn’t so dangerous get you and double H to attack him. On your right should be a new path with a hand switch. Press it and the trolley will come, get onto the trolley, and then use your key. You will appear into another *Central Hall Room* Central Hall Now on your left you should see some machinery and a hand switch. Get double H to press that and an animal will appear. Take a picture of it. And also there will be a vending machine there. Now….in the next room you will get ambushed by another set of Transport Unit XB 24. Smash them into the barriers. Once done onto your right you should see a pearl and a new triangular key. Give that key to double H, Head out of the room and get both you to use the key to open the door. In this next place there are some more exercise for jade. But it is not all that it may seem as there are also red barriers on top of the blue one, so get double H to use his key to help you. The first one is to roll 2 times. The second one is the same but just with a bit of distance from each other. The third one is to crouch, roll then crouch again. You have now arrived. In this room there are two guards attack and kill them before taking the pictures. When you have done that also kick don some lockers which has some items in it. So when you are done leave the place. And head back for the iris den. Ok this may annoy you a bit so go to the hovercraft you can A press the switch. And go out from the gate which can give you a headache. Or B go through another path which is so much easier.. Let me show you a picture of it.  < So....if you did manage to break the other path while coming through the slaughter house for the first time it would be opened for you. And you could take that path instead of going to press the switch. It saves so much time. < So....if you did manage to break the other path while coming through the slaughter house for the first time it would be opened for you. And you could take that path instead of going to press the switch. It saves so much time. < There it is but as I said it needs to be knocked down from the other side to be opened. < There it is but as I said it needs to be knocked down from the other side to be opened.This path has to be knocked down first from the entrance way so keep that in mind so it doesn’t hassle you. I should have said this in my part 2 walkthrough, but I am just remembering it now. So leave the surveillance room. You will be back in the slaughterhouse entrance. Dock the ship by now you should have the code. Put the code in and head out. There will be some bomb mines get rid of them and go out through this path I’ll show you.  < Here's the way out of the slaughterhouse. < Here's the way out of the slaughterhouse.You will be back at the entrance for the races of 3 and 4 so exit the place and head back to the iris den. And just as you are on your way something else happens…..the sky goes green and another boss comes in. 6th boss You should know this boss as you have faced it before. But something is different this time. It will full blown its attacks on you. So attack it until it is dead and then you will gain another pearl. There are so many places to explore on this game. I say you should do the sidequest first before heading to the moon. So you need to get as many pearls as you can. I will explain the way that I do it because it is the right way to do it. And it will be much easier for you. Head back to the iris den. When you get back a cutscene will happen, and you will meet the governor. More cutscenes will happen after. Now you have the star key leave that one till last. Before heading to the moon I am going to divert this walkthrough to a sidequest section. This is to get a lot of pearls for the spaceship reason being that I said this. Sidequest Now in the pedestrian district you see some bars, and keys to some doors? Those are the hidden challengeable places that you can go to. But it is better to do this after the slaughterhouse. Reason being because that's there is a lot to do. And also, You can go into looters cavern as well if you have never been there that too is a fun place to go. I’ll explain more about that later on. So….let’s start off with the warehouse. Alpha Sections Warehouse. I will show you a pic of where it is.  < This is where you need to go for the warehouse. < This is where you need to go for the warehouse.So get double H to break down the door and go through it. There will be a lift there so go in and get double H to press the switch. So the lift will go down and you will come to a hidden place. You see there are creates on your left? I will show you where you need to go to get there, and also. There will be an alpha section guard so watch out. He will be turning around every now and then so when you get the chance hit his gas tank. Here is the picture of how to get into that blocked small room with the crates.  < There's the path to head to that small room. < There's the path to head to that small room. < This is where you need to climb up. < This is where you need to climb up.There are rats on the floor so kill them. Get what you need from the room and move on. There will be another guard in the next area, and there is also a Ms Laser Turrets and two Surveillance Module in this place. The guard will be turning around so sneak when you can to get up close, and to hit is tank with the hand disk. So head to the next place there and are no guards there so don’t worry. In this place there are some exercises for jade. There will be moving lasers and such. Before doing that around should be more creates to kick, so do that before proceeding on. Then you should step on some platform, and a scene should happen to show you. Of where you need to go and what to do. That platform you are stepping on opens the door. Do you know what this means? It means it will only be opened for a limited of time. So it is a race against the door closing. Run for it with good timing and once you get to the door on time, roll quickly into the next room. In this place will be a pearl and more creates to kick. So make sure all of them is kicked before going on. This room will be like the previous room. But with two lasers this time, and with extra distance on your hands. So you have to be fast, and yet careful to do this and to get to the next path. When you have done that again, there will be more creates and two pearls this time to collect. Ok get yourself ready for this part. Its so fun to do yet you can also be caught. Go to the lift and it will take you outside and to where exactly? To the place of many guards aka with more enemies. Such as red bars, Surveillance Module and more. Press the hand switch and…..RUN FOR YOUR LIFE!!! Sorry for the spam. Run away big time! First run away from the guard and its flying contraption! And then dodge the Surveillance Modules! Then roll over the blue bars and more just run and dodge when you can! This part you can die on let me show you some pictures of it.  < When escaping these guards can kill you. So dodge their attacks and keep on running. < When escaping these guards can kill you. So dodge their attacks and keep on running. < Here's a close up one see those arrows that I made? Take either way to run at, and avoid that guard. < Here's a close up one see those arrows that I made? Take either way to run at, and avoid that guard. < just in case if you get confused of where to go. I just put that arrow in there. < just in case if you get confused of where to go. I just put that arrow in there. < See that I crossed off some path? People can accidentally go there and that would not be the way out. The arrow that I made is to guide the way out for you. < See that I crossed off some path? People can accidentally go there and that would not be the way out. The arrow that I made is to guide the way out for you. < Keep on running this way until you see something in the distance I circled and arrowed it that is your exit. < Keep on running this way until you see something in the distance I circled and arrowed it that is your exit. < Jump on the boxes to get the heck out of there! < Jump on the boxes to get the heck out of there!So keep on running until you exit out. Woo…..that was exciting now wasn’t it? There will be more to that later on. The next place to go to is *Alpha sections und. Quarters* that is near the akuda bar. You know when you come out from the bar? It’s the door with the triangular key it cannot be missed as it is right in your face. So go there next. Alpha Sections Und. Quarters So this place is also exciting to do. when you go in, the entrance will be blocked by the big crate. Move it with double H and only jade can go through this. Ok when you proceed on there will be many obstacles in the way. Such as blue bars read lasers and more. So you will be more like descending to the ground. First crouch and then drop down, beware not to do this immediately as there will be something on the ground. Which are red barriers appearing and disappearing. Go down fully when it has disappeared, and carry onto the next challenge. Next you have the moving lasers drop down only when it is safe to pass. Next one is some blue bars with twin lasers turning around. there will be places you can hide that will block of the lasers. If you don’t know what I mean, then here is a picture of it.  < The ones that I circled are the hiding places. < The ones that I circled are the hiding places. So make sure you don’t get hit, and then drop down when the lasers are not near you. There will be another appearing and disappearing red bars. Make sure to shimmy across and only cross when the barriers are not shown, when you have done that move onto the next one. This one might annoy you. As you have to shimmy across with one of the red barriers blocking you way. And while on the other side there is one chasing you. Move when the red barrier has gone, so that you don’t get hit by the other one. This will be the last exercise thingy for jade in this place. There will be red barriers moving back and forth. So drop down when the red barrier is not near you. And if it does come roll and drop down. Make sure toy still hold onto the ladder. When the second red barrier does the same thing drop down again and avoid getting hit. So as you see bellow there is two guards. Keep on moving. To your right will be your next way to go. Keep on crouching and avoid the blue bars. When going through drop down and watch it. theres a blue barrier blocking your way, so you have to roll. When you have rolled a scene will happen, leading you of where to exit out from. And there will be two guards without a gas tank. Remember I spoke in my previous walkthroughs saying that they will appear more? This is what I meant. So you can’t hit you have to sneak. And also there are 2 Ms Laser Turrets around that area as well. These two guards will be walking and then they stop from time to time. And also when going through the red barrier it will disappear for them, as they walk on. And then re appear. So in a way you have to follow a guard without being caught. Let me show you some picture of one.  < So when you are on the ground this is what I was describing to you. So heres s picture of it. < So when you are on the ground this is what I was describing to you. So heres s picture of it.So you have to bypass them in a way. So follow one but don’t stay too close to him. And also don’t be so slow or those re barriers will close on you. get into that small hole when you are able too. There will be some rats so kick them out of the way. The path that you jump down into, don’t jump. There are red barriers that they also covered the floor with, as well as the other places. You should see a hand switch when you do use the hand disk. And that would be one down. don’t go descending to that place yet. Move on and you should see a broken glass window. There will be another hand switch to click on. So do that and then go back and drop down to that path. There will be 3 pearls to get and move on forward. Once taken and there will be another crate. Kick that down before opening a door. Open that door using your square key then crouch down. As there will be another guard, and another Ms Laser Turrets. This guard will be walking around. Also there are blue bars as well. When you get the chance use the hand disk, take out his tank and kick him. On the left you should see a hand switch, and on the right would be a closed door. Instead of going all the way round to press it here’s a better idea. Use your hand disk from the distance from where you are to press it. Easier said than done right? It saves so much stress. Mind you this door is also on limited time. Ooh…..this bit is exciting to do as well. Ok what you do here is go on the lift and it will go up. But wait that’s not all. You will have guards be in corner places as the lift goes up. There will be like 2 hiding places. And here’s the trick. You have to follow the shadow. When the shadow moves to one side quick go and hide there, if not then you will be caught. As the lift goes up a guard will join the fun ride with you. Getting more intense now isn’t it? Just keep on moving to where the show is and you will be fine. Don’t move until the guard has gone. Or if you want kick him from behind. And then go and head to the left onto the create and out of the place. The next area will be the *transit* Transit This one I love to do because of the music. This one is dodgy to do so here’s a video link. I would try to explain it but you will get confused. In this video the person doing it was about to go the wrong way. Thankfully he didn’t so this is the way that you should do it. http://youtu.be/Shv0mLj0QbM < Here's a video of it hope this helps you. Ok the sidequest for looters cavern. Basically there are 4 caverns to go and get it. And also you can get some in the hovercraft races as well. Here are the links for the looters craven. http://youtu.be/wjZ3CseWELQ < Video for looters cavern 1 http://youtu.be/MJvPOs_lAYE < Video for looters cavern 2 http://youtu.be/vVW0_Qhzvd8 < Video for looters cavern 3 http://youtu.be/El74P1f-hLI < Video for looters cavern 4 For the 4 races you should know where it is. If you have forgotten than I will remind you. The first two can be found in main canal, while the other two are at where the slaughterhouse is. I will show you some other places as well. There is Vorax's Lair you can do. And Volcano's Treasure as well. This one you can do yet until you have gained the ship. Ok the last sidequest you have to do is. Alpha sections Hq. And to get in there you would need the star key which you have now got on you. Make sure to save the game before going into this place as…….it will be a lot of challenge for you to do. Really I mean it when you play it yourself you will see what I mean. So save the game and head back to the pedestrian district, because that’s where the hq is. Alpha sections HQ Now I would explain this but it is better to watch the video to help you. http://youtu.be/jH9iRbmU6EY < Alpha Sections HQ Now that you have seen the video you have seen what you are up against. For that one I wish you luck. When this is done head back to the lighthouse. But before that go to mammago to buy the *flight stabilizer*for the space ship. And when you are on your way back, something terrible has happened to the lighthouse…..you get back to discover that all of the children had been kidnapped. and the house being in ruins as well. Go up the stairs and that should trigger a cutscene. It’s a very sad cutscene. But that’s not all they left. Something is waiting for you which is going to annoy you so much, and you know them as Surveillance Robot. There will be like 5-6 of them to fight. And you will have to fight all of them. This will annoy you as 2 will attack you at a time. When you have killed 2 another set will appear. When that happens its time to look at pey’js boots….. Go to menu when you pause the game and toggle it around on the bottom of his shoes it will have two pass words. There is one computer in the house and the other in the hanger. So you found the hidden ship, and you can now use it since you have got both flight stabilizers. Ignore the mdisk the only thing that you need to get is the *stellar motor* that allowed you to break gravity and go into space. Since you have the ship the controls are a bit different. But also you can still take the hovercraft with you. And you need more pearls to get it. Remember that I mentioned the volcano treasure place? Its on top of black isle it can’t be missed. Seriously when you hover above you will see some water. Press square to release the hovercraft and go in. Volcano treasure As double H said this place is filled with many crochaxs. There are some animals take pictures if you want to then move on. A path will be blocked in a way as it is closed. Get jade to shimmy on the side and there will be a glow worm there use the glow worm to hit that platform down so that double H can follow you. Go on and you will see one, and then a bunch of crochaxs will ambush you! Defeat them all and carry on with the hunt for pearls. Go to the path on the left first as the right path is closed. There will be a glow worm so you should know what to do next. Open that path and jump go to the right path when you do…more crochax will come! Watch out as they will come in groups of 3 or 4 and then take the pearls as you kill them. Press onto the last area and….. More will come! Beat them all and take the pearls by now you should have like 30 or more to be able to get the* stellar motor* go back to mammagos to get the stellar motor and head for the moon. Moon Transmitter Entrance So you are finally here….where pey’j is. And now you have to find out where he is. Firstly you want to open the path to the other side or it will get annoying to do later. So there are two paths one has 3 platforms to step on. And the other side has 2. But the one that has the 3 platform one is blocked off. So I’ll show you some pictures of what to do.  < When in the selene. Look out for this one when you do climb on it. < When in the selene. Look out for this one when you do climb on it. < And then climb onto that until you reach the top. < And then climb onto that until you reach the top. < jump onto that and then the box. < jump onto that and then the box.Ok once you are on top, jump on the box and then get double H to press on the hand switch. Then the box will move. You should be on top of the ship now. Hop off the box and move up on the ship if you don’t understand here’s another picture.  < Drop down on the ship and jump to the top. < Drop down on the ship and jump to the top. < See where I circled the hand switch? Use the hand disk and then climb up on the box. < See where I circled the hand switch? Use the hand disk and then climb up on the box.So now use the hand disk to hit the hand switch, on the other side. And hop onto the big box to hold on to. You will move to the other side. There will be more create boxes to kick and a save point as well. Also you should see something, to open the pathway to that area. Get jade to do this. And then head for the other side that has two platforms to step on. This will lead you to the *domz base* *Domz base* There will be more puzzles to solve down here as all you can see is green slimy things appearance wise. And also you will see a green beam, on top of a stand. That would be the mirrors that the green beam is on. So you have to find other stands as well to make or to connect the mirrors. So go to where the green beam is and around there should be another mirror. Pick it up and then connect it to another stand. Once you have done that move the mirror. Not the non-active one, the active one. Go to it and press X then use your analog stick to move the mirror. Move it to non-active one so it connects, then it will bounce the beam to a different direction. So go to the other stand. Do you see the closed up places? Use the beam to unlock them. In order to do that you will have to turn the beam to do that .One has a crystal in it, and the other has another mirror. Unlock both of them if you can. Oh, when you unlock one you have to keep it opened. Until you have finished taking things in there. I thought that I should point you out on that. When you get a new mirror you should know like what to do now with it. Find a stand connect the mirror and keep on activating the non-active ones. Keep connecting. There will be 3 different ones to do I’ll show you a picture  < These are the other mirrors that I was talking about. < These are the other mirrors that I was talking about.So make sure they are all are connecting properly and it should connect to this. 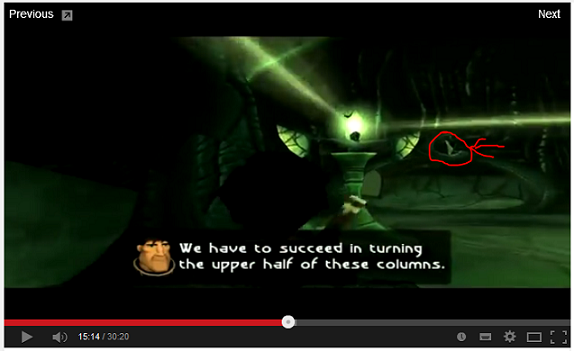 < Connect the beams to those mirrors and make sure it connects to what I circled. < Connect the beams to those mirrors and make sure it connects to what I circled.So that should be connected when you have done that head for the *cloister* Cloister so keep on going as this is a long walk and then something will shock you at the end of this tunnel. You have found pey’j! But hes trapped! As you can see there is another puzzle surrounding him that you need to figure out. Don’t worry this puzzle looks much easier than you think it is. People think this one is hard, but its not really. As you can see it’s a form of a star. The green beam has connected to one stand so move that around the edges. It won’t go through all of it so when you see one bounce out of place. Go to that stand and keep on connecting and only just around the edges. When you have done that the first part of the puzzle should clear. Now for the second one go back to the heart of the mirror stand that was first beamed up. And I will show you two pictures of where the beams should hit next.  < Ok when you have done the first puzzle of this. I circled of where you have to connect it next. < Ok when you have done the first puzzle of this. I circled of where you have to connect it next. < And I did the same for the last puzzle too. Where I circled is where you need to connect it lastly. < And I did the same for the last puzzle too. Where I circled is where you need to connect it lastly.So once you have done that you have freed pey’j! Get double H to smash that container that he is held in! And…and…sniffs* double H checks for his heart pulse and he is dead….yes pey’j is dead. Sad as it may seem…you have to proceed on….. This is where you need to go next.  < After that puzzle this is where you need to go to next. < After that puzzle this is where you need to go to next.So save the game shimmy through that pathway. And you will come to an open area. On your right will be two guards. So just go full blown attack on them, and kick down any creates that you see. Next go down another blue pathway when you come to a large stone thingy in front of you. Go to the right and you should see a door path. This will lead you to *the great crypt* The great crypt This is another puzzle to do as there will be a lot a blue elevators to go on. But the one that you need to get to is the green one. Once you have done that keep on going until a cutscene happens. Take the picture of the domz priest with the others. And that will be your last picture to take. Then…get the heck out of there! As it will be scary in a way. Find and get back to the dark blue elevator to get back to the cloister to meet up with the double H. Cloister Get back to double H and get back to the transmitter entrance. Once you get back to the domz base a cutscene will happen. Neno has confirmed that pey’j is alive! Hes alive!! So jades runs back to the cloister and look who’s waiting for her. *Sniffs* lovely re Transmitter entrance Remember what I told you to do before going to the domz base? To open the path for the other side that has 3 platforms? That is why I told you to do that first, to save the stress and whatnot. So get to the other side that has the 3 platforms. Get ready to dodge attacks from a machine that will surprise attack you. Head for the tram, which will lead you to the *transmitter room* Transmitter room There’s are code that you will see take a picture of it to send to the governor. She will send you the code put the code in and a cutscene will happen. After that escape from the transmitter room. As it will explode head back to the ship as quick as you can. More cutscenes will happen and then you will get trapped in a beam and this will trigger a boss fight. 7th boss Oh….this boss is annoying to face. Your trapped in his beam so you can only do so much in there. You can shoot and still dodge as well. I will show you a picture of what you have to shoot.  < And when facing this boss those are the places that you need to use your cannon on to make some damage. < And when facing this boss those are the places that you need to use your cannon on to make some damage.For this boss you have to use your cannon to shoot the back of his spider ship. Watch out for his attacks though. The more damage you give the powerful his attacks become. So avoid getting hit at all costs! So once you have finished defeating him, the tracker beam will still be on. So you have to release the hover craft to get into the ship to turn it off. There will be some mines blocking the path though. And also watch out as the torpedo’s will come at you automatically. So to get rid of the mines that is blocking the way. Get the torpedo to hit it to clear the way for you. Once in, dock your ship and save the game. There will be 3 guards just take them down and hit their tanks. Go up the blue elevator and another cutscene will happen. After that press the hand switch and head back to the ship. Then you will be shown where to go next. And then you will get ambushed from the air. Use your cannon to take those ships down. And then you will get back up help, head for the landing place. And then head to that 3 platform place. And now…..you face the final boss in this game. A cutscene will happen and pey’j again, gets kidnapped. Domz priest The final boss music is so awesome I tell you. Its like oh yeah lets take down this boss! So be prepared use your moves to beat this boss. And also use what you learned during the game. This boss is not as hard as you may think. But it will only be for those who are playing it for the first time. First off will be a set of his puppets that he made. I call them that because that’s what they are. After you defeated them next one would be the priest himself. He will come out to attack you. And he will shoot his beam, with some other green missiles coming at you. So hide behind double H at times. And then when you get the chance, use the hand disk to hit the priest 3 times. For the next one he will cover himself with a crystal shield, and then use pey’j clones to attack you. Get double H to use his attack. And then use the clones to destroy the crystal shield. And use the clone to hit the priest as well. After that, double H also gets taken away from you just as pey’j was. Then water will arise the domz priest will come out and he will attack you. watch his pattern of how he attacks. Attack him on the direction that he comes at you. If he bits you then you will have to start the process again. One thing, when he is above you, dodge quickly then attack him. That’s when he will most likely bit you when you least expect it. When you have done that. The water will disappear. Then double H clones will appear, fight them off. While halfway in the fight, he will shoot green missiles at you. Dodge them and continue to attack when you can. Next thing happens is that the screen will turn green. And the domz priest has reversed your controls. Annoying right? So it will be like this. Right is left, left is right, up is down while down is up. The priest will come back to attack, and give him the final blow. Attack him in the directions that he comes at you with. Dodge his attacks and then give off the finishing attack. And that my friend is the end of that boss. A cutscene will happen showing what will happen and such. And that’s the end of the game. That’s rubbish ending if you can ask me. Anyways I hoped you enjoyed reading this. And I hope it helps you out a lot in a way. For now I won’t do a walkthrough for a couple days or so. Considering the amount of work I have put into this one. As this is the longest walkthrough I have done. Well until next time look out for my walkthroughs. ^-^ Laian : Eirinn : Sorry for not summing you to the part 2 one.... Here are the links for my part 1 and 2 walkthroughs. ^^ https://www.vizzed.com/boards/thread.php?id=76806&ref=259134 https://www.vizzed.com/boards/thread.php?id=76872&ref=259134 Beyond Good and Evil Walkthrough part 3 Make sure you save the game before going on like I said in my last part of my walkthrough 2. So kick down the boxes and take the crystals. There are some traps on the floor so make sure that you clear them by using the hand disk. Once cleared move onto the next area, and be careful as you would get ambushed. These things are annoying to deal with so use double H’s action button to stop them from moving so that you can hit them. When you have dealt with them kick down the boxes and climb up on the ledge. Get double H to hit the electrical box for as the barrier is blocking your way. Jade will duck again meaning there are guards near. And she is right, as there are 3 guards in this next room. 2 of them are standing so they won’t turn around. While the other one is walking back and forth. There are some shadows for you to hide in. So if you can’t be bothered to attack them then just sneak through. The guard that is walking when he walks back follow him but not too close then hide in the shadows. When he walks back then sneak on, but remember do this with good timing and you won’t get caught. When you do manage to sneak proceed onto the next place. In this small place will be some crystal boxes and a save point. Save the game and then continue on. There will be one guard in this place, sadly he won’t move so you have to find a way to hit his tank. Let me show you a way if you are not sure how too. So heres some pictures < That's where the guard is as I circled him, I pointed the arrow straight for a reason. < Keep on going straight until you are in this corner. < Toggle the camera view to suit your needs. Then when you are ready hit his tank.When you go on there will be some red bars blocking your way .There is a switch on your right so use your key and the barrier will disappear. You’re now close to the central hall as you can see. There will be a vending machine nearby so take when you need before going on. There will be another one guard in this area. And this time the guard will be turning around. So that gives you a chance to use the hand disk on him. So go on when you have done that. And use your key again to open the door for you. There will be some more crates for you to kick on. On your right will be a fuse socket and you will need to fine one. You will be in a place to take your last picture for the east area. There will be two guards as there will be a close up scene to show you of what you need to do. Take out the guards. And take the fuse you should see a small path bellow to crouch, so that you can take a better picture of it. That will be another full report done in the east wing. So the last place is at the surveillance room. Go back there and now that you are on the other side double H can help you. For this one I will show you some pictures of what you need to do. But firstly this is what you have to do. Save the game and near the save point to your left you should see metal things and whatnot climb on there. If you still don’t know what I mean then I will show you. < When you are in the surveillance room. This is what you need to jump on as I said it is near the save point and to your left when saving the game. < When you jump up this is what it should look like. I did some arrows to guide you the way. < Once on top of the gate get double H to press the switch and it will go up. < Go to the right first as I said there's a room there.Ok now that I have shown you the last picture I pointed was to the right for a reason. And I will explain. Go to the right there is another small room there. Its filled with rats so watch out. Kick those rats and on top you should see a hand switch use the hand disk on it. And an animal in the corner should appear. Take a picture of it and then go back to where you was. And this time climb up on the ledge. And you should appear here. < When back on track from coming out from the other room this is your next path to go to.So when you do you should be in the *trolley entrance.* from where you are start to descend and again there will be an enemy waiting for you which is another *Cyclopius* attack and hit it into the barrier. And go through the barrier there will be a stand box on your left containing something’s. Then go out of the room. This will lead you back to the surveillance room. So make sure double H follows you and then head back. Push the big box that is there and climb onto it and proceed on. There will be a door blocked with some bars. Get double H to knock it down. Mind you there is a guard there. No need to sneak as it isn’t so dangerous get you and double H to attack him. On your right should be a new path with a hand switch. Press it and the trolley will come, get onto the trolley, and then use your key. You will appear into another *Central Hall Room* Central Hall Now on your left you should see some machinery and a hand switch. Get double H to press that and an animal will appear. Take a picture of it. And also there will be a vending machine there. Now….in the next room you will get ambushed by another set of Transport Unit XB 24. Smash them into the barriers. Once done onto your right you should see a pearl and a new triangular key. Give that key to double H, Head out of the room and get both you to use the key to open the door. In this next place there are some more exercise for jade. But it is not all that it may seem as there are also red barriers on top of the blue one, so get double H to use his key to help you. The first one is to roll 2 times. The second one is the same but just with a bit of distance from each other. The third one is to crouch, roll then crouch again. You have now arrived. In this room there are two guards attack and kill them before taking the pictures. When you have done that also kick don some lockers which has some items in it. So when you are done leave the place. And head back for the iris den. Ok this may annoy you a bit so go to the hovercraft you can A press the switch. And go out from the gate which can give you a headache. Or B go through another path which is so much easier.. Let me show you a picture of it. < So....if you did manage to break the other path while coming through the slaughter house for the first time it would be opened for you. And you could take that path instead of going to press the switch. It saves so much time. < There it is but as I said it needs to be knocked down from the other side to be opened.This path has to be knocked down first from the entrance way so keep that in mind so it doesn’t hassle you. I should have said this in my part 2 walkthrough, but I am just remembering it now. So leave the surveillance room. You will be back in the slaughterhouse entrance. Dock the ship by now you should have the code. Put the code in and head out. There will be some bomb mines get rid of them and go out through this path I’ll show you. < Here's the way out of the slaughterhouse.You will be back at the entrance for the races of 3 and 4 so exit the place and head back to the iris den. And just as you are on your way something else happens…..the sky goes green and another boss comes in. 6th boss You should know this boss as you have faced it before. But something is different this time. It will full blown its attacks on you. So attack it until it is dead and then you will gain another pearl. There are so many places to explore on this game. I say you should do the sidequest first before heading to the moon. So you need to get as many pearls as you can. I will explain the way that I do it because it is the right way to do it. And it will be much easier for you. Head back to the iris den. When you get back a cutscene will happen, and you will meet the governor. More cutscenes will happen after. Now you have the star key leave that one till last. Before heading to the moon I am going to divert this walkthrough to a sidequest section. This is to get a lot of pearls for the spaceship reason being that I said this. Sidequest Now in the pedestrian district you see some bars, and keys to some doors? Those are the hidden challengeable places that you can go to. But it is better to do this after the slaughterhouse. Reason being because that's there is a lot to do. And also, You can go into looters cavern as well if you have never been there that too is a fun place to go. I’ll explain more about that later on. So….let’s start off with the warehouse. Alpha Sections Warehouse. I will show you a pic of where it is. < This is where you need to go for the warehouse.So get double H to break down the door and go through it. There will be a lift there so go in and get double H to press the switch. So the lift will go down and you will come to a hidden place. You see there are creates on your left? I will show you where you need to go to get there, and also. There will be an alpha section guard so watch out. He will be turning around every now and then so when you get the chance hit his gas tank. Here is the picture of how to get into that blocked small room with the crates. < There's the path to head to that small room. < This is where you need to climb up.There are rats on the floor so kill them. Get what you need from the room and move on. There will be another guard in the next area, and there is also a Ms Laser Turrets and two Surveillance Module in this place. The guard will be turning around so sneak when you can to get up close, and to hit is tank with the hand disk. So head to the next place there and are no guards there so don’t worry. In this place there are some exercises for jade. There will be moving lasers and such. Before doing that around should be more creates to kick, so do that before proceeding on. Then you should step on some platform, and a scene should happen to show you. Of where you need to go and what to do. That platform you are stepping on opens the door. Do you know what this means? It means it will only be opened for a limited of time. So it is a race against the door closing. Run for it with good timing and once you get to the door on time, roll quickly into the next room. In this place will be a pearl and more creates to kick. So make sure all of them is kicked before going on. This room will be like the previous room. But with two lasers this time, and with extra distance on your hands. So you have to be fast, and yet careful to do this and to get to the next path. When you have done that again, there will be more creates and two pearls this time to collect. Ok get yourself ready for this part. Its so fun to do yet you can also be caught. Go to the lift and it will take you outside and to where exactly? To the place of many guards aka with more enemies. Such as red bars, Surveillance Module and more. Press the hand switch and…..RUN FOR YOUR LIFE!!! Sorry for the spam. Run away big time! First run away from the guard and its flying contraption! And then dodge the Surveillance Modules! Then roll over the blue bars and more just run and dodge when you can! This part you can die on let me show you some pictures of it. < When escaping these guards can kill you. So dodge their attacks and keep on running. < Here's a close up one see those arrows that I made? Take either way to run at, and avoid that guard. < just in case if you get confused of where to go. I just put that arrow in there. < See that I crossed off some path? People can accidentally go there and that would not be the way out. The arrow that I made is to guide the way out for you. < Keep on running this way until you see something in the distance I circled and arrowed it that is your exit. < Jump on the boxes to get the heck out of there!So keep on running until you exit out. Woo…..that was exciting now wasn’t it? There will be more to that later on. The next place to go to is *Alpha sections und. Quarters* that is near the akuda bar. You know when you come out from the bar? It’s the door with the triangular key it cannot be missed as it is right in your face. So go there next. Alpha Sections Und. Quarters So this place is also exciting to do. when you go in, the entrance will be blocked by the big crate. Move it with double H and only jade can go through this. Ok when you proceed on there will be many obstacles in the way. Such as blue bars read lasers and more. So you will be more like descending to the ground. First crouch and then drop down, beware not to do this immediately as there will be something on the ground. Which are red barriers appearing and disappearing. Go down fully when it has disappeared, and carry onto the next challenge. Next you have the moving lasers drop down only when it is safe to pass. Next one is some blue bars with twin lasers turning around. there will be places you can hide that will block of the lasers. If you don’t know what I mean, then here is a picture of it. < The ones that I circled are the hiding places.So make sure you don’t get hit, and then drop down when the lasers are not near you. There will be another appearing and disappearing red bars. Make sure to shimmy across and only cross when the barriers are not shown, when you have done that move onto the next one. This one might annoy you. As you have to shimmy across with one of the red barriers blocking you way. And while on the other side there is one chasing you. Move when the red barrier has gone, so that you don’t get hit by the other one. This will be the last exercise thingy for jade in this place. There will be red barriers moving back and forth. So drop down when the red barrier is not near you. And if it does come roll and drop down. Make sure toy still hold onto the ladder. When the second red barrier does the same thing drop down again and avoid getting hit. So as you see bellow there is two guards. Keep on moving. To your right will be your next way to go. Keep on crouching and avoid the blue bars. When going through drop down and watch it. theres a blue barrier blocking your way, so you have to roll. When you have rolled a scene will happen, leading you of where to exit out from. And there will be two guards without a gas tank. Remember I spoke in my previous walkthroughs saying that they will appear more? This is what I meant. So you can’t hit you have to sneak. And also there are 2 Ms Laser Turrets around that area as well. These two guards will be walking and then they stop from time to time. And also when going through the red barrier it will disappear for them, as they walk on. And then re appear. So in a way you have to follow a guard without being caught. Let me show you some picture of one. < So when you are on the ground this is what I was describing to you. So heres s picture of it.So you have to bypass them in a way. So follow one but don’t stay too close to him. And also don’t be so slow or those re barriers will close on you. get into that small hole when you are able too. There will be some rats so kick them out of the way. The path that you jump down into, don’t jump. There are red barriers that they also covered the floor with, as well as the other places. You should see a hand switch when you do use the hand disk. And that would be one down. don’t go descending to that place yet. Move on and you should see a broken glass window. There will be another hand switch to click on. So do that and then go back and drop down to that path. There will be 3 pearls to get and move on forward. Once taken and there will be another crate. Kick that down before opening a door. Open that door using your square key then crouch down. As there will be another guard, and another Ms Laser Turrets. This guard will be walking around. Also there are blue bars as well. When you get the chance use the hand disk, take out his tank and kick him. On the left you should see a hand switch, and on the right would be a closed door. Instead of going all the way round to press it here’s a better idea. Use your hand disk from the distance from where you are to press it. Easier said than done right? It saves so much stress. Mind you this door is also on limited time. Ooh…..this bit is exciting to do as well. Ok what you do here is go on the lift and it will go up. But wait that’s not all. You will have guards be in corner places as the lift goes up. There will be like 2 hiding places. And here’s the trick. You have to follow the shadow. When the shadow moves to one side quick go and hide there, if not then you will be caught. As the lift goes up a guard will join the fun ride with you. Getting more intense now isn’t it? Just keep on moving to where the show is and you will be fine. Don’t move until the guard has gone. Or if you want kick him from behind. And then go and head to the left onto the create and out of the place. The next area will be the *transit* Transit This one I love to do because of the music. This one is dodgy to do so here’s a video link. I would try to explain it but you will get confused. In this video the person doing it was about to go the wrong way. Thankfully he didn’t so this is the way that you should do it. http://youtu.be/Shv0mLj0QbM < Here's a video of it hope this helps you. Ok the sidequest for looters cavern. Basically there are 4 caverns to go and get it. And also you can get some in the hovercraft races as well. Here are the links for the looters craven. http://youtu.be/wjZ3CseWELQ < Video for looters cavern 1 http://youtu.be/MJvPOs_lAYE < Video for looters cavern 2 http://youtu.be/vVW0_Qhzvd8 < Video for looters cavern 3 http://youtu.be/El74P1f-hLI < Video for looters cavern 4 For the 4 races you should know where it is. If you have forgotten than I will remind you. The first two can be found in main canal, while the other two are at where the slaughterhouse is. I will show you some other places as well. There is Vorax's Lair you can do. And Volcano's Treasure as well. This one you can do yet until you have gained the ship. Ok the last sidequest you have to do is. Alpha sections Hq. And to get in there you would need the star key which you have now got on you. Make sure to save the game before going into this place as…….it will be a lot of challenge for you to do. Really I mean it when you play it yourself you will see what I mean. So save the game and head back to the pedestrian district, because that’s where the hq is. Alpha sections HQ Now I would explain this but it is better to watch the video to help you. http://youtu.be/jH9iRbmU6EY < Alpha Sections HQ Now that you have seen the video you have seen what you are up against. For that one I wish you luck. When this is done head back to the lighthouse. But before that go to mammago to buy the *flight stabilizer*for the space ship. And when you are on your way back, something terrible has happened to the lighthouse…..you get back to discover that all of the children had been kidnapped. and the house being in ruins as well. Go up the stairs and that should trigger a cutscene. It’s a very sad cutscene. But that’s not all they left. Something is waiting for you which is going to annoy you so much, and you know them as Surveillance Robot. There will be like 5-6 of them to fight. And you will have to fight all of them. This will annoy you as 2 will attack you at a time. When you have killed 2 another set will appear. When that happens its time to look at pey’js boots….. Go to menu when you pause the game and toggle it around on the bottom of his shoes it will have two pass words. There is one computer in the house and the other in the hanger. So you found the hidden ship, and you can now use it since you have got both flight stabilizers. Ignore the mdisk the only thing that you need to get is the *stellar motor* that allowed you to break gravity and go into space. Since you have the ship the controls are a bit different. But also you can still take the hovercraft with you. And you need more pearls to get it. Remember that I mentioned the volcano treasure place? Its on top of black isle it can’t be missed. Seriously when you hover above you will see some water. Press square to release the hovercraft and go in. Volcano treasure As double H said this place is filled with many crochaxs. There are some animals take pictures if you want to then move on. A path will be blocked in a way as it is closed. Get jade to shimmy on the side and there will be a glow worm there use the glow worm to hit that platform down so that double H can follow you. Go on and you will see one, and then a bunch of crochaxs will ambush you! Defeat them all and carry on with the hunt for pearls. Go to the path on the left first as the right path is closed. There will be a glow worm so you should know what to do next. Open that path and jump go to the right path when you do…more crochax will come! Watch out as they will come in groups of 3 or 4 and then take the pearls as you kill them. Press onto the last area and….. More will come! Beat them all and take the pearls by now you should have like 30 or more to be able to get the* stellar motor* go back to mammagos to get the stellar motor and head for the moon. Moon Transmitter Entrance So you are finally here….where pey’j is. And now you have to find out where he is. Firstly you want to open the path to the other side or it will get annoying to do later. So there are two paths one has 3 platforms to step on. And the other side has 2. But the one that has the 3 platform one is blocked off. So I’ll show you some pictures of what to do. < When in the selene. Look out for this one when you do climb on it. < And then climb onto that until you reach the top. < jump onto that and then the box.Ok once you are on top, jump on the box and then get double H to press on the hand switch. Then the box will move. You should be on top of the ship now. Hop off the box and move up on the ship if you don’t understand here’s another picture. < Drop down on the ship and jump to the top. < See where I circled the hand switch? Use the hand disk and then climb up on the box.So now use the hand disk to hit the hand switch, on the other side. And hop onto the big box to hold on to. You will move to the other side. There will be more create boxes to kick and a save point as well. Also you should see something, to open the pathway to that area. Get jade to do this. And then head for the other side that has two platforms to step on. This will lead you to the *domz base* *Domz base* There will be more puzzles to solve down here as all you can see is green slimy things appearance wise. And also you will see a green beam, on top of a stand. That would be the mirrors that the green beam is on. So you have to find other stands as well to make or to connect the mirrors. So go to where the green beam is and around there should be another mirror. Pick it up and then connect it to another stand. Once you have done that move the mirror. Not the non-active one, the active one. Go to it and press X then use your analog stick to move the mirror. Move it to non-active one so it connects, then it will bounce the beam to a different direction. So go to the other stand. Do you see the closed up places? Use the beam to unlock them. In order to do that you will have to turn the beam to do that .One has a crystal in it, and the other has another mirror. Unlock both of them if you can. Oh, when you unlock one you have to keep it opened. Until you have finished taking things in there. I thought that I should point you out on that. When you get a new mirror you should know like what to do now with it. Find a stand connect the mirror and keep on activating the non-active ones. Keep connecting. There will be 3 different ones to do I’ll show you a picture < These are the other mirrors that I was talking about.So make sure they are all are connecting properly and it should connect to this. < Connect the beams to those mirrors and make sure it connects to what I circled.So that should be connected when you have done that head for the *cloister* Cloister so keep on going as this is a long walk and then something will shock you at the end of this tunnel. You have found pey’j! But hes trapped! As you can see there is another puzzle surrounding him that you need to figure out. Don’t worry this puzzle looks much easier than you think it is. People think this one is hard, but its not really. As you can see it’s a form of a star. The green beam has connected to one stand so move that around the edges. It won’t go through all of it so when you see one bounce out of place. Go to that stand and keep on connecting and only just around the edges. When you have done that the first part of the puzzle should clear. Now for the second one go back to the heart of the mirror stand that was first beamed up. And I will show you two pictures of where the beams should hit next. < Ok when you have done the first puzzle of this. I circled of where you have to connect it next. < And I did the same for the last puzzle too. Where I circled is where you need to connect it lastly.So once you have done that you have freed pey’j! Get double H to smash that container that he is held in! And…and…sniffs* double H checks for his heart pulse and he is dead….yes pey’j is dead. Sad as it may seem…you have to proceed on….. This is where you need to go next. < After that puzzle this is where you need to go to next.So save the game shimmy through that pathway. And you will come to an open area. On your right will be two guards. So just go full blown attack on them, and kick down any creates that you see. Next go down another blue pathway when you come to a large stone thingy in front of you. Go to the right and you should see a door path. This will lead you to *the great crypt* The great crypt This is another puzzle to do as there will be a lot a blue elevators to go on. But the one that you need to get to is the green one. Once you have done that keep on going until a cutscene happens. Take the picture of the domz priest with the others. And that will be your last picture to take. Then…get the heck out of there! As it will be scary in a way. Find and get back to the dark blue elevator to get back to the cloister to meet up with the double H. Cloister Get back to double H and get back to the transmitter entrance. Once you get back to the domz base a cutscene will happen. Neno has confirmed that pey’j is alive! Hes alive!! So jades runs back to the cloister and look who’s waiting for her. *Sniffs* lovely re Transmitter entrance Remember what I told you to do before going to the domz base? To open the path for the other side that has 3 platforms? That is why I told you to do that first, to save the stress and whatnot. So get to the other side that has the 3 platforms. Get ready to dodge attacks from a machine that will surprise attack you. Head for the tram, which will lead you to the *transmitter room* Transmitter room There’s are code that you will see take a picture of it to send to the governor. She will send you the code put the code in and a cutscene will happen. After that escape from the transmitter room. As it will explode head back to the ship as quick as you can. More cutscenes will happen and then you will get trapped in a beam and this will trigger a boss fight. 7th boss Oh….this boss is annoying to face. Your trapped in his beam so you can only do so much in there. You can shoot and still dodge as well. I will show you a picture of what you have to shoot. < And when facing this boss those are the places that you need to use your cannon on to make some damage.For this boss you have to use your cannon to shoot the back of his spider ship. Watch out for his attacks though. The more damage you give the powerful his attacks become. So avoid getting hit at all costs! So once you have finished defeating him, the tracker beam will still be on. So you have to release the hover craft to get into the ship to turn it off. There will be some mines blocking the path though. And also watch out as the torpedo’s will come at you automatically. So to get rid of the mines that is blocking the way. Get the torpedo to hit it to clear the way for you. Once in, dock your ship and save the game. There will be 3 guards just take them down and hit their tanks. Go up the blue elevator and another cutscene will happen. After that press the hand switch and head back to the ship. Then you will be shown where to go next. And then you will get ambushed from the air. Use your cannon to take those ships down. And then you will get back up help, head for the landing place. And then head to that 3 platform place. And now…..you face the final boss in this game. A cutscene will happen and pey’j again, gets kidnapped. Domz priest The final boss music is so awesome I tell you. Its like oh yeah lets take down this boss! So be prepared use your moves to beat this boss. And also use what you learned during the game. This boss is not as hard as you may think. But it will only be for those who are playing it for the first time. First off will be a set of his puppets that he made. I call them that because that’s what they are. After you defeated them next one would be the priest himself. He will come out to attack you. And he will shoot his beam, with some other green missiles coming at you. So hide behind double H at times. And then when you get the chance, use the hand disk to hit the priest 3 times. For the next one he will cover himself with a crystal shield, and then use pey’j clones to attack you. Get double H to use his attack. And then use the clones to destroy the crystal shield. And use the clone to hit the priest as well. After that, double H also gets taken away from you just as pey’j was. Then water will arise the domz priest will come out and he will attack you. watch his pattern of how he attacks. Attack him on the direction that he comes at you. If he bits you then you will have to start the process again. One thing, when he is above you, dodge quickly then attack him. That’s when he will most likely bit you when you least expect it. When you have done that. The water will disappear. Then double H clones will appear, fight them off. While halfway in the fight, he will shoot green missiles at you. Dodge them and continue to attack when you can. Next thing happens is that the screen will turn green. And the domz priest has reversed your controls. Annoying right? So it will be like this. Right is left, left is right, up is down while down is up. The priest will come back to attack, and give him the final blow. Attack him in the directions that he comes at you with. Dodge his attacks and then give off the finishing attack. And that my friend is the end of that boss. A cutscene will happen showing what will happen and such. And that’s the end of the game. That’s rubbish ending if you can ask me. Anyways I hoped you enjoyed reading this. And I hope it helps you out a lot in a way. For now I won’t do a walkthrough for a couple days or so. Considering the amount of work I have put into this one. As this is the longest walkthrough I have done. Well until next time look out for my walkthroughs. ^-^ Laian : Eirinn : Sorry for not summing you to the part 2 one.... Here are the links for my part 1 and 2 walkthroughs. ^^ https://www.vizzed.com/boards/thread.php?id=76806&ref=259134 https://www.vizzed.com/boards/thread.php?id=76872&ref=259134 |
Vizzed Elite
Affected by 'Laziness Syndrome'
Registered: 08-16-12
Last Post: 1055 days
Last Active: 158 days
  Number 1 Sailor Moon, Final Fantasy And Freedom Planet Fan On Vizzed! Number 1 Sailor Moon, Final Fantasy And Freedom Planet Fan On Vizzed! |
Affected by 'Laziness Syndrome'
Registered: 08-16-12
Last Post: 1055 days
Last Active: 158 days
Post Rating: 2 Liked By: Laian, TheReaper7290,
06-16-14 11:22 AM
 TheReaper7290 is Offline
| ID: 1036748 | 18 Words
TheReaper7290 is Offline
| ID: 1036748 | 18 Words
 TheReaper7290 is Offline
| ID: 1036748 | 18 Words
TheReaper7290
Level: 80

POSTS: 934/1737
POST EXP: 37593
LVL EXP: 4664620
CP: 9863.0
VIZ: 154252

POSTS: 934/1737
POST EXP: 37593
LVL EXP: 4664620
CP: 9863.0
VIZ: 154252
Likes: 1 Dislikes: 0
Another great job I really enjoyed reading your walkthroughs and I would love to read your next walkthrough. |
Trusted Member
Affected by 'Laziness Syndrome'
Registered: 04-10-14
Location: The After life
Last Post: 3037 days
Last Active: 759 days
| Angel Of Death |
Affected by 'Laziness Syndrome'
Registered: 04-10-14
Location: The After life
Last Post: 3037 days
Last Active: 759 days
Post Rating: 1 Liked By: Eniitan,
06-17-14 08:47 AM
 juuldude is Offline
| ID: 1037045 | 19 Words
juuldude is Offline
| ID: 1037045 | 19 Words
 juuldude is Offline
| ID: 1037045 | 19 Words
juuldude
Level: 118

POSTS: 1437/3976
POST EXP: 272721
LVL EXP: 18236433
CP: 13351.9
VIZ: 518203

POSTS: 1437/3976
POST EXP: 272721
LVL EXP: 18236433
CP: 13351.9
VIZ: 518203
Likes: 1 Dislikes: 0
Vizzed Elite
Affected by 'Laziness Syndrome'
Registered: 02-26-11
Location: Holland, The Netherlands, which you prefer
Last Post: 2555 days
Last Active: 7 days
Dutch vizzedeer and Professor Layton fan  |
Affected by 'Laziness Syndrome'
Registered: 02-26-11
Location: Holland, The Netherlands, which you prefer
Last Post: 2555 days
Last Active: 7 days
Post Rating: 1 Liked By: Eniitan,
06-21-14 09:04 AM
Laian is Offline
| ID: 1038722 | 51 Words
| ID: 1038722 | 51 Words
Laian
Level: 92

POSTS: 1696/2232
POST EXP: 457173
LVL EXP: 7496548
CP: 23733.5
VIZ: 3570463

POSTS: 1696/2232
POST EXP: 457173
LVL EXP: 7496548
CP: 23733.5
VIZ: 3570463
Likes: 1 Dislikes: 0
Since I have a bit of time, I'm going to reply to this. Sorry for the late feedback, Enii. I like how you focus on specifics spots on the screenshots, that's a nice touch. It brings an extra information for the player, which is good. Keep up this good work I like how you focus on specifics spots on the screenshots, that's a nice touch. It brings an extra information for the player, which is good. Keep up this good work |
Vizzed Elite
Affected by 'Laziness Syndrome'
Registered: 10-21-11
Location: France
Last Post: 2325 days
Last Active: 1499 days
| Games have secrets, I have my eagle gaze. |
Affected by 'Laziness Syndrome'
Registered: 10-21-11
Location: France
Last Post: 2325 days
Last Active: 1499 days
Post Rating: 1 Liked By: Eniitan,
