

 User Notice
 Forum Links

Thread Information
Creator
02-27-14 12:57 PM
Post
03-03-14 03:35 PM
9.5
Today: 0
Users: 0 unique
Thread Actions


Walkthrough Crystalis
02-27-14 12:57 PM
Laian is Offline
| ID: 982030 | 11149 Words

POSTS: 1565/2232
POST EXP: 457173
LVL EXP: 7582684
CP: 23733.5
VIZ: 3570463

 Hello everyone, this is your host Laian and welcome to another walkthrough. After a journey into madness, let's go on an adventure! Let's go back to the NES and play a game that I just discovered and enjoyed: Crystalis. It might not be familiar to you as well but, you know, sometimes, it's good to find and give a shot to games we haven't heard of. To be honest, as a fan of good RPGs, I fell in love with this one but I'm not going to ramble too much during that introduction because... I myself don't know what else to say. Ah one more thing: this walkthrough is for the NES version only, the orignal version in other words. Yes, there's also a GBC version and it has some slight differences. Well then, are you ready for a new quest? Let's start that walkthrough, shall we!
CHAPTER 1: THE VAMPIRE You start in a small cave with some kind of time travel device. Go outside, then go to the village. Go in the house to the north, talk to the man and get 100$. Now, go in the house to the west, talk to the man to get your first weapon: the sword of wind. It increases your attack by 1 and you can now attack the enemies outside. There are two types of attacks: the regular attack if you press the attack button and the charged attack if you hold the attack button (you'll see the arrow below your health bar filled and blink). Ah, one more thing about the charged attack: you don't have to move while charging otherwise the charge bar will stop until you stop moving. You can also see a giant bubble to the right of the charge bar. It's the charge max and it has a "1" in it, which means you can charge the sword once. You'll find an upgrade later in the game that will allow you to charge your sword twice and make a devastating charged attack. For now, talk to the little boy twice (or girl) to get an interesting information. You can now talk to the other people if you want to kill some time since they tell you about the windmill and other stuff. Go to the tool shop (the shop with a bag above the door) and buy the alarm flute for 50$.
Now, equip the sword of wind, go north and welcome to the danger zone. No, I'm exaggerating a bit (just a bit). It's just where the troubles start. You'll meet some creatures in this zone: some blue slimes and some tigers. Your first objective is a cave located to the west. Inside, you'll meet an elder named Zebu. He has apparently been waiting for you. He will ask you to make the windmill work. Note the fake wall behind him, leave the cave, head to the north, cross the bridge and enter the cave. Go north to see a Face a new enemy, go up, cross the bridge and go up the stairs. This new section has two types of enemies: the winged snake Ok, and the pink slime, a bit tougher than the blue slime. This one may poison you if it hits you so be careful. The first way to the north is blocked by a fake wall. The stairs to the north lead to a chest with the warp boots, kept by a tough golem. That item allows you to go back to the towns you've already visited. Go downstairs, kill the enemies, go south, open the chest to get a medical herb, go east and go down to find another chest that contains the ball of wind. This is the upgrade for the sword of wind. Now, you can charge twice and make a powerful attack. Also, you can destroy those fake walls, which is cool (not the one inside the elder's cave though, you'll need the specific sword and its upgrade). Go north from here to find a fake wall. Destroy it, open the chest and grab the antidote. Go back to the other fake wall in this cave, destroy it, go west and go downstairs to get a medical herb. Go back upstairs, go east now, go upstairs, carry on and face the first boss of the game: the vampire. He has two abilities: he teleports himself around the room and he summons two bats. The bats are really annoying so get rid of them as soon as possible. Their hits might kill you easily if you don't pay attention to your life. Otherwise, this boss is not that hard if you move constantly, fully charge your attacks and heal with medical herbs and the refresh spell. When he will be almost dead, he will teleport faster than usual. All you need is haste and accuracy in this situation for the final blow. Your reward will be the rabbit boots. That item allows you to jump over Now, go north to leave the cave.
CHAPTER 2: BIG BUG, YOU ARE BEAUTIFUL! Go down then go west to enter the second town of the game. Welcome to Brynmaer, folks! The man standing next to the entrance is named Akahana and he seems to have lost a statue somewhere near the river outside the town. Hmm, maybe we can help him. Talk to the townfolks to get some informations about the surroundings and enter the armor shop if you can afford the leather armor and the bronze shield. Now, go outside the town, go east, cross the bridge, ignore the new enemy since you can't take care of it at that moment with your sword and check the portion of herb to find the statue of onyx (2). Time to bring it back to Akahana now.
Next up, the poisonous forest to the east. Cross the bridge, go east, equip the gas mask (really important) and go in the forest. The forest is not that hard. You can kill the centipedes and the flowers that spit some poisonous spores, however you have to avoid that flying centipede since it's immune to your attacks at that moment. Otherwise, go north, then east, then north one more time and keep moving forward to find the entrance to the village of Oak. It's the village mentioned by one of the NPCs from Brynmaer. They despise humans so you can talk to them personally, however you can equip the telepathy spell and talk to their mind. Yes, that sounds strange but it works. Also, you can't buy anything to the shop, nor take a nap to the inn. One of them is looking for its son lost in the forest. Hmm, maybe if we find him, we'll be able to talk to them personally. If you unequipped the gas mask, equip it and go back to the forest now. Go east, then keep going south to reach a dead end. You'll find the lost child. Activate the telepathy spell to talk to him and go back to the village. Go talk to the mother to get the insect flute. Go talk to the village elder now. His house is located to then orth of the village. He will ask you to get rid of a creature in the forest and will give you the sword of fire (3). A new item is available in the tool shop: the fruit of power. It costs 80$ and recovers some MP. Buy some supplies if you can afford and head to the swamp. It is somewhere to the east from the entrance of the village of Oak. Just go east, then north and keep moving forward. Activate the refresh spell,
CHAPTER 3: TROUBLES IN MT. SABRE Outside, you'll encounter some undeads. When you reach the branching paths, go to the right and go in the cave. This cave is a shortcut leading to the first elder and Leaf. Bad news: the sword of fire doesn't kill the creatures so you have to switch back to the sword of wind and the ball of wind. Farther, you'll see a wall of ice. You know the score, right? Equip the sword of fire and the ball of fire and blast that wall with a charged attack. The elder will tell you to go to Leaf. Something's not right there. Go back there and notice that the townfolks are missing. Unfortunately, you must find the tornado bracelet to get his help. Ok fine, open the chest to the right to get the magic ring and go back in the cave. Something to know about the magic ring: it fully recovers your MP. The common point with the fruit of power is his durability: you can use it once only. Oh and it's really rare so use this item wisely. Now here is where you might wander around for a while if you don't read that walkthrough. Remember that we haven't explored in the cave two ways. They both lead to the same place outside. Choose one of these paths and go west outside. There's a slope to slide. You should notice a bridge above your head while sliding the ice slope. Now, don't slide the one below, go west, equip the rabbit boots and remove the spell
In this cave, you'll find an improved version of the walking broccoli. This one will poison you if they hurt you so be careful. Go upstairs, then go west to find an antidote in the chest. Now go south to leave that cave. Kill the... blue raddishes? Well, they look like raddishes so don't judge me, leave me alone! Enter the next cave, face some new enemies and go east when you reach the branching paths. The other way leads to the same place but it's the long way and there's nothing really exciting besides some enemies and probably being lost. Blast the ice wall, beat the ice golems, go up then ignore the staircases. Kill some enemies, go east, destroy another ice wall and get a medical herb inside the chest. Now go back to the staircases you just passed by. Ah yes, you might wonder why we don't go south. Well, if you take the long way, you come from this way so it's pointless to go back to the last area, don't you think so? Anyway, moving on. In the next area, destroy the ice wall and face some guards. Hmm, it looks like we are close to where the villagers are. Destroy the next ice wall, go north (because the other way leads back to the last hallway) and carry on. DON'T try to go up or down the ice slopes (especially the the first ones), just kill the guards outside and enter the next cave. Kill more guards and destroy the first ice wall to save some villagers from Leaf. There's more to do before destroying the other ice wall straight ahead. Go back and destroy the other ice wall. Destroy the next wall to the north and grab the key to the prison (5). You can talk to the NPCs but they will give you some informations and thank you, that's it. Now go back to the previous jail and destroy the ice wall. Kill some guards and reach the top of Mt. Sabre. Go up the stairs and prepare to face the boss of this area: the General Kelbesque. Ah sorry, I just got a message from him: it's the GREAT General Kelbesque. This guy is immune to the sword of fire. Oh well, you have the sword of wind with the last upgrade so it's not gonna be a big deal. All you need to do is move constantly to avoid his movements and his projectiles and stop sometimes to fully charge your power. Yes, I mean it. You should use that powerful attack you got from Tornel to make the fight easier. I hope you have some MP recovery items besides the magic ring otherwise you'll have to use the level 1 and the level 2 wind attacks to get rid of him and that will take a while. Do not worry, this boss is not that hard. Just pay attention to his projectiles and his movements and let him eat some tornados in the face. After a few hits, he will run away like a coward and leave a treasure chest. Open it to get to get the last upgrade for the sword of fire: the flame bracelet. Obviously, this thing will
CHAPTER 4: THE INFAMOUS SORCERESS In this town, you can buy the bronze armor and the platinum set in the armor shop. The platinum set is really nice, however its price is painful: 3500$ if you buy both of the pieces. I don't need to tell you that, if you want to get it at this point of the game, you'll have to farm the gold for a while. The item shop also has new items: the lysis plant and the fruit of lime. They are kind of expensive. It looks like the end of the day has brought crisis in this world, oh well. You can talk to the NPCs, they will give you some useful informations. If you go to the west, you can talk to a young lady. Her father is away, he did head to the waterfall. Hmm, that waterfall is intersting, we should check this out more closely. The waterfall is east of Portoa. The enemies outside are really tough and does a good amount of damages so be careful while going to the waterfall. Hey look behind the waterfall, there's a cave. Let's go in, shall we? The first area of that dungon introduces a new enemy that will poison you everytime it hits you. Farther, you'll see a branching path. Go north, destroy the ice wall and... oh look, a chest. Ah it's a mimic! This enemy drops a great amount of gold (represented by a treasure chest). I have a tip to get the platinum set. Go in the waterfall cave, kill the enemies and the mimic (since it drops a lot of money), go outside, come back and fight the mimic. With this tip, you'll get 3500$ easily and be able to buy the platinum set. Destroy the ice wall to the south and carry on to go back to the branching path. Go east now, destroy another ice wall, go upstairs and otice the two people blocking the way. Either they are paralysed or they are not talkative. Use the paralysis spell to notice that they are
In this new section, don't bother to hit the enemies because they are immune to the sword of wind AND the sword of fire. Ah, and their shots will turn you into stone if you are too careless. Unless you have a fruit of lime to fix that, DO NOT greet with open arms their shots. Just avoid them, go east, blast the ice wall and carry on. The next part has the same enemy. Go north then east, blast the wall and grab the sword of water in the chest. You now have the third sword of the game and you can kill the enemies of this cave including those medusa snakes. Seize this opportunity to farm some gold and experience. We are not done with this place, not yet. There's one more thing to get. Go back to the last part of the waterfall cave, go west, blast the ice wall and carry on. If you go north from the branching paths, you'll see a person turned into stone. Ok Vaati, where are you? You did it again. Just kidding folks, moving on. You have to break the spell. Oh wait, the flute of lime given by the queen has already been used earlier so you need to find another one. Now, if you go east then north, you'll find a chest. Can you guess what's inside? A flute of lime, yes! Go back to the person, use it and talk to him. You'll get the shield ring (6). This item adds 13 to your secondary defense once equipped. Now leave the waterfall cave, go back and see mister triton. Oh apparently, he gives us the ball of water, sweet. Use your new powers to hit the tree and make a bridge. Enter the tree and talk to Mesia (or I should say the hologram of Mesia since you can't talk to her anymore after that discussion). Apparently, she heads to Draygonia and she is waiting for you there. Now go back to Portoa. This is where the things go a little bit tricky. Have you noticed that door kept by the guard in the throne room of the castle? Why does he keep it? We should figure this out, don't you think so? Unfortunately, when the queen is in the throne room, you can't go through this door. So you have to make sure that the queen is the fortune teller. Her house is next to the pawn shop (the building with the scales on the signboard). If you see her in this building, DO NOT talk to her. Go to the castle, equip the paralysis spell, cast it on the guard (otherwise he will move and stad in front of the door, preventing you to go to the throne room) and go through the suspicious. If you don't see her, talk to the queen in the castle, leave the castle and go back inside. So this is it. The secret behind the door... a cave. How interesting. With the ball of water, you can freeze some parts of the water like the one shown on this screenshot (7). Make your progress and go through the hole in the wall. Your majesty? You're here? Ok fine. Talk to her. She is gonna reveal the thruth if you haven't noticed this yet: she is the fortune teller. Should I repeat that one more time? No, of course not, you knew it anyway. But what we might not know is the other part of the speech: she is in fact Asina, one of the three great wise men (err three? I think they are four when you talk to them via telepathy, just want to point that out). She will teach you a new spell: recover. This spell is amazing. It can cure certain ailments for the good cost of 24 MP. Yes, the cost is expensive compared to the others but it's a nice spell, to tell the truth. You can now stop buying antidotes and fruits of lime and save some money in order ot buy some fruits of power since this spell can cure petrification and poison. Now, if you solve the problem of the Angry Sea, she will teach you another spell: barrier. We'll have to come back here once this side quest is completed. Leave the shrine, go north, freeze the water and talk to the fish. He is badly injured and needs some cure. Go buy a medical herb to Leaf (unless you really want to stay in Portoa and buy one to the tool shop for 90$, which is totally ridiculous in my opinion), then bring it back to him. Don't forget to Go back and to the young lady in the house to the west. Her father is back but he is upset. He lost his fog lamp apparently. We should help him, shouldn't we? Now that we can freeze the water, we can access the eastern part of that continent next to the waterfall and below. Let's explore the one south from the waterfall first. Cross the bridge to the south once you left Portoa, cross the pool of mud, walk close to the river and locate the part to freeze with your sword of water. Cross the ice bridge and enter the cave. In this cave, you'll face enemies that will inflict a status ailment. The red spiderclops inflict paralysis with their shockwaves. Compared to other RPGs, paralysis in this game is different. You could move but you couldn't focus your power to unleash special attacks unless you use a lysis plant or cast the recover spell. The other enemies inflict poison. Ah and one more thing, the sword of wind will come in handy in order to blast the walls of this cave, I'm not kidding. Kill some enemies, blast the wall, and carry on. Go south, then east, then south one more time, blast the wall and grab the antidote in the chest. Go back to the branching path, go south this time, blast a wall and go downstairs. Farther, there's another wall to bash. Make your progress, leave the cave and collect the Kirisa plant in the flower field (8). This item is kept by the flying bug, his spores paralyses you and, unless you are level 11 or so, you can't hit it. It gives lot of experience, however it's really mean with gold. Now, time to explore the other cave, the one next to the waterfall. Notice the part of water to freeze, enter the cave and blast the wall with the sword of wind. Keep going north, blast another wall, pick up the lysis plant in the chest, then go back to the branching path and go east. Go down, then north, bash the wall, kill the mimic, go south, bash the wall, kill the mimic, go south, bash another wall and go east. The way to the west leads to a pointless loop. In the next section, go either to the west or to the east, both of the ways lead to the same exact place. Go south, bash the walls, go up, cross the bridge, bash the wall and go down. Farther, there's another wall to blast. You'll find the fog lamp behind. Now, time to bring it back to the young lady's father. You can now use the boat outside. It leads to a house with two people. One of them lost something apparently. Go outside, then to the left and use the shell flute to summon the buddy you saved earlier in the secret cave behind the castle. With his help you can now travel to the islands of the angry sea. You'll find two types of creatures here: the mermen and the one-eyed octopus. They are immune to the sword of water, which makes sense since they are aquatic creatures. The first island to the west with the lighthouse is Joel Island. Go talk to the NPCs to get some informations about the elder, a sacrifice and a Draygonian sorceress. There's also an inn and an item shop in which you can buy an alarm flute. That might come in handy. Leave the town after doing your business, go west then south, kill the octopus and go in the cave. You will find the love pendant somewhere underwater (9). Hey, isn't that what that man lost? Let's go see him, shall we? Oh, he is gone and his mate won't help us. Sweet, we need to find him now. Where to go now? Well, there's a cave to the nort from where you just found the love pendant. Go in... Well, you don't have any option left. There's also a shrine nearby this ave but we can't do anything with this at that moment so the only option left is the exploration of that cave, also known as the evil spirit cave. Lot of new enemies in this cave. Most of them are immune to the sword of water. Kill the first group of enemies, go up then go south. Freeze the water, move on, create another ice bridge farther and go north. Follow the first northern path, keeping going north, bash the wall with the sword of wind and get a magic ring inside the chest. Now, follow the last northern path to the left and go up. Keep going south then west, blast the wall and go down. You'll find, not one but TWO chests kept by a winged snake. One of them is obviously a mimic, the other chest contains an iron necklace. This item adds 13 to your primary defense when you equip it. However, you can't hold the iron necklace and the ring shield. Now go back to the last area, precisely to the first branching path, keep going east, make the gap using the moving platform (if you fail, don't worry, you go back down so you can return to this gap easily) and carry on. The chest in the next part of the cave contains a lysis plant. Carry on to leave the cave and come to a ghost town.
Ghost town means zombies. Check the house to the west to find a survivor. He will tell you that that sorceress lives here and has turned all the people into zombies. Time to get rid of her and break free the spell. Do not worry, the zombies won't hurt you. Go up the stairs and enter the castle. In this castle, harpies and Draygonian guards are back. Go north, then upstairs, avoid the insivibles enemies (or kill them with a level 3 attack), make the gap and go get the fruit of power in the chest. Go east and face the vampire. You know, the first boss of the game. Yes, he is back. This fight should be easy now that you have the sword of water. A few hits and it will disappear for the second time. Your reward will be a fruit of power this time. Carry on, go upstairs, go west, then east, make the gap, equip the rabbit boots and jump repeatly to cross the spikes and grab the medical herb inside the chest. Head to the south now, go downstairs, talk to the person and go north. Apparently, the other person in the chamber is the real Mesia. So who is the clone? Sabera? Only one thing to do: jump into the hole, go back and see the first person and hit it three times. She will finally reveal its true form. It's Sabera, the infamous sorceress. Her weakness is the sword of fire. The only way to beat her is to move constantly and wait until she throws her magic powers at you. She stops for a while at this point so avoid the shots and seize the opportunity to strike. The final attack, also known as the ring of fire (no Johnny Cash reference intended)... even if it costs lot of MP, to be honest it's really nice and powerful against her so use it. Her shots are really easy to dodge if you keep your distances and notice an opening between two shots. After a few hits, she will admit defeated but she will take Mesia with her. Darn, oh well at least Sabera left a treasure chest. Let's see what it contains. A broken statue... interesting but I don't think we were expecting to find an old relic. Anyway, better than nothing so let's leave this castle and see how the possessed village is doing. Everything is back to normal. Well, they'll have to rebuild the town but they are fine now. Actually, if you talk to them, you will learn about a shrine nearby that requires a statue of gold to make the whirlpools disappear. And if you talk to Clark (the guy you saw in the basement of the house), he will give you the eye glasses. The little girl in the same house will tell you something about a glowing lamp that has the power to restore a broken item. We have one so our next destination will be the lighthouse nearby Joel Island.
CHAPTER 5: THE FOURTH SWORD Just one side stuff before heading to the next part of the main quest. If you go back to Brynmaer, you should see a part of the rive to freeze. Cross the bridge of ice you made and go south to find the amazones village. They despise men so you're not gonna be welcomed here, except in the inn and the shops. The armor shop has two nice shields on sale: the mirrored shield and the sacred shield. Compared to the equipment you'll get in the next town, it's kind of useless. But those two shields have an extra protection. The mirrored shield gives you protection from petrification and the sacred shield gives you protection from paralysis, which is really nice if you are sick of these ailments. Now they are quite expensive and I suggest you to save your gold for the next equipments on sale in the next armor shop. Now, there's one item in this town that you need. And guess where it is. You see that house to the right? It's the elder house. Unfortunately the guard standing outside the elder house won't let you in... unless you paralyse him with the paralysis spell. Now, go in, do not talk to the elder (otherwise the guards will drop you outside the house), paralyse them and go downstairs. Open the chest to get the blizzard bracelet First of all, go buy an alarm flute if you haven't bought one yet then go in the shed next to the elder house, use the eye glasses to reveal a secret door and enter the cave. Go in the lighthouse, use the alarm flute to wake the Go north and enter the cave instead. Go east, open the chest outside to get a fruit of Lime, go back in the cave and go west. Carry on, then go west when you reach the branching path, go up the stairs and open the gate with the key. Use the barrier spell to avoid the projectiles (that's why I suggested you to buy some magic rings), go to the left and kill the wizard. There's a tip to get rid of him easily. Go to the north-west or the north-east, stick to the wall and come close enough to him in order to hit him with your blade and not get hurt by his projectiles and hiss shape. Now go kill the other one to the east, go back to the west and carry on. There's a mimic to kill to the north, otherwise freeze the water to make your progress, go south, open the chest to get a medical herb and go east. Go east, use the rabbit boots to cross the spikes, go to the right and grab the sword of thunder inside the chest. You now possess the four swords required to destroy the evil. After being teleported to the temple and the discussion, you have to head to the fortress of Goa.
CHAPTER 6: THE RESCUE OF THE FOUR WISE MEN Before going to Goa, I highly recommend you to buy the sacred shield in the armor shop of Shyron. We'll need that later. Leave Mt. Hydra and go north. Welcome to Goa. Head to the castle to the north. Use the barrier spell to avoid the shots and face the iron wall. Unfortunately, Shyron is being invaded so you have to head back to the town as soon as possible. Use teleport to instantly go there. Sadly, everyone is dying or already dead, even the store keepers. That's why I suggested you to buy the sacred shield before heading to Goa, otherwise your only option would have been the amazones village but the price is excessively expensive compared to Shyron (6000$ in Shyron, 9000$ in the amazones village... huge difference for your butt, right?). Head to the temple and face Mado. That boss has two attacks: the first one is the ball. He rolls like a ball around the temple, trying to hit you. He will stop at some points and throw some shurikens at you. Hit him when he does that kind of attack. You can also hurt him when he is a ball but it's a bit harder. Ah, he is immune to the sword of thunder, the sword of fire and the sword of wind so use the sword of water. After a couple of attacks, he will be defeated and will disappear. Your reward will be the ball of thunder. Now, let's go to the fortress of Goa. After the traps, use your new power to destroy the iron wall and carry on. Go left, pass by the stairs and carry on until you reach the branching path. Go left, go up the stairs to the right, move forward, then go east until you face a familiar face. Oh don't tell me you've forgotten the great General Kelbesque! You know, he faced you at the top of Mt. Sabre. Time for a rematch. Use the sword of wind to hurt him, it's his weakness. Avoid his attack and unleash a charged attack. After a few hits, he will die and you could get the opel statue (11). That item has the power of resurrection, which is really nice. Go up and talk to Zebu. He will fully recover your HP and your MP before vanishing. Three more to go! Ok, I recommended you to buy the sacred shield earlier, time to equip it because the second floor has a new new enemy really tedious: the blueflying centipede. His spores paralyses you and you have to freeze the water in this floor so I don't have to tell you that this shield is required to make that part easily. Oh don't worry, it will also be useful later. Carry on, go north, ignore the part of the water to freeze, kill the new enemy, then bash the broken iron wall and go get the fruit of power in the chest straight ahead. Now go back and freeze that part of the wayer you just passed by, go south, then east, freeze another part of water, go south and open the chest to get a fruit of repun. This item removes the curse status, which is the MP drain. Go north, freeze the water, freeze the water to the left, go south and get the lysis plant inside the chest. Go back, go east, freeze the water and go north. Blast the wall, go up and face Sabera, the infamous sorceress. Like his friend, she didn't digest the defeat last time and wants a rematch... Ok! For this fight, use the sword of fire and unleash the level 3 attack since she has a barrier. Charge your sword, move constantly to avoid the magic powers and unleash the attack. This fight shouldn't be hard if you have some MP recovery items and if you don't screw up. Two rings of fire should kill her. Open the chest to get a fruit of repun, carry on, talk to Tornel and go up the stairs. Keep going north using the rabbit boots to cross the spikes, grab the opel statue in the chest, Go east then south to find another chest containing a magic ring, go west now then south, go up, go to the left, blast the iron wall and get a magic ring. Go back, then go north, go up, go west and open the chest to get an antidote. Go back, go east, go up the stairs, equip the sacred shield if you unequipped it because this part has a new kind of moth. Also, the invisible enemies from Sabera's castle are back so use a level 3 attack to get rid of them if you choose so. Make the gap, go east, open the chest to get a magic ring, go south, make the gaps and go up. Ok, we faced the great General Kelbesque, Sabera, who's next? Mado, of course. Time to equip the sword of water and get him wet. This time, he is ridiculously fast and shoot more shurikens. Move constantly, charge your sword to level 3 and unleash your power. Seriously, abuse this attack otherwise you'll get some trouble to beat him. This fight is tougher than the first two showdown of this dungeon so make sure you have enough MP to heal yourself and cast the level 3 attack. Good thing we found some magic rings and opel statues earlier, they might come in handy during this fight. Your reward will be a sacred shield. You'll be able to sell after that dungeon, don't worry. Talk to Asina and carry on. One more enemy to get rid of and its name is Karmine. Go east, then north, go downstairs, then north, destroy the wall and carry on. Go to the right, go down, cross the first pool of spikes then go south to get a magic ring. Go west then south to get some warp boots and go north. Use the barrier spell to avoid the projectiles and prepare yourself for the last showdown of this dungeon. This is Karmine and I think you know his weakness. General Kelbesque hates the sword of wind, Sabera hates the sword of fire, Mado dislikes the sword of water... So the sword of thunder is the last option. This fight is really hard. Karmine has two attacks: the first one is the fireballs. They are kind of hard to dodge. The second attack is the one you have to avoid at all cost. It's a magical ring that turns you into a defenseless slime. You won't be able to attack and use magic so avoid this attack at all cost. So friendly advice: move constantly to avoid the attacks and stop from time to time to charge your attack. And obviously, charge your sword to level 2 and hit him with your best shot. The opel statues and the refresh spell are recommended during this intense fight. Your reward will be the ivory statue. Go north to get the storm bracelet (that allows you to use the level 3 attack for the sword of thunder, for the cost of 40 MP). Now go back to the room of spikes, go west, then up, go north and talk to Kensu... who is apparently a slime. He needs the ivory statue to break free the spell. Oh, we have one, let's use it! Kensu will teach you the last spell: flight. You can levitate now and reach the places you couldn't go before. Trust me, there's a lot of items to get and we need this spell and the sacred shield. Take the shortcut behind Kensu, use your new spell to cross the pool of acid, open the chest to the left to get a fruit of power, go south to go back to the surface, go rest to Swan, buy some supplies and, once you're ready, we'll go on the quest for the last items.
CHAPTER 7: THE QUEST FOR THE LAST ITEMS Let's go back to the cave of Styx. If you remember correctly, we haven't explored the part of the dungeon located behind the wizard to the right. You should see three chests. Two of them are mimics, the last one contains the best shield of the game: the psycho shield. This shield is amazing, I tell you. It adds 32 to your secondary defense, that's a fact. But it also combines the effect of the sacred shield and the mirrored shield, which is really nice. Let's go to the desert now. Locate the oasis and go in the tomb. Equip the psycho shield because this cave has one enemy: a flying centiede that paralyse you with your spores. It's really obnoxious to tell the truth, especially when you have to freeze the water at some points to make your progress. Go east, then north, ignore the part of the water to freeze and go west to get the leather boots. Freeze the water, carry on, go south to get a fruit of power (12). There is two more things to get here, two nice items. Go back to the beginning of this floor, go north, freeze some water and fly to the isle to the south, then the one to the east and the next one. Open the chest to get the battle armor, a new armor. It's not the best armor of the game though but it's really nice. It adds 20 to your primary defense and protects you from poison. Now, you are immune to all the status ailments but curse and mutation. Well, it sounds legit, it wouldn't be funny otherwise. Now from this island, go south until you find some stairs. Go up, bash the iron wall and grab the power ring. This item increases your attack once equipped. One more item to get before heading to the next destination. Go as if you wanted to go to the cave of Styx but go east instead and go in the cave. Go east, then north, go upstairs, destroy the wall to the east with the sword of wind and go upstairs. Blast another wall with the same sword, leave the cave and grab the magic ring in the chest. Now go back to the very first banching path of that cave and go west. In the next area you'll face a new enemy that can turn you into stone with their shots. Go west, then downstairs, kill the two pink crabs and get a medical herb in the chest. Go back, go east, blast the wall with the sword of wind, then another one and leave the cave. Do you see that lonely chest? Let's give him a hug, erh I mean let's take his loot. You'll get the bow of sun. Now, it's time to go back to the desert and carry on our journey. We must save Mesia. Go back to the desert. Next to the oasis, you should see a cave. Use the flight spell to enter the cave. At the end of the line, you'll reach a desert of bunnies. One of them is Deo and is looking for Stom. Use the change spell to turn into Stom (the first form) and talk to him. Sadly, the truth is told, Deo is sad and gives you his pendant. It slowly recovers your MP when you don't move. Go south to enter Sahara, the next town. Talk to the townfolks to learn more about the legend. Oh and apparently, they don't know that Stom is dead. Better say that once the quest is complete. The item shop sells some good stuff, including the magic ring. Buy some because this is the last part of the game.
CHAPTER 8: FROM THE GREAT PYRAMID TO THE FLOATING TOWER Go east, enter the cave, get rid of the scorpions and leave the cave. This is the great pyramid. Mesia and the bad guy must be in this building so let's go in. Go to the right, go west twice then north. In the next room, grab the magic ring inside the chest and go north. Now go west, then north then east and go up. Prepare to face the emperor of Draygonia. He has no resistance so you can use any sword you want. I suggest you to use the sword of thunder and abuse the level 3 attack. Otherwise, watch out when he tackles and don't get shocked by the lightnings he throws at you after a dash. That fight is not that hard to be honest. Now, grab the psycho armor (the best armor of the game in chest, it slowly recovers your HP when you don't move), equip it if you choose so and talk to Azteca. You'll get the bow of truth, the only thing that can kill the emperor once and for all. Now, leave the great pyramid and grind in order to get the max level (which is level 16), go buy some supplies in Sahara item shop and head north to find another entrance. It leads to the basement of the pyramid. Farther, you're going to wake two sphinx up. You can only kill them with the bow of sun and the bow of moon. Equip one of the tow bows, use it to kill one sphinx and
Carry on, go right and kill the enemies here with your sword of wind and the power ring (without the ring, it's possible but it will take forever to kill them). Avoid their magical ring at all cost, it's Karmine's trick which means it will turn you into a defenseless slime. Go up, keep going north with the flight spell (or the rabbit boots, it also works), then go to the right, cross the spikes and get an opel statue in the chest. Go west now, use the flight spell to levitate over the spikes and the pits then go up. Ready for the second round? Now you have the real weakness of the emperor: the bow of truth (thanks Azteca, that would have been useful earlier... why didn't you hide it and tell us about that before? Oh well... ).
BONUS CHAPTER: SHOPS, EQUIPMENT AND SPELLS Just a bonus chapter as always, completely optional by I thought it would have been cool to make it. First of all, the shops in each town, what's on sale and the price for each item. As always, by order of appearance in the game.
- Tanned hide: 100$ - Carapace shield: 80$
LEAF ITEMS SHOP - Medical herb (recovers some health): 30$ - Antidote (cures poison): 40$ - Warp boots (allows you to go back to the towns already explored): 60$ - Alarm flute (handy for
BRYNMAER ARMOR SHOP - Leather armor: 140$ - Carapace shield: 70$ - Bronze shield: 220$
BRYNMAER ITEMS SHOP - Medical herb: 35$ - Antidote: 45$ - Warp boots: 65$
OAK ITEM SHOP - Medical herb: 50$ - Antidote: 60$ - Fruit of power (recovers some MP): 80$
MT. SABRE ITEM SHOP - Medical herb: 60$ - Antidote: 70$ - Fruit of power: 100$ - Warp boots: 80$
PORTOA ARMOR SHOP - Bronze armor: 600$ - Platinum armor: 2000$ - Platinum shield: 1500$
PORTOA ITEM SHOP - Medical herb: 90$ - Warp boots: 120$ - Lysis plant: 200$ (Cures paralysis) - Fruit of Lime: 180$ (Cures petrification)
JOEL ISLAND ITEM SHOP - Medical herb: 120$ - Antidote: 150$ - Fruit of power: 180$ - Alarm flute: 300$
AMAZONES ITEM SHOP Warp boots: 100$ Lysis plant: 150$ Fruit of power: 150$
AMAZONES ARMOR SHOP - Platinum armor: 1800$ - Platinum shield: 1300$ - Mirrored shield: 2000$ - Sacred shield: 9000$
SWAN ITEM SHOP - Medical herb: 180$ - Antidote: 200$ - Warp boots: 300$ - Fruit of power: 350$
SWAN ARMOR SHOP - Soldier suit: 3000$ - Ceramic suit: 6500$ - Ceramic shield: 2500$ - Battle shield: 6000$
SHYRON ARMOR SHOP - Ceramic suit: 5500$ - Sacred shield: 6000$ - Battle shield: 5000$
SHYRON ITEM SHOP - Medical herb: 180$ - Antidote: 200$ - Fruit of lime: 300$ - Magic ring: 800$
GOA ITEM SHOP - Medical herb: 500$ - Antidote: 600$ - Lysis plant: 700$ - Warp boots: 800$
SAHARA ITEM SHOP - Antidote: 1000$ - Magic ring: 4000$ - Fruit of repun: 3000$ - Warp boots: 1500$
- Sword of Wind: the first sword of the game, given by a man in the top left house. It adds 1 to your attack once equipped. - Sword of Fire: the second sword of the game, given by the elder of the village of Oak. It adds 2 to your attack when you equip it. - Sword of Water: the thrid sword of the game can be found in the waterfall cave. It adds 4 to your attack when you equip it. - Sword of Thunder: the fourth sword of the game is hidden in the cave of Styx. It adds 8 to your attack once equipped. - Crystalis: the last sword of the game. It's the fusion of the four swords. It adds 16 to your attack when you equip it.
ARMORS - Tanned hide: adds 2 to your primary defense. - Leather armor: adds 6 to your primary defense. - Bronze armor: adds 10 to your primary defense. - Platinum armor: adds 14 to your primary defense. - Soldier suit: adds 18 to yur primary defense. - Battle armor: adds 20 to your primary defense and protects you from poison. - Ceramic suit: adds 24 to your primary defense. - Psycho armor: adds 32 to your primary defense and slowly recovers your HP when you don't move.
SHIELDS - Carapace shield: adds 2 to your secondary defense. - Bronze shield: adds 6 to your secondary defense. - Platinum shield: adds 8 to your secondary defense. - Mirrored shield: adds 12 to your secondary defense and protects you from petrification. - Sacred shield: adds 16 to your secondary defense and protects you from paralysis. - Ceramic shield: adds 18 to your secondary defense. - Battle shield: adds 24 to your secondary defense. - Psycho shield: adds 32 to your secondary defense and protects you from paralysis and petrification.
Finally, the spells you'll get during this adventure.
- Refresh spell (1 MP per hit point recovered): Recovers some hit points. - Telepathy spell (8 MP, only if you desire to talk to the elders): Allows you to communicate with animals and wise men. - Teleport spell (20 MP): Allows you to move ot any visited town. - Paralysis spell (4 MP): Paralyse the enemies for a while and make people - Recover spell (24 MP): Cures certain ailments such as poison and petrification. - Barrier (1 MP per second): Protects you from attacks as long as you have enough MP. - Change (20 MP): Allows you to turn into someone else (among four forms of course). - Flight (1MP per second): Allows you to levitate in order to reach places you couldn't go before.
I also wanted to add a bestiary but this idea has been cancelled and
Well, that's the end of this walkthrough. I see you in the next adventure. Bye and take care, folks.
Hello everyone, this is your host Laian and welcome to another walkthrough. After a journey into madness, let's go on an adventure! Let's go back to the NES and play a game that I just discovered and enjoyed: Crystalis. It might not be familiar to you as well but, you know, sometimes, it's good to find and give a shot to games we haven't heard of. To be honest, as a fan of good RPGs, I fell in love with this one but I'm not going to ramble too much during that introduction because... I myself don't know what else to say. Ah one more thing: this walkthrough is for the NES version only, the orignal version in other words. Yes, there's also a GBC version and it has some slight differences. Well then, are you ready for a new quest? Let's start that walkthrough, shall we!
CHAPTER 1: THE VAMPIRE You start in a small cave with some kind of time travel device. Go outside, then go to the village. Go in the house to the north, talk to the man and get 100$. Now, go in the house to the west, talk to the man to get your first weapon: the sword of wind. It increases your attack by 1 and you can now attack the enemies outside. There are two types of attacks: the regular attack if you press the attack button and the charged attack if you hold the attack button (you'll see the arrow below your health bar filled and blink). Ah, one more thing about the charged attack: you don't have to move while charging otherwise the charge bar will stop until you stop moving. You can also see a giant bubble to the right of the charge bar. It's the charge max and it has a "1" in it, which means you can charge the sword once. You'll find an upgrade later in the game that will allow you to charge your sword twice and make a devastating charged attack. For now, talk to the little boy twice (or girl) to get an interesting information. You can now talk to the other people if you want to kill some time since they tell you about the windmill and other stuff. Go to the tool shop (the shop with a bag above the door) and buy the alarm flute for 50$.
Now, equip the sword of wind, go north and welcome to the danger zone. No, I'm exaggerating a bit (just a bit). It's just where the troubles start. You'll meet some creatures in this zone: some blue slimes and some tigers. Your first objective is a cave located to the west. Inside, you'll meet an elder named Zebu. He has apparently been waiting for you. He will ask you to make the windmill work. Note the fake wall behind him, leave the cave, head to the north, cross the bridge and enter the cave. Go north to see a Face a new enemy, go up, cross the bridge and go up the stairs. This new section has two types of enemies: the winged snake Ok, and the pink slime, a bit tougher than the blue slime. This one may poison you if it hits you so be careful. The first way to the north is blocked by a fake wall. The stairs to the north lead to a chest with the warp boots, kept by a tough golem. That item allows you to go back to the towns you've already visited. Go downstairs, kill the enemies, go south, open the chest to get a medical herb, go east and go down to find another chest that contains the ball of wind. This is the upgrade for the sword of wind. Now, you can charge twice and make a powerful attack. Also, you can destroy those fake walls, which is cool (not the one inside the elder's cave though, you'll need the specific sword and its upgrade). Go north from here to find a fake wall. Destroy it, open the chest and grab the antidote. Go back to the other fake wall in this cave, destroy it, go west and go downstairs to get a medical herb. Go back upstairs, go east now, go upstairs, carry on and face the first boss of the game: the vampire. He has two abilities: he teleports himself around the room and he summons two bats. The bats are really annoying so get rid of them as soon as possible. Their hits might kill you easily if you don't pay attention to your life. Otherwise, this boss is not that hard if you move constantly, fully charge your attacks and heal with medical herbs and the refresh spell. When he will be almost dead, he will teleport faster than usual. All you need is haste and accuracy in this situation for the final blow. Your reward will be the rabbit boots. That item allows you to jump over Now, go north to leave the cave.
CHAPTER 2: BIG BUG, YOU ARE BEAUTIFUL! Go down then go west to enter the second town of the game. Welcome to Brynmaer, folks! The man standing next to the entrance is named Akahana and he seems to have lost a statue somewhere near the river outside the town. Hmm, maybe we can help him. Talk to the townfolks to get some informations about the surroundings and enter the armor shop if you can afford the leather armor and the bronze shield. Now, go outside the town, go east, cross the bridge, ignore the new enemy since you can't take care of it at that moment with your sword and check the portion of herb to find the statue of onyx (2). Time to bring it back to Akahana now.
Next up, the poisonous forest to the east. Cross the bridge, go east, equip the gas mask (really important) and go in the forest. The forest is not that hard. You can kill the centipedes and the flowers that spit some poisonous spores, however you have to avoid that flying centipede since it's immune to your attacks at that moment. Otherwise, go north, then east, then north one more time and keep moving forward to find the entrance to the village of Oak. It's the village mentioned by one of the NPCs from Brynmaer. They despise humans so you can talk to them personally, however you can equip the telepathy spell and talk to their mind. Yes, that sounds strange but it works. Also, you can't buy anything to the shop, nor take a nap to the inn. One of them is looking for its son lost in the forest. Hmm, maybe if we find him, we'll be able to talk to them personally. If you unequipped the gas mask, equip it and go back to the forest now. Go east, then keep going south to reach a dead end. You'll find the lost child. Activate the telepathy spell to talk to him and go back to the village. Go talk to the mother to get the insect flute. Go talk to the village elder now. His house is located to then orth of the village. He will ask you to get rid of a creature in the forest and will give you the sword of fire (3). A new item is available in the tool shop: the fruit of power. It costs 80$ and recovers some MP. Buy some supplies if you can afford and head to the swamp. It is somewhere to the east from the entrance of the village of Oak. Just go east, then north and keep moving forward. Activate the refresh spell,
CHAPTER 3: TROUBLES IN MT. SABRE Outside, you'll encounter some undeads. When you reach the branching paths, go to the right and go in the cave. This cave is a shortcut leading to the first elder and Leaf. Bad news: the sword of fire doesn't kill the creatures so you have to switch back to the sword of wind and the ball of wind. Farther, you'll see a wall of ice. You know the score, right? Equip the sword of fire and the ball of fire and blast that wall with a charged attack. The elder will tell you to go to Leaf. Something's not right there. Go back there and notice that the townfolks are missing. Unfortunately, you must find the tornado bracelet to get his help. Ok fine, open the chest to the right to get the magic ring and go back in the cave. Something to know about the magic ring: it fully recovers your MP. The common point with the fruit of power is his durability: you can use it once only. Oh and it's really rare so use this item wisely. Now here is where you might wander around for a while if you don't read that walkthrough. Remember that we haven't explored in the cave two ways. They both lead to the same place outside. Choose one of these paths and go west outside. There's a slope to slide. You should notice a bridge above your head while sliding the ice slope. Now, don't slide the one below, go west, equip the rabbit boots and remove the spell
In this cave, you'll find an improved version of the walking broccoli. This one will poison you if they hurt you so be careful. Go upstairs, then go west to find an antidote in the chest. Now go south to leave that cave. Kill the... blue raddishes? Well, they look like raddishes so don't judge me, leave me alone! Enter the next cave, face some new enemies and go east when you reach the branching paths. The other way leads to the same place but it's the long way and there's nothing really exciting besides some enemies and probably being lost. Blast the ice wall, beat the ice golems, go up then ignore the staircases. Kill some enemies, go east, destroy another ice wall and get a medical herb inside the chest. Now go back to the staircases you just passed by. Ah yes, you might wonder why we don't go south. Well, if you take the long way, you come from this way so it's pointless to go back to the last area, don't you think so? Anyway, moving on. In the next area, destroy the ice wall and face some guards. Hmm, it looks like we are close to where the villagers are. Destroy the next ice wall, go north (because the other way leads back to the last hallway) and carry on. DON'T try to go up or down the ice slopes (especially the the first ones), just kill the guards outside and enter the next cave. Kill more guards and destroy the first ice wall to save some villagers from Leaf. There's more to do before destroying the other ice wall straight ahead. Go back and destroy the other ice wall. Destroy the next wall to the north and grab the key to the prison (5). You can talk to the NPCs but they will give you some informations and thank you, that's it. Now go back to the previous jail and destroy the ice wall. Kill some guards and reach the top of Mt. Sabre. Go up the stairs and prepare to face the boss of this area: the General Kelbesque. Ah sorry, I just got a message from him: it's the GREAT General Kelbesque. This guy is immune to the sword of fire. Oh well, you have the sword of wind with the last upgrade so it's not gonna be a big deal. All you need to do is move constantly to avoid his movements and his projectiles and stop sometimes to fully charge your power. Yes, I mean it. You should use that powerful attack you got from Tornel to make the fight easier. I hope you have some MP recovery items besides the magic ring otherwise you'll have to use the level 1 and the level 2 wind attacks to get rid of him and that will take a while. Do not worry, this boss is not that hard. Just pay attention to his projectiles and his movements and let him eat some tornados in the face. After a few hits, he will run away like a coward and leave a treasure chest. Open it to get to get the last upgrade for the sword of fire: the flame bracelet. Obviously, this thing will
CHAPTER 4: THE INFAMOUS SORCERESS In this town, you can buy the bronze armor and the platinum set in the armor shop. The platinum set is really nice, however its price is painful: 3500$ if you buy both of the pieces. I don't need to tell you that, if you want to get it at this point of the game, you'll have to farm the gold for a while. The item shop also has new items: the lysis plant and the fruit of lime. They are kind of expensive. It looks like the end of the day has brought crisis in this world, oh well. You can talk to the NPCs, they will give you some useful informations. If you go to the west, you can talk to a young lady. Her father is away, he did head to the waterfall. Hmm, that waterfall is intersting, we should check this out more closely. The waterfall is east of Portoa. The enemies outside are really tough and does a good amount of damages so be careful while going to the waterfall. Hey look behind the waterfall, there's a cave. Let's go in, shall we? The first area of that dungon introduces a new enemy that will poison you everytime it hits you. Farther, you'll see a branching path. Go north, destroy the ice wall and... oh look, a chest. Ah it's a mimic! This enemy drops a great amount of gold (represented by a treasure chest). I have a tip to get the platinum set. Go in the waterfall cave, kill the enemies and the mimic (since it drops a lot of money), go outside, come back and fight the mimic. With this tip, you'll get 3500$ easily and be able to buy the platinum set. Destroy the ice wall to the south and carry on to go back to the branching path. Go east now, destroy another ice wall, go upstairs and otice the two people blocking the way. Either they are paralysed or they are not talkative. Use the paralysis spell to notice that they are
In this new section, don't bother to hit the enemies because they are immune to the sword of wind AND the sword of fire. Ah, and their shots will turn you into stone if you are too careless. Unless you have a fruit of lime to fix that, DO NOT greet with open arms their shots. Just avoid them, go east, blast the ice wall and carry on. The next part has the same enemy. Go north then east, blast the wall and grab the sword of water in the chest. You now have the third sword of the game and you can kill the enemies of this cave including those medusa snakes. Seize this opportunity to farm some gold and experience. We are not done with this place, not yet. There's one more thing to get. Go back to the last part of the waterfall cave, go west, blast the ice wall and carry on. If you go north from the branching paths, you'll see a person turned into stone. Ok Vaati, where are you? You did it again. Just kidding folks, moving on. You have to break the spell. Oh wait, the flute of lime given by the queen has already been used earlier so you need to find another one. Now, if you go east then north, you'll find a chest. Can you guess what's inside? A flute of lime, yes! Go back to the person, use it and talk to him. You'll get the shield ring (6). This item adds 13 to your secondary defense once equipped. Now leave the waterfall cave, go back and see mister triton. Oh apparently, he gives us the ball of water, sweet. Use your new powers to hit the tree and make a bridge. Enter the tree and talk to Mesia (or I should say the hologram of Mesia since you can't talk to her anymore after that discussion). Apparently, she heads to Draygonia and she is waiting for you there. Now go back to Portoa. This is where the things go a little bit tricky. Have you noticed that door kept by the guard in the throne room of the castle? Why does he keep it? We should figure this out, don't you think so? Unfortunately, when the queen is in the throne room, you can't go through this door. So you have to make sure that the queen is the fortune teller. Her house is next to the pawn shop (the building with the scales on the signboard). If you see her in this building, DO NOT talk to her. Go to the castle, equip the paralysis spell, cast it on the guard (otherwise he will move and stad in front of the door, preventing you to go to the throne room) and go through the suspicious. If you don't see her, talk to the queen in the castle, leave the castle and go back inside. So this is it. The secret behind the door... a cave. How interesting. With the ball of water, you can freeze some parts of the water like the one shown on this screenshot (7). Make your progress and go through the hole in the wall. Your majesty? You're here? Ok fine. Talk to her. She is gonna reveal the thruth if you haven't noticed this yet: she is the fortune teller. Should I repeat that one more time? No, of course not, you knew it anyway. But what we might not know is the other part of the speech: she is in fact Asina, one of the three great wise men (err three? I think they are four when you talk to them via telepathy, just want to point that out). She will teach you a new spell: recover. This spell is amazing. It can cure certain ailments for the good cost of 24 MP. Yes, the cost is expensive compared to the others but it's a nice spell, to tell the truth. You can now stop buying antidotes and fruits of lime and save some money in order ot buy some fruits of power since this spell can cure petrification and poison. Now, if you solve the problem of the Angry Sea, she will teach you another spell: barrier. We'll have to come back here once this side quest is completed. Leave the shrine, go north, freeze the water and talk to the fish. He is badly injured and needs some cure. Go buy a medical herb to Leaf (unless you really want to stay in Portoa and buy one to the tool shop for 90$, which is totally ridiculous in my opinion), then bring it back to him. Don't forget to Go back and to the young lady in the house to the west. Her father is back but he is upset. He lost his fog lamp apparently. We should help him, shouldn't we? Now that we can freeze the water, we can access the eastern part of that continent next to the waterfall and below. Let's explore the one south from the waterfall first. Cross the bridge to the south once you left Portoa, cross the pool of mud, walk close to the river and locate the part to freeze with your sword of water. Cross the ice bridge and enter the cave. In this cave, you'll face enemies that will inflict a status ailment. The red spiderclops inflict paralysis with their shockwaves. Compared to other RPGs, paralysis in this game is different. You could move but you couldn't focus your power to unleash special attacks unless you use a lysis plant or cast the recover spell. The other enemies inflict poison. Ah and one more thing, the sword of wind will come in handy in order to blast the walls of this cave, I'm not kidding. Kill some enemies, blast the wall, and carry on. Go south, then east, then south one more time, blast the wall and grab the antidote in the chest. Go back to the branching path, go south this time, blast a wall and go downstairs. Farther, there's another wall to bash. Make your progress, leave the cave and collect the Kirisa plant in the flower field (8). This item is kept by the flying bug, his spores paralyses you and, unless you are level 11 or so, you can't hit it. It gives lot of experience, however it's really mean with gold. Now, time to explore the other cave, the one next to the waterfall. Notice the part of water to freeze, enter the cave and blast the wall with the sword of wind. Keep going north, blast another wall, pick up the lysis plant in the chest, then go back to the branching path and go east. Go down, then north, bash the wall, kill the mimic, go south, bash the wall, kill the mimic, go south, bash another wall and go east. The way to the west leads to a pointless loop. In the next section, go either to the west or to the east, both of the ways lead to the same exact place. Go south, bash the walls, go up, cross the bridge, bash the wall and go down. Farther, there's another wall to blast. You'll find the fog lamp behind. Now, time to bring it back to the young lady's father. You can now use the boat outside. It leads to a house with two people. One of them lost something apparently. Go outside, then to the left and use the shell flute to summon the buddy you saved earlier in the secret cave behind the castle. With his help you can now travel to the islands of the angry sea. You'll find two types of creatures here: the mermen and the one-eyed octopus. They are immune to the sword of water, which makes sense since they are aquatic creatures. The first island to the west with the lighthouse is Joel Island. Go talk to the NPCs to get some informations about the elder, a sacrifice and a Draygonian sorceress. There's also an inn and an item shop in which you can buy an alarm flute. That might come in handy. Leave the town after doing your business, go west then south, kill the octopus and go in the cave. You will find the love pendant somewhere underwater (9). Hey, isn't that what that man lost? Let's go see him, shall we? Oh, he is gone and his mate won't help us. Sweet, we need to find him now. Where to go now? Well, there's a cave to the nort from where you just found the love pendant. Go in... Well, you don't have any option left. There's also a shrine nearby this ave but we can't do anything with this at that moment so the only option left is the exploration of that cave, also known as the evil spirit cave. Lot of new enemies in this cave. Most of them are immune to the sword of water. Kill the first group of enemies, go up then go south. Freeze the water, move on, create another ice bridge farther and go north. Follow the first northern path, keeping going north, bash the wall with the sword of wind and get a magic ring inside the chest. Now, follow the last northern path to the left and go up. Keep going south then west, blast the wall and go down. You'll find, not one but TWO chests kept by a winged snake. One of them is obviously a mimic, the other chest contains an iron necklace. This item adds 13 to your primary defense when you equip it. However, you can't hold the iron necklace and the ring shield. Now go back to the last area, precisely to the first branching path, keep going east, make the gap using the moving platform (if you fail, don't worry, you go back down so you can return to this gap easily) and carry on. The chest in the next part of the cave contains a lysis plant. Carry on to leave the cave and come to a ghost town.
Ghost town means zombies. Check the house to the west to find a survivor. He will tell you that that sorceress lives here and has turned all the people into zombies. Time to get rid of her and break free the spell. Do not worry, the zombies won't hurt you. Go up the stairs and enter the castle. In this castle, harpies and Draygonian guards are back. Go north, then upstairs, avoid the insivibles enemies (or kill them with a level 3 attack), make the gap and go get the fruit of power in the chest. Go east and face the vampire. You know, the first boss of the game. Yes, he is back. This fight should be easy now that you have the sword of water. A few hits and it will disappear for the second time. Your reward will be a fruit of power this time. Carry on, go upstairs, go west, then east, make the gap, equip the rabbit boots and jump repeatly to cross the spikes and grab the medical herb inside the chest. Head to the south now, go downstairs, talk to the person and go north. Apparently, the other person in the chamber is the real Mesia. So who is the clone? Sabera? Only one thing to do: jump into the hole, go back and see the first person and hit it three times. She will finally reveal its true form. It's Sabera, the infamous sorceress. Her weakness is the sword of fire. The only way to beat her is to move constantly and wait until she throws her magic powers at you. She stops for a while at this point so avoid the shots and seize the opportunity to strike. The final attack, also known as the ring of fire (no Johnny Cash reference intended)... even if it costs lot of MP, to be honest it's really nice and powerful against her so use it. Her shots are really easy to dodge if you keep your distances and notice an opening between two shots. After a few hits, she will admit defeated but she will take Mesia with her. Darn, oh well at least Sabera left a treasure chest. Let's see what it contains. A broken statue... interesting but I don't think we were expecting to find an old relic. Anyway, better than nothing so let's leave this castle and see how the possessed village is doing. Everything is back to normal. Well, they'll have to rebuild the town but they are fine now. Actually, if you talk to them, you will learn about a shrine nearby that requires a statue of gold to make the whirlpools disappear. And if you talk to Clark (the guy you saw in the basement of the house), he will give you the eye glasses. The little girl in the same house will tell you something about a glowing lamp that has the power to restore a broken item. We have one so our next destination will be the lighthouse nearby Joel Island.
CHAPTER 5: THE FOURTH SWORD Just one side stuff before heading to the next part of the main quest. If you go back to Brynmaer, you should see a part of the rive to freeze. Cross the bridge of ice you made and go south to find the amazones village. They despise men so you're not gonna be welcomed here, except in the inn and the shops. The armor shop has two nice shields on sale: the mirrored shield and the sacred shield. Compared to the equipment you'll get in the next town, it's kind of useless. But those two shields have an extra protection. The mirrored shield gives you protection from petrification and the sacred shield gives you protection from paralysis, which is really nice if you are sick of these ailments. Now they are quite expensive and I suggest you to save your gold for the next equipments on sale in the next armor shop. Now, there's one item in this town that you need. And guess where it is. You see that house to the right? It's the elder house. Unfortunately the guard standing outside the elder house won't let you in... unless you paralyse him with the paralysis spell. Now, go in, do not talk to the elder (otherwise the guards will drop you outside the house), paralyse them and go downstairs. Open the chest to get the blizzard bracelet First of all, go buy an alarm flute if you haven't bought one yet then go in the shed next to the elder house, use the eye glasses to reveal a secret door and enter the cave. Go in the lighthouse, use the alarm flute to wake the Go north and enter the cave instead. Go east, open the chest outside to get a fruit of Lime, go back in the cave and go west. Carry on, then go west when you reach the branching path, go up the stairs and open the gate with the key. Use the barrier spell to avoid the projectiles (that's why I suggested you to buy some magic rings), go to the left and kill the wizard. There's a tip to get rid of him easily. Go to the north-west or the north-east, stick to the wall and come close enough to him in order to hit him with your blade and not get hurt by his projectiles and hiss shape. Now go kill the other one to the east, go back to the west and carry on. There's a mimic to kill to the north, otherwise freeze the water to make your progress, go south, open the chest to get a medical herb and go east. Go east, use the rabbit boots to cross the spikes, go to the right and grab the sword of thunder inside the chest. You now possess the four swords required to destroy the evil. After being teleported to the temple and the discussion, you have to head to the fortress of Goa.
CHAPTER 6: THE RESCUE OF THE FOUR WISE MEN Before going to Goa, I highly recommend you to buy the sacred shield in the armor shop of Shyron. We'll need that later. Leave Mt. Hydra and go north. Welcome to Goa. Head to the castle to the north. Use the barrier spell to avoid the shots and face the iron wall. Unfortunately, Shyron is being invaded so you have to head back to the town as soon as possible. Use teleport to instantly go there. Sadly, everyone is dying or already dead, even the store keepers. That's why I suggested you to buy the sacred shield before heading to Goa, otherwise your only option would have been the amazones village but the price is excessively expensive compared to Shyron (6000$ in Shyron, 9000$ in the amazones village... huge difference for your butt, right?). Head to the temple and face Mado. That boss has two attacks: the first one is the ball. He rolls like a ball around the temple, trying to hit you. He will stop at some points and throw some shurikens at you. Hit him when he does that kind of attack. You can also hurt him when he is a ball but it's a bit harder. Ah, he is immune to the sword of thunder, the sword of fire and the sword of wind so use the sword of water. After a couple of attacks, he will be defeated and will disappear. Your reward will be the ball of thunder. Now, let's go to the fortress of Goa. After the traps, use your new power to destroy the iron wall and carry on. Go left, pass by the stairs and carry on until you reach the branching path. Go left, go up the stairs to the right, move forward, then go east until you face a familiar face. Oh don't tell me you've forgotten the great General Kelbesque! You know, he faced you at the top of Mt. Sabre. Time for a rematch. Use the sword of wind to hurt him, it's his weakness. Avoid his attack and unleash a charged attack. After a few hits, he will die and you could get the opel statue (11). That item has the power of resurrection, which is really nice. Go up and talk to Zebu. He will fully recover your HP and your MP before vanishing. Three more to go! Ok, I recommended you to buy the sacred shield earlier, time to equip it because the second floor has a new new enemy really tedious: the blueflying centipede. His spores paralyses you and you have to freeze the water in this floor so I don't have to tell you that this shield is required to make that part easily. Oh don't worry, it will also be useful later. Carry on, go north, ignore the part of the water to freeze, kill the new enemy, then bash the broken iron wall and go get the fruit of power in the chest straight ahead. Now go back and freeze that part of the wayer you just passed by, go south, then east, freeze another part of water, go south and open the chest to get a fruit of repun. This item removes the curse status, which is the MP drain. Go north, freeze the water, freeze the water to the left, go south and get the lysis plant inside the chest. Go back, go east, freeze the water and go north. Blast the wall, go up and face Sabera, the infamous sorceress. Like his friend, she didn't digest the defeat last time and wants a rematch... Ok! For this fight, use the sword of fire and unleash the level 3 attack since she has a barrier. Charge your sword, move constantly to avoid the magic powers and unleash the attack. This fight shouldn't be hard if you have some MP recovery items and if you don't screw up. Two rings of fire should kill her. Open the chest to get a fruit of repun, carry on, talk to Tornel and go up the stairs. Keep going north using the rabbit boots to cross the spikes, grab the opel statue in the chest, Go east then south to find another chest containing a magic ring, go west now then south, go up, go to the left, blast the iron wall and get a magic ring. Go back, then go north, go up, go west and open the chest to get an antidote. Go back, go east, go up the stairs, equip the sacred shield if you unequipped it because this part has a new kind of moth. Also, the invisible enemies from Sabera's castle are back so use a level 3 attack to get rid of them if you choose so. Make the gap, go east, open the chest to get a magic ring, go south, make the gaps and go up. Ok, we faced the great General Kelbesque, Sabera, who's next? Mado, of course. Time to equip the sword of water and get him wet. This time, he is ridiculously fast and shoot more shurikens. Move constantly, charge your sword to level 3 and unleash your power. Seriously, abuse this attack otherwise you'll get some trouble to beat him. This fight is tougher than the first two showdown of this dungeon so make sure you have enough MP to heal yourself and cast the level 3 attack. Good thing we found some magic rings and opel statues earlier, they might come in handy during this fight. Your reward will be a sacred shield. You'll be able to sell after that dungeon, don't worry. Talk to Asina and carry on. One more enemy to get rid of and its name is Karmine. Go east, then north, go downstairs, then north, destroy the wall and carry on. Go to the right, go down, cross the first pool of spikes then go south to get a magic ring. Go west then south to get some warp boots and go north. Use the barrier spell to avoid the projectiles and prepare yourself for the last showdown of this dungeon. This is Karmine and I think you know his weakness. General Kelbesque hates the sword of wind, Sabera hates the sword of fire, Mado dislikes the sword of water... So the sword of thunder is the last option. This fight is really hard. Karmine has two attacks: the first one is the fireballs. They are kind of hard to dodge. The second attack is the one you have to avoid at all cost. It's a magical ring that turns you into a defenseless slime. You won't be able to attack and use magic so avoid this attack at all cost. So friendly advice: move constantly to avoid the attacks and stop from time to time to charge your attack. And obviously, charge your sword to level 2 and hit him with your best shot. The opel statues and the refresh spell are recommended during this intense fight. Your reward will be the ivory statue. Go north to get the storm bracelet (that allows you to use the level 3 attack for the sword of thunder, for the cost of 40 MP). Now go back to the room of spikes, go west, then up, go north and talk to Kensu... who is apparently a slime. He needs the ivory statue to break free the spell. Oh, we have one, let's use it! Kensu will teach you the last spell: flight. You can levitate now and reach the places you couldn't go before. Trust me, there's a lot of items to get and we need this spell and the sacred shield. Take the shortcut behind Kensu, use your new spell to cross the pool of acid, open the chest to the left to get a fruit of power, go south to go back to the surface, go rest to Swan, buy some supplies and, once you're ready, we'll go on the quest for the last items.
CHAPTER 7: THE QUEST FOR THE LAST ITEMS Let's go back to the cave of Styx. If you remember correctly, we haven't explored the part of the dungeon located behind the wizard to the right. You should see three chests. Two of them are mimics, the last one contains the best shield of the game: the psycho shield. This shield is amazing, I tell you. It adds 32 to your secondary defense, that's a fact. But it also combines the effect of the sacred shield and the mirrored shield, which is really nice. Let's go to the desert now. Locate the oasis and go in the tomb. Equip the psycho shield because this cave has one enemy: a flying centiede that paralyse you with your spores. It's really obnoxious to tell the truth, especially when you have to freeze the water at some points to make your progress. Go east, then north, ignore the part of the water to freeze and go west to get the leather boots. Freeze the water, carry on, go south to get a fruit of power (12). There is two more things to get here, two nice items. Go back to the beginning of this floor, go north, freeze some water and fly to the isle to the south, then the one to the east and the next one. Open the chest to get the battle armor, a new armor. It's not the best armor of the game though but it's really nice. It adds 20 to your primary defense and protects you from poison. Now, you are immune to all the status ailments but curse and mutation. Well, it sounds legit, it wouldn't be funny otherwise. Now from this island, go south until you find some stairs. Go up, bash the iron wall and grab the power ring. This item increases your attack once equipped. One more item to get before heading to the next destination. Go as if you wanted to go to the cave of Styx but go east instead and go in the cave. Go east, then north, go upstairs, destroy the wall to the east with the sword of wind and go upstairs. Blast another wall with the same sword, leave the cave and grab the magic ring in the chest. Now go back to the very first banching path of that cave and go west. In the next area you'll face a new enemy that can turn you into stone with their shots. Go west, then downstairs, kill the two pink crabs and get a medical herb in the chest. Go back, go east, blast the wall with the sword of wind, then another one and leave the cave. Do you see that lonely chest? Let's give him a hug, erh I mean let's take his loot. You'll get the bow of sun. Now, it's time to go back to the desert and carry on our journey. We must save Mesia. Go back to the desert. Next to the oasis, you should see a cave. Use the flight spell to enter the cave. At the end of the line, you'll reach a desert of bunnies. One of them is Deo and is looking for Stom. Use the change spell to turn into Stom (the first form) and talk to him. Sadly, the truth is told, Deo is sad and gives you his pendant. It slowly recovers your MP when you don't move. Go south to enter Sahara, the next town. Talk to the townfolks to learn more about the legend. Oh and apparently, they don't know that Stom is dead. Better say that once the quest is complete. The item shop sells some good stuff, including the magic ring. Buy some because this is the last part of the game.
CHAPTER 8: FROM THE GREAT PYRAMID TO THE FLOATING TOWER Go east, enter the cave, get rid of the scorpions and leave the cave. This is the great pyramid. Mesia and the bad guy must be in this building so let's go in. Go to the right, go west twice then north. In the next room, grab the magic ring inside the chest and go north. Now go west, then north then east and go up. Prepare to face the emperor of Draygonia. He has no resistance so you can use any sword you want. I suggest you to use the sword of thunder and abuse the level 3 attack. Otherwise, watch out when he tackles and don't get shocked by the lightnings he throws at you after a dash. That fight is not that hard to be honest. Now, grab the psycho armor (the best armor of the game in chest, it slowly recovers your HP when you don't move), equip it if you choose so and talk to Azteca. You'll get the bow of truth, the only thing that can kill the emperor once and for all. Now, leave the great pyramid and grind in order to get the max level (which is level 16), go buy some supplies in Sahara item shop and head north to find another entrance. It leads to the basement of the pyramid. Farther, you're going to wake two sphinx up. You can only kill them with the bow of sun and the bow of moon. Equip one of the tow bows, use it to kill one sphinx and
Carry on, go right and kill the enemies here with your sword of wind and the power ring (without the ring, it's possible but it will take forever to kill them). Avoid their magical ring at all cost, it's Karmine's trick which means it will turn you into a defenseless slime. Go up, keep going north with the flight spell (or the rabbit boots, it also works), then go to the right, cross the spikes and get an opel statue in the chest. Go west now, use the flight spell to levitate over the spikes and the pits then go up. Ready for the second round? Now you have the real weakness of the emperor: the bow of truth (thanks Azteca, that would have been useful earlier... why didn't you hide it and tell us about that before? Oh well... ).
BONUS CHAPTER: SHOPS, EQUIPMENT AND SPELLS Just a bonus chapter as always, completely optional by I thought it would have been cool to make it. First of all, the shops in each town, what's on sale and the price for each item. As always, by order of appearance in the game.
- Tanned hide: 100$ - Carapace shield: 80$
LEAF ITEMS SHOP - Medical herb (recovers some health): 30$ - Antidote (cures poison): 40$ - Warp boots (allows you to go back to the towns already explored): 60$ - Alarm flute (handy for
BRYNMAER ARMOR SHOP - Leather armor: 140$ - Carapace shield: 70$ - Bronze shield: 220$
BRYNMAER ITEMS SHOP - Medical herb: 35$ - Antidote: 45$ - Warp boots: 65$
OAK ITEM SHOP - Medical herb: 50$ - Antidote: 60$ - Fruit of power (recovers some MP): 80$
MT. SABRE ITEM SHOP - Medical herb: 60$ - Antidote: 70$ - Fruit of power: 100$ - Warp boots: 80$
PORTOA ARMOR SHOP - Bronze armor: 600$ - Platinum armor: 2000$ - Platinum shield: 1500$
PORTOA ITEM SHOP - Medical herb: 90$ - Warp boots: 120$ - Lysis plant: 200$ (Cures paralysis) - Fruit of Lime: 180$ (Cures petrification)
JOEL ISLAND ITEM SHOP - Medical herb: 120$ - Antidote: 150$ - Fruit of power: 180$ - Alarm flute: 300$
AMAZONES ITEM SHOP Warp boots: 100$ Lysis plant: 150$ Fruit of power: 150$
AMAZONES ARMOR SHOP - Platinum armor: 1800$ - Platinum shield: 1300$ - Mirrored shield: 2000$ - Sacred shield: 9000$
SWAN ITEM SHOP - Medical herb: 180$ - Antidote: 200$ - Warp boots: 300$ - Fruit of power: 350$
SWAN ARMOR SHOP - Soldier suit: 3000$ - Ceramic suit: 6500$ - Ceramic shield: 2500$ - Battle shield: 6000$
SHYRON ARMOR SHOP - Ceramic suit: 5500$ - Sacred shield: 6000$ - Battle shield: 5000$
SHYRON ITEM SHOP - Medical herb: 180$ - Antidote: 200$ - Fruit of lime: 300$ - Magic ring: 800$
GOA ITEM SHOP - Medical herb: 500$ - Antidote: 600$ - Lysis plant: 700$ - Warp boots: 800$
SAHARA ITEM SHOP - Antidote: 1000$ - Magic ring: 4000$ - Fruit of repun: 3000$ - Warp boots: 1500$
- Sword of Wind: the first sword of the game, given by a man in the top left house. It adds 1 to your attack once equipped. - Sword of Fire: the second sword of the game, given by the elder of the village of Oak. It adds 2 to your attack when you equip it. - Sword of Water: the thrid sword of the game can be found in the waterfall cave. It adds 4 to your attack when you equip it. - Sword of Thunder: the fourth sword of the game is hidden in the cave of Styx. It adds 8 to your attack once equipped. - Crystalis: the last sword of the game. It's the fusion of the four swords. It adds 16 to your attack when you equip it.
ARMORS - Tanned hide: adds 2 to your primary defense. - Leather armor: adds 6 to your primary defense. - Bronze armor: adds 10 to your primary defense. - Platinum armor: adds 14 to your primary defense. - Soldier suit: adds 18 to yur primary defense. - Battle armor: adds 20 to your primary defense and protects you from poison. - Ceramic suit: adds 24 to your primary defense. - Psycho armor: adds 32 to your primary defense and slowly recovers your HP when you don't move.
SHIELDS - Carapace shield: adds 2 to your secondary defense. - Bronze shield: adds 6 to your secondary defense. - Platinum shield: adds 8 to your secondary defense. - Mirrored shield: adds 12 to your secondary defense and protects you from petrification. - Sacred shield: adds 16 to your secondary defense and protects you from paralysis. - Ceramic shield: adds 18 to your secondary defense. - Battle shield: adds 24 to your secondary defense. - Psycho shield: adds 32 to your secondary defense and protects you from paralysis and petrification.
Finally, the spells you'll get during this adventure.
- Refresh spell (1 MP per hit point recovered): Recovers some hit points. - Telepathy spell (8 MP, only if you desire to talk to the elders): Allows you to communicate with animals and wise men. - Teleport spell (20 MP): Allows you to move ot any visited town. - Paralysis spell (4 MP): Paralyse the enemies for a while and make people - Recover spell (24 MP): Cures certain ailments such as poison and petrification. - Barrier (1 MP per second): Protects you from attacks as long as you have enough MP. - Change (20 MP): Allows you to turn into someone else (among four forms of course). - Flight (1MP per second): Allows you to levitate in order to reach places you couldn't go before.
I also wanted to add a bestiary but this idea has been cancelled and
Well, that's the end of this walkthrough. I see you in the next adventure. Bye and take care, folks.
|


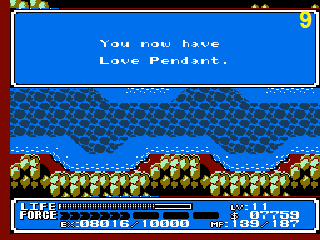


| Games have secrets, I have my eagle gaze. |
Affected by 'Laziness Syndrome'
Registered: 10-21-11
Location: France
Last Post: 2442 days
Last Active: 1616 days
03-03-14 03:16 PM
 Davideo7 is Offline
| ID: 983986 | 10 Words
Davideo7 is Offline
| ID: 983986 | 10 Words
 Davideo7 is Offline

POSTS: 31081/45600
POST EXP: 3520098
LVL EXP: 853363290
CP: 197351.0
VIZ: 127695995
This is massive, very organized and very detailed. Awesome job. |
Owner, Developer, Advertiser, etc
| Founder, Mod, Investor |
Affected by 'Laziness Syndrome'
Registered: 12-06-04
Location: Wisconsin
Last Post: 3 days
Last Active: 7 hours
03-03-14 03:29 PM
Laian is Offline
| ID: 984008 | 61 Words
POSTS: 1573/2232
POST EXP: 457173
LVL EXP: 7582684
CP: 23733.5
VIZ: 3570463
Davideo7 : Thanks, David. I think it's my second long walkthrough, the first one being The Legend of Zelda - Link's Awakening DX. This month, I might make the walkthrough of a game I don't know, released for a system I haven't played yet. I'm going to explore a scary manor and solve some puzzles, that's all I can tell you Thanks, David. I think it's my second long walkthrough, the first one being The Legend of Zelda - Link's Awakening DX. This month, I might make the walkthrough of a game I don't know, released for a system I haven't played yet. I'm going to explore a scary manor and solve some puzzles, that's all I can tell you |
| Games have secrets, I have my eagle gaze. |
Affected by 'Laziness Syndrome'
Registered: 10-21-11
Location: France
Last Post: 2442 days
Last Active: 1616 days
03-03-14 03:35 PM
 megamanmaniac is Offline
| ID: 984012 | 20 Words
megamanmaniac is Offline
| ID: 984012 | 20 Words
 megamanmaniac is Offline

POSTS: 2888/4966
POST EXP: 452698
LVL EXP: 24736631
CP: 17259.2
VIZ: 152622
| Triple M |
Affected by 'Laziness Syndrome'
Registered: 04-12-12
Location: Access withheld from you
Last Post: 3125 days
Last Active: 3121 days
