Dragon Quest 8 Journey Of The Cursed King Walkthrough Part 2 So to go from where we left off. You have just obtained Angelo the last person in the party, and your next destination from Simpleton would be to *Ascantha* a kingdom which will be a long journey ahead of you before you can reach the kingdom.
Monsters found in this region She-Slime Healslime Winky Jargon Bag o' Laughs
Morphean Mushroom Brownie – They are the same as hammerhoods they will use psyche up. But in a different way so watch out for that. They will do this 10 times faster and will get their tension to 100! Beat them down before they can do serious damage to you.
Puppeteer – Uses a spell *Dazzle* which will blind your party members. Sometimes it will put on a show and see who got the joke. Whoever does ends up laughing and missing turns until it wears off on its own. It also uses different puppets each time to encountered it. If this pupperter does *Exciting tale* it would mean a good thing. It would make all party members psyche up at the same time.
Bodkin Bowyer - Does a move called *Multishot* in the air, and attacks all party members.
Night Sneaker – It can cast crack, bounce.
Mummy Boy - Nothing new from this guy except he is tougher to face that’s about it. Scratch that when sometimes they attack they will cause sleep. Pan Piper – Uses a move called *Plays cursed song* basically this will curse all party members except for hero as we know he is immune to it, and all. Slime Knight – Does an attack called *Flying attack* it does some serious damage so watch it. Clockwork Cuckoo - Its attacks is it will transform into a blade, and will attack all of your party at the same time. So be on alert for that one. Treeface Kisser – Nothing out of the ordinary with these guys. Diemon - Ok now with this monster you need to be extra careful. The attacks he does is based on rolls of dices he has if it gets to 6 it will be very powerful the name should be something like this * The diemon eyes rolls like dice! The diemon strikes with a lv. 6 wind sickle attack!* it can also use a spell, crack.
Fat Bat - A very fat bat looking for trouble. Chimaera -They can use flame breath on the entire party.
This 4 since a family will form a monster a powerful one so quickly kill one of them. Mum - A mother to jum and boe and of course her husband boh.
Boh - The father has ability to use zing, but it won't always work.
Jum – Uses Kabuff so watch out for that. His power will double up when, that happens. Uses the spell accelerate on all. Boe - Like jum but is positioned differently.
Riverside Chapel So after a sort of long journey you should come to a *Riverside Chapel* and there will be a house before the chapel though. An old woman lives there go and talk to her. She will tell you something very helpful. Her granddaughter called *Emma* works as a made in a castle. When you ask for the way the old lady says keep following the path, that you were on to get there. First go inside the chapel to save the game there will also be an inn. There is an optional cut scene I suggest you taking if you want to know more about Angelo and Marcello's relationship. This can happen when you stay in the church this cut scene will be a little long. After you have done that you will yet again have another long journey of road to get to the castle, that the old woman was talking about. When you finally reached it, and you will see it’s a pretty much large kingdom.
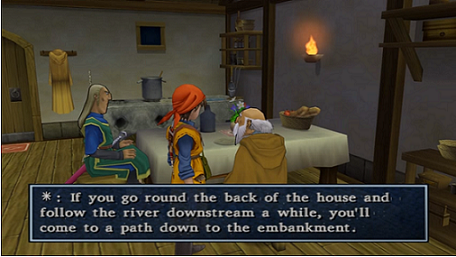
A King Still Mourning After 2 Years For His Queen Ascantha This is the kingdom of Ascantha. If you have reached there by day go into the inn and rest. Also the church in here has lots of books so make sure to read to gain some more recipes of alchemy or learn something new, that may help you on your journey. There are two optional ways to go around it go inside the castle, and to the throne room you will see the king is not there. Then head down the stairs you should trigger a cut scene. Or you can get to the evening mode to get to see the king. But when you go and talk to him he won't pat attention to you. When this happens go down the stairs there a little girl will be coming up the stairs, and that would be Emma. She will ask if you have seen the king and you will go on explaining saying no. She will apologize on beyond his behalf. So she will say things has not been the same since Queen Sasha died 2 years ago. Emma will then come up with an idea. Her grandmother as you have met told her lots of strange stories to do with about a way to making a wish come true for someone. She will then ask you for this favour to help the king. See her grandmother again to know the story. She will explain to about something important of when the night of the full moon something mysterious happens. So to get there its around the back of the house. This will be tricky to do. On Your Way To The Peak Monsters found in this region Metal Slime Kisser Khalamari Kid – When you have faced the boss before you know Khalamari? These will be his little miniature size kids that will come out to play. They don’t do much. And mostly doodle around since they are pretty much still kids. They will attack you at times though. See Urchin King Kelp Ok when you go back to her house go and talk to the old man and he will say this
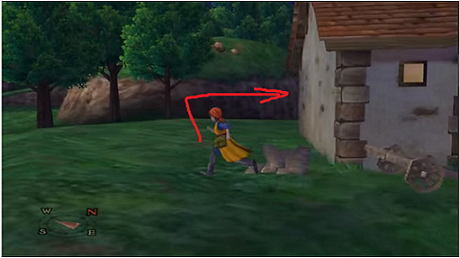
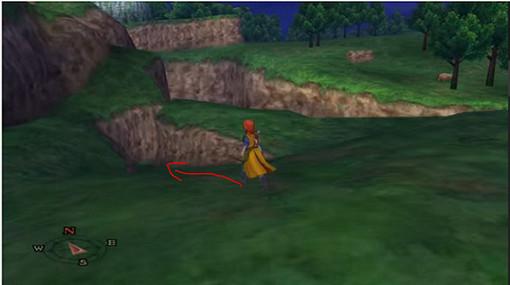
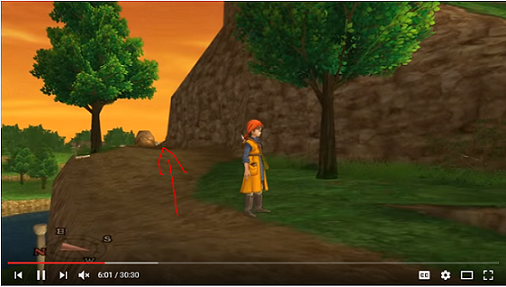
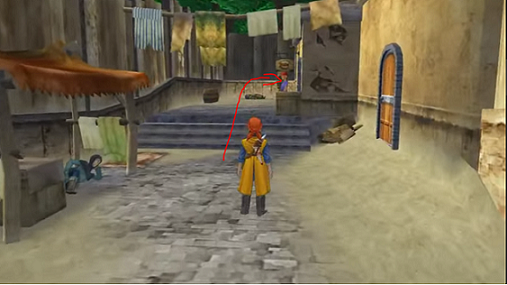
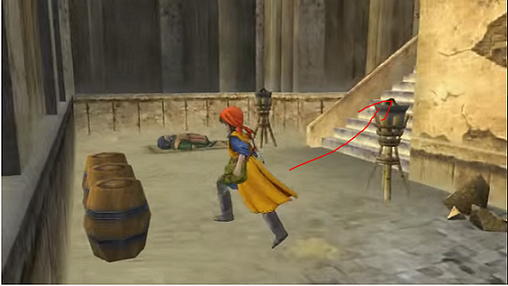
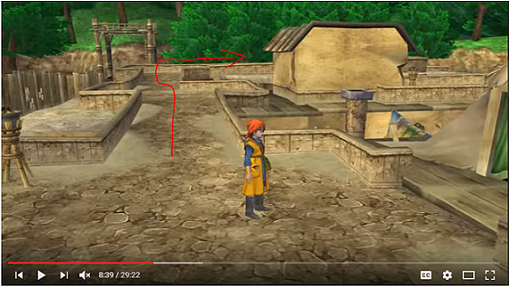
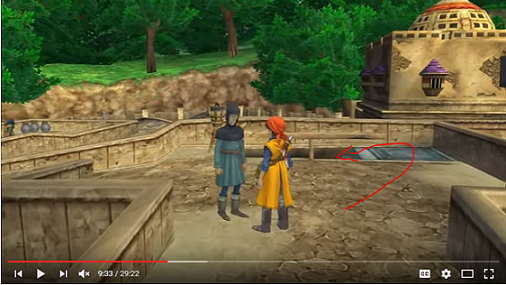
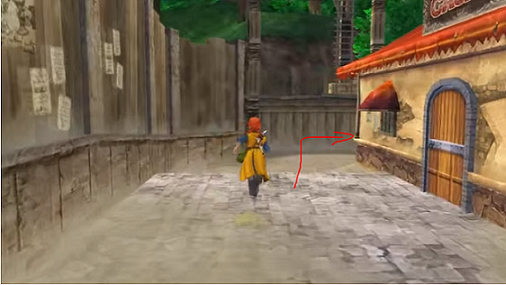
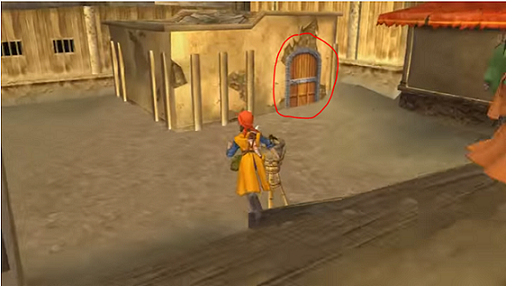
 So go outside around her house and you should see a slope if not here is a picture So go outside around her house and you should see a slope if not here is a picture   Head down and follow the path that will lead you to the wishers peak. There will be 2 routes you can take to the left or the right take the right path. The left path leads to a blocked way. So you will need to take the path to the right which is the correct path. You should be able to reach it before evening. Doing this part of a quest is dodgy so it very important you get it right the first time or you will have to start all over again. You should see an upcoming cave that’s where you need to go into. Head down and follow the path that will lead you to the wishers peak. There will be 2 routes you can take to the left or the right take the right path. The left path leads to a blocked way. So you will need to take the path to the right which is the correct path. You should be able to reach it before evening. Doing this part of a quest is dodgy so it very important you get it right the first time or you will have to start all over again. You should see an upcoming cave that’s where you need to go into.
Wisher's Peak
Monsters found in this cave Healslime Bodkin Bowyer Mummy Boy Hell Hornet - Causes paralyze with its tail so watch out for that. Slime Knight Treeface Diemon Walking Corpse - I told you before and I will say it again these guys are very annoying to deal with. Fat Bat - Uses snooze which will attack the while party members. They even use one of their attacks to butt attack you in the face.....
Ok in the cave there are some detour places you will have to go in order to find the right way. On the left there is a treasure chest. When you go to the right, that would be the right path. You will come to a small split path on your way don't go to the one on the left keep on straight to the slight right. Then you should see stairs next take the stairs up, and you will be outside again there will be slopes for you to climb.
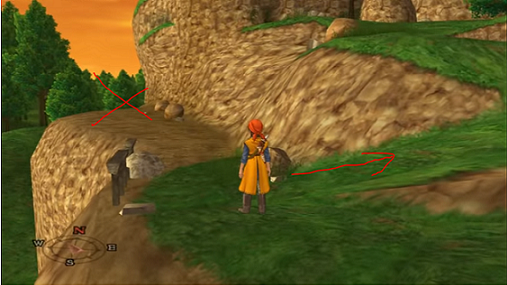
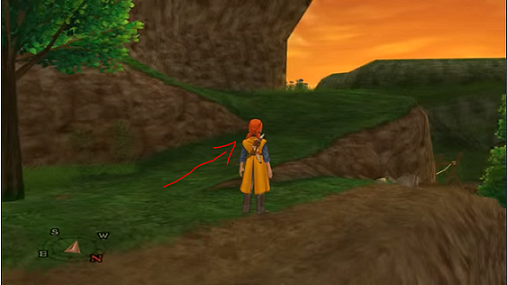
 Keep going up until you have reached to the top of the slope you should see another path go in it. You will be inside the cave again go forward to climb the rope. And then you will be outside again. At this time the sky should be orange that’s what you want happening. But, this will be a time ticker for you to reach the hilltop before the sun starts to set. Continue on the path you see cross the bridge. Go up a small slop and you will come 2 paths for the first one is this Keep going up until you have reached to the top of the slope you should see another path go in it. You will be inside the cave again go forward to climb the rope. And then you will be outside again. At this time the sky should be orange that’s what you want happening. But, this will be a time ticker for you to reach the hilltop before the sun starts to set. Continue on the path you see cross the bridge. Go up a small slop and you will come 2 paths for the first one is this  If you go that way it will lead you to a treasure chest so its best to go first then second. If you go that way it will lead you to a treasure chest so its best to go first then second. 
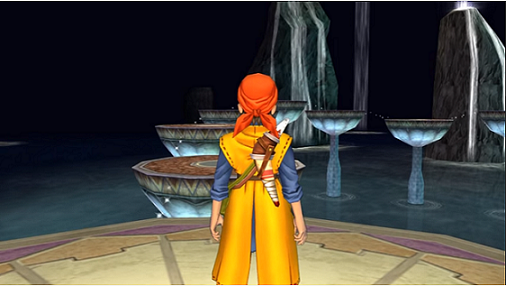
This would be the right way to go to help you reach the hilltop. When you have it should be night time. Not sure of what to do next move a little forward you will see some sort of looking window. Then you will be wondering what to do next. Watch the window's shadow appear on the ground then it will grow longer very slowly. You will have to wait a few mins so it will trigger the next storyline. When that has happened and the window shadow reaches the wall go to it and press x. It will open a door to another path which will lead you to another world. You should be here  Start going in further to inspect this usual world when you get to the door open it and you should come across someone. Another cut scene will happen this person will introduce himself as *Ishmahri keeper of the moonshadow land* when that finishes go up the stairs and talk to him another cut scene will happen Ishmahri will use his harp to see what the matter is. So after that head back to ascantha to see king pavan then a cut scene will happen. Another kinda of bittersweet so when you have finished this section and the king is back to his normal self. There will be another cut scene you will be at the dinner table eating. And after that this quest is done! Head outside to meet trode with medea. There will be another cut scene again. And this talk will lead yangus telling you your next destination which is *Pickham* so use your map to guide. You can now be on your way to Pickham! Start going in further to inspect this usual world when you get to the door open it and you should come across someone. Another cut scene will happen this person will introduce himself as *Ishmahri keeper of the moonshadow land* when that finishes go up the stairs and talk to him another cut scene will happen Ishmahri will use his harp to see what the matter is. So after that head back to ascantha to see king pavan then a cut scene will happen. Another kinda of bittersweet so when you have finished this section and the king is back to his normal self. There will be another cut scene you will be at the dinner table eating. And after that this quest is done! Head outside to meet trode with medea. There will be another cut scene again. And this talk will lead yangus telling you your next destination which is *Pickham* so use your map to guide. You can now be on your way to Pickham!
On the way to Pickham Monsters found in this region Drackmage Healslime Winky Scorpion Brownie Puppeteer Night Sneaker Mummy Boy Hell Hornet Pan Piper Slime Knight Clockwork Cuckoo Treeface Kisser Diemon Chimaeras Walking Corpse Night Fox Paprikan Hood - This guy is weird in a way. He can also throw stones to attack your party and it will do some damage. It may even blind them.
Headhunter - These guys are pretty funny. I can’t name one of the abilities that they use because its so weird looking. But, I do know somehow they throw their weapon at you for that attack. Also when you attack them, sometimes they will put their shield up for defence mode. But, this shouldn't stop you from killing them it will take less damage after sometime when you don't attack them with their shield up they will lower their guard. Minidemon Gorerilla - These guys are a tough nut to deal with. Their attacks are very powerful so watch out. Their *Desperate attacks* are the worse ones to endure. Mum Boh Jum Boe Khalamari Kid Yabby
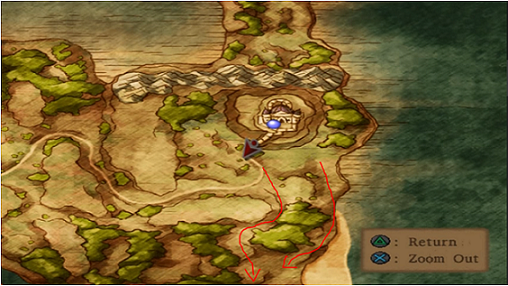
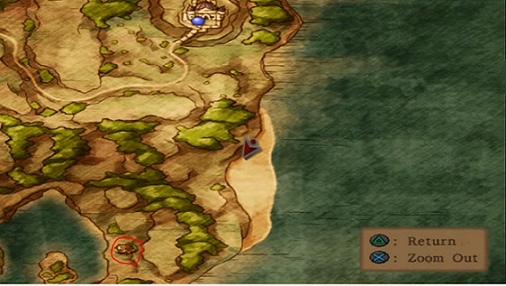
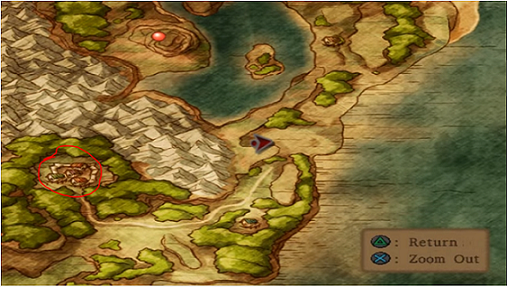
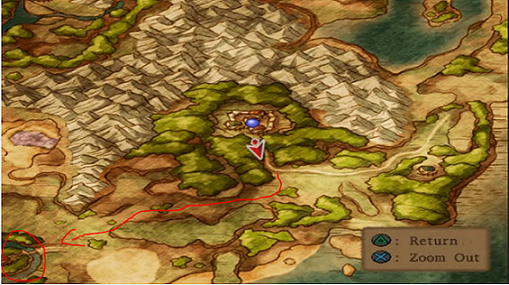
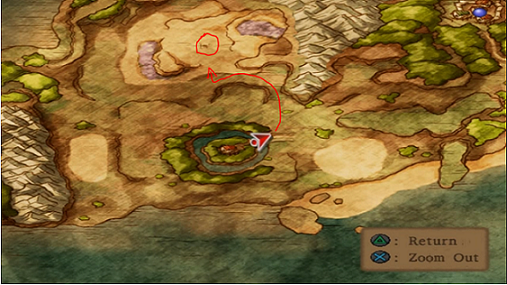
King Kelp So as yangus said pickham head southwest to your next destination. Make sure to look at your map. If you are still having some trouble then here are a few screenshots that will help you out
   Now that you have seen where to go head there. Now that you have seen where to go head there.
Lakeside Cabin On your way you should see a small house on the map the place its called *Lakeside Cabin* it has a church and an inn in there. So rest up if you need to then be on your way again. Look at the word map when you leave you should get a more closer look at the path you are so that you know where you need to go. For now have Jessica on defend until she is strong enough to withstand attacks. Be careful the monsters here are stronger so you'll be a bit under leveled, but not too much to the point that you keep dying. So as soon as you get to Pickham train your party members to be stronger. As you get a clear distance view by seeing the road ahead this would mean you are almost at your destination. Before you get to Pickham though there is a place before it called *Morries Place* basically there is something happening in it but that will be explained for another time. You can't go up the door it will be locked but you will see someone standing on top of the place. Go and talk to him. When you eventually do all you get is dotted lines. Then leave this will trigger a cut scene. He will introduce himself as *Morrie* talk to him again after the scene. Another one will occur. He asks for a favour and you will be given something to look at. Its to do with special monsters you have to fight, and send back to Morrie. And after you have done that you will be given a good reward for that. Sadly this won't be part of this walkthrough but the next one. So continue on your path back to Pickham. The 'orse princess goes missing! Pickham
So when you enter this place. You'll see its.....very dirty, and not a clean town to live in. And of course its filled with thieves as well so watch it. Also don't bother going to the casino there as there is another better one. But this one is really rubbish, and not worth your time. There will be of course pub, church, item store, weapon and armor store in this place so you can get some new stuff for your party. Do what you have to do then find brains. It won't be an easy task to know where he lives so here is what you need to do to find him.
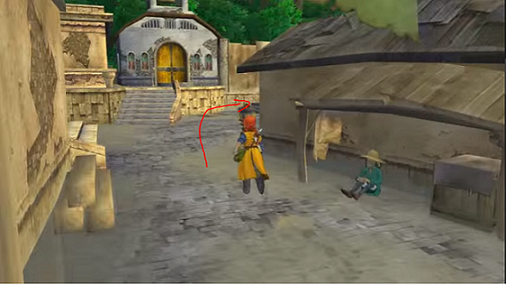
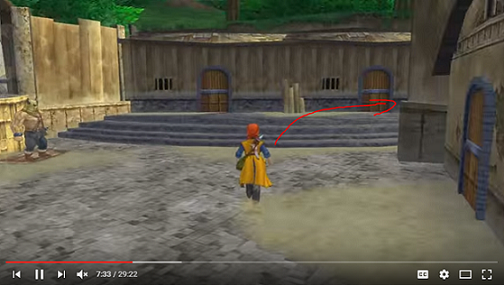
      Once you find his room. You find out he is not at home. Go back to the pub and talk to trode about it and then something bad will happen....medea goes missing. So to catch the thief you need to go to this area it won't be easy. When you enter into pickam to find the place you need to go to the left and then turn right. Once you find his room. You find out he is not at home. Go back to the pub and talk to trode about it and then something bad will happen....medea goes missing. So to catch the thief you need to go to this area it won't be easy. When you enter into pickam to find the place you need to go to the left and then turn right.   Then a cut scene will happen. After that go to the second pub. Not the one that trode was in the other on for when you were on your first time taking the route to get to mitts house. After you talk to the person yangus said about. You'll find out where medea has been taken too so exit out of pickham to go to her house. Which is not so far off use the map to see where she lives. Then a cut scene will happen. After that go to the second pub. Not the one that trode was in the other on for when you were on your first time taking the route to get to mitts house. After you talk to the person yangus said about. You'll find out where medea has been taken too so exit out of pickham to go to her house. Which is not so far off use the map to see where she lives.  The Venus Tear The Venus Tear
Monsters found in this region Hipster – Does the sultry dance. This will make one of your party members to start dancing uncontrollably. This will last until it wears off on its own. Drackmage Clockwork Cuckoo Treeface Kisser Walking Corpse Night Fox – Does fuddles dance and affects all party members so watch out for that. As fuddle can confuse you. Paprikan Chimaera Hood
Headhunter
Minidemon Gorerilla Witch – Will use swoosh and hit all party members. She also had a move called puff. If she hits Jessica with it. That won't affect her. But...if she hits any of the boys with it that wouldn't be good.
Khalamari Kid Yabby King Kelp So when you get there first look in the shed. You'll find medea, but one of her ankles are strapped with a metal. Then go and speak to the person who is blocking the way of the door. A scene will happen and the guard will let you through to see red. Go up and talk to her. And it seems she is not allowing by getting medea back. And so she will say what she wants in return of exchanging medea. The *Venus Tear* its being held in a place called *Swordsman's Labyrinth* so that will be your next place to go.  Swordsman's Labyrinth Swordsman's Labyrinth
Monsters found in this cave Mummy Boy Cannibox Goodybag – With this one you can gain even more money so it helps when you want to buy weapons, and other stuff. And can use kasap as well. Mummy Restless Armour – Quick on attacks and very powerful too. Can also call backup Lost Soul – A soul that seems lost. And has trouble to make up their minds to attack or not. Phantom Fencer – Very quick on attacks and can kill you easily. And uses a move called thunder slash as well. So head up north because that is where it will be. And be careful in this cave the monsters here are really strong, but have a lot of exp and money as well. Once you enter it will look like a maze. When you proceed on a little cut scene will happen and yangus showing where the treasure I which you can see not so far off. But, the cave is a puzzle to solve to get to it. There will be two doors to choose to go into first. The door to the right explains what the place is for. So I suggest reading it before carrying on. So the door to the left is actually the right path to take. And also you will get guides onto how to reach the Venus tear making it a lot more easier for you. Once you head down the stairs make sure you also look at the ground panels they point you most of the right way to go while some others might trick you. When you get to this area  You might not see the door but this place. It a route to get you back on track when you accidentally opened the wrong door. I'll show you when you get there also on this path is poison a purple pool so watch out for that as well. But there is a treasure chest here you can get and it would make sense to get it the first time round, than going all the way back to get it. And this would be the map for the cave so its worth to cross over for. Head on back up the stairs and on route to get to the Venus tear. Ok so there will be 3 spilt paths to go to here is what it looks like. You might not see the door but this place. It a route to get you back on track when you accidentally opened the wrong door. I'll show you when you get there also on this path is poison a purple pool so watch out for that as well. But there is a treasure chest here you can get and it would make sense to get it the first time round, than going all the way back to get it. And this would be the map for the cave so its worth to cross over for. Head on back up the stairs and on route to get to the Venus tear. Ok so there will be 3 spilt paths to go to here is what it looks like.  Now the panel on the floor is pointing to the right way. But we don't need to go there just yet. There will be nothing on path left so don't go there. So go to the one that is straight forward and there will be 2 doors to go through. On door left will be some vases to break as well as a treasure chest. It will be locked but your thief's key will be able to open it. Head out once done and go into door right. There will be 2 treasure chests. Open the chest on the right first. And this will be a kitty shield for Jessica. Then open the one on the left to reveal.....a cannibox! Don't bother to open the door right in the middle. If you wanna know why go ahead then. So once done with that head out of the place and go back to where was before. Going back into the right path. You see this path? And the door? And this hole also? Now the panel on the floor is pointing to the right way. But we don't need to go there just yet. There will be nothing on path left so don't go there. So go to the one that is straight forward and there will be 2 doors to go through. On door left will be some vases to break as well as a treasure chest. It will be locked but your thief's key will be able to open it. Head out once done and go into door right. There will be 2 treasure chests. Open the chest on the right first. And this will be a kitty shield for Jessica. Then open the one on the left to reveal.....a cannibox! Don't bother to open the door right in the middle. If you wanna know why go ahead then. So once done with that head out of the place and go back to where was before. Going back into the right path. You see this path? And the door? And this hole also?
 Don’t bother to open it as the door is attached to something will push you back and causing you to fall into that hole. Remember where you found the map in that treasure chest? That’s where you'll fall back to. So carry in until you see the second door the right one to open. Once you have gone down the stairs you should come to 2 split paths again one straight forward and another path to your right. Ignore the one to the right since there is nothing. So keep going you will see a statue blocking the way go to the right or left and push it by pressing x first then push press x again to come off from it. So head on in the path. There will be again s split path. One for straight forward while the other is onto the right. On the right and at the end will be 2 vases for you to break. Once done head back on track. Ok now you will come to a room. You will have to move another statue again I think its pretty obvious of where you need to move it too, if not here is a picture. Don’t bother to open it as the door is attached to something will push you back and causing you to fall into that hole. Remember where you found the map in that treasure chest? That’s where you'll fall back to. So carry in until you see the second door the right one to open. Once you have gone down the stairs you should come to 2 split paths again one straight forward and another path to your right. Ignore the one to the right since there is nothing. So keep going you will see a statue blocking the way go to the right or left and push it by pressing x first then push press x again to come off from it. So head on in the path. There will be again s split path. One for straight forward while the other is onto the right. On the right and at the end will be 2 vases for you to break. Once done head back on track. Ok now you will come to a room. You will have to move another statue again I think its pretty obvious of where you need to move it too, if not here is a picture.
 So when you have done that the bridge will lower itself granting you access to proceed on. Ok so when you get to the door and open it you will come to this room the last room. If you are a bit confused on what to do go and read what it says on the board. Once you have the statue swords aline the right way it will open and up path for you. But you get this wrong you hit your head on the ceiling how would you know? You will see when it happens. The first statue you see move it to this place. The 4th block So when you have done that the bridge will lower itself granting you access to proceed on. Ok so when you get to the door and open it you will come to this room the last room. If you are a bit confused on what to do go and read what it says on the board. Once you have the statue swords aline the right way it will open and up path for you. But you get this wrong you hit your head on the ceiling how would you know? You will see when it happens. The first statue you see move it to this place. The 4th block   Now for the second one do the same and it will push you up to where the treasure will be waiting for you. But before you do so. You should see a board onto the right with a message make sure to read it before proceeding on! It will also help restore any mp or health that had decreased when facing the monsters in the cave. Now for the second one do the same and it will push you up to where the treasure will be waiting for you. But before you do so. You should see a board onto the right with a message make sure to read it before proceeding on! It will also help restore any mp or health that had decreased when facing the monsters in the cave.
Boss fight 4 Trap Box His attacks and spells
Attacks-can make a desperate attack
casts Snooze
casts Fuddle
casts Crackle Now for this you need to raise speed and defence this is when jesscia and Angelo's spells come in. Have them both do that until you are ready for them to attack. While have hero and yangus on psyche up to attack and do some real damage. Sadly you can't use sap as its not much effective. If you want extra damage and have jesscia already learnt oomph then use that as well. 4 hits including oomph added to yangus and hero to their psyche up will do the job. So once you've got it the Venus tear. Head back to reds house to get back medea so when done yangus will suggest again to go and see if brains is back in pickham.
The Informant And A New Destination So head back there and then brains will inform you of somewhere else you need to go. He will say he saw dhoulmagus going across the sea to the western continent, and sadly you need to find your ship to go to the western continent. He will say *follow the cliffs along the coast to the west from Port Prospect, and you will come to a wide open wasteland. According to what I heard there is an old abandon ship there. I don't know why a ship should be in a place of a desert of no water, but anyway.... people say it’s a magic ship if you can get it up and running again you'd be able to sail anywhere you wanted.* He has books in his house so don't forget to read them before leaving. You may be a bit stuck on that but I'll guide you so you don't get confused of where you need to go next. Looking And Getting A Magical Ship Remember the first time and if you did train around and saw a blocked path of boulders? Its now been cleared away granting and allowing access for anyone to go into it. On your map in the not so distance you should see a small looking house. That would be the hilltop hunt. In there will be an inn and a church. Be careful from now monsters will get harder to face. So make sure you level up your party at the right times. Hilltop Hut So go up the road to get to the hut to rest before carrying on with your journey. And then for some strange reason in the middle of the night you will see trode again working on the alchemy pot. You will find out in time as of why. And speak to the old woman who used to be a sister of a church. She will you know say the lines that a sister would do. Save the game and then head out to the desert. Actually before you do that head down to a well. You will see this blue thing you are standing on and a crown as well. Go to the crown and pull it off. It won't budge at first but the slime king will notice you trying to help him. Help him out by pulling off the crown again and it will come off. That will be your prize for helping. Talk to all of the slimes. Because one of them will tell you an alchemy recipe. When done go out of the well and head down to the desert. Monsters found in this region Candy Cat Bodkin Archer Drackmage
Mud Mannequin – Can also do weird dance which lowers your mp.
Rockbomb – Yeah this guy will be annoying to face at first but as you lv up more it will be easier for you to face. Muddy Hand – Can call for back up which makes more muddy hands to appear in battle.
Terror Tabby – Ok so with this one any attacks it will do to you. It will out you to sleep. Buffalo Wing – Can use kasap on the party members Pink Pongo Devilmoths – Same is the previous moths that you face before. But, this time you get poisoned more often since their poison attacks are much more stronger. Also they can do poison breath as well so watch out for that.
You should see the ship in the distance so you'll find a way to find it. Once you do it will trigger a cut scene. When trode talks he will ask for the map so this will send you to your next destination. To look at the books for it in trodain! So once out of the desert head for the cave you saw which will be a tunnel and have you end up appearing from the south side. West Trodain Church Monsters found in this region Slime
Dracky Dancing Devil Beetleboy Healslime Dieablo – Same as the previous one you saw. But his attacks with eyes is thin air attacks. Terror Tabby Devilmoth Buffalo Wing
Mumboh-Jumboe – Now remember the group of family of 4? How this comes to be is when the mum yells the go of doing so. You'll know trust me a little scene happens to show you. So make sure you beat down this foe very quickly. It can shake the ground in fury attacking all party members uses swords to attack and slash at you. I suggest raising your defence for this one and also be aware on when you need to heal as well. Mum Boh Jum Boe Pink Pongo Garuda Hawk Man Now when you exit out of the cave head for the church first to rest up and stuff then head to trodain. When you get to the gates go and try by opening it. When you can't trode will ask jesscia to use her fire attacks to dismantle some thorns that are blocking the path way. Then you'll be able to go in. Trodain So...at the sad sight. You'll see what has happened. The since is kinda long. But you'll need to know what happened to trode and medea. So after that long cut scene you get back to where you are and when it ends find a path that is opened to you. The castle library is on the left. Sadly you have to go through the long way to get there. And watch out the monsters here are really powerful and annoying to deal with.
Monsters found in this castle Cureslime – Can cure all enemies, take down as soon as you can. Also it can call for back up as well.
Rockbomb Hunter Mech – They have one sword on their left hand and on the right a bow. So they can hit you with either one.
Liquid Metal Slime – Now as for this one the exp to gain is a lot more than metal slime. Wailin' Weed – Uses abilities like cursed song. Sings heavenly strains. This move allows to bring back to life the recent enemy you killed. Garuda Infernal Armour – Can call for back up does some sort of a thunder or lightning attack on the party and this is on all of them. Dragonthorn - Does a wrap tail thorn attack which will trap one of your party members until it wears off on it own. That's if they can break free from it. Can use flame breath also. On the far right corner you should see a door go through it. The vines in some areas will block some paths you will have to find a way to get to the library. On the right path is not the right way. But you should still explore it to get items and such. When you have done that head back outside. Can climb the stairs to the left. You will see a treasure chest and in there is the map. Go in through the big door and you should be in the throne room but on top. There will be 2 door paths. One on the left and the other on the right. Go to the one on the left first when you enter you should see a bit door to your left. In there will be 2 treasure chests and something to break as well such as barrels and vases. On the chest to the left you will obtain magic key! It will open chests that a thief's key can not open. On the right you will gain a templers sword for Angelo. Leave that room and then head to the door on the right in the throne room. Now you will see halls. This will lead to the library but, its still a puzzle to get there. On the right isn't much to take or to look at so take the path onto the left. Straight ahead you will see rocks blocking. You should see the stairs on the right take the stairs. When you get up the there's there are two paths you can take the one straight forward isn't the right way but its best to explore it anyway. While on the right a dodgy path and I say this because it can be easily be missed. If you shift your camera angle to the right you'll see what I mean so take that path.  You should come to the end of the hall and see a door. And be in another room there will be some barrels to break once done then leave through the double doors. Then go right there will be another door for you to take to get back in. Head down the stairs and you will come to a floor carry on since there will be nothing to explore keep going to the ground floor level. There will be a door to your right. In there will be 2 vases to break. Head back out and keep on going. The door you see before you will lead you to another room. Before that there will be another path to the right. You'll be in the throne room on the ground floor so you can go and explore a bit when done head back and to carry onto your path. You see the path to the right in the throne room? Go through there and you should see a door which is the library room. So head further into the room and a cut scene will happen. After that start looking each book on the shelf about a magical ship. As you may find some clues to get it moving again. Make sure to unlock the door as well. To look for the book its in the last shelf to your left if you are facing the window. Here it is if you can't find it. You should come to the end of the hall and see a door. And be in another room there will be some barrels to break once done then leave through the double doors. Then go right there will be another door for you to take to get back in. Head down the stairs and you will come to a floor carry on since there will be nothing to explore keep going to the ground floor level. There will be a door to your right. In there will be 2 vases to break. Head back out and keep on going. The door you see before you will lead you to another room. Before that there will be another path to the right. You'll be in the throne room on the ground floor so you can go and explore a bit when done head back and to carry onto your path. You see the path to the right in the throne room? Go through there and you should see a door which is the library room. So head further into the room and a cut scene will happen. After that start looking each book on the shelf about a magical ship. As you may find some clues to get it moving again. Make sure to unlock the door as well. To look for the book its in the last shelf to your left if you are facing the window. Here it is if you can't find it.  So trode will ask you to read to see if it will be any use of help. Anyways after reading the book it won't be much of help but something else happens the full moon will respond to the broken window and you know what that means? Yes! That means we get to visit him again for help! Open the moonshadow window and enter. Go and talk to ishmarhri and hero will explain the reason. As things get better he starts to play his harp and....well some of the strings breaks. So you'll have to find a powerful harp for him to play before you can get the ship sadly. Ok this is where to get confused. To get the moonshadow harp. You need to go back to ascantha. Yep back there! Go and talk to king pavan when you get there about the problem. As you get the harp you will see something else. Something...bad. All the treasures stolen and you see a hole. So go into the hole to chase after who stole the harp. So trode will ask you to read to see if it will be any use of help. Anyways after reading the book it won't be much of help but something else happens the full moon will respond to the broken window and you know what that means? Yes! That means we get to visit him again for help! Open the moonshadow window and enter. Go and talk to ishmarhri and hero will explain the reason. As things get better he starts to play his harp and....well some of the strings breaks. So you'll have to find a powerful harp for him to play before you can get the ship sadly. Ok this is where to get confused. To get the moonshadow harp. You need to go back to ascantha. Yep back there! Go and talk to king pavan when you get there about the problem. As you get the harp you will see something else. Something...bad. All the treasures stolen and you see a hole. So go into the hole to chase after who stole the harp.
Mole Hole Monsters found in this cave
Mischievous Mole Goodybag Rockbomb Muddy Hand Mad Mole – Like mischievous moles but more annoying to deal with. They will waste no time to psyche up and to attack you as well.
Mars Rover – Does a move called Intimidating scream. Which can make all of the party members to fall over. And this will delay their turns. And can also bark for more back up. Peeper When in the mole hole this path is basically straight forward,. Keep going straight until you reach the other end of the hole and see a light on your right. This will lead to outside. Ok once outside you need to go into another cave to find the harp and who took it as well. You can easily see on the map its north of you. If you can't  That’s where you need to go. So go on in. And also an upcoming boss will be happening as well. On your way there you should see a treasure chest in their contains the seed of life. So the main mole hole will be a little annoying to do. But hey who ever says things come easy? So head on the path you see before you. You should see the path split in a way but take the path to the right. Because the one you see further will also lead you to the same place. But as a longer course. Enter into the next hole that you see to carry on. You will see another split. Take the path on the left because the right path is not a path. Ok you should come to a big room next. And there are two big paths to go into. Being one of them is the right one. And one of them that is the wrong one. Actually both of them lead to the same room. The one on the right is the longer way while the one straight ahead is the short way. You should see a treasure box get to it and inside you will get a stone hardhat. Carry on course to find where the harp is. There will be a path on the right to take. And will be in the main domain of the big boss of the moles. Make your way down. And as you closer inspect you will see he has stolen the moonshadow harp and the other items as well! Talk to the moles first before confronting him. A cut scene will happen and don more will be playing the harp.....so badly it will destroy your ears. I'm telling you its so badly played and out of tune. But in a way I find it really funny. XD Anyways after that scene go and talk to the small moles first before don mole himself. The small moles are tired of his playing and wants someone to take the harp from him. Which would be you. So do their wishes. When you talk to don mole another cut scene will happen he will ask if you want to hear his funky tune say NO and that will trigger the boss fight. That’s where you need to go. So go on in. And also an upcoming boss will be happening as well. On your way there you should see a treasure chest in their contains the seed of life. So the main mole hole will be a little annoying to do. But hey who ever says things come easy? So head on the path you see before you. You should see the path split in a way but take the path to the right. Because the one you see further will also lead you to the same place. But as a longer course. Enter into the next hole that you see to carry on. You will see another split. Take the path on the left because the right path is not a path. Ok you should come to a big room next. And there are two big paths to go into. Being one of them is the right one. And one of them that is the wrong one. Actually both of them lead to the same room. The one on the right is the longer way while the one straight ahead is the short way. You should see a treasure box get to it and inside you will get a stone hardhat. Carry on course to find where the harp is. There will be a path on the right to take. And will be in the main domain of the big boss of the moles. Make your way down. And as you closer inspect you will see he has stolen the moonshadow harp and the other items as well! Talk to the moles first before confronting him. A cut scene will happen and don more will be playing the harp.....so badly it will destroy your ears. I'm telling you its so badly played and out of tune. But in a way I find it really funny. XD Anyways after that scene go and talk to the small moles first before don mole himself. The small moles are tired of his playing and wants someone to take the harp from him. Which would be you. So do their wishes. When you talk to don mole another cut scene will happen he will ask if you want to hear his funky tune say NO and that will trigger the boss fight.
Boss fight 5 Don Mole Soul Mole
Their Attacks and Spells Ok so do the usual gain speed and defence when ready attack. What also give a great advantage is that when don plays he can also make the little moles go easily confuse. So this makes things a little easier for you in the battle. So 4 psyche up from hero and yangus plus oomph added as well will take don down. When you have done that get rid of the little moles.
So after that the mole will thank you for stopping their boss playing the harp and will give it to you. When you have end things there.
Finally Getting The Magical Ship After Getting The Moonshadow Harp Go back to ascantha to talk to king pavan and once that is done go back to trodain and to the moonshadow realm where you can finally get the ship! You get to see the most wonderful cut scene you have ever witness. It’s a really beautiful scene to watch and afterwards It kinda feels sad because your parting from the guy. And this will be the end of this storyline!
Set Sail for the High Seas! Another cut scene will happen with all the stuff just happened and you know yangus it always makes things funny only to be hit on the head by king trode. You now have your net destination to sail to the west as said before to catch up with you know who.
Princess Minnie's Castle Now remember the mini medals you collected or have? You see it belongs to the princess who lives in this castle so if you bring her all of the medals in quite amount she will award you greatly for that. So that’s another cool thing. Anyways when you first enter in the princess will be upstairs with her father. Go to her which will trigger a cut scene with her and her father talking. She will ask if you have come across the mini medals say yes. And after that cut scene meet her downstairs in the throne room. Talk to her and she will explain about her mini medals and what to do so if you get them. The list of Mini Medal Prizes, and amount of mini medals to collect are For 28 Medals you will get - Fishnet Stockings. For 36 Medals you will get - Posh Waistcoat. For 45 Medals you will get - Staff of Divine Wrath. For 52 Medals you will get - Gold Nugget. For 60 Medals you will get - Meteorite Bracer. For 68 Medals you will get - Miracle Sword. For 75 Medals you will get - Sacred Armour. For 83 Medals you will get – Orichalcum. For 90 Medals you will get - Metal King Helm. For 99 Medals you will get - Princess minis secret. For 110 Medals you will get - The kings Prize. Monsters found on this island Cureslime Bodkin Fletcher Tap Devil – Does *The death dance* you better pray he doesn't always do this because...this move applies to all of your party members... does a move Kerplunk this sacrifices his life to bring one back to life. It can also fail as well. They do underpants song as well as the fuddle dance too. Iron Scorpion – Like scorpion before it has metals attached to it. Which will make it more annoying for you to face and beat as well. So your going to have to double your attacks for that. Frogman - This one is annoying to deal with. As it will attack you very fast.
Now head back to the ship. And with this you can go either to explore some places or get onto the path to find Dhoulmagus. Your next path is a place called *Neos* if you don't know where that is here
 Neos Monsters found on this island Night Emperor Skeleton Soldier Tap Devil Mushroom Mage - Can cast different types of spells. Redtail Hipster - Can do an all hit attack with its tail that can do some serious damage. You really need to be careful when this happens because this can easily kill your party. Neos Monsters found on this island Night Emperor Skeleton Soldier Tap Devil Mushroom Mage - Can cast different types of spells. Redtail Hipster - Can do an all hit attack with its tail that can do some serious damage. You really need to be careful when this happens because this can easily kill your party.
Gold Golem - Helps a lot with money problems and they really do. Fight a lot of them to gain a lot of money in no time. But because they are made out of brick gold. Their damage attacks are really high so watch out for that
Toxic Zombie - For this you will get poisoned when being attacked by this monster. It will happen most of the time. So when it does just heal it off. Volpone – Uses spell *Boom* on all party members Hades Condor - For some reason this thing has a liking to attack only Jessica a lot or most of the time. So be on guard for that. Can also cast the spell *Midheal* to heal itself or on other ally.
When you enter neos head straight and to the end to talk to the templers which will trigger a cut scene. And of course being the idiots that they are will assume of you. Then Marcello and someone else will come out of the doors that the templers are blocking. So after that scene is done you will no longer have any need to stay. Now the shops here are ridiculous expensive but it will mean you have to train a lot to get a lot of money. And the best way is to encounter *Gold golems* they will drop a lot amount of money. And the highest you can get to these guys at the same time is 4. I need to say more monsters you will encounter will get to attack you 2 times and not only just one. So it w the next place to head is the *Seaview Church* to get their the easiest thing to do is zoom to princess minis castle again and go to this destination. This will be the end of part 2 of this walkthrough. I hope this does help and I will put up the other parts up when I can or really soon.  Dragon Quest 8 Journey Of The Cursed King Walkthrough Part 2
So to go from where we left off. You have just obtained Angelo the last person in the party, and your next destination from Simpleton would be to *Ascantha* a kingdom which will be a long journey ahead of you before you can reach the kingdom.
Monsters found in this region
She-Slime
Healslime
Winky
Jargon
Bag o' Laughs
Morphean Mushroom
Brownie – They are the same as hammerhoods they will use psyche up. But in a different way so watch out for that. They will do this 10 times faster and will get their tension to 100! Beat them down before they can do serious damage to you.
Puppeteer – Uses a spell *Dazzle* which will blind your party members. Sometimes it will put on a show and see who got the joke. Whoever does ends up laughing and missing turns until it wears off on its own. It also uses different puppets each time to encountered it. If this pupperter does *Exciting tale* it would mean a good thing. It would make all party members psyche up at the same time.
Bodkin Bowyer - Does a move called *Multishot* in the air, and attacks all party members.
Night Sneaker – It can cast crack, bounce.
Mummy Boy - Nothing new from this guy except he is tougher to face that’s about it. Scratch that when sometimes they attack they will cause sleep.
Pan Piper – Uses a move called *Plays cursed song* basically this will curse all party members except for hero as we know he is immune to it, and all.
Slime Knight – Does an attack called *Flying attack* it does some serious damage so watch it.
Clockwork Cuckoo - Its attacks is it will transform into a blade, and will attack all of your party at the same time. So be on alert for that one.
Treeface
Kisser – Nothing out of the ordinary with these guys.
Diemon - Ok now with this monster you need to be extra careful. The attacks he does is based on rolls of dices he has if it gets to 6 it will be very powerful the name should be something like this * The diemon eyes rolls like dice! The diemon strikes with a lv. 6 wind sickle attack!* it can also use a spell, crack.
Fat Bat - A very fat bat looking for trouble.
Chimaera -They can use flame breath on the entire party.
This 4 since a family will form a monster a powerful one so quickly kill one of them.
Mum - A mother to jum and boe and of course her husband boh.
Boh - The father has ability to use zing, but it won't always work.
Jum – Uses Kabuff so watch out for that. His power will double up when, that happens. Uses the spell accelerate on all.
Boe - Like jum but is positioned differently.
Riverside Chapel
So after a sort of long journey you should come to a *Riverside Chapel* and there will be a house before the chapel though. An old woman lives there go and talk to her. She will tell you something very helpful. Her granddaughter called *Emma* works as a made in a castle. When you ask for the way the old lady says keep following the path, that you were on to get there. First go inside the chapel to save the game there will also be an inn. There is an optional cut scene I suggest you taking if you want to know more about Angelo and Marcello's relationship. This can happen when you stay in the church this cut scene will be a little long. After you have done that you will yet again have another long journey of road to get to the castle, that the old woman was talking about. When you finally reached it, and you will see it’s a pretty much large kingdom.
A King Still Mourning After 2 Years For His Queen
Ascantha
This is the kingdom of Ascantha. If you have reached there by day go into the inn and rest. Also the church in here has lots of books so make sure to read to gain some more recipes of alchemy or learn something new, that may help you on your journey. There are two optional ways to go around it go inside the castle, and to the throne room you will see the king is not there. Then head down the stairs you should trigger a cut scene. Or you can get to the evening mode to get to see the king. But when you go and talk to him he won't pat attention to you. When this happens go down the stairs there a little girl will be coming up the stairs, and that would be Emma. She will ask if you have seen the king and you will go on explaining saying no. She will apologize on beyond his behalf. So she will say things has not been the same since Queen Sasha died 2 years ago. Emma will then come up with an idea. Her grandmother as you have met told her lots of strange stories to do with about a way to making a wish come true for someone. She will then ask you for this favour to help the king. See her grandmother again to know the story. She will explain to about something important of when the night of the full moon something mysterious happens. So to get there its around the back of the house. This will be tricky to do.
On Your Way To The Peak
Monsters found in this region
Metal Slime
Kisser
Khalamari Kid – When you have faced the boss before you know Khalamari? These will be his little miniature size kids that will come out to play. They don’t do much. And mostly doodle around since they are pretty much still kids. They will attack you at times though.
See Urchin
King Kelp
Ok when you go back to her house go and talk to the old man and he will say this

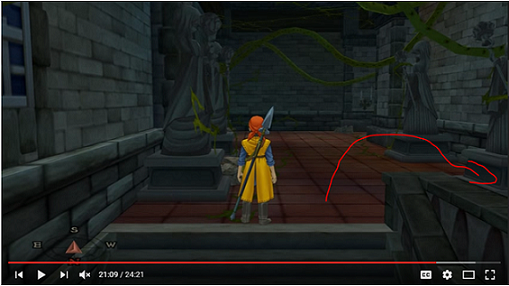
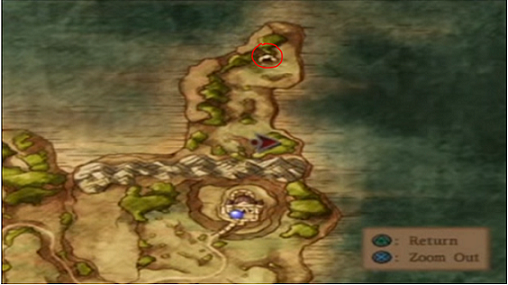
So go outside around her house and you should see a slope if not here is a picture


Head down and follow the path that will lead you to the wishers peak. There will be 2 routes you can take to the left or the right take the right path. The left path leads to a blocked way. So you will need to take the path to the right which is the correct path. You should be able to reach it before evening. Doing this part of a quest is dodgy so it very important you get it right the first time or you will have to start all over again. You should see an upcoming cave that’s where you need to go into.
Wisher's Peak
Monsters found in this cave
Healslime
Bodkin Bowyer
Mummy Boy
Hell Hornet - Causes paralyze with its tail so watch out for that.
Slime Knight
Treeface
Diemon
Walking Corpse - I told you before and I will say it again these guys are very annoying to deal with.
Fat Bat - Uses snooze which will attack the while party members. They even use one of their attacks to butt attack you in the face.....
Ok in the cave there are some detour places you will have to go in order to find the right way. On the left there is a treasure chest. When you go to the right, that would be the right path. You will come to a small split path on your way don't go to the one on the left keep on straight to the slight right. Then you should see stairs next take the stairs up, and you will be outside again there will be slopes for you to climb.

Keep going up until you have reached to the top of the slope you should see another path go in it. You will be inside the cave again go forward to climb the rope. And then you will be outside again. At this time the sky should be orange that’s what you want happening. But, this will be a time ticker for you to reach the hilltop before the sun starts to set. Continue on the path you see cross the bridge. Go up a small slop and you will come 2 paths for the first one is this

If you go that way it will lead you to a treasure chest so its best to go first then second.

This would be the right way to go to help you reach the hilltop. When you have it should be night time. Not sure of what to do next move a little forward you will see some sort of looking window. Then you will be wondering what to do next. Watch the window's shadow appear on the ground then it will grow longer very slowly. You will have to wait a few mins so it will trigger the next storyline. When that has happened and the window shadow reaches the wall go to it and press x. It will open a door to another path which will lead you to another world. You should be here

Start going in further to inspect this usual world when you get to the door open it and you should come across someone. Another cut scene will happen this person will introduce himself as *Ishmahri keeper of the moonshadow land* when that finishes go up the stairs and talk to him another cut scene will happen Ishmahri will use his harp to see what the matter is. So after that head back to ascantha to see king pavan then a cut scene will happen. Another kinda of bittersweet so when you have finished this section and the king is back to his normal self. There will be another cut scene you will be at the dinner table eating. And after that this quest is done! Head outside to meet trode with medea. There will be another cut scene again. And this talk will lead yangus telling you your next destination which is *Pickham* so use your map to guide. You can now be on your way to Pickham!
On the way to Pickham
Monsters found in this region
Drackmage
Healslime
Winky
Scorpion
Brownie
Puppeteer
Night Sneaker
Mummy Boy
Hell Hornet
Pan Piper
Slime Knight
Clockwork Cuckoo
Treeface
Kisser
Diemon
Chimaeras
Walking Corpse
Night Fox
Paprikan
Hood - This guy is weird in a way. He can also throw stones to attack your party and it will do some damage. It may even blind them.
Headhunter - These guys are pretty funny. I can’t name one of the abilities that they use because its so weird looking. But, I do know somehow they throw their weapon at you for that attack. Also when you attack them, sometimes they will put their shield up for defence mode. But, this shouldn't stop you from killing them it will take less damage after sometime when you don't attack them with their shield up they will lower their guard.
Minidemon
Gorerilla - These guys are a tough nut to deal with. Their attacks are very powerful so watch out. Their *Desperate attacks* are the worse ones to endure.
Mum
Boh
Jum
Boe
Khalamari Kid
Yabby
King Kelp
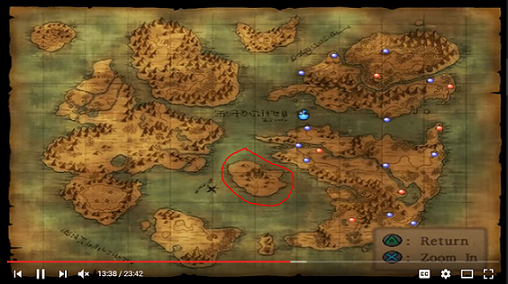
So as yangus said pickham head southwest to your next destination. Make sure to look at your map. If you are still having some trouble then here are a few screenshots that will help you out


Now that you have seen where to go head there.
Lakeside Cabin
On your way you should see a small house on the map the place its called *Lakeside Cabin* it has a church and an inn in there. So rest up if you need to then be on your way again. Look at the word map when you leave you should get a more closer look at the path you are so that you know where you need to go. For now have Jessica on defend until she is strong enough to withstand attacks. Be careful the monsters here are stronger so you'll be a bit under leveled, but not too much to the point that you keep dying. So as soon as you get to Pickham train your party members to be stronger. As you get a clear distance view by seeing the road ahead this would mean you are almost at your destination. Before you get to Pickham though there is a place before it called *Morries Place* basically there is something happening in it but that will be explained for another time. You can't go up the door it will be locked but you will see someone standing on top of the place. Go and talk to him. When you eventually do all you get is dotted lines. Then leave this will trigger a cut scene. He will introduce himself as *Morrie* talk to him again after the scene. Another one will occur. He asks for a favour and you will be given something to look at. Its to do with special monsters you have to fight, and send back to Morrie. And after you have done that you will be given a good reward for that. Sadly this won't be part of this walkthrough but the next one. So continue on your path back to Pickham.
The 'orse princess goes missing!
Pickham
So when you enter this place. You'll see its.....very dirty, and not a clean town to live in. And of course its filled with thieves as well so watch it. Also don't bother going to the casino there as there is another better one. But this one is really rubbish, and not worth your time. There will be of course pub, church, item store, weapon and armor store in this place so you can get some new stuff for your party. Do what you have to do then find brains. It won't be an easy task to know where he lives so here is what you need to do to find him.


Once you find his room. You find out he is not at home. Go back to the pub and talk to trode about it and then something bad will happen....medea goes missing. So to catch the thief you need to go to this area it won't be easy. When you enter into pickam to find the place you need to go to the left and then turn right.


Then a cut scene will happen. After that go to the second pub. Not the one that trode was in the other on for when you were on your first time taking the route to get to mitts house. After you talk to the person yangus said about. You'll find out where medea has been taken too so exit out of pickham to go to her house. Which is not so far off use the map to see where she lives.

The Venus Tear
Monsters found in this region
Hipster – Does the sultry dance. This will make one of your party members to start dancing uncontrollably. This will last until it wears off on its own.
Drackmage
Clockwork Cuckoo
Treeface
Kisser
Walking Corpse
Night Fox – Does fuddles dance and affects all party members so watch out for that. As fuddle can confuse you.
Paprikan
Chimaera
Hood
Headhunter
Minidemon
Gorerilla
Witch – Will use swoosh and hit all party members. She also had a move called puff. If she hits Jessica with it. That won't affect her. But...if she hits any of the boys with it that wouldn't be good.
Khalamari Kid
Yabby
King Kelp
So when you get there first look in the shed. You'll find medea, but one of her ankles are strapped with a metal. Then go and speak to the person who is blocking the way of the door. A scene will happen and the guard will let you through to see red. Go up and talk to her. And it seems she is not allowing by getting medea back. And so she will say what she wants in return of exchanging medea. The *Venus Tear* its being held in a place called *Swordsman's Labyrinth* so that will be your next place to go.

Swordsman's Labyrinth
Monsters found in this cave
Mummy Boy
Cannibox
Goodybag – With this one you can gain even more money so it helps when you want to buy weapons, and other stuff. And can use kasap as well.
Mummy
Restless Armour – Quick on attacks and very powerful too. Can also call backup
Lost Soul – A soul that seems lost. And has trouble to make up their minds to attack or not.
Phantom Fencer – Very quick on attacks and can kill you easily. And uses a move called thunder slash as well.
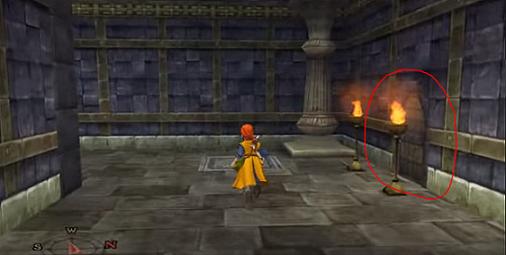
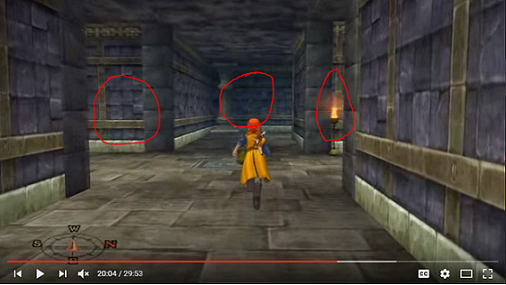
So head up north because that is where it will be. And be careful in this cave the monsters here are really strong, but have a lot of exp and money as well. Once you enter it will look like a maze. When you proceed on a little cut scene will happen and yangus showing where the treasure I which you can see not so far off. But, the cave is a puzzle to solve to get to it. There will be two doors to choose to go into first. The door to the right explains what the place is for. So I suggest reading it before carrying on. So the door to the left is actually the right path to take. And also you will get guides onto how to reach the Venus tear making it a lot more easier for you. Once you head down the stairs make sure you also look at the ground panels they point you most of the right way to go while some others might trick you. When you get to this area

You might not see the door but this place. It a route to get you back on track when you accidentally opened the wrong door. I'll show you when you get there also on this path is poison a purple pool so watch out for that as well. But there is a treasure chest here you can get and it would make sense to get it the first time round, than going all the way back to get it. And this would be the map for the cave so its worth to cross over for. Head on back up the stairs and on route to get to the Venus tear. Ok so there will be 3 spilt paths to go to here is what it looks like.

Now the panel on the floor is pointing to the right way. But we don't need to go there just yet. There will be nothing on path left so don't go there. So go to the one that is straight forward and there will be 2 doors to go through. On door left will be some vases to break as well as a treasure chest. It will be locked but your thief's key will be able to open it. Head out once done and go into door right. There will be 2 treasure chests. Open the chest on the right first. And this will be a kitty shield for Jessica. Then open the one on the left to reveal.....a cannibox! Don't bother to open the door right in the middle. If you wanna know why go ahead then. So once done with that head out of the place and go back to where was before. Going back into the right path. You see this path? And the door? And this hole also?

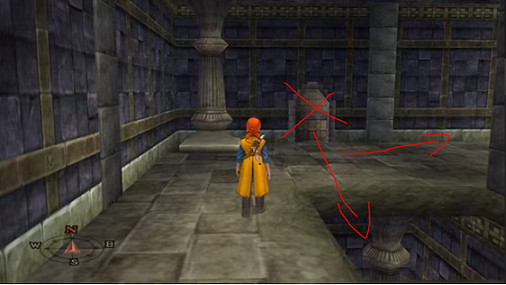
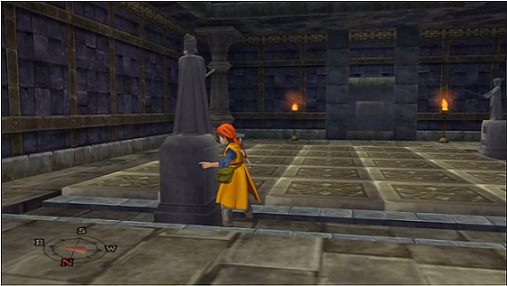
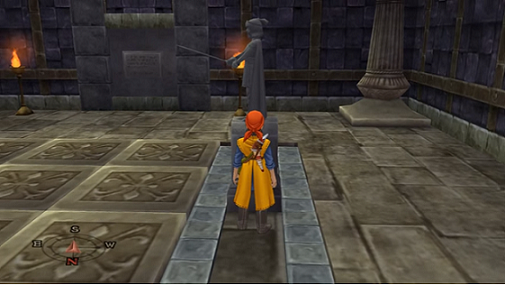
Don’t bother to open it as the door is attached to something will push you back and causing you to fall into that hole. Remember where you found the map in that treasure chest? That’s where you'll fall back to. So carry in until you see the second door the right one to open. Once you have gone down the stairs you should come to 2 split paths again one straight forward and another path to your right. Ignore the one to the right since there is nothing. So keep going you will see a statue blocking the way go to the right or left and push it by pressing x first then push press x again to come off from it. So head on in the path. There will be again s split path. One for straight forward while the other is onto the right. On the right and at the end will be 2 vases for you to break. Once done head back on track. Ok now you will come to a room. You will have to move another statue again I think its pretty obvious of where you need to move it too, if not here is a picture.

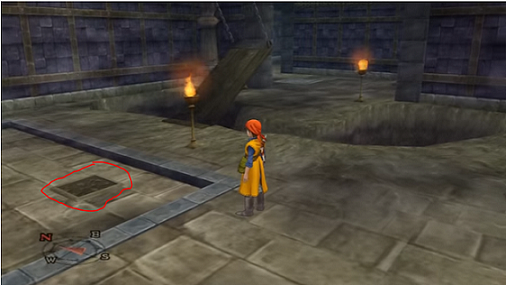
So when you have done that the bridge will lower itself granting you access to proceed on. Ok so when you get to the door and open it you will come to this room the last room. If you are a bit confused on what to do go and read what it says on the board. Once you have the statue swords aline the right way it will open and up path for you. But you get this wrong you hit your head on the ceiling how would you know? You will see when it happens. The first statue you see move it to this place. The 4th block


Now for the second one do the same and it will push you up to where the treasure will be waiting for you. But before you do so. You should see a board onto the right with a message make sure to read it before proceeding on! It will also help restore any mp or health that had decreased when facing the monsters in the cave.
Boss fight 4
Trap Box
His attacks and spells
Attacks-can make a desperate attack
casts Snooze
casts Fuddle
casts Crackle
Now for this you need to raise speed and defence this is when jesscia and Angelo's spells come in. Have them both do that until you are ready for them to attack. While have hero and yangus on psyche up to attack and do some real damage. Sadly you can't use sap as its not much effective. If you want extra damage and have jesscia already learnt oomph then use that as well. 4 hits including oomph added to yangus and hero to their psyche up will do the job. So once you've got it the Venus tear. Head back to reds house to get back medea so when done yangus will suggest again to go and see if brains is back in pickham.
The Informant And A New Destination
So head back there and then brains will inform you of somewhere else you need to go. He will say he saw dhoulmagus going across the sea to the western continent, and sadly you need to find your ship to go to the western continent. He will say *follow the cliffs along the coast to the west from Port Prospect, and you will come to a wide open wasteland. According to what I heard there is an old abandon ship there. I don't know why a ship should be in a place of a desert of no water, but anyway.... people say it’s a magic ship if you can get it up and running again you'd be able to sail anywhere you wanted.* He has books in his house so don't forget to read them before leaving. You may be a bit stuck on that but I'll guide you so you don't get confused of where you need to go next.
Looking And Getting A Magical Ship
Remember the first time and if you did train around and saw a blocked path of boulders? Its now been cleared away granting and allowing access for anyone to go into it. On your map in the not so distance you should see a small looking house. That would be the hilltop hunt. In there will be an inn and a church. Be careful from now monsters will get harder to face. So make sure you level up your party at the right times.
Hilltop Hut
So go up the road to get to the hut to rest before carrying on with your journey. And then for some strange reason in the middle of the night you will see trode again working on the alchemy pot. You will find out in time as of why. And speak to the old woman who used to be a sister of a church. She will you know say the lines that a sister would do. Save the game and then head out to the desert. Actually before you do that head down to a well. You will see this blue thing you are standing on and a crown as well. Go to the crown and pull it off. It won't budge at first but the slime king will notice you trying to help him. Help him out by pulling off the crown again and it will come off. That will be your prize for helping. Talk to all of the slimes. Because one of them will tell you an alchemy recipe. When done go out of the well and head down to the desert.
Monsters found in this region
Candy Cat
Bodkin Archer
Drackmage
Mud Mannequin – Can also do weird dance which lowers your mp.
Rockbomb – Yeah this guy will be annoying to face at first but as you lv up more it will be easier for you to face.
Muddy Hand – Can call for back up which makes more muddy hands to appear in battle.
Terror Tabby – Ok so with this one any attacks it will do to you. It will out you to sleep.
Buffalo Wing – Can use kasap on the party members
Pink Pongo
Devilmoths – Same is the previous moths that you face before. But, this time you get poisoned more often since their poison attacks are much more stronger. Also they can do poison breath as well so watch out for that.
You should see the ship in the distance so you'll find a way to find it. Once you do it will trigger a cut scene. When trode talks he will ask for the map so this will send you to your next destination. To look at the books for it in trodain! So once out of the desert head for the cave you saw which will be a tunnel and have you end up appearing from the south side.
West Trodain Church
Monsters found in this region
Slime
Dracky
Dancing Devil
Beetleboy
Healslime
Dieablo – Same as the previous one you saw. But his attacks with eyes is thin air attacks.
Terror Tabby
Devilmoth
Buffalo Wing
Mumboh-Jumboe – Now remember the group of family of 4? How this comes to be is when the mum yells the go of doing so. You'll know trust me a little scene happens to show you. So make sure you beat down this foe very quickly. It can shake the ground in fury attacking all party members uses swords to attack and slash at you. I suggest raising your defence for this one and also be aware on when you need to heal as well.
Mum
Boh
Jum
Boe
Pink Pongo
Garuda
Hawk Man
Now when you exit out of the cave head for the church first to rest up and stuff then head to trodain. When you get to the gates go and try by opening it. When you can't trode will ask jesscia to use her fire attacks to dismantle some thorns that are blocking the path way. Then you'll be able to go in.
Trodain
So...at the sad sight. You'll see what has happened. The since is kinda long. But you'll need to know what happened to trode and medea. So after that long cut scene you get back to where you are and when it ends find a path that is opened to you. The castle library is on the left. Sadly you have to go through the long way to get there. And watch out the monsters here are really powerful and annoying to deal with.
Monsters found in this castle
Cureslime – Can cure all enemies, take down as soon as you can. Also it can call for back up as well.
Rockbomb
Hunter Mech – They have one sword on their left hand and on the right a bow. So they can hit you with either one.
Liquid Metal Slime – Now as for this one the exp to gain is a lot more than metal slime.
Wailin' Weed – Uses abilities like cursed song. Sings heavenly strains. This move allows to bring back to life the recent enemy you killed.
Garuda
Infernal Armour – Can call for back up does some sort of a thunder or lightning attack on the party and this is on all of them.
Dragonthorn - Does a wrap tail thorn attack which will trap one of your party members until it wears off on it own. That's if they can break free from it. Can use flame breath also.
On the far right corner you should see a door go through it. The vines in some areas will block some paths you will have to find a way to get to the library. On the right path is not the right way. But you should still explore it to get items and such. When you have done that head back outside. Can climb the stairs to the left. You will see a treasure chest and in there is the map. Go in through the big door and you should be in the throne room but on top. There will be 2 door paths. One on the left and the other on the right. Go to the one on the left first when you enter you should see a bit door to your left. In there will be 2 treasure chests and something to break as well such as barrels and vases. On the chest to the left you will obtain magic key! It will open chests that a thief's key can not open. On the right you will gain a templers sword for Angelo. Leave that room and then head to the door on the right in the throne room. Now you will see halls. This will lead to the library but, its still a puzzle to get there. On the right isn't much to take or to look at so take the path onto the left. Straight ahead you will see rocks blocking. You should see the stairs on the right take the stairs. When you get up the there's there are two paths you can take the one straight forward isn't the right way but its best to explore it anyway. While on the right a dodgy path and I say this because it can be easily be missed. If you shift your camera angle to the right you'll see what I mean so take that path.

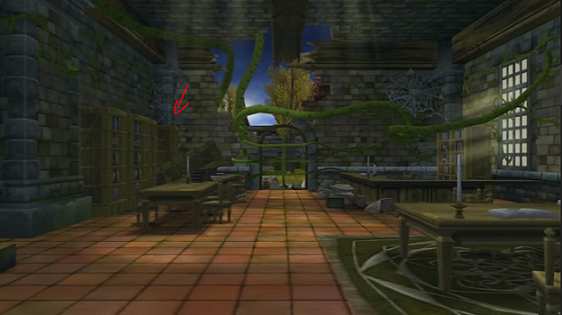
You should come to the end of the hall and see a door. And be in another room there will be some barrels to break once done then leave through the double doors. Then go right there will be another door for you to take to get back in. Head down the stairs and you will come to a floor carry on since there will be nothing to explore keep going to the ground floor level. There will be a door to your right. In there will be 2 vases to break. Head back out and keep on going. The door you see before you will lead you to another room. Before that there will be another path to the right. You'll be in the throne room on the ground floor so you can go and explore a bit when done head back and to carry onto your path. You see the path to the right in the throne room? Go through there and you should see a door which is the library room. So head further into the room and a cut scene will happen. After that start looking each book on the shelf about a magical ship. As you may find some clues to get it moving again. Make sure to unlock the door as well. To look for the book its in the last shelf to your left if you are facing the window. Here it is if you can't find it.

So trode will ask you to read to see if it will be any use of help. Anyways after reading the book it won't be much of help but something else happens the full moon will respond to the broken window and you know what that means? Yes! That means we get to visit him again for help! Open the moonshadow window and enter. Go and talk to ishmarhri and hero will explain the reason. As things get better he starts to play his harp and....well some of the strings breaks. So you'll have to find a powerful harp for him to play before you can get the ship sadly. Ok this is where to get confused. To get the moonshadow harp. You need to go back to ascantha. Yep back there! Go and talk to king pavan when you get there about the problem. As you get the harp you will see something else. Something...bad. All the treasures stolen and you see a hole. So go into the hole to chase after who stole the harp.
Mole Hole
Monsters found in this cave
Mischievous Mole
Goodybag
Rockbomb
Muddy Hand
Mad Mole – Like mischievous moles but more annoying to deal with. They will waste no time to psyche up and to attack you as well.
Mars Rover – Does a move called Intimidating scream. Which can make all of the party members to fall over. And this will delay their turns. And can also bark for more back up.
Peeper
When in the mole hole this path is basically straight forward,. Keep going straight until you reach the other end of the hole and see a light on your right. This will lead to outside. Ok once outside you need to go into another cave to find the harp and who took it as well. You can easily see on the map its north of you. If you can't

That’s where you need to go. So go on in. And also an upcoming boss will be happening as well. On your way there you should see a treasure chest in their contains the seed of life. So the main mole hole will be a little annoying to do. But hey who ever says things come easy? So head on the path you see before you. You should see the path split in a way but take the path to the right. Because the one you see further will also lead you to the same place. But as a longer course. Enter into the next hole that you see to carry on. You will see another split. Take the path on the left because the right path is not a path. Ok you should come to a big room next. And there are two big paths to go into. Being one of them is the right one. And one of them that is the wrong one. Actually both of them lead to the same room. The one on the right is the longer way while the one straight ahead is the short way. You should see a treasure box get to it and inside you will get a stone hardhat. Carry on course to find where the harp is. There will be a path on the right to take. And will be in the main domain of the big boss of the moles. Make your way down. And as you closer inspect you will see he has stolen the moonshadow harp and the other items as well! Talk to the moles first before confronting him. A cut scene will happen and don more will be playing the harp.....so badly it will destroy your ears. I'm telling you its so badly played and out of tune. But in a way I find it really funny. XD
Anyways after that scene go and talk to the small moles first before don mole himself. The small moles are tired of his playing and wants someone to take the harp from him. Which would be you. So do their wishes. When you talk to don mole another cut scene will happen he will ask if you want to hear his funky tune say NO and that will trigger the boss fight.
Boss fight 5
Don Mole
Soul Mole
Their Attacks and Spells
Ok so do the usual gain speed and defence when ready attack. What also give a great advantage is that when don plays he can also make the little moles go easily confuse. So this makes things a little easier for you in the battle. So 4 psyche up from hero and yangus plus oomph added as well will take don down. When you have done that get rid of the little moles.
So after that the mole will thank you for stopping their boss playing the harp and will give it to you. When you have end things there.
Finally Getting The Magical Ship After Getting The Moonshadow Harp
Go back to ascantha to talk to king pavan and once that is done go back to trodain and to the moonshadow realm where you can finally get the ship! You get to see the most wonderful cut scene you have ever witness. It’s a really beautiful scene to watch and afterwards It kinda feels sad because your parting from the guy. And this will be the end of this storyline!
Set Sail for the High Seas!
Another cut scene will happen with all the stuff just happened and you know yangus it always makes things funny only to be hit on the head by king trode. You now have your net destination to sail to the west as said before to catch up with you know who.
Princess Minnie's Castle
Now remember the mini medals you collected or have? You see it belongs to the princess who lives in this castle so if you bring her all of the medals in quite amount she will award you greatly for that. So that’s another cool thing. Anyways when you first enter in the princess will be upstairs with her father. Go to her which will trigger a cut scene with her and her father talking. She will ask if you have come across the mini medals say yes. And after that cut scene meet her downstairs in the throne room. Talk to her and she will explain about her mini medals and what to do so if you get them.
The list of Mini Medal Prizes, and amount of mini medals to collect are
For 28 Medals you will get - Fishnet Stockings.
For 36 Medals you will get - Posh Waistcoat.
For 45 Medals you will get - Staff of Divine Wrath.
For 52 Medals you will get - Gold Nugget.
For 60 Medals you will get - Meteorite Bracer.
For 68 Medals you will get - Miracle Sword.
For 75 Medals you will get - Sacred Armour.
For 83 Medals you will get – Orichalcum.
For 90 Medals you will get - Metal King Helm.
For 99 Medals you will get - Princess minis secret.
For 110 Medals you will get - The kings Prize.
Monsters found on this island
Cureslime
Bodkin Fletcher
Tap Devil – Does *The death dance* you better pray he doesn't always do this because...this move applies to all of your party members... does a move Kerplunk this sacrifices his life to bring one back to life. It can also fail as well. They do underpants song as well as the fuddle dance too.
Iron Scorpion – Like scorpion before it has metals attached to it. Which will make it more annoying for you to face and beat as well. So your going to have to double your attacks for that.
Frogman - This one is annoying to deal with. As it will attack you very fast.
Now head back to the ship. And with this you can go either to explore some places or get onto the path to find Dhoulmagus. Your next path is a place called *Neos* if you don't know where that is here

Neos
Monsters found on this island
Night Emperor
Skeleton Soldier
Tap Devil
Mushroom Mage - Can cast different types of spells.
Redtail Hipster - Can do an all hit attack with its tail that can do some serious damage. You really need to be careful when this happens because this can easily kill your party.
Gold Golem - Helps a lot with money problems and they really do. Fight a lot of them to gain a lot of money in no time. But because they are made out of brick gold. Their damage attacks are really high so watch out for that
Toxic Zombie - For this you will get poisoned when being attacked by this monster. It will happen most of the time. So when it does just heal it off.
Volpone – Uses spell *Boom* on all party members
Hades Condor - For some reason this thing has a liking to attack only Jessica a lot or most of the time. So be on guard for that. Can also cast the spell *Midheal* to heal itself or on other ally.
When you enter neos head straight and to the end to talk to the templers which will trigger a cut scene. And of course being the idiots that they are will assume of you. Then Marcello and someone else will come out of the doors that the templers are blocking. So after that scene is done you will no longer have any need to stay. Now the shops here are ridiculous expensive but it will mean you have to train a lot to get a lot of money. And the best way is to encounter *Gold golems* they will drop a lot amount of money. And the highest you can get to these guys at the same time is 4. I need to say more monsters you will encounter will get to attack you 2 times and not only just one. So it w the next place to head is the *Seaview Church* to get their the easiest thing to do is zoom to princess minis castle again and go to this destination.
This will be the end of part 2 of this walkthrough. I hope this does help and I will put up the other parts up when I can or really soon.  |
 Eniitan is Offline
| ID: 1292878 | 7271 Words
 Eniitan is Offline





 Number 1 Sailor Moon, Final Fantasy And Freedom Planet Fan On Vizzed!
  TheFadedWarrior is Offline
| ID: 1293136 | 126 Words
 TheFadedWarrior is Offline


 Eniitan is Offline
| ID: 1293178 | 88 Words
 Eniitan is Offline


 Number 1 Sailor Moon, Final Fantasy And Freedom Planet Fan On Vizzed!




 Eniitan is Offline
| ID: 1293533 | 31 Words
 Eniitan is Offline


 Number 1 Sailor Moon, Final Fantasy And Freedom Planet Fan On Vizzed!

 User Notice


