

 User Notice
 Forum Links


Thread Information
Views
1,041
Replies
1
Rating
0
Status
OPEN
Thread
Creator
Creator
supernerd117
04-13-15 02:23 PM
04-13-15 02:23 PM
Last
Post
Post
gamerforlifefor..
04-14-15 02:09 AM
04-14-15 02:09 AM
System
9.4
Views: 647
Today: 0
Users: 0 unique
Today: 0
Users: 0 unique
Thread Actions


Order
Kid Icarus Uprising Walkthrough - Part One!
Game's Ratings
Overall
Graphics
Sound
Addictiveness
Depth
Story
Difficulty
Average User Score
9.4
9.3
9
9.8
10
8.8
5.8
04-13-15 02:23 PM
supernerd117 is Offline
| ID: 1157720 | 1010 Words
| ID: 1157720 | 1010 Words
supernerd117
Level: 144


POSTS: 4285/6187
POST EXP: 404633
LVL EXP: 36484375
CP: 17963.7
VIZ: 14971

POSTS: 4285/6187
POST EXP: 404633
LVL EXP: 36484375
CP: 17963.7
VIZ: 14971
Likes: 0 Dislikes: 0
Welcome to this series, the first of nine! I’ll be walking you through all of Kid Icarus: Uprising’s nine levels, beginning with the first level. Part 1 will cover Level 1’s introductory Air Battle and Land Battle and provide a separate section for the boss. Each part after it will do the same, with the exception of only a few levels.
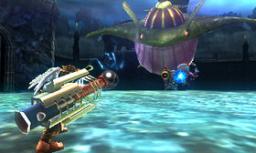
Let’s begin! ______________________________________________________________________________ Chapter 1: The Return of Palutena Recommended weapon class: Any. ______________________________________________________________________________ Air Battle: After Palutena’s intro, you start off in a battle against Medusa’s minions with the first weapon you receive, the “First Blade”. Dodge fire from monoeyes and wave anglers while taking them out, and soon after the beginning of the level Medusa shows up. No enemies will appear for a brief period of time. You can use this brief time to prepare for the enemies to come. Shortly afterwards, Pit will dive down towards the ground. Five monoeyes appear in a circle. Dodge using circular movements while firing on them. As Pit reaches ground level, new enemies will appear. The Octos shoots purple rings that can be dodged either to the side or in the middle, and the Keron jumps around (sometimes in front of Pit) before disappearing. Take as many out as you can to gain hearts. You’ll need these later on to increase difficulty for better items and unlocking intensity gates (more on that later). Shortly after this assault, Pit will turn around, being assaulted by monoeyes again, and a treasurefish (shoot this to gain a “Happy Trigger” or “Power-Up Drop”). The Happy Trigger causes the reticle to “charge” at a faster rate, and the Power-Up Drop causes Pit not to take any damage for a while. Pit turns around again, this time receiving Recovery Orbs. These will restore a bit of health to Pit, and is the only way to recover during Air Battles. More monoeyes and Kerons appear and attack Pit, followed by Gyrazers. Shortly afterwards, Pit speeds toward the town, circling overhead. More monoeyes, the wave guy and the frog guy appear. Take them out. Shortly afterwards, Pit dives into That First Town for a Land Battle. ______________________________________________________________________________ Land Battle: Palutena will walk you through the basic Land Battle controls to start with. In an alley nearby, there are three food items that give health. Grab them, if necessary, and if you aren’t confident with your skills, consider leaving one or two of the food items to regain health later, if necessary. The food does not disappear until eaten. Proceed down the alley until you reach a wide open space. Shemums (small blue snakes) will attack you. If they hit you, you’ll be poisoned momentarily. This does damage to Pit over a short amount of time, but will not prevent him from attacking or moving normally. Distanced shots are best, with melee attacks necessary only if they get too close. Keep proceeding forward to encounter some monoeyes and a Nettler (a deflatable beast that rarely attacks.) Keep your distance from the monoeyes. If the Nettler is deflated, you can’t hit him with melee attacks (but it also won’t attack you), so attack it with fire from your blade. Moving forward, you’ll be at an area with a fountain. Enemies will appear, so take them out. To the left is a treasure chest with health-restoring item and hearts. To the right is an intensity gate. Return to this level at 5.0 or higher intensity (difficulty) to pass through the gate and receive a treasure. (You will first have to defeat some enemies, including a large tank called a crawler. Dodge around it to attack its weak spot, a red button at the back. Be careful, because it can spin around and hurt you at close range.) At the top right is a Shemum urn. Melee it to defeat it and prevent it from sending out more Shemums. Continue moving forward to reach two sets of steps. Proceed up one or the other (it doesn’t matter, or move between them and defeat a wave angler to receive a warp pad with a treasure chest at the top with an item inside (a weapon or power). Keep proceeding up the large steps. Near the top is a Ganewmede. Meleeing it is the best option, since it sends spike balls at you if you try to attack it from a distance. But there are also other enemies. There are Gyrazers, a Keron, and a Skuttler. Defeat them or move past them. At the top is a “drink of the gods” (recovers all health) and an entrance to the Colosseum containing the boss, Twinbellows. ______________________________________________________________________________ Boss: Twinbellows Stay to the left or right of Twinbellows at all times. Run/dash often. It is recommended that you adjust the reticle settings to be more sensitive to your movements so that you can keep him in the middle of your sights at all times. Twinbellows can shoot fireballs out of one mouth (not hard to dodge), breathe fire out of both mouths (you can avoid it all together by staying to the side, but if you fail, you can dodge in the middle of it.), and attack with his body and claws. The claw attack will require you to dodge left or right, depending on which claw he uses to attack. Keeping him in the middle of your sights will likely make this not too hard to avoid. The other attack is a bit trickier, and is often done several times in a row. If you dodge the first one, watch out for the second/third, etc. This can do a lot of damage if you aren’t careful. If you keep trying to stay to the side of Twinbellows, you should take him down with few problems. ______________________________________________________________________________ NOTA BENE: I highly suggest you replay this level on higher intensities (5.0 or so) to get the treasure behind the intensity gate and better weapons. Chapter 2 is significantly more difficult. Well, that wraps up part one of my KI: Uprising Walkthrough! Hope to see you for part two! Let’s begin! ______________________________________________________________________________ Chapter 1: The Return of Palutena Recommended weapon class: Any. ______________________________________________________________________________ Air Battle: After Palutena’s intro, you start off in a battle against Medusa’s minions with the first weapon you receive, the “First Blade”. Dodge fire from monoeyes and wave anglers while taking them out, and soon after the beginning of the level Medusa shows up. No enemies will appear for a brief period of time. You can use this brief time to prepare for the enemies to come. Shortly afterwards, Pit will dive down towards the ground. Five monoeyes appear in a circle. Dodge using circular movements while firing on them. As Pit reaches ground level, new enemies will appear. The Octos shoots purple rings that can be dodged either to the side or in the middle, and the Keron jumps around (sometimes in front of Pit) before disappearing. Take as many out as you can to gain hearts. You’ll need these later on to increase difficulty for better items and unlocking intensity gates (more on that later). Shortly after this assault, Pit will turn around, being assaulted by monoeyes again, and a treasurefish (shoot this to gain a “Happy Trigger” or “Power-Up Drop”). The Happy Trigger causes the reticle to “charge” at a faster rate, and the Power-Up Drop causes Pit not to take any damage for a while. Pit turns around again, this time receiving Recovery Orbs. These will restore a bit of health to Pit, and is the only way to recover during Air Battles. More monoeyes and Kerons appear and attack Pit, followed by Gyrazers. Shortly afterwards, Pit speeds toward the town, circling overhead. More monoeyes, the wave guy and the frog guy appear. Take them out. Shortly afterwards, Pit dives into That First Town for a Land Battle. ______________________________________________________________________________ Land Battle: Palutena will walk you through the basic Land Battle controls to start with. In an alley nearby, there are three food items that give health. Grab them, if necessary, and if you aren’t confident with your skills, consider leaving one or two of the food items to regain health later, if necessary. The food does not disappear until eaten. Proceed down the alley until you reach a wide open space. Shemums (small blue snakes) will attack you. If they hit you, you’ll be poisoned momentarily. This does damage to Pit over a short amount of time, but will not prevent him from attacking or moving normally. Distanced shots are best, with melee attacks necessary only if they get too close. Keep proceeding forward to encounter some monoeyes and a Nettler (a deflatable beast that rarely attacks.) Keep your distance from the monoeyes. If the Nettler is deflated, you can’t hit him with melee attacks (but it also won’t attack you), so attack it with fire from your blade. Moving forward, you’ll be at an area with a fountain. Enemies will appear, so take them out. To the left is a treasure chest with health-restoring item and hearts. To the right is an intensity gate. Return to this level at 5.0 or higher intensity (difficulty) to pass through the gate and receive a treasure. (You will first have to defeat some enemies, including a large tank called a crawler. Dodge around it to attack its weak spot, a red button at the back. Be careful, because it can spin around and hurt you at close range.) At the top right is a Shemum urn. Melee it to defeat it and prevent it from sending out more Shemums. Continue moving forward to reach two sets of steps. Proceed up one or the other (it doesn’t matter, or move between them and defeat a wave angler to receive a warp pad with a treasure chest at the top with an item inside (a weapon or power). Keep proceeding up the large steps. Near the top is a Ganewmede. Meleeing it is the best option, since it sends spike balls at you if you try to attack it from a distance. But there are also other enemies. There are Gyrazers, a Keron, and a Skuttler. Defeat them or move past them. At the top is a “drink of the gods” (recovers all health) and an entrance to the Colosseum containing the boss, Twinbellows. ______________________________________________________________________________ Boss: Twinbellows Stay to the left or right of Twinbellows at all times. Run/dash often. It is recommended that you adjust the reticle settings to be more sensitive to your movements so that you can keep him in the middle of your sights at all times. Twinbellows can shoot fireballs out of one mouth (not hard to dodge), breathe fire out of both mouths (you can avoid it all together by staying to the side, but if you fail, you can dodge in the middle of it.), and attack with his body and claws. The claw attack will require you to dodge left or right, depending on which claw he uses to attack. Keeping him in the middle of your sights will likely make this not too hard to avoid. The other attack is a bit trickier, and is often done several times in a row. If you dodge the first one, watch out for the second/third, etc. This can do a lot of damage if you aren’t careful. If you keep trying to stay to the side of Twinbellows, you should take him down with few problems. ______________________________________________________________________________ NOTA BENE: I highly suggest you replay this level on higher intensities (5.0 or so) to get the treasure behind the intensity gate and better weapons. Chapter 2 is significantly more difficult. Well, that wraps up part one of my KI: Uprising Walkthrough! Hope to see you for part two! |
Vizzed Elite
Affected by 'Laziness Syndrome'
Registered: 03-21-10
Location: Location
Last Post: 2080 days
Last Active: 558 days
| WOOOOOOOO |
Affected by 'Laziness Syndrome'
Registered: 03-21-10
Location: Location
Last Post: 2080 days
Last Active: 558 days
04-14-15 02:09 AM
gamerforlifeforever is Offline
| ID: 1158054 | 48 Words
| ID: 1158054 | 48 Words
gamerforlifeforever2
Level: 178

POSTS: 1095/10714
POST EXP: 585495
LVL EXP: 76709591
CP: 104613.0
VIZ: 3581415

POSTS: 1095/10714
POST EXP: 585495
LVL EXP: 76709591
CP: 104613.0
VIZ: 3581415
Likes: 0 Dislikes: 0
Nice work with this part of your Kid Icarus: Uprising walkthrough. Anyone who's having a hard time beating this level on higher difficulty levels will benefit from reading this walkthrough and it'll probably make it easier for them to beat this chapter on a higher intensity. Good job! |
Site Staff
Console Manager, Video Game Music Manager
Affected by 'Laziness Syndrome'
Registered: 07-04-12
Location: Somewhere in Ohio
Last Post: 12 days
Last Active: 3 days
Console Manager, Video Game Music Manager
| Ultimate Pokemon Fanboy, Member of the Year 2016, and Vizzed's #1 My Hero Academia fan |
Affected by 'Laziness Syndrome'
Registered: 07-04-12
Location: Somewhere in Ohio
Last Post: 12 days
Last Active: 3 days
