

 User Notice
 Forum Links


Thread Information
Views
940
Replies
1
Rating
1
Status
OPEN
Thread
Creator
Creator
Lexatom
04-07-15 12:12 AM
04-07-15 12:12 AM
Last
Post
Post
gamerforlifefor..
04-11-15 09:53 PM
04-11-15 09:53 PM
System
9.5
Views: 601
Today: 0
Users: 0 unique
Today: 0
Users: 0 unique
Thread Actions


Order
ALBW - Chapter 3.1 Guide
Game's Ratings
Overall
Graphics
Sound
Addictiveness
Depth
Story
Difficulty
Average User Score
9.5
9
9.2
8.3
8.7
7.7
5.5
04-07-15 12:12 AM
 Lexatom is Offline
| ID: 1155163 | 1979 Words
Lexatom is Offline
| ID: 1155163 | 1979 Words
 Lexatom is Offline
| ID: 1155163 | 1979 Words
Lexatom
LunarDarkness2
LunarDarkness2
Level: 129


POSTS: 1189/5106
POST EXP: 331704
LVL EXP: 24425807
CP: 27183.1
VIZ: 726909

POSTS: 1189/5106
POST EXP: 331704
LVL EXP: 24425807
CP: 27183.1
VIZ: 726909
Likes: 0 Dislikes: 0
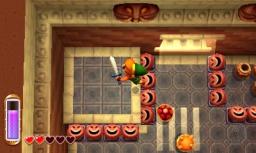
Chapter 3 Now that we’re finished with the House of Gales, we need to go to the Tower of Hera next. But, before we do that, we need to get a certain item to scale up the mountain. Use your bell, and fly to the weathervane at the Sanctuary. After, go left 1 screen, and up 2 screens. You will soon see a house. Go inside to meet Rosso. Talk to him, and he’ll give you the Power Glove. With the Power Glove with you, you can now lift and throw rocks and other objects! Once you got the Power Glove from Rosso, go back down a screen, and head east for a few seconds. Eventually, you’ll see a cave blocked by small rocks. Pick up the rocks and throw them out of the way to enter the cave. Inside the cave, there is one main path with Mini-Moldorms in it. Defeat the Mini-Moldorms and keep following the path to exit the cave. Once you exited the cave, you’ll find yourself on Death Mountain. There are a ton of rocks in this area, as well as some big meteors filled with rupees. Alongside with those, this area introduces you to a new enemy called a Deadrock. If you hit one, they will turn into stone. Be careful around them, as they move quickly. Once they are stone, run past them to avoid taking damage. Just don’t stay near for too long, because they will turn back to normal if you do. After going through the gigantic maze of rocks, you will see a bridge. Cross the bridge and climb the ladder you see. You will see another entrance to a cave, along with a Weather Vane. Make sure to save here, so you can fly to it just in case. Once you enter the cave, you will see a bunch of boulders rolling around pathways. Cross the pathways avoiding the rolling boulders as you go, and you’ll see some stairs leading to another pathway. Another way to avoid the boulders is to turn into a painting and let them pass by. Once you reach the top pathway, go left, and exit the cave. Once you are back outside, there will be a chest directly beside you. Open it to get 20 rupees. Once that’s done, jump off the ledge and head west for a few seconds to find another cave. Enter the cave and work your way to the exit. Back outside, you’ll see another cave to your left. Go inside that cave. Once inside, you’ll realize that this one is identical to the first cave you went in with the Weather Vane beside it. Use the same technique as the first cave. In the northeast corner of this cave, there is a chest containing monster guts. After obtaining them, head the other direction (northwest corner of the cave) and exit the cave. Once you have exited the cave, you will see another cave near below you. Turn into a painting and move directly above the cave (the one furthest down). Once above it, turn back to normal and enter that cave. Keep walking north, and you’ll eventually find another Heart Piece! Above the Heart Piece is another cave. Go inside to find a Fairy Fountain. If you have a bottle and a net with you, you can catch a fairy! Swing your net at an angle so that it catches a fairy. If you have a bottle, it will be yours! Fairys can revive you if you faint, so they can be very useful. Once that’s done, go back south until you reach the ledge that you landed on to enter the cave you just went in. Jump off the ledge this time, and head east. Soon enough, you will find the Tower of Hera. Near the entrance is two pillars that have a hammer symbol on it. You know what this means. But, before you go to your house, make sure to save at the Weather Vane next to the Tower of Hera before you go. After you saved, go to your house and rent the hammer from Ravio. After you’ve done that, fly back to the Tower of Hera, and get ready to start your 3rd (Or 2nd) dungeon! Immediately after entering, you’ll see a row of switches with faces on them blocking your path. (We’ll call them face switches from now on.) Hit them with your hammer and walk across them before they pop back up. You’ll see a crystal switch in front of you. Hit it, and you’ll realize that these switches control the red and blue pillars. Once you made the pillars go down from the crystal switch, walk either left or right above them, and do the same to the next crystal switch. After hitting it, you will be introduced to a new enemy called a Terrorpin. To defeat it, simply use an item (more specifically, the hammer) near or on it to make it fly away and land on its back, making it vulnerable for attacks. After you defeat them, hit the face switches at the top-left part of the room with your hammer, and stand on them. Soon, they will pop back up and spring you into the air. Once on the higher platform, turn into a painting and walk to the right and outside the window to get outside. Once outside, turn back to normal and open the chest you see. It will give you a whopping 50 rupees. Turn back into a painting and walk back inside, and land on the higher platform you were on before. Turn into a painting again, but walk left this time. When you see another platform to land on, turn back to normal. Walk the path the platform takes you, until you see blades spinning and moving. Turn into a painting, and walk the same direction you were headed, to avoid the blades. Keep walking the path the high platform takes you, and eventually you’ll see another set of face switches. Hit them with your hammer and stand on them like last time, and they will pop out and allow you to get to the next platform. Once you are on the highest platform, you’ll see a giant face switch on the ground. Hit it with your hammer and stand on it. It will soon pop out and advance you to the 2nd floor. On the 2nd floor, you’ll be introduced to another new enemy, called a Hardhat Beetle. To kill them, just simply attack them with your sword, or use an item. Take note, however, that if you hit them with your sword, they can bounce you back a few steps. Also keep your eye on the giant bumpers on that same floor, as they can also bump you back so far, it will knock you back down to the 1st floor. Fall down the hole you see in the middle, and open the chest that is down there. You will receive the Compass for this dungeon. To get back up, use your hammer on the giant face switch, and stand on it until it pops out. After that’s done, go to the very left side of the 2nd floor, and you’ll see another giant face switch. Do the same thing you always do to get to the 3rd floor. At the 3rd floor, go against the standing pillars, and turn into a painting. Walk across them to get to the other side. Hit the crystal switch you see to lower the pillars. Just be cautious of the Mini-Moldorms, they are all over this area. After the blue pillars go down, walk across them and hit the next crystal switch you see to make the red pillars go down. Stand on the lowered red pillars, and hit the blue switch that is right beside them, to raise yourself up. Walk carefully to the platform that is now accesbile in the center of the room, and pick up the small key there. Jump off the center platform, and walk to the very right side of the room. Climb up the stairs and unlock the door you see to advance outside. As soon as you walk outside, you will see a moving platform. Stand on it and let it take you around the castle for a bit. Be careful of the various Crows that will fly at you. Once you see the platform about to go under a dead end, get ready to turn into a painting. Once you’re next to the dead end, turn into a painting, and quickly turn back to normal so you land back on the platform. Stay on the moving platform until you see a platform sticking out from the wall that has a few hearts on it. If you need to, collect the hearts, then turn into a painting onto the wall, walk to the right and wait until the moving block you saw a bit earlier moves down. Once it does, walk onto it, and stay a painting until it raises you up to the next platform. (You can also do this when the moving platform passes by a wall, allowing you to turn into a painting and walking onto the moving block that’s on the right.) Once you get to the 4th floor, go inside the opened door. You will be in a room with 2 Stalfos, and 3 Mini-Moldorms inside the raised pillars. Walk to the top-right corner of the room, and hit the crystal switch to lower the pillars. Beware of the Mini-Moldorms that will scurry everywhere as you hit the switch. Once the blue pillars are lowered, go to the giant face switch. Use your hammer on it, and stand on it until it pops out, bringing you to the 5th floor. Hit the next crystal switch that you see, so that it lowers the red pillars. Stand on the red pillars, and hit the switch next to them, so that you can get to the chest nearby. Open the chest to get 5 rupees. Go back and stand on the lowered blue pillars, and hit the crystal switch next to them so that you will be raised back up. Once raised, walk carefully to a wall, and turn into a painting. Once a painting, walk across the wall and exit out the window to get back outside. Once you get back outside, you will see another moving platform. Quickly get on it and wait for a bit. While it’s taking you around the tower, you will occasionally see blades moving and spinning. Try to dodge them. After you have dodged 2 blades, a wall will start to emerge from the tower, trying to knock you off the moving platform. Turn into a painting before it knocks you off, then quickly walk to the other side of the wall, and get back on the moving platform. Soon after, more blades will appear. Dodge these the same way you did with the last ones. The moving platform will soon come to a dead end. Turn into a painting once you are against the dead end, and wait for the block that’s moving up and down to come next to you. Once it’s beside you, walk onto it, and wait for it to raise you up. Once it’s raised, turn back to normal to land on a safe platform. There are some optional rupees you can get if you turn into a painting and walk across the tower, but only a few. Once you get onto the 6th floor, go inside the door you see. Once inside the room, the doors will close behind you, and a bunch of Stalfos will appear. Defeat them all, and the green portal to the beginning of the dungeon will appear, marking the halfway point of this dungeon. Chapter 3 Now that we’re finished with the House of Gales, we need to go to the Tower of Hera next. But, before we do that, we need to get a certain item to scale up the mountain. Use your bell, and fly to the weathervane at the Sanctuary. After, go left 1 screen, and up 2 screens. You will soon see a house. Go inside to meet Rosso. Talk to him, and he’ll give you the Power Glove. With the Power Glove with you, you can now lift and throw rocks and other objects! Once you got the Power Glove from Rosso, go back down a screen, and head east for a few seconds. Eventually, you’ll see a cave blocked by small rocks. Pick up the rocks and throw them out of the way to enter the cave. Inside the cave, there is one main path with Mini-Moldorms in it. Defeat the Mini-Moldorms and keep following the path to exit the cave. Once you exited the cave, you’ll find yourself on Death Mountain. There are a ton of rocks in this area, as well as some big meteors filled with rupees. Alongside with those, this area introduces you to a new enemy called a Deadrock. If you hit one, they will turn into stone. Be careful around them, as they move quickly. Once they are stone, run past them to avoid taking damage. Just don’t stay near for too long, because they will turn back to normal if you do. After going through the gigantic maze of rocks, you will see a bridge. Cross the bridge and climb the ladder you see. You will see another entrance to a cave, along with a Weather Vane. Make sure to save here, so you can fly to it just in case. Once you enter the cave, you will see a bunch of boulders rolling around pathways. Cross the pathways avoiding the rolling boulders as you go, and you’ll see some stairs leading to another pathway. Another way to avoid the boulders is to turn into a painting and let them pass by. Once you reach the top pathway, go left, and exit the cave. Once you are back outside, there will be a chest directly beside you. Open it to get 20 rupees. Once that’s done, jump off the ledge and head west for a few seconds to find another cave. Enter the cave and work your way to the exit. Back outside, you’ll see another cave to your left. Go inside that cave. Once inside, you’ll realize that this one is identical to the first cave you went in with the Weather Vane beside it. Use the same technique as the first cave. In the northeast corner of this cave, there is a chest containing monster guts. After obtaining them, head the other direction (northwest corner of the cave) and exit the cave. Once you have exited the cave, you will see another cave near below you. Turn into a painting and move directly above the cave (the one furthest down). Once above it, turn back to normal and enter that cave. Keep walking north, and you’ll eventually find another Heart Piece! Above the Heart Piece is another cave. Go inside to find a Fairy Fountain. If you have a bottle and a net with you, you can catch a fairy! Swing your net at an angle so that it catches a fairy. If you have a bottle, it will be yours! Fairys can revive you if you faint, so they can be very useful. Once that’s done, go back south until you reach the ledge that you landed on to enter the cave you just went in. Jump off the ledge this time, and head east. Soon enough, you will find the Tower of Hera. Near the entrance is two pillars that have a hammer symbol on it. You know what this means. But, before you go to your house, make sure to save at the Weather Vane next to the Tower of Hera before you go. After you saved, go to your house and rent the hammer from Ravio. After you’ve done that, fly back to the Tower of Hera, and get ready to start your 3rd (Or 2nd) dungeon! Immediately after entering, you’ll see a row of switches with faces on them blocking your path. (We’ll call them face switches from now on.) Hit them with your hammer and walk across them before they pop back up. You’ll see a crystal switch in front of you. Hit it, and you’ll realize that these switches control the red and blue pillars. Once you made the pillars go down from the crystal switch, walk either left or right above them, and do the same to the next crystal switch. After hitting it, you will be introduced to a new enemy called a Terrorpin. To defeat it, simply use an item (more specifically, the hammer) near or on it to make it fly away and land on its back, making it vulnerable for attacks. After you defeat them, hit the face switches at the top-left part of the room with your hammer, and stand on them. Soon, they will pop back up and spring you into the air. Once on the higher platform, turn into a painting and walk to the right and outside the window to get outside. Once outside, turn back to normal and open the chest you see. It will give you a whopping 50 rupees. Turn back into a painting and walk back inside, and land on the higher platform you were on before. Turn into a painting again, but walk left this time. When you see another platform to land on, turn back to normal. Walk the path the platform takes you, until you see blades spinning and moving. Turn into a painting, and walk the same direction you were headed, to avoid the blades. Keep walking the path the high platform takes you, and eventually you’ll see another set of face switches. Hit them with your hammer and stand on them like last time, and they will pop out and allow you to get to the next platform. Once you are on the highest platform, you’ll see a giant face switch on the ground. Hit it with your hammer and stand on it. It will soon pop out and advance you to the 2nd floor. On the 2nd floor, you’ll be introduced to another new enemy, called a Hardhat Beetle. To kill them, just simply attack them with your sword, or use an item. Take note, however, that if you hit them with your sword, they can bounce you back a few steps. Also keep your eye on the giant bumpers on that same floor, as they can also bump you back so far, it will knock you back down to the 1st floor. Fall down the hole you see in the middle, and open the chest that is down there. You will receive the Compass for this dungeon. To get back up, use your hammer on the giant face switch, and stand on it until it pops out. After that’s done, go to the very left side of the 2nd floor, and you’ll see another giant face switch. Do the same thing you always do to get to the 3rd floor. At the 3rd floor, go against the standing pillars, and turn into a painting. Walk across them to get to the other side. Hit the crystal switch you see to lower the pillars. Just be cautious of the Mini-Moldorms, they are all over this area. After the blue pillars go down, walk across them and hit the next crystal switch you see to make the red pillars go down. Stand on the lowered red pillars, and hit the blue switch that is right beside them, to raise yourself up. Walk carefully to the platform that is now accesbile in the center of the room, and pick up the small key there. Jump off the center platform, and walk to the very right side of the room. Climb up the stairs and unlock the door you see to advance outside. As soon as you walk outside, you will see a moving platform. Stand on it and let it take you around the castle for a bit. Be careful of the various Crows that will fly at you. Once you see the platform about to go under a dead end, get ready to turn into a painting. Once you’re next to the dead end, turn into a painting, and quickly turn back to normal so you land back on the platform. Stay on the moving platform until you see a platform sticking out from the wall that has a few hearts on it. If you need to, collect the hearts, then turn into a painting onto the wall, walk to the right and wait until the moving block you saw a bit earlier moves down. Once it does, walk onto it, and stay a painting until it raises you up to the next platform. (You can also do this when the moving platform passes by a wall, allowing you to turn into a painting and walking onto the moving block that’s on the right.) Once you get to the 4th floor, go inside the opened door. You will be in a room with 2 Stalfos, and 3 Mini-Moldorms inside the raised pillars. Walk to the top-right corner of the room, and hit the crystal switch to lower the pillars. Beware of the Mini-Moldorms that will scurry everywhere as you hit the switch. Once the blue pillars are lowered, go to the giant face switch. Use your hammer on it, and stand on it until it pops out, bringing you to the 5th floor. Hit the next crystal switch that you see, so that it lowers the red pillars. Stand on the red pillars, and hit the switch next to them, so that you can get to the chest nearby. Open the chest to get 5 rupees. Go back and stand on the lowered blue pillars, and hit the crystal switch next to them so that you will be raised back up. Once raised, walk carefully to a wall, and turn into a painting. Once a painting, walk across the wall and exit out the window to get back outside. Once you get back outside, you will see another moving platform. Quickly get on it and wait for a bit. While it’s taking you around the tower, you will occasionally see blades moving and spinning. Try to dodge them. After you have dodged 2 blades, a wall will start to emerge from the tower, trying to knock you off the moving platform. Turn into a painting before it knocks you off, then quickly walk to the other side of the wall, and get back on the moving platform. Soon after, more blades will appear. Dodge these the same way you did with the last ones. The moving platform will soon come to a dead end. Turn into a painting once you are against the dead end, and wait for the block that’s moving up and down to come next to you. Once it’s beside you, walk onto it, and wait for it to raise you up. Once it’s raised, turn back to normal to land on a safe platform. There are some optional rupees you can get if you turn into a painting and walk across the tower, but only a few. Once you get onto the 6th floor, go inside the door you see. Once inside the room, the doors will close behind you, and a bunch of Stalfos will appear. Defeat them all, and the green portal to the beginning of the dungeon will appear, marking the halfway point of this dungeon. |
Vizzed Elite
Affected by 'Laziness Syndrome'
Registered: 07-30-13
Location: Denver, CO
Last Post: 1111 days
Last Active: 262 days
| The Dragon of Rock Bottom |
Affected by 'Laziness Syndrome'
Registered: 07-30-13
Location: Denver, CO
Last Post: 1111 days
Last Active: 262 days
04-11-15 09:53 PM
gamerforlifeforever is Offline
| ID: 1157051 | 47 Words
| ID: 1157051 | 47 Words
gamerforlifeforever2
Level: 179

POSTS: 1050/10715
POST EXP: 585502
LVL EXP: 77423395
CP: 104688.2
VIZ: 3585305

POSTS: 1050/10715
POST EXP: 585502
LVL EXP: 77423395
CP: 104688.2
VIZ: 3585305
Likes: 1 Dislikes: 0
Like the previous parts of the game guide, this part is very well done as well. All people who are stuck have to do is look at your game guide and they'll be just fine. I'm glad that you're making these game guides so well. Great job! |
Vizzed Elite
Affected by 'Laziness Syndrome'
Registered: 07-04-12
Location: Somewhere in Ohio
Last Post: 87 days
Last Active: 83 days
| Ultimate Pokemon Fanboy, Member of the Year 2016, and Vizzed's #1 My Hero Academia fan |
Affected by 'Laziness Syndrome'
Registered: 07-04-12
Location: Somewhere in Ohio
Last Post: 87 days
Last Active: 83 days
Post Rating: 1 Liked By: Lexatom,
