

 User Notice
 Forum Links


Thread Information
Thread Actions


Walkthrough Neutopia
07-29-14 09:53 AM
Laian is Offline
| ID: 1059797 | 6713 Words

POSTS: 1736/2232
POST EXP: 457173
LVL EXP: 7518040
CP: 23733.5
VIZ: 3570463

Hello everyone, it's your host Laian with a brand new walkthrough. Ok so, I wanted to play «Medievil 2» and make the game guide of this game but I changed my mind and kept that game for next month actually. Instead, I'm going to introduce a new system in this long list of walkthroughs I made: the legendary Turbo Graphx. I've never had the chance to own that system and play any game so I guess it's time to fix that. And I'm going to play Neutopia for you, folks. So, let's go on a new adventure, shall we? Ready for the time travel and the epic quest of loot and creatures? I don't know if a princess awaits us at the end of the line but we shall see that in due time. Let's just jump into it, folks!
CHAPTER 1: TO THE FIRST DUNGEON Well, apparently, the evil guy already kidnapped the beautiful girl and the precious treasures we need to retrieve in order to save the world from corruption and darkness. Bad timing as always... Well, it wouldn't be funny if we go in a temple, ask for the medallions, do the ritual and woohoo end of the game, we saved the world. So yeah, your mission is to find the eight medallions and the princess abducted by Dirth, the bad guy you saw during the cutscene. That woman is important: she gives you the magic compass but she also can heal you if you lost some health. Now, if you go south then go back north and talk to her once more, she will tell you that a man has the book of revival, useful to get the passwords. That's our first destination before heading to the first dungeon. Leave the temple, go south, kill the slimes here and go downstairs. You'll get the book of revival inside the chest next to the old man. That man gave you a lead: you must go west to find the first dungeon. Leave the basement, go to the left, enter the cave and grab the boom bombs and the medicine of vitality in the chests. This part of the map has lot of underground caves in which you will find a NPC who will tell you some tips (that goes for the other spheres). Cross the bridge if you want to carry on the quest. There's a person who sells some medicines of vitality in the southern cave for 200 gold pieces each dose. Go north, kill the enemies on your way to the mountain, where the first dungeon awaits you with open arms. Oh, see the shape of the statue on the wall, next to the stairs? It's a secret room, there's lot of these rooms in the world map and in the dungeons so I suggest you to spot them and use a bomb. Ok, these ones have just NPCs but they might contain interesting stuff later in the game. Climb up the mountain, kill the scorpions to make some secret stairs appear, go down to meet a woman who can heal your wounds, leave the room, go to the right, kill the snake man and enter the first dungeon of the game (1).
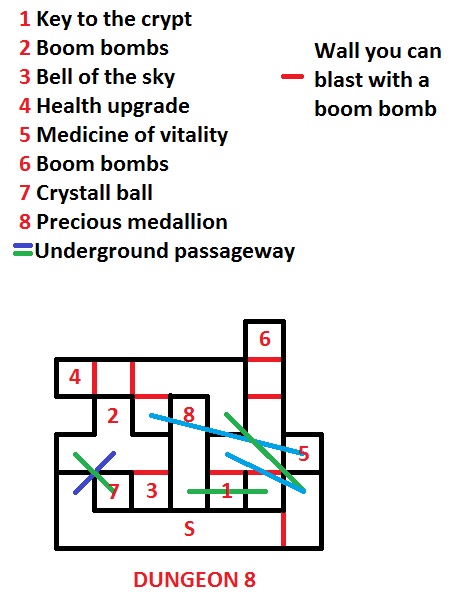
CHAPTER 2: THE FIRST DUNGEON Hail to the original title, yeah. Anyway, kill the bat in the room to the right, then the next enemies in the next room, go east, kill the bats to unlock the sealed door to the right, carry on and kill the enemies in the next room. Move the block to unlock the door, open the chest to get the key to the crypt, go back to the room with the fireballs spitter, go west, kill the bats, go north and kill the enemies in this room. Don't forget the crystal ball in the chest and keep in mind that this item shows you the map of the dungeon, but it doesn't show all the rooms. There are secrets room to be found here and there with the boom bombs so try to blast some of the walls. Most of the secret rooms are shortcuts. I made the map dungeons just in case you are curious and want to find all the secrets rooms that the crystal ball can't reveal (refer to the bonus chapter). The walls to blast with the boom bombs are obviously shown on the map. And as you can tell, there's also the important loot in the specific rooms. Yes, that's me, I'm nice. Anyway, let's carry on, shall we?
From the room with the crystal ball, blast the eastern wall with a boom bomb if you have one, go through the passageway, go north, kill the enemies, go west, kill the next enemies and get the bronze armor in the chest surrounded by rocks. Go back to the last room, go north to meet an old man, blast the wall to the west to find a secret room with two enemies and a chest containing some boom bombs and go back to the last room. Blast the wall to the right, like the old man said earlier, kill the enemies then carry on, kill the skeletons and open the door with the key. Time to face the boss of this dungeon. This blue dragon is not that hard. You just have to avoid the four fireballs he throws at you and hit him a few times. Thirty-two hits with your sword should kill him. After this battle, go north and grab the prized medallion. You'll be teleported back to the temple, your max HP will be increased by 1 and you will be fully healed.
CHAPTER 2: THE FIRE WAND Before exploring the second dungeon of the game, we must grab some stuff. Note that you can do these things before entering the first dungeon but some of them requires the boom bombs to get them. Although, you really need one specific item before going to the second dungeon. Hint: it's the title of that chapter. It can't be more clear I suppose, you need magic powers, you must be the pyromancer and its fire wand. Ok, let's start that mini-quest for the fire wand, shall we? From the temple, go east, then north and finally east to reach a dead end with some enemies. A dead end, yeah... why would we check a dead end, Laian? Because there's some cash here! A good amount of gold actually. You don't trust me, right? Well, kill the enemies, go downstairs and talk to the little boy to get 100 gold. Leave the cave, go south, keep going east then north, kill the slime before the bridge and move the rock located to the bottom right hand corner to make some stairs appear. Go down, talk to the elder and get the fire wand in the chest next to him. That magical wand has multiple uses. You can attack enemies with that and the power of your shots depends of the health you have, which means the more health you have, the more powerful the shot will be. You can also burn some stuff, such as trees. Maybe you'll find secret spots if you are curious and take the time to turn the trees into ashes. There's one more thing to pick up before heading to the next objective and it's something nice and useful. Leave the cave, go west then keep going north. Go to the left, take the second path to the north, then go up the stairs. You are back in the mountains, well the other part of the mountains. Go up, then go west, kill the sandmen, blast the wall with a boom bomb, go in and talk to the man to get another health upgrade. Well then, I guess you are ready for the next dungeon. Leave the cave, go back to the stairs, go east, then south, go east once more and finally north. Right before you is the entrance of the next dungeon. Go in, the second medallion awaits you.
CHAPTER 3: THE SECOND DUNGEON Kill the bats in the next room, then go north and kill the slimes. That didn't unlock the sealed door to the north, hmm. Maybe you should push the block to the right. Hey, it worked! Go to the next room, talk to another elder trapped and go east. Kill the creatures, push the block and move on to the next room. Kill the giant bats to unlock the door, go to the next room and use a boom bomb to blast the northern wall. Get rid of the werewolves, open the chest and take the key to the crypt. Now, head back to the elder and go west. Kill the enemies, go south, kill more enemies and open the chest to get the bronze sword. Go back to the last room, go west, kill the skeletons, push the block to unlock the doors and go north. Slay the creatures, open the chest and pick up the crystal ball. Go west, kill the giants bats, blast the wall to the north to find a secret room with some boom bombs and go south. More enemies to kill; carry on after this encounter. Kill the snakes, blast the western wall, kill the werewolves (beware of the trap) and open the door with the key. Time to face the guardian of the second medallion. That golem is not really hard to beat. His weak point is his heart but it only appears when his limbs go away. Always stand right before him and keep your distances. You won't be hit by his limbs. When the heart shows off and comes at you (yes, it's the red ball), hit it hard. Easy like ABC. Repeat this method until he dies, go to the next room and grab the prized medallion. You will be teleported back to the temple. The old woman will fully heal you and increase your HP max by 1 as always. You retrieved the two medallion of this sphere, you can proceed to the next one and look for the two medallions hidden in the next sphere. Buy some supplies if needed and go downstairs to enter the next sphere. CHAPTER 4: LET THERE BE LIGHT! Welcome to the second sphere of the game. Before going to the first dungeon of this place (or the third dungeon of the game), you need to find a source of light. It's required. If you keep going north, you'll reach the mountains and a cave in which a man will tell you to check the stalactites. Leave the cave, go west, kill the enemies and use the fire wand to burn the stalactite to the left. Some stairs appear. Go downstairs, open the chest and grab your permanent source of light: the jar of moonbeam moss (2). Ok, you now have what you need for the next dungeon but there's more to pick up. How about some gold? From the starting point of this area, go north twice then west. Kill the enemies and move the rock to the left. Go downstairs and get 150 gold. There's more, like I said earlier, it's not over, no no. Go back to the starting point, keep going west then go south. Burn the stalactite and go down to find a one-eyed man who will give you 300 gold. Go back to the surface, go south, use your source of light and kill the enemies. Move the rock to find some stairs and go down to get an upgrade for the boom bombs. You can now carry 12 boom bombs instead of 8, which is nice. Time to go to the first dungeon. Keep going north, go up the stairs, kill the creature and go in the dungeon.
CHAPTER 5: THE THIRD DUNGEON Go north, kill the enemies and blast the northern wall. Use your source of light, kill the creatures, then blast the northern wall and grab the bronze shield in the chest next to the elder. Go east, kill the enemies, then keep going south. Kill the evil mushrooms, push the block and grab the crystal ball in the chest. Go back to the last room, keep going west, then go north. Kill the spectres, blast the western wall, go in the secret room, kill the enemies and open the chest to pick up a medicine of vitality. Go back to the last room, go north until you encounter a sealed door. Killing the enemies won't open it, you must push one of the blocks. Beware of the traps. Use a boom bomb on the western wall, kill the ghosts and grab the boom bombs in the chest. Now, go through the door you unlocked earlier, notice the door to the boss' lair and go east. Kill the enemies, carry on, don't even bother to kill the enemimes in the next room, since they respawn (although, that can be useful if you need gold and boom bombs for example) and go north. More enemies to kill. In the next room, get rid of the enemies and push the second block to the left of the bottom row to open the door. Go get the key to the crypt in the chest and go back to the locked door. Use the key to open it and get ready for the boss fight. The twins gargoyles, honestly, gave me a bit of trouble to beat them. You have to pay attention to the daggers they throw at you and how they move. Use your sword to hit them. Once you got rid of one of the gargoyles, the fight should be easier. Take care of the last gargoyle and go get the third prized medallion in the next room. You know the score, right? HP max increased by 1, fully healed and you have to go to the next dungeon.
CHAPTER 6: RAINBOW DROP This chapter shouldn't be that long. There's one specific item to get for the next dungeon and another nice item. Let's pick up that last item, shall we? Go to the mountains from the starting point, don't go west, go east instead. Once you reached the second screen, blast the northern wall, go in the dark secret room, use the jar of moonbeam moss and go through the fi
CHAPTER 7: THE FOURTH DUNGEON Kill the enemies and cross the river with the rainbow drop. Yes, it has the same effect as the ladder from «The Legend of Zelda» released for NES. Go west when you can, keep going west, then south. Kill the enemies, push the fifth block from the left of second row to open the sealed doors and go to the right. That old woman will tell you to find the weak point of the boss and mention something about the boss' tail. Interesting, let's keep that in mind. Go west now and pick up the steel armor in the chest. Go north now, blast the wall to the north, kill the slimes and go get the medicine of vitality in the chest. Go back to the last room, kill the enemies here then go east and grab the crystal ball in the chest at the end of the deadly path of arrows. Go back to the last room, push the block and go north. Keep going north, blast the wall and go get the key to the crypt, kept by the enemies. Now, go back and go east. Don't go east when you face the locked door., there's nothing inside the room but bugs and you'll be trapped. The only way to leave the room afterwards will be to push the fifth block from the left of the top row. Open the door and face the boss of this dungeon. Remember what the old woman trapped in this dungeon said? Aim for the weak point. The weak point is the tail. That boss might give you some troubles. But if you move constantly and you hit the tail, after a dozen of hits, it should be dead once and for all. Beware of its head though, as it walks as the same speed as you, it can catch you up easily. Go grab the prized medallion in the next room once you beat it and get ready to go to the next sphere.
CHAPTER 8: FINDING ORIAN Welcome to the third sphere, folks. There's a lot of goodies to get. That's some good news. The bad news are... the first dungeon is locked and you must find a person called Orian. Some people will tell you that Dirth imprisoned him in a cave. Great, it's not like there's a ton of caves to explore... oh wait, there's a million of caves here, as always! Anyway, go north, then west for the first goodie to get. It's a health upgrade and the monk is hidden underneath one of these pillars. Use the fire wand to brun it and go downstairs to find the monk and get your health upgrade. There's another monk to find in this sphere but he will increase your max capacity of boom bombs by 4. Leave the cave, take the southern path, kill the enemies and burn one of the pillars to find some stairs. Go downstairs, use the jar of moonbeam moss and open the chest to get a medicine of vitality. Now go back to the last screen, take the other path, then go east. Burn the pillar after killing the enemies and go downstairs. Here is the second and last monk of this sphere, the one who will give you the boom bombs upgrade I mentioned earlier. Go back to the last screen, go north, then east, then north once again and west twice. Kill the two creatures, cross the waterfall with the rainbow drop and go downstairs. Go through the fi
Now go north, blast the wall and go in the cave. You can hit the wizard and the ghosts with your sword but I suggest you to use the magic ring you just bought and kill them. The door will be unlocked. Go through and talk to Orian. He will tell you the secret of the crypt hidden by Dirth. Yes, the one to the southwest. Push the red block to the right and leave the cave. We have one more item to get before heading to the dungeon and it's a nice item. Go back to the screen where you found the good amount of cash given by the man, go east twice and keep going south. Cross the rivers with the rainbow drop and reach the curved wall. This one can't be destroyed, however blast the one to the right, in the next screen. Go through the secret passageway and open the chest to pick up the steel shield. Now you can go to the first dungeon. There's nothing else to pick up so time to take care of the two medallions of this sphere.
CHAPTER 9: THE FIFTH DUNGEON Kill the creatures, then the shadow in the next room (beware of the traps) and the slimes in the next room. Avoid the spiked chain and go to the left. Blast the northern wall, kill the ghosts in the next room and open the chest to get the crystall ball. Go back to the last room, blast the western wall, then the northern wall in the next room and grab the boom bombs in the chest. You can blast the eastern wall to go back to the room with the crystal ball. Go east, kill the wizard and the shadows, then push the block to the left to unlock the doors and go to the right. Blast the wall to the east, grab the medicine of vitality in the chest and blast the wall to the south. Do the same thing with the wall to the west in the next room and go up to grab the boom bombs. Now, go back to the room with the wizard and the shadows and go north. Kill the slimes, go east, then north and east once you reach the branching path. Kill the enemies, push the bottom right hand corner block to unlock the door and go north. Kill the two creatures, push the block and pick up the key to the crypt. Go back to the branching path and go west now. Kill the enemies to unlock the door then avoid the fireballs in the next room to get the silver sword in the chest. Now, go back to the branching path, go south, blast the western wall and talk to the man. Keep in mind his tip. Blast the wall to your left, go in the next room, avoid the deathtraps and blast the wall to the west. Open the door and prepare yourself for the boss fight. The only way to hit him, as the trapped man said, is when this giant crab opens its mouth. Otherwise, you can avoid its move easily. Wait until the giant crab spits the bubbles and aim for the mouth. It might take a while, considering mister giant crab prefers walking than spitting. That's a nice fellow, with good manners apparently. After a few hits, the giant crab will die and you could take the prized medallion in the next room. As always, you'll be teleported back to the main shrine and the old mother will fully heal you and increase your HP max by 1. Time to go to the next dungeon, shall we? From the starting point of the third sphere, go north twice and keep going west. Then go south and make your way through the creatures until you find the entrance of the second dungeon of the sphere.
CHAPTER 10: THE SIXTH DUNGEON Kill the enemies in the entrance and the wizard in the next room then go to the left. You should reach a dead end. However, if you blast the northern wall, you'll find a chest containing the key to the crypt. Go back to the branching path and go north to talk with a man. You can either blast the wall to the east or go back to the previous and go east, it's up to you. The way is now quite linear. Go east from the branching path and fight your way to the stairs. Don't forget the crystal ball in the chest before the room with the stairs. Go down, kill the shadow and go up the next stairs. Carry on, killing all the enemies you'll encounter. When you reach a room full of slimes and statues spitting fireballs, blast the wall to the south, then kill the wizards in the dark room and open the chest to get the strongest armor. The name says everything, it's the best armor of the game. Go back to the last room and go east. At the end of the line, you'll have to fight four shadows. Push the bottom block to the east to open the door and make some stairs appear. Before going downstairs, blast the wall to the east, kill the ghosts and get the medicine of vitality. Now, go downstairs, kill the shadow, then go up the stairs, slay the two wizards and unlock the door with the key. This massive boss has three heads, which are the weak spots. He is slow but he is massive so try not to stay next to a wall or a corner, move constantly. Also, try to focus on one head at the time. Hit each of its heads a few times and they will fade away. Once the boss is headless, the fight will be over. Go to the next room, kill the enemies, avoid the fireballs and grab the prized medallion. Time to get your reward for your effort as always and go to the fourth and last sphere.
CHAPTER 11: TO THE SEVENTH DUNGEON We have a few things to get before going to the first dungeon. First, go east twice then south, kill the demon and blast the suspicious wall. Go in the cave to find a monk who will increase your max capacity of boom bombs by 4. Leave the cave, go east, then down and, once you reach the next screen, blast the wall to the right to find some boom bombs in a chest. The next screen to the right has a secret as well, it contains a medicine of vitality. Just blast the suspicious wall to the right to get it. Now, carry on, don't go west yet, keep going south instead. Two screens to the left, there's a suspicious wall to blast: the one to the right. You'll find another medicine of vitality. There's one more thing to pick up, a nice health upgrade. The last one given by one of the three monks hidden in the spheres actually. Leave the secret room, go west then keep going south. Go east, then south and finally west. Blast the wall and talk to the monk to get your health upgrade. Note that this monk can fully heal you if you come back and talk to him later. The last health upgrades will be given by another person later in the game so needless to worry about that. Time to head to the first dungeon of this sphere, also known as the seventh dungeon of the game. Remember when I said «don't go west yet»? There was a reason. Yes, the dungeon is there. If you don't remember, well follow the magic compass. It's between the two medicines of vitality you picked up. Once you reach the dungeon, go in.
CHAPTER 12: THE SEVENTH DUNGEON Kill the bug, then the next creatures in the next rooms and go west when you are at the branching paths. You can't go north unless you come from the left, which is embarrassing. Go back to the last room then go back south and blast the wall to the left. Kill the next enemies (beware of the traps), blast the northern wall, kill the enemies then push the block to open th doors and go west. Kill the enemies, push the black to the north and grab the crystall ball. Now go east, then use the rainbow drop to reach the room to the north, talk to the elder to get a hint about the strongest shield and go downstairs. Kill the mummy, then the snake, kill the enemies in the next room, push the block to the top right hand corner and go west. You are back to the branching path. Go north now. Don't even bother to kill these creatures, they will respawn. Keep going north instead, kill the next enemies, blast the wall to the north and go in the secret room. Slay all the enemies then push the first and third blocks to the northwest then the one between these two blocks to the left or to the right. Go get the key to the crypt in the chest, then push the two blocks to the northeast to leave the room. Go east, avoid the arrows, kill the enemies and push the block to the right in the next room to open the door and make your way through this puzzle. Don't forget to blast the northern wall to find a secret room with a medicine of vitality kept by a bunch of snakes. Go east after leaving the secret room, kill the bat and go to th next room. Kill the enemies and blast the northern wall to find some boom bombs in the chest. Go back to the last room, blast the southern wall and kill the enemies to reach the chest and get the strongest shield (4). Look at your map: you should see the west wing unexplored and a little room next to where you are. Go back to the room with the bat, blast the southern wall, kill the mummy and push the blocks in order to go downstairs. Kill the skeleton, Go up the stairs and kill the mummy. Push the blocks, carry on, kill the snake and push the block to the right. In the next room, kill the creatures, push the block and carry on. Kill the creatures, push another block to open the door and kill the last enemies. Unlock the door and prepare yourself for the boss fight. There's one way to beat this boss. You have to wait until he stops moving then strike. Otherwise, you must move constantly and avoid the magic missiles that the crystals floating around him are shooting at you. The crystals turns white when they are ready to shoot the projectiles or when the giant wants to show its true form. After a few hits, he will die. Go to the next room and grab the prized medallion. After the discussion, go back to the fourth sphere. It's time to go to the dungeon number eight. It's quite hard to get there though. Go back to the screen where you found the second medicine of vitality, go downstairs, then to the east. Use the stairs to be teleported to the next part of the sphere. You'll face an improved version of the wizards in this section. But you have the strongest shield so you shouldn't have any troubles with them. Two screens to the right, blast the wall to find an empty and dark room. Remember, these rooms might hide some secrets so go check the fi
CHAPTER 13: THE EIGHTH DUNGEON Kill the bug then go west. Fight your way to the stairs, go downstairs, then kill more enemies and go north to find some boom bombs in the chest. Go back to the last room, go east, then blast the southern wall to find a secret room with three enemies, keeping the bell of the sky in the chest. Go west, kill the creatures and push a block to make some stairs appear. Go downstairs, kill the creatures and open the chest to get the crystal ball (5). Now, go back to the entrance and go east after pushing the fourth block of the second top row. Kill the enemies in the next room and push the block to the right to carry on. After the discussion, blast the eastern wall. Kill the enemies in the next rooms, then go down the stairs to the right and carry on. In the room with the sealed door, kill the enemies then push the block nearby the sealed door to unlock it. Blast the wall to the west, kill the skeletons and talk to the man to get the last health upgrade. Here is the person I mentioned earlier and this is the last health upgrade of the game, which means you should have at this point of the game 16 HP, the max amount of health in other words. Go back to the last room, blast the wall to the south, kill the creature, avoid the arrows and push the two blocks to the south to make some stairs appear and go down. You'll find a medicine of vitality in the chest, kept by some creatures. Now go back to the room with the two stairs and go down the stairs to the left this time. Blast the wall to the south, grab the key to the crypt in the chest and go east. In the next room, kill the mummies, blast the southern wall but don't go there yet. Go north, blast the northern wall, and pick up the boom bombs in the chest. Now go south, go through the secret passageway and go downstairs. Kill the enemies and open the door to face the boss.
This boss is long and tough. This giant golden head moves constantly and shoots two projectiles from its eyes at you before showing Dirth himself. It's exactly at this moment that you have to strike. Be careful, Dirth shoots some projectiles as well. The only difficulty in this battle is his projectiles because you have to avoid them and strike at the same time. If you have a good timing and accuracy, you could hit him twice before he hides in his shell and avoid the projectiles. Now, I said the battle will be long because it takes a ton of hits to get rid of this boss. Trust me, I yelled at my laptop screen «Die already!» over and over again while listening to Tiny Tim's song «Livin' in the sunlight, lovin' in the moonlight» (yes, the song that you can hear in the very first episode of Spongebob Squarepants
Go back to the sky sphere, exactly where the monk who gave you the health upgrade was and go east until you see that pedestal (6). Step on it, use the bell of the sky and use the stairs to go in the shrine of the sky. Pick up the strongest sword in the chest and go back to the main shrine with the wings of revival if you have one in your inventory. Go buy two medicines of vitality at a potion shop (or pick them up at the secret spots if you haven't taken them yet) and proceed to the castle by the door open in the shrine. Time to put an end to this story. Dirth, here we come!
LAST CHAPTER: REQUIEM FOR DIRTH I know, it's not appropriate since we won't play a nice lullaby for Dirth but at least we'll dance the waltz of death with him. After the discussion, avoid the projectiles (or take the damages). If you have two potions of health and full health, you can «tank» this boss easily and spam your attacks without worrying about your health. Yes, that's it. After a few hits, Dirth will die and the princess will be saved. Watch the final cutscene. Congratulations, you completed «Neutopia»
BONUS CHAPTER: MAPS AND ITEMS Here is the maps of each sphere with the locations of the important stuff (the sanctuaries are not shown though so feel free to find them), the dungeon maps and the item list because I had no other choice. The map are obviously made with Paint so deal with it. Oh, and it should be a 100% walkthrough. If I missed some stuff that doesn't appear on any of these maps, feel free to reply to this walkthrough and tell me about that, thanks
The sphere maps No, it's not grids for lottery or bingo xP
The dungeon maps
The item list - Wings of revival: Allows you to go back to the last sanctuary you entered. You can carry up to one at the time though. - Medicine of vitality: Fully recovers your health. You can carry up to two doses in your inventory. - Magic ring: Turns most of the enemies into weaker enemies. Really handy for tougher enemies such as the blue wizards or legion of creatures. You can carry up to one ring at the time though. - Bell of the sky: Allows you to go to the shrine of the sky in order to get the strongest sword. - Boom bombs: Does that need some explaining? Use these bombs to blast walls and hit the enemies. They are stackable and the max amount depends of the upgrades you got during the adventure. The max amount is 20 (I think, unless I forgot some stuff). - Jar of moonbeam moss: Your source of light. Use it when you are in the dark and you can't see anything (or barely). - Fire wand: Use it to hit the enemies and burn some stuff in the spheres, such as trees and pillars. The power depends of your health. - Rainbow drop: It works like the ladder from «The Legend of Zelda» and allows you to cross ditches and rivers in the dungeons and the spheres. - Book of revival: This item is necessary if you want to get the passwords and save your progress. - Falcon shoes: Increases your speed. - Magic compass: Shows you the way to the crypts and the location of the medallions in the crypt. A sound is made when you are close to a medallion and a dungeon. - Crystal ball: Stands for the dungeon map. Keep in mind it doesn't show all the rooms of the crypts. - Key to the crypt: Unlocks the door leading to the boss of the dungeon. - Prized medallion (precious medallion): Your primary goal. There are eight medallions hidden in the crypt of the spheres. - Bronze sword: First upgrade for the sword. - Silver sword: Second upgrade for the sword. - Strongest sword: Third and last upgrade for the sword. Required in order to beat Dirth. - Bronze shield: First upgrade for the shield. - Steel shield: Second upgrade for the shield. - Strongest shield: Third and last upgrade for the shield. Required in order to beat Dirth. - Bronze armor: First upgrade for your armor. - Steel armor: Second upgrade for the armor. - Strongest armor: Third and last upgrade for the armor. Required in order to beat Dirth. - Hourglass: Stops the enemies for a short period of time. - Cherry: Recovers 1 HP. - Silver coin: Adds 10 gold. - Golden coin: Adds 50 gold. That all for this walkthrough. I see you in the next adventure. Bye and take care, folks 
Hello everyone, it's your host Laian with a brand new walkthrough. Ok so, I wanted to play «Medievil 2» and make the game guide of this game but I changed my mind and kept that game for next month actually. Instead, I'm going to introduce a new system in this long list of walkthroughs I made: the legendary Turbo Graphx. I've never had the chance to own that system and play any game so I guess it's time to fix that. And I'm going to play Neutopia for you, folks. So, let's go on a new adventure, shall we? Ready for the time travel and the epic quest of loot and creatures? I don't know if a princess awaits us at the end of the line but we shall see that in due time. Let's just jump into it, folks!
CHAPTER 1: TO THE FIRST DUNGEON Well, apparently, the evil guy already kidnapped the beautiful girl and the precious treasures we need to retrieve in order to save the world from corruption and darkness. Bad timing as always... Well, it wouldn't be funny if we go in a temple, ask for the medallions, do the ritual and woohoo end of the game, we saved the world. So yeah, your mission is to find the eight medallions and the princess abducted by Dirth, the bad guy you saw during the cutscene. That woman is important: she gives you the magic compass but she also can heal you if you lost some health. Now, if you go south then go back north and talk to her once more, she will tell you that a man has the book of revival, useful to get the passwords. That's our first destination before heading to the first dungeon. Leave the temple, go south, kill the slimes here and go downstairs. You'll get the book of revival inside the chest next to the old man. That man gave you a lead: you must go west to find the first dungeon. Leave the basement, go to the left, enter the cave and grab the boom bombs and the medicine of vitality in the chests. This part of the map has lot of underground caves in which you will find a NPC who will tell you some tips (that goes for the other spheres). Cross the bridge if you want to carry on the quest. There's a person who sells some medicines of vitality in the southern cave for 200 gold pieces each dose. Go north, kill the enemies on your way to the mountain, where the first dungeon awaits you with open arms. Oh, see the shape of the statue on the wall, next to the stairs? It's a secret room, there's lot of these rooms in the world map and in the dungeons so I suggest you to spot them and use a bomb. Ok, these ones have just NPCs but they might contain interesting stuff later in the game. Climb up the mountain, kill the scorpions to make some secret stairs appear, go down to meet a woman who can heal your wounds, leave the room, go to the right, kill the snake man and enter the first dungeon of the game (1).
CHAPTER 2: THE FIRST DUNGEON Hail to the original title, yeah. Anyway, kill the bat in the room to the right, then the next enemies in the next room, go east, kill the bats to unlock the sealed door to the right, carry on and kill the enemies in the next room. Move the block to unlock the door, open the chest to get the key to the crypt, go back to the room with the fireballs spitter, go west, kill the bats, go north and kill the enemies in this room. Don't forget the crystal ball in the chest and keep in mind that this item shows you the map of the dungeon, but it doesn't show all the rooms. There are secrets room to be found here and there with the boom bombs so try to blast some of the walls. Most of the secret rooms are shortcuts. I made the map dungeons just in case you are curious and want to find all the secrets rooms that the crystal ball can't reveal (refer to the bonus chapter). The walls to blast with the boom bombs are obviously shown on the map. And as you can tell, there's also the important loot in the specific rooms. Yes, that's me, I'm nice. Anyway, let's carry on, shall we?
From the room with the crystal ball, blast the eastern wall with a boom bomb if you have one, go through the passageway, go north, kill the enemies, go west, kill the next enemies and get the bronze armor in the chest surrounded by rocks. Go back to the last room, go north to meet an old man, blast the wall to the west to find a secret room with two enemies and a chest containing some boom bombs and go back to the last room. Blast the wall to the right, like the old man said earlier, kill the enemies then carry on, kill the skeletons and open the door with the key. Time to face the boss of this dungeon. This blue dragon is not that hard. You just have to avoid the four fireballs he throws at you and hit him a few times. Thirty-two hits with your sword should kill him. After this battle, go north and grab the prized medallion. You'll be teleported back to the temple, your max HP will be increased by 1 and you will be fully healed.
CHAPTER 2: THE FIRE WAND Before exploring the second dungeon of the game, we must grab some stuff. Note that you can do these things before entering the first dungeon but some of them requires the boom bombs to get them. Although, you really need one specific item before going to the second dungeon. Hint: it's the title of that chapter. It can't be more clear I suppose, you need magic powers, you must be the pyromancer and its fire wand. Ok, let's start that mini-quest for the fire wand, shall we? From the temple, go east, then north and finally east to reach a dead end with some enemies. A dead end, yeah... why would we check a dead end, Laian? Because there's some cash here! A good amount of gold actually. You don't trust me, right? Well, kill the enemies, go downstairs and talk to the little boy to get 100 gold. Leave the cave, go south, keep going east then north, kill the slime before the bridge and move the rock located to the bottom right hand corner to make some stairs appear. Go down, talk to the elder and get the fire wand in the chest next to him. That magical wand has multiple uses. You can attack enemies with that and the power of your shots depends of the health you have, which means the more health you have, the more powerful the shot will be. You can also burn some stuff, such as trees. Maybe you'll find secret spots if you are curious and take the time to turn the trees into ashes. There's one more thing to pick up before heading to the next objective and it's something nice and useful. Leave the cave, go west then keep going north. Go to the left, take the second path to the north, then go up the stairs. You are back in the mountains, well the other part of the mountains. Go up, then go west, kill the sandmen, blast the wall with a boom bomb, go in and talk to the man to get another health upgrade. Well then, I guess you are ready for the next dungeon. Leave the cave, go back to the stairs, go east, then south, go east once more and finally north. Right before you is the entrance of the next dungeon. Go in, the second medallion awaits you.
CHAPTER 3: THE SECOND DUNGEON Kill the bats in the next room, then go north and kill the slimes. That didn't unlock the sealed door to the north, hmm. Maybe you should push the block to the right. Hey, it worked! Go to the next room, talk to another elder trapped and go east. Kill the creatures, push the block and move on to the next room. Kill the giant bats to unlock the door, go to the next room and use a boom bomb to blast the northern wall. Get rid of the werewolves, open the chest and take the key to the crypt. Now, head back to the elder and go west. Kill the enemies, go south, kill more enemies and open the chest to get the bronze sword. Go back to the last room, go west, kill the skeletons, push the block to unlock the doors and go north. Slay the creatures, open the chest and pick up the crystal ball. Go west, kill the giants bats, blast the wall to the north to find a secret room with some boom bombs and go south. More enemies to kill; carry on after this encounter. Kill the snakes, blast the western wall, kill the werewolves (beware of the trap) and open the door with the key. Time to face the guardian of the second medallion. That golem is not really hard to beat. His weak point is his heart but it only appears when his limbs go away. Always stand right before him and keep your distances. You won't be hit by his limbs. When the heart shows off and comes at you (yes, it's the red ball), hit it hard. Easy like ABC. Repeat this method until he dies, go to the next room and grab the prized medallion. You will be teleported back to the temple. The old woman will fully heal you and increase your HP max by 1 as always. You retrieved the two medallion of this sphere, you can proceed to the next one and look for the two medallions hidden in the next sphere. Buy some supplies if needed and go downstairs to enter the next sphere. CHAPTER 4: LET THERE BE LIGHT! Welcome to the second sphere of the game. Before going to the first dungeon of this place (or the third dungeon of the game), you need to find a source of light. It's required. If you keep going north, you'll reach the mountains and a cave in which a man will tell you to check the stalactites. Leave the cave, go west, kill the enemies and use the fire wand to burn the stalactite to the left. Some stairs appear. Go downstairs, open the chest and grab your permanent source of light: the jar of moonbeam moss (2). Ok, you now have what you need for the next dungeon but there's more to pick up. How about some gold? From the starting point of this area, go north twice then west. Kill the enemies and move the rock to the left. Go downstairs and get 150 gold. There's more, like I said earlier, it's not over, no no. Go back to the starting point, keep going west then go south. Burn the stalactite and go down to find a one-eyed man who will give you 300 gold. Go back to the surface, go south, use your source of light and kill the enemies. Move the rock to find some stairs and go down to get an upgrade for the boom bombs. You can now carry 12 boom bombs instead of 8, which is nice. Time to go to the first dungeon. Keep going north, go up the stairs, kill the creature and go in the dungeon.
CHAPTER 5: THE THIRD DUNGEON Go north, kill the enemies and blast the northern wall. Use your source of light, kill the creatures, then blast the northern wall and grab the bronze shield in the chest next to the elder. Go east, kill the enemies, then keep going south. Kill the evil mushrooms, push the block and grab the crystal ball in the chest. Go back to the last room, keep going west, then go north. Kill the spectres, blast the western wall, go in the secret room, kill the enemies and open the chest to pick up a medicine of vitality. Go back to the last room, go north until you encounter a sealed door. Killing the enemies won't open it, you must push one of the blocks. Beware of the traps. Use a boom bomb on the western wall, kill the ghosts and grab the boom bombs in the chest. Now, go through the door you unlocked earlier, notice the door to the boss' lair and go east. Kill the enemies, carry on, don't even bother to kill the enemimes in the next room, since they respawn (although, that can be useful if you need gold and boom bombs for example) and go north. More enemies to kill. In the next room, get rid of the enemies and push the second block to the left of the bottom row to open the door. Go get the key to the crypt in the chest and go back to the locked door. Use the key to open it and get ready for the boss fight. The twins gargoyles, honestly, gave me a bit of trouble to beat them. You have to pay attention to the daggers they throw at you and how they move. Use your sword to hit them. Once you got rid of one of the gargoyles, the fight should be easier. Take care of the last gargoyle and go get the third prized medallion in the next room. You know the score, right? HP max increased by 1, fully healed and you have to go to the next dungeon.
CHAPTER 6: RAINBOW DROP This chapter shouldn't be that long. There's one specific item to get for the next dungeon and another nice item. Let's pick up that last item, shall we? Go to the mountains from the starting point, don't go west, go east instead. Once you reached the second screen, blast the northern wall, go in the dark secret room, use the jar of moonbeam moss and go through the fi
CHAPTER 7: THE FOURTH DUNGEON Kill the enemies and cross the river with the rainbow drop. Yes, it has the same effect as the ladder from «The Legend of Zelda» released for NES. Go west when you can, keep going west, then south. Kill the enemies, push the fifth block from the left of second row to open the sealed doors and go to the right. That old woman will tell you to find the weak point of the boss and mention something about the boss' tail. Interesting, let's keep that in mind. Go west now and pick up the steel armor in the chest. Go north now, blast the wall to the north, kill the slimes and go get the medicine of vitality in the chest. Go back to the last room, kill the enemies here then go east and grab the crystal ball in the chest at the end of the deadly path of arrows. Go back to the last room, push the block and go north. Keep going north, blast the wall and go get the key to the crypt, kept by the enemies. Now, go back and go east. Don't go east when you face the locked door., there's nothing inside the room but bugs and you'll be trapped. The only way to leave the room afterwards will be to push the fifth block from the left of the top row. Open the door and face the boss of this dungeon. Remember what the old woman trapped in this dungeon said? Aim for the weak point. The weak point is the tail. That boss might give you some troubles. But if you move constantly and you hit the tail, after a dozen of hits, it should be dead once and for all. Beware of its head though, as it walks as the same speed as you, it can catch you up easily. Go grab the prized medallion in the next room once you beat it and get ready to go to the next sphere.
CHAPTER 8: FINDING ORIAN Welcome to the third sphere, folks. There's a lot of goodies to get. That's some good news. The bad news are... the first dungeon is locked and you must find a person called Orian. Some people will tell you that Dirth imprisoned him in a cave. Great, it's not like there's a ton of caves to explore... oh wait, there's a million of caves here, as always! Anyway, go north, then west for the first goodie to get. It's a health upgrade and the monk is hidden underneath one of these pillars. Use the fire wand to brun it and go downstairs to find the monk and get your health upgrade. There's another monk to find in this sphere but he will increase your max capacity of boom bombs by 4. Leave the cave, take the southern path, kill the enemies and burn one of the pillars to find some stairs. Go downstairs, use the jar of moonbeam moss and open the chest to get a medicine of vitality. Now go back to the last screen, take the other path, then go east. Burn the pillar after killing the enemies and go downstairs. Here is the second and last monk of this sphere, the one who will give you the boom bombs upgrade I mentioned earlier. Go back to the last screen, go north, then east, then north once again and west twice. Kill the two creatures, cross the waterfall with the rainbow drop and go downstairs. Go through the fi
Now go north, blast the wall and go in the cave. You can hit the wizard and the ghosts with your sword but I suggest you to use the magic ring you just bought and kill them. The door will be unlocked. Go through and talk to Orian. He will tell you the secret of the crypt hidden by Dirth. Yes, the one to the southwest. Push the red block to the right and leave the cave. We have one more item to get before heading to the dungeon and it's a nice item. Go back to the screen where you found the good amount of cash given by the man, go east twice and keep going south. Cross the rivers with the rainbow drop and reach the curved wall. This one can't be destroyed, however blast the one to the right, in the next screen. Go through the secret passageway and open the chest to pick up the steel shield. Now you can go to the first dungeon. There's nothing else to pick up so time to take care of the two medallions of this sphere.
CHAPTER 9: THE FIFTH DUNGEON Kill the creatures, then the shadow in the next room (beware of the traps) and the slimes in the next room. Avoid the spiked chain and go to the left. Blast the northern wall, kill the ghosts in the next room and open the chest to get the crystall ball. Go back to the last room, blast the western wall, then the northern wall in the next room and grab the boom bombs in the chest. You can blast the eastern wall to go back to the room with the crystal ball. Go east, kill the wizard and the shadows, then push the block to the left to unlock the doors and go to the right. Blast the wall to the east, grab the medicine of vitality in the chest and blast the wall to the south. Do the same thing with the wall to the west in the next room and go up to grab the boom bombs. Now, go back to the room with the wizard and the shadows and go north. Kill the slimes, go east, then north and east once you reach the branching path. Kill the enemies, push the bottom right hand corner block to unlock the door and go north. Kill the two creatures, push the block and pick up the key to the crypt. Go back to the branching path and go west now. Kill the enemies to unlock the door then avoid the fireballs in the next room to get the silver sword in the chest. Now, go back to the branching path, go south, blast the western wall and talk to the man. Keep in mind his tip. Blast the wall to your left, go in the next room, avoid the deathtraps and blast the wall to the west. Open the door and prepare yourself for the boss fight. The only way to hit him, as the trapped man said, is when this giant crab opens its mouth. Otherwise, you can avoid its move easily. Wait until the giant crab spits the bubbles and aim for the mouth. It might take a while, considering mister giant crab prefers walking than spitting. That's a nice fellow, with good manners apparently. After a few hits, the giant crab will die and you could take the prized medallion in the next room. As always, you'll be teleported back to the main shrine and the old mother will fully heal you and increase your HP max by 1. Time to go to the next dungeon, shall we? From the starting point of the third sphere, go north twice and keep going west. Then go south and make your way through the creatures until you find the entrance of the second dungeon of the sphere.
CHAPTER 10: THE SIXTH DUNGEON Kill the enemies in the entrance and the wizard in the next room then go to the left. You should reach a dead end. However, if you blast the northern wall, you'll find a chest containing the key to the crypt. Go back to the branching path and go north to talk with a man. You can either blast the wall to the east or go back to the previous and go east, it's up to you. The way is now quite linear. Go east from the branching path and fight your way to the stairs. Don't forget the crystal ball in the chest before the room with the stairs. Go down, kill the shadow and go up the next stairs. Carry on, killing all the enemies you'll encounter. When you reach a room full of slimes and statues spitting fireballs, blast the wall to the south, then kill the wizards in the dark room and open the chest to get the strongest armor. The name says everything, it's the best armor of the game. Go back to the last room and go east. At the end of the line, you'll have to fight four shadows. Push the bottom block to the east to open the door and make some stairs appear. Before going downstairs, blast the wall to the east, kill the ghosts and get the medicine of vitality. Now, go downstairs, kill the shadow, then go up the stairs, slay the two wizards and unlock the door with the key. This massive boss has three heads, which are the weak spots. He is slow but he is massive so try not to stay next to a wall or a corner, move constantly. Also, try to focus on one head at the time. Hit each of its heads a few times and they will fade away. Once the boss is headless, the fight will be over. Go to the next room, kill the enemies, avoid the fireballs and grab the prized medallion. Time to get your reward for your effort as always and go to the fourth and last sphere.
CHAPTER 11: TO THE SEVENTH DUNGEON We have a few things to get before going to the first dungeon. First, go east twice then south, kill the demon and blast the suspicious wall. Go in the cave to find a monk who will increase your max capacity of boom bombs by 4. Leave the cave, go east, then down and, once you reach the next screen, blast the wall to the right to find some boom bombs in a chest. The next screen to the right has a secret as well, it contains a medicine of vitality. Just blast the suspicious wall to the right to get it. Now, carry on, don't go west yet, keep going south instead. Two screens to the left, there's a suspicious wall to blast: the one to the right. You'll find another medicine of vitality. There's one more thing to pick up, a nice health upgrade. The last one given by one of the three monks hidden in the spheres actually. Leave the secret room, go west then keep going south. Go east, then south and finally west. Blast the wall and talk to the monk to get your health upgrade. Note that this monk can fully heal you if you come back and talk to him later. The last health upgrades will be given by another person later in the game so needless to worry about that. Time to head to the first dungeon of this sphere, also known as the seventh dungeon of the game. Remember when I said «don't go west yet»? There was a reason. Yes, the dungeon is there. If you don't remember, well follow the magic compass. It's between the two medicines of vitality you picked up. Once you reach the dungeon, go in.
CHAPTER 12: THE SEVENTH DUNGEON Kill the bug, then the next creatures in the next rooms and go west when you are at the branching paths. You can't go north unless you come from the left, which is embarrassing. Go back to the last room then go back south and blast the wall to the left. Kill the next enemies (beware of the traps), blast the northern wall, kill the enemies then push the block to open th doors and go west. Kill the enemies, push the black to the north and grab the crystall ball. Now go east, then use the rainbow drop to reach the room to the north, talk to the elder to get a hint about the strongest shield and go downstairs. Kill the mummy, then the snake, kill the enemies in the next room, push the block to the top right hand corner and go west. You are back to the branching path. Go north now. Don't even bother to kill these creatures, they will respawn. Keep going north instead, kill the next enemies, blast the wall to the north and go in the secret room. Slay all the enemies then push the first and third blocks to the northwest then the one between these two blocks to the left or to the right. Go get the key to the crypt in the chest, then push the two blocks to the northeast to leave the room. Go east, avoid the arrows, kill the enemies and push the block to the right in the next room to open the door and make your way through this puzzle. Don't forget to blast the northern wall to find a secret room with a medicine of vitality kept by a bunch of snakes. Go east after leaving the secret room, kill the bat and go to th next room. Kill the enemies and blast the northern wall to find some boom bombs in the chest. Go back to the last room, blast the southern wall and kill the enemies to reach the chest and get the strongest shield (4). Look at your map: you should see the west wing unexplored and a little room next to where you are. Go back to the room with the bat, blast the southern wall, kill the mummy and push the blocks in order to go downstairs. Kill the skeleton, Go up the stairs and kill the mummy. Push the blocks, carry on, kill the snake and push the block to the right. In the next room, kill the creatures, push the block and carry on. Kill the creatures, push another block to open the door and kill the last enemies. Unlock the door and prepare yourself for the boss fight. There's one way to beat this boss. You have to wait until he stops moving then strike. Otherwise, you must move constantly and avoid the magic missiles that the crystals floating around him are shooting at you. The crystals turns white when they are ready to shoot the projectiles or when the giant wants to show its true form. After a few hits, he will die. Go to the next room and grab the prized medallion. After the discussion, go back to the fourth sphere. It's time to go to the dungeon number eight. It's quite hard to get there though. Go back to the screen where you found the second medicine of vitality, go downstairs, then to the east. Use the stairs to be teleported to the next part of the sphere. You'll face an improved version of the wizards in this section. But you have the strongest shield so you shouldn't have any troubles with them. Two screens to the right, blast the wall to find an empty and dark room. Remember, these rooms might hide some secrets so go check the fi
CHAPTER 13: THE EIGHTH DUNGEON Kill the bug then go west. Fight your way to the stairs, go downstairs, then kill more enemies and go north to find some boom bombs in the chest. Go back to the last room, go east, then blast the southern wall to find a secret room with three enemies, keeping the bell of the sky in the chest. Go west, kill the creatures and push a block to make some stairs appear. Go downstairs, kill the creatures and open the chest to get the crystal ball (5). Now, go back to the entrance and go east after pushing the fourth block of the second top row. Kill the enemies in the next room and push the block to the right to carry on. After the discussion, blast the eastern wall. Kill the enemies in the next rooms, then go down the stairs to the right and carry on. In the room with the sealed door, kill the enemies then push the block nearby the sealed door to unlock it. Blast the wall to the west, kill the skeletons and talk to the man to get the last health upgrade. Here is the person I mentioned earlier and this is the last health upgrade of the game, which means you should have at this point of the game 16 HP, the max amount of health in other words. Go back to the last room, blast the wall to the south, kill the creature, avoid the arrows and push the two blocks to the south to make some stairs appear and go down. You'll find a medicine of vitality in the chest, kept by some creatures. Now go back to the room with the two stairs and go down the stairs to the left this time. Blast the wall to the south, grab the key to the crypt in the chest and go east. In the next room, kill the mummies, blast the southern wall but don't go there yet. Go north, blast the northern wall, and pick up the boom bombs in the chest. Now go south, go through the secret passageway and go downstairs. Kill the enemies and open the door to face the boss.
This boss is long and tough. This giant golden head moves constantly and shoots two projectiles from its eyes at you before showing Dirth himself. It's exactly at this moment that you have to strike. Be careful, Dirth shoots some projectiles as well. The only difficulty in this battle is his projectiles because you have to avoid them and strike at the same time. If you have a good timing and accuracy, you could hit him twice before he hides in his shell and avoid the projectiles. Now, I said the battle will be long because it takes a ton of hits to get rid of this boss. Trust me, I yelled at my laptop screen «Die already!» over and over again while listening to Tiny Tim's song «Livin' in the sunlight, lovin' in the moonlight» (yes, the song that you can hear in the very first episode of Spongebob Squarepants
Go back to the sky sphere, exactly where the monk who gave you the health upgrade was and go east until you see that pedestal (6). Step on it, use the bell of the sky and use the stairs to go in the shrine of the sky. Pick up the strongest sword in the chest and go back to the main shrine with the wings of revival if you have one in your inventory. Go buy two medicines of vitality at a potion shop (or pick them up at the secret spots if you haven't taken them yet) and proceed to the castle by the door open in the shrine. Time to put an end to this story. Dirth, here we come!
LAST CHAPTER: REQUIEM FOR DIRTH I know, it's not appropriate since we won't play a nice lullaby for Dirth but at least we'll dance the waltz of death with him. After the discussion, avoid the projectiles (or take the damages). If you have two potions of health and full health, you can «tank» this boss easily and spam your attacks without worrying about your health. Yes, that's it. After a few hits, Dirth will die and the princess will be saved. Watch the final cutscene. Congratulations, you completed «Neutopia»
BONUS CHAPTER: MAPS AND ITEMS Here is the maps of each sphere with the locations of the important stuff (the sanctuaries are not shown though so feel free to find them), the dungeon maps and the item list because I had no other choice. The map are obviously made with Paint so deal with it. Oh, and it should be a 100% walkthrough. If I missed some stuff that doesn't appear on any of these maps, feel free to reply to this walkthrough and tell me about that, thanks
The sphere maps No, it's not grids for lottery or bingo xP
The dungeon maps
The item list - Wings of revival: Allows you to go back to the last sanctuary you entered. You can carry up to one at the time though. - Medicine of vitality: Fully recovers your health. You can carry up to two doses in your inventory. - Magic ring: Turns most of the enemies into weaker enemies. Really handy for tougher enemies such as the blue wizards or legion of creatures. You can carry up to one ring at the time though. - Bell of the sky: Allows you to go to the shrine of the sky in order to get the strongest sword. - Boom bombs: Does that need some explaining? Use these bombs to blast walls and hit the enemies. They are stackable and the max amount depends of the upgrades you got during the adventure. The max amount is 20 (I think, unless I forgot some stuff). - Jar of moonbeam moss: Your source of light. Use it when you are in the dark and you can't see anything (or barely). - Fire wand: Use it to hit the enemies and burn some stuff in the spheres, such as trees and pillars. The power depends of your health. - Rainbow drop: It works like the ladder from «The Legend of Zelda» and allows you to cross ditches and rivers in the dungeons and the spheres. - Book of revival: This item is necessary if you want to get the passwords and save your progress. - Falcon shoes: Increases your speed. - Magic compass: Shows you the way to the crypts and the location of the medallions in the crypt. A sound is made when you are close to a medallion and a dungeon. - Crystal ball: Stands for the dungeon map. Keep in mind it doesn't show all the rooms of the crypts. - Key to the crypt: Unlocks the door leading to the boss of the dungeon. - Prized medallion (precious medallion): Your primary goal. There are eight medallions hidden in the crypt of the spheres. - Bronze sword: First upgrade for the sword. - Silver sword: Second upgrade for the sword. - Strongest sword: Third and last upgrade for the sword. Required in order to beat Dirth. - Bronze shield: First upgrade for the shield. - Steel shield: Second upgrade for the shield. - Strongest shield: Third and last upgrade for the shield. Required in order to beat Dirth. - Bronze armor: First upgrade for your armor. - Steel armor: Second upgrade for the armor. - Strongest armor: Third and last upgrade for the armor. Required in order to beat Dirth. - Hourglass: Stops the enemies for a short period of time. - Cherry: Recovers 1 HP. - Silver coin: Adds 10 gold. - Golden coin: Adds 50 gold. That all for this walkthrough. I see you in the next adventure. Bye and take care, folks |


| Games have secrets, I have my eagle gaze. |
Affected by 'Laziness Syndrome'
Registered: 10-21-11
Location: France
Last Post: 2354 days
Last Active: 1528 days
