

 User Notice
 Forum Links

Thread Information
Thread Actions


Beyond Good and Evil Walkthrough Part 2
06-13-14 02:20 PM
 Eniitan is Offline
| ID: 1035409 | 5355 Words
Eniitan is Offline
| ID: 1035409 | 5355 Words
 Eniitan is Offline

POSTS: 1942/10522
POST EXP: 959649
LVL EXP: 74145136
CP: 55412.4
VIZ: 2632176

Hi this is my second part of my walkthrough for beyond good and evil. I hope this helps you out. ^-^ Beyond Good and Evil Walkthrough Part 2 Next to the save point you should see another passageway. Look to the floor if you do see it then kick it open crouch to go into the new pathway. Keep on going until, you suddenly see Double H he will help you in some ways as well. So take on board of what he says and carry on sneaking. This is where you will get tested. Pass the two alpha sections guard and no. Do not hit them in any way. Keep on going. There will be another set above you. And also there will be some rats there, so pass the rats instead of kicking them. Whatever you do…..do not let those rats attack you or the guards will hear you. So keep on sneaking until you come to another path. In the first room there are two alpha section guards. You can either A sneak pass them, or B hit their tanks. But for your second report you have to take the picture of the *Human traffic* it’s basically the moving big wooden cardboard boxes in the machines. When one comes it will be x rayed that’s when you take the picture. When you are done move onto the next room but be on guard. As there are alpha section guards are in every room.
This guard will be walking back and forth. When he is facing the opposite way, hit his tank with the hand disk and then kick him. Proceed on when that happens. For this next path you don’t have to sneak as you meet up with Double H again. He is blocked by the flames use the hand disk to the hand switch to switch off the flames. But mind you when you hit the hand switch it will only be for a limited of time before it comes back on. So you will have to do this quickly. There will be an mdisk reader, so save the game before pressing on. You will be blocked off so get double H to use the action button for you to pass through. A small cutscene will happen. Continue on when double H has given you some more advice. In this next area there is another guard let me show you a pic.
So leave the closet when you are done and you should come out to *Nutriples Vat*
So the first thing you should do its to go to open the cupboard with a triangular key on it. And you will find something upsetting….his boots. You found Pey’js boots. So take them as it will be a great deal of help to you. And also take anything else that you see. On the left hand side there’s a hand switch. Press on that and an mdisk will appear. Take it as it is useful to see. You should at least guess what happens next right? You will be ambushed by two *Cyclopius* there are two electrical barriers as you saw. Put each one into that barrier to destroy it. Two new paths will open for you the path that you need to go to is the *computer room* first. Which is the path that the Cyclopius was not in, so it’s the other room. When you find the room there will be an mdisk reader, and another mdisk to take. So watch those two and save before leaving the room. Go through another path which is the routing room.
So it’s like that exercise thing again for jade. Roll over and crouch, next you will come to some corner. You should see a hand switch on the left. That will open the door. But when that does happen the red bars will appear. And the door will only be open for a limited of time. As it will slowly go back down to close itself, so crouch then roll to quickly get pass the door. in this room the alpha section guard will be above you so make sure you are crouching at all times. He will walk back and forth so when he is not looking, go through a small passage as it is before you. There will be some rats there kick them and then go up the upper platform. Then when he his looking the other way you can either pass or kick him. When you have done that, go up the blue looking teleportation that will lead you up. Ok be fast. As when you are on here there’s a blue bar on the floor and an electrical barrier not so far off so roll and then crouch afterwards. Then head to the left quickly before something bad happens to you. There will be an mdisk reader so save your game before carrying on. Then shimmy your way to another path and…..you will see that the guard has been possessed by the domz, so hes not human anymore. Next you will need to get across as you will see. And also there will be another electrical barrier. But this time it is in mid-air meaning you will have to crouch. Use the hand disk to bring the lift to you. If you don’t know where it is, use your camera to find it up on a high ledge. So when you do find it, use the hand disk. Go on it crouch and use the hand disk again, for it to carry you to the other side. You will have to crouch again to get to the other area. There will be one guard he will be moving in his position. When he is facing the other way kick him, and then proceed on. And there will be more exercise for jade, meaning crouch and roll. You know of what to do of that now. When you pass that part there will be two more guards on patrol. And they are both walking at the same time, so it is best to kick one guard. Then go on full blown attack on the other one. When that is done keep on going. Or if you just can’t be bothered to attack you can sneak pass them. When they both walk, for a few seconds they face the wall. So that would be your chance to pass by, without them even knowing.
5th boss
The Slaughterhouse
And also do not let them catch you as well. Or that wouldn’t be a nice ending for you. So before you move on use your camera to toggle to see when you need to hide. Which are in the foggy parts, if you hide in there you will not be seen. And some of them are moving so make sure to time when you quickly pass them and to hide as well….it might take time as it is intimidating in a way. When you do get passed them keep on going and don’t go back. So…..you’re safe for now… that was just one of the big parts in the game. And you will run into them more as you proceed on. So you see some looking sort of a lift. And there is no fuse. Kick the electrical box and go through the way that has the blue bars. Do this quickly but yet carefully at the same time. Then at the end there would be a fuse. Take it quickly and head back to the lift. Put in the fuse and use your key to operate it.
On your way to the next room you should see a red barrier. And a small room with a pearl and with something else there as well. And you would ask. How am I going to get in there? Well in the next place there are like 4-5 guards with 2 Ms Laser Turrets. You have to be extra careful. If you can see there is a small crouch place to go through in, that leads to the pearl. But you have to sneak. Once you had taken the fuse, head out of the room and onto another path. Which will be to your left when you go out it will be dark. But don’t worry keep on going straight until you are on a lift. Use your key to operate it, jade will crouch down meaning there will be guards nearby again. In this place there will be one guard with a gas tank. But he will be above you so he won’t see you. 1 you can either get rid of this guard, and go into the room that he is guarding. But there will be another on the loose and without a gas tank. If you go into that small room he will see you. Or 2 you can go and destroy that other guard first, that doesn’t have the gas tank on him. Basically he is walking around back and forth. When he is on the lift use the hand switch to make the lift move and he will die. Problem solved. But in that room what the first guard is guarding there is a PA 1. So it’s best to get it before moving on. When you have taken care of those two guards go onto the lift and move on to another area. The next one might annoy you as there are 3 guards and the way the angle is. It’s not pretty nice so I suggest you find a way to sneak pass them instead of attacking. Or you can go and attack them if you wish. 2 will be walking while the other one will be turning from back to front. So when you do pass them there will be a socket. Now put the fuse that you picked up in there, and a door will open. But not fully so you will have to crouch to get in. So…. Good news! The horror has ended for now! as you will meet up with double H again. Save the game and process onto the last room which is the central hall. Laian: Hope you liked it. ^-^ Here's a link to my part 1 walkthrough https://www.vizzed.com/boards/thread.php?id=76806&ref=259134 Hi this is my second part of my walkthrough for beyond good and evil. I hope this helps you out. ^-^ Beyond Good and Evil Walkthrough Part 2 Next to the save point you should see another passageway. Look to the floor if you do see it then kick it open crouch to go into the new pathway. Keep on going until, you suddenly see Double H he will help you in some ways as well. So take on board of what he says and carry on sneaking. This is where you will get tested. Pass the two alpha sections guard and no. Do not hit them in any way. Keep on going. There will be another set above you. And also there will be some rats there, so pass the rats instead of kicking them. Whatever you do…..do not let those rats attack you or the guards will hear you. So keep on sneaking until you come to another path. In the first room there are two alpha section guards. You can either A sneak pass them, or B hit their tanks. But for your second report you have to take the picture of the *Human traffic* it’s basically the moving big wooden cardboard boxes in the machines. When one comes it will be x rayed that’s when you take the picture. When you are done move onto the next room but be on guard. As there are alpha section guards are in every room.
This guard will be walking back and forth. When he is facing the opposite way, hit his tank with the hand disk and then kick him. Proceed on when that happens. For this next path you don’t have to sneak as you meet up with Double H again. He is blocked by the flames use the hand disk to the hand switch to switch off the flames. But mind you when you hit the hand switch it will only be for a limited of time before it comes back on. So you will have to do this quickly. There will be an mdisk reader, so save the game before pressing on. You will be blocked off so get double H to use the action button for you to pass through. A small cutscene will happen. Continue on when double H has given you some more advice. In this next area there is another guard let me show you a pic.
So leave the closet when you are done and you should come out to *Nutriples Vat*
So the first thing you should do its to go to open the cupboard with a triangular key on it. And you will find something upsetting….his boots. You found Pey’js boots. So take them as it will be a great deal of help to you. And also take anything else that you see. On the left hand side there’s a hand switch. Press on that and an mdisk will appear. Take it as it is useful to see. You should at least guess what happens next right? You will be ambushed by two *Cyclopius* there are two electrical barriers as you saw. Put each one into that barrier to destroy it. Two new paths will open for you the path that you need to go to is the *computer room* first. Which is the path that the Cyclopius was not in, so it’s the other room. When you find the room there will be an mdisk reader, and another mdisk to take. So watch those two and save before leaving the room. Go through another path which is the routing room.
So it’s like that exercise thing again for jade. Roll over and crouch, next you will come to some corner. You should see a hand switch on the left. That will open the door. But when that does happen the red bars will appear. And the door will only be open for a limited of time. As it will slowly go back down to close itself, so crouch then roll to quickly get pass the door. in this room the alpha section guard will be above you so make sure you are crouching at all times. He will walk back and forth so when he is not looking, go through a small passage as it is before you. There will be some rats there kick them and then go up the upper platform. Then when he his looking the other way you can either pass or kick him. When you have done that, go up the blue looking teleportation that will lead you up. Ok be fast. As when you are on here there’s a blue bar on the floor and an electrical barrier not so far off so roll and then crouch afterwards. Then head to the left quickly before something bad happens to you. There will be an mdisk reader so save your game before carrying on. Then shimmy your way to another path and…..you will see that the guard has been possessed by the domz, so hes not human anymore. Next you will need to get across as you will see. And also there will be another electrical barrier. But this time it is in mid-air meaning you will have to crouch. Use the hand disk to bring the lift to you. If you don’t know where it is, use your camera to find it up on a high ledge. So when you do find it, use the hand disk. Go on it crouch and use the hand disk again, for it to carry you to the other side. You will have to crouch again to get to the other area. There will be one guard he will be moving in his position. When he is facing the other way kick him, and then proceed on. And there will be more exercise for jade, meaning crouch and roll. You know of what to do of that now. When you pass that part there will be two more guards on patrol. And they are both walking at the same time, so it is best to kick one guard. Then go on full blown attack on the other one. When that is done keep on going. Or if you just can’t be bothered to attack you can sneak pass them. When they both walk, for a few seconds they face the wall. So that would be your chance to pass by, without them even knowing.
5th boss
The Slaughterhouse
And also do not let them catch you as well. Or that wouldn’t be a nice ending for you. So before you move on use your camera to toggle to see when you need to hide. Which are in the foggy parts, if you hide in there you will not be seen. And some of them are moving so make sure to time when you quickly pass them and to hide as well….it might take time as it is intimidating in a way. When you do get passed them keep on going and don’t go back. So…..you’re safe for now… that was just one of the big parts in the game. And you will run into them more as you proceed on. So you see some looking sort of a lift. And there is no fuse. Kick the electrical box and go through the way that has the blue bars. Do this quickly but yet carefully at the same time. Then at the end there would be a fuse. Take it quickly and head back to the lift. Put in the fuse and use your key to operate it.
On your way to the next room you should see a red barrier. And a small room with a pearl and with something else there as well. And you would ask. How am I going to get in there? Well in the next place there are like 4-5 guards with 2 Ms Laser Turrets. You have to be extra careful. If you can see there is a small crouch place to go through in, that leads to the pearl. But you have to sneak. Once you had taken the fuse, head out of the room and onto another path. Which will be to your left when you go out it will be dark. But don’t worry keep on going straight until you are on a lift. Use your key to operate it, jade will crouch down meaning there will be guards nearby again. In this place there will be one guard with a gas tank. But he will be above you so he won’t see you. 1 you can either get rid of this guard, and go into the room that he is guarding. But there will be another on the loose and without a gas tank. If you go into that small room he will see you. Or 2 you can go and destroy that other guard first, that doesn’t have the gas tank on him. Basically he is walking around back and forth. When he is on the lift use the hand switch to make the lift move and he will die. Problem solved. But in that room what the first guard is guarding there is a PA 1. So it’s best to get it before moving on. When you have taken care of those two guards go onto the lift and move on to another area. The next one might annoy you as there are 3 guards and the way the angle is. It’s not pretty nice so I suggest you find a way to sneak pass them instead of attacking. Or you can go and attack them if you wish. 2 will be walking while the other one will be turning from back to front. So when you do pass them there will be a socket. Now put the fuse that you picked up in there, and a door will open. But not fully so you will have to crouch to get in. So…. Good news! The horror has ended for now! as you will meet up with double H again. Save the game and process onto the last room which is the central hall. Laian: Hope you liked it. ^-^ Here's a link to my part 1 walkthrough https://www.vizzed.com/boards/thread.php?id=76806&ref=259134 |
 < that's the hallway that you will come in.
 < This is what I meant by being careful as that guard can catch you.
 < This is a better view of the guard and what you have to do next. As you can see I pointed the way of where to do next which is on jades left side.
 < I pointed the way of the next area that you need to go.
 < Here is where the tiny animals live and these ones are rare. I will show a bit more to show how funny it is.


 < that's the next area to be in.
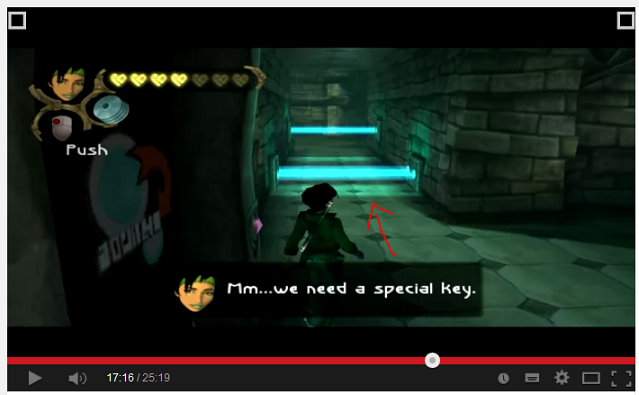 < That is the path that you need to go through.
 < where I ringed it that's where you need to go to re open the gate for you to leave.
 < That is where the slaughterhouse is.
 < Remember to your left to look out for an opening to the slaughterhouse.
 < When in the Interior moats look out for it.
  Number 1 Sailor Moon, Final Fantasy And Freedom Planet Fan On Vizzed! Number 1 Sailor Moon, Final Fantasy And Freedom Planet Fan On Vizzed! |
Affected by 'Laziness Syndrome'
Registered: 08-16-12
Last Post: 1021 days
Last Active: 124 days
06-13-14 03:45 PM
sonicthehedgehog57 is Offline
| ID: 1035448 | 35 Words
POSTS: 610/1185
POST EXP: 342082
LVL EXP: 2981447
CP: 43682.1
VIZ: 55687
Eniitan : You're just keeping that great ball of perfection rolling with this walkthrough sis ^-^! I really enjoy reading it and having the images helped out alot with the reading too so great job ^^! |
Affected by 'Laziness Syndrome'
Registered: 12-02-10
Location: Springfield, MO
Last Post: 988 days
Last Active: 83 days
06-13-14 06:01 PM
 tgags123 is Offline
| ID: 1035531 | 39 Words
tgags123 is Offline
| ID: 1035531 | 39 Words
 tgags123 is Offline
Davideo123

POSTS: 4804/10073
POST EXP: 621549
LVL EXP: 67562080
CP: 40710.9
VIZ: 5818702
Local Mods : Didn't you guys outlaw having multiple part walkthroughs? Or was that rule changed it my short absence? Eniitan : I think you will have to combine your walkthrough parts into one thread, unless the new rules was repealed. Eniitan : I think you will have to combine your walkthrough parts into one thread, unless the new rules was repealed. |
| 2x Tour de Vizzed Champion |
Affected by 'Laziness Syndrome'
Registered: 04-26-13
Location: Florida
Last Post: 3 days
Last Active: 1 day
06-13-14 06:04 PM
Eniitan is Offline
| ID: 1035532 | 20 Words
Eniitan is Offline
POSTS: 1946/10522
POST EXP: 959649
LVL EXP: 74145136
CP: 55412.4
VIZ: 2632176
tgag123: Re read the rules please. I wouldn't do something stupid as this without asking and to prove it. IgorBird122 : IgorBird122 : |
| Number 1 Sailor Moon, Final Fantasy And Freedom Planet Fan On Vizzed! |
Affected by 'Laziness Syndrome'
Registered: 08-16-12
Last Post: 1021 days
Last Active: 124 days
06-13-14 06:06 PM
 IgorBird122 is Offline
| ID: 1035533 | 21 Words
IgorBird122 is Offline
| ID: 1035533 | 21 Words
 IgorBird122 is Offline
The_IB122

POSTS: 3143/6414
POST EXP: 526201
LVL EXP: 34743176
CP: 40936.9
VIZ: 780236
| The Shadow King |
Affected by 'Laziness Syndrome'
Registered: 01-07-13
Location: The Big Easy
Last Post: 1927 days
Last Active: 1912 days
06-13-14 06:34 PM
 TheReaper7290 is Offline
| ID: 1035547 | 15 Words
TheReaper7290 is Offline
| ID: 1035547 | 15 Words
 TheReaper7290 is Offline

POSTS: 867/1737
POST EXP: 37593
LVL EXP: 4645068
CP: 9860.0
VIZ: 154236
Wow you are really good at this great job on part 2 of the walkthrough |
| Angel Of Death |
Affected by 'Laziness Syndrome'
Registered: 04-10-14
Location: The After life
Last Post: 3003 days
Last Active: 724 days
06-14-14 04:15 AM
 juuldude is Offline
| ID: 1035697 | 20 Words
juuldude is Offline
| ID: 1035697 | 20 Words
 juuldude is Offline

POSTS: 1393/3976
POST EXP: 272721
LVL EXP: 18176481
CP: 13346.5
VIZ: 517678
Dutch vizzedeer and Professor Layton fan  |
Affected by 'Laziness Syndrome'
Registered: 02-26-11
Location: Holland, The Netherlands, which you prefer
Last Post: 2520 days
Last Active: 17 min.
06-14-14 08:21 AM
Laian is Offline
| ID: 1035742 | 50 Words

POSTS: 1689/2232
POST EXP: 457173
LVL EXP: 7470746
CP: 23733.5
VIZ: 3570463
Good job on this second part of the walkthrough. This part is totally uncharted territory for me, considering my game always crashed before this part of the game (refer to my post in the part 1 of the walkthrough for the obscure reason). Anyway, keep up this good work |
| Games have secrets, I have my eagle gaze. |
Affected by 'Laziness Syndrome'
Registered: 10-21-11
Location: France
Last Post: 2291 days
Last Active: 1464 days
