

 User Notice
 Forum Links
Guide: DRA Master Guide
An in-depth guide to uncover the secrets of the game
An in-depth guide to uncover the secrets of the game
Play Digimon Rumble Arena Online
Thread Information
Thread Actions


Order
DRA Master Guide
Game's Ratings
Overall
Graphics
Sound
Addictiveness
Depth
Story
Difficulty
Average User Score
8.8
8.5
8
6
5
4
4.5
07-23-25 05:06 PM
 EX Palen is Offline
| ID: 1416153 | 6329 Words
EX Palen is Offline
| ID: 1416153 | 6329 Words
 EX Palen is Offline
| ID: 1416153 | 6329 Words
EX Palen
Spanish Davideo7
Spanish Davideo7
Level: 141


POSTS: 6363/6387
POST EXP: 1153618
LVL EXP: 34097541
CP: 192670.7
VIZ: 11126683

POSTS: 6363/6387
POST EXP: 1153618
LVL EXP: 34097541
CP: 192670.7
VIZ: 11126683
Likes: 1 Dislikes: 0
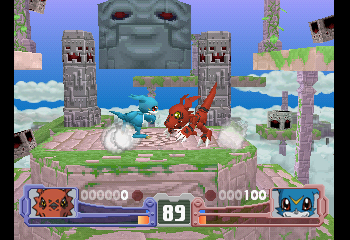
Ever since it appeared in the late 90s, Digimon became a major success in several media. And with the boom in videogames around that time, it was more than obvious the franchise would get its fair share in that sector as well in a wide variety of genres. Kind of surprisingly, fighting videogames haven’t been the most prolific ones, despite the fact that what kicked off the franchise was pitting two Digimon against each other when they were still the original Digital Monsters. We had to wait until this very game, which was released well after the PSX had a successor in the market, but nevertheless managed good sales and even spurred a sequel that completely overhauled the battle system… Though we’ll leave the sequel for a future time. This Master Guide will detail all the information you need to know about Digimon Rumble Arena: the 24 available characters, the controls, the stages and the power-ups. And while the game can initially look simple, it does have a component of strategy that, personally, is what makes this game stand out from most of the rest of fighting games of the time. So, starting with the business, here’s a little index to showcase the order in which the contents will be presented and quick links to each section to ease your trip through here. Getting Started Controls Digivolution and Super Attacks Stages Items Characters SECTION ONE: Getting Started As a fighting game, it is overall very simple, with a 1-Player Mode serving as the game’s Arcade Mode with its traditional final boss and two Versus Modes, one against another human player and another one against the CPU. There are also two unlockable modes for minigames but they’re not worth it: only three minigames exist, and they’re played randomly as a middle stage in the arcade mode with the only relevance being in the game’s end score.  Here you can see how a battle goes on in the game. Things like the Digimon’s icon or the timer don’t need explanation, the orange bar is the Digimon’s remaining life and the scoreboard right to the Digimon’s icon only serves a purpose in 1-Player Mode, as it keeps track of the score you will end up with after all the battles. The score increases every time your opponent gets hit, be it either your attacks or the hazards present in the stage. The red dot lights up when you win a round, and winning a second one earns you the overall victory. The blue meter above the life bar is the Digivolve meter. This is a major point of the game, so I’ll expand on this matter on the next paragraph. Another thing to note are types. I’ve noticed that the game clearly makes a difference between three types: Fire, Water and Nature. Both Digimon and stage hazards are classified in these three types, and the damage they deal depends on the receiving Digimon’s type: Fire will deal lower damage against Water but higher against Nature, Water will deal lower damage against Nature but higher against Fire, and Nature will deal lower damage to Fire and higher against Water. Same type will deal standard damage (nope, they’re not exempt of being damaged by stage hazards of their same type). Lastly, there’s a mechanic I’d call “Stunned”. A Digimon is left in this state after it receives too much damage or too many attacks in a short span. It is easily seen because the Digimon is dizzy, with an appropriate sound playing. One hit and the Digimon will snap out of it, even if the hit didn’t knock it down. SECTION TWO: Controls Control Stick – Movement (double tap for short jump forward) Square – basic melee attack (up to three hits if hit consecutively while on the ground) Forward+Square – throw (when up-close to the opponent) Circle – main attack Triangle – secondary attack Cross – jump (usable in mid-air for a second jump) L1 – guard (not usable in mid-air) R1 – Digivolve/Super Attack NOTE: The basic melee attack has a sweep variant (down+Square) that knocks down the opponent and an upper variant (up+Square) that sends them flying slightly. In the air, pressing forward+Square uses a horizontal attack that allows for air mobility, the same attack used if you press Square during a short jump forward, and pressing up+Square can sometimes give you more vertical reach. MINI SECTION: About Digivolution and Super Attacks As I said before, the Digivolve meter is a major point in the game. It fills up whenever you land a hit on an opponent or viceversa. Once it is full, your Digimon will be able to Digivolve to a higher level to increase its fighting capabilities, for which the screen will zoom in on you as the Digivolution is formally announced and after a brief animation battle will resume. However, the digivolved form has a time limit, which is displayed with the Digivolve meter slowly depleting. When empty, the Digimon de-Digivolves back to its basic form. During the time you spend in the digivolved form you can use the Super Attack at any time, at the cost of immediately de-Digivolving, even if unsuccesful. Only the nine Digimon available from the start (plus one unlockable) are capable of digivolution. Progressing through the game should get you their digivolved forms to use in the Versus Modes as separate characters, just like other unlockable characters only have their digivolved form available. When playing directly with the digivolved forms, the Digivolve meter still fills up under the same circumstances, but only when full can you unleash the Super Attack. While in the Digimon universe there are several levels of digivolution (Champion, Ultimate and Mega), in this game all of them receive the same treatment as simply the digivolved form of a specific character. Obviously, digivolved forms deal a lot more damage to basic Digimon, so try to get your digivolved opponent to deplete its remaining time in the form and nullify said advantage. When fighting against a character with no basic form you better digivolve quickly and wisely use your time to fight on par with your opponent, and survive any way you can until you can digivolve again. This is important, as you’ll need to clear the 1-Player mode with the basic characters to unlock the slot of their digivolved forms and the final boss has no basic form (and as a final boss is quite of broken, as you’ll see below because it is also an unlockable character). SECTION THREE: Stages A total of 7 stages are featured in this game. Each of them is unique in some way, so learning their tricks is crucial to correctly fight in each one. (Not sure if there’s any official name for the stages, I made them up myself judging from their appearance) Disposal Factory  At first glance a very simple level, with a main platform below, one side-moving floating platforms on each side, four platforms with conveyor belts at different altitudes and a small one atop them all. But the stage goes through an interesting cycle to spice things up a bit in your battles. A hook on the ceiling transports small dump containers it drops in the center of each of the four platforms. Once all four has one container deposited in it, a red alarm will initiate and the fun starts. The main platform opens up, the four higher platforms incline and activate the belts to let the containers down below into what should be an incinerator, and once the process ends everything returns to normal so the cycle can repeat itself. As you’d think, falling into the void of the main platform makes you lose health and respawn atop it, just like if you fall from the sides of the platform. You can get hit by the falling containers, as well as the always moving hook on the ceiling, so avoid them as much as possible. Since no type is associated with this stage, everyone receives the same damage from its hazards. The stage has four slots where items can appear: the main ones are the moving platforms on the side and the platform above everything. On rare occasions items may spawn in the center of the main platform when it’s closed. Heaven Sanctuary   This stage is located high above the clouds, so falling off is very easy. A few stone platforms at different levels, with thin and small platforms that sink under weight, big square blocks moving and stopping at specific points and a holy pillar in the center. The key to survive in this level is to keep moving. While the risk of falling down increases, there aren’t many safe zones you can stay in and it’s not a place where fighting in a small space is recommended. Watch your step and trick your opponent into an attack leading nowhere and they’ll be left without the chance of recovering. As you see, the stage has a day-night cycle. During the day, the big blocks move about and stop every so often, and the hilly pillar stays dormant. At night, however, the blocks remain stationary in their last position and the holly pilar opens, unleashing divine judgement onto the stage. The blocks serve as lightning rods apparently, from which lightning explodes in the four directions at mid range in an alternate motion. Combined with the easyness to fall off if knocked down, you could take big damage if you decide to carelessly move about. And since the damage is neutral, no one can benefit of taking more risks. The stage has five slots where items can appear: the platforms below, the center of the upper platform and the outermost end of the middle platforms. Landslide Waterfall  A cave in the background, a waterfall in the forefront, a battlefield for Digimon. The “shore” at each side has two steps, and the tree marking the stage wall has a branch extending forward that serves as a platform. The interesting part of the stage is the cave. At random times, a landslide will bring rocks rolling down into the waterfall (hence the name), which can be of small, medium or big size. The small ones can be pushed away somewhat with certain attacks, and will only inflict medium damage while pushing you aside. The bigger rocks cause a lot more damage, and if they hit you fully they will push you to the waterfall and respawn atop the tree branch (if hit only partially the effect is the same as the small rocks). Jumping over the rocks is possible, though the biggest ones are better avoided laterally. The stage is associated with the nature-type, so water Digimon will need to beware even more of the rocky hazards. The stage has five slots where items can appear: atop the two branches, on the higher step of both shores and right in the middle of the stream (this one should normally be the exact center, but I’ve sometimes seen items spawn closer to one of the shores). Volcanic Pit  The devilish face in the background is kind of fitting for this relative inferno. Mostly dormant, the face sometimes lights up which signals the volcano is about to erupt. And while it’s nothing flashy whatsoever, you still need to be careful when that happens. This rocky area has a main big platform we start on, surrounded by four other platforms slightly above and below as well as two protrusions on each side. Down below the lava pit we have two more solid platforms at each end as well as two floating platforms in the middle of the fiery lake, leaving three openings. Not very hard to fall down into the lava, but it still has a trick up its sleeve: eruption. Normally, the background music is accompanied by a characteristic sound reminiscent of a boiling pot. From time to time, the devilish face in the background illuminates, and the sound is changed into something like a firestorm to indicate the eruption starts. At random, one of the openings starts spitting out a stream of fire which reaches up to the platforms below the main one. After some time, the volcano returns to its dormant state until the process initiates again. Obviously, the stream and the pit below deal fire-damage so nature-types will have to beware from going into the lower part of this stage. The stage has six points where items can spawn: the center of the main platform, the protrusions at each side and the openings down below. These last three pose some risk because you’ll have to jump for them and land safely or fall into the pit, as well as sudden eruptions blocking the way, and the main platform sometimes isn’t the best of places, specially for bombs. Iceberg Ocean  From scorching heat to freezing cold, literally. We’re stranded in an iceberg in the middle of the ocean, which of course means a very slippery surface that will cause major problems. Standing still here is almost impossible, and absolutely not recommended or you’ll run out of time to react to a more than possible fall. The iceberg has three different levels, as we can see. The upper level has a smaller platform from which stalactites grow in the ends, which fall into the bigger platform below. In this platform also grow stalactites which fall into the lowest level, which for some reason is almost U-shaped. At each side, the freezing ocean awaits for anyone who ventures way too far. The thing is that the surface is very slippery, so moving around is much harder than the rest of stages specially when needing to change direction or keep distance. Additionally, for some weird reason, the bigger sides of the middle platform can fall off permanently, posing a serious threat and also diminishing the available space. The freezing water as well as the stalactites deal water-type damage, so fire-types will have a tough time staying out of harm in this place. The stage has five points where items can spawn: the far-ends of both the upper and middle platforms, as well as in the center of the lowest platform. The first two require jumping, so be wary of where you’re going or where do you land. And when the edges of the middle platform fall down, the items in both the upper and middle platform are almost unreachable without landing safely. Revolving Prison  Just a very big squared cage with red digital platforms and solid yellow ones scattered through it. Simple and with no apparent hazards, but as you will have guessed from its name, it hides a trick up its sleeve. We start in one of the edges of this cage, with one yellow platform, a red smaller platform to the right and a corner-shaped platform a bit higher to the left. The red platforms disappear if a character stays on them for a prolonged while, though they reappear a few seconds later. No hazards apparently in sight, but the twist comes when, all of a sudden, characters freeze still as the camera zooms out to show the whole cage and one or two revolving arrows appear at the screen in the middle. The arrows rotate the cage one or two steps to one side, meaning characters will fall to a different side of the cage with a slightly different layout. While this twist is a bit bland, as you can check from the picture, squared bombs are placed in four key red platforms and fall down whenever the cage stops, dealing substantial damage to anybody they catch in their path. It’s not hard to avoid them, but if you’re not careful about them you can end up in the losing side. Items can appear atop each of the platforms, both red and yellow, as well as the center of the cage. They don’t appear only in the side you’re standing, you can try to aim higher and see if any helpful item lays in a platform above or if after a twist you want to reach for an item that appeared in the last side. It can sometimes be hard to reach the upper sides for having very limited space to propel yourself up. Digital Void  The home of the final boss, but it has nothing epic to it. In fact, it’s an empty stage without any platforms, ledges, hazards, walls or even items. So, all you can do is fight flat out or evade in a linear way, nothing else to it. The background looks like the generic visuals generated by Windows Media Player from that time, they serve no real purpose. Well, except causing a bit of dizziness because it creates odd after-images. Such a shame that the only unlockable stage is so empty about everything. While I see how it poses an extreme challenge in Arcade mode, in part because the final boss is broken as you’ll see below, in a regular fight this stage falls very bland and tasteless compared to the ones we’ve already seen. Even without items, the other stages present hazards that makes battles thrilling and going in different directions, here you can only go from side to side, and occasionally up and down via jumping. SECTION FOUR: Items Items can be either helpful or hazardous items. Most of them appear in the form of cards, depending on the item, opened or unopened. A basic attack using Square or Circle will reveal any unopened cards you may find, simply passing over them won’t flip them nor allow you to collect them, only when they’re open can they be collected. There’s a special sound played for when an item spawns close by. Items have specific places throughout the stage they can appear in, and while I’ve seen some items appear almost always at certain spots I wouldn’t confirm it fully. Finally, after some 15 seconds, an uncollected item will disappear off the stage, and I haven’t seen a change in this time in an unopened card if it does get open. IMPORTANT: You collect items passing over them. Attacking them with your main or secondary attacks will push them away, which means you could accidentally put a helpful item right in your foe’s way! Here’s the list of available items: Bomb  A bomb appears in the stage and its fuse lights up upon appearing, once the fuse runs out it explodes on its own hurting anyone close by. However, coming into contact with it at anytime will also make it explode, so avoid getting close to them. Food (bread, chocolate bar, wrapped candy)    Restores a considerable amount of life. I’ve seen no difference between each edible, so it must be simply aesthetic for some reason. Plus (opened card)  Increases the Digivolve meter by a noticeable amount. Minus (opened card)  Decreases the Digivolve meter in the same noticeable amount as the Plus seen above. Digiwave (opened card)  Automatically triggers Digivolution if the Digivolve meter is full. No effect otherwise. Elemental Projectiles (opened cards)    Gives the Digimon the ability to fire a medium-ranged projectile once when pressing Circle (thus meaning the character won’t be able to use its main attack while holding the projectile). The projectiles can be of Fire (red), Nature (green) or Water (blue), and the Digimon will show a specific glow depending on which projectile it’s holding. Don’t wait too much using it or you run the risk of losing it! Down Arrow (opened card)  Halves the Digimon’s attack power for a long while. Evil Ring (unopened card)  Confuses the Digimon for a short period of time. It will move erratically but will still jump and attack when commanded. Evil Spiral (unopened card)  Same effect as the Evil Ring, but harder to properly control. Grand Plus (unopened card)  Completely fills up the Digivolve meter, allowing instant digivolution or use of the Super Attack. Marble Bust (unopened card)  Doubles the Digimon’s attack power for the same period of time as the Down Arrow seen before. NOTE: Items that have a lasting effect (projectiles, evil ring and spiral, marble bust and down arrow) may be interswitched if the Digimon picks up another item. For example, you cannot hold a projectile and have the marble bust at the same time. Digivolving or de-Digivolving also cancels the effects of any of these items. NOTE 2: Projectiles between Digimon nullify each other, but Elemental Projectiles override them. Additionally, Elemental Projectiles override one another following the type strengths we saw earlier on. SECTION FIVE: Characters  Main water-type of the game. Pretty average in all aspects, maybe lacks a bit of mobility. Main attack: Blue Blaster. A standard projectile traveling quite fast and far. Secondary attack: Horn Attack. Jumps very high damaging the opponent with the horn on its forehead. Deals a few hits and jumps quite high, but can’t be used in mid-air.  The Mega level of Gabumon sports an arsenal of weapons at its disposal. Its offensive might is almost second to none, specializing in long range fights to extract the best of its attacks, but it lacks a bit of mobility which hinders its potential in plaform-filled stages. Main attack: Metal Wolf Claw. A powerful stream of freezing energy that lasts for a while covering the whole screen, dealing a few hits to the opponent. Secondary attack: Garuru Tomahawk. Fires a big missile doing a backflip, as its fired from its chest, which travels a bit slowly but deals massive damage. Super Attack: G Cross Freezer. Shoots several missiles from all over its body, one of them is much bigger and travels more slowly but all of them home in to the enemy (somewhat), the bigger one dealing the bulk of the damage.  Main fire-type of the game. Decent stats overall, if anything it lacks a bit of vertical reach. Main attack: Pepper Breath. Standard projectile, I’d say it’s average in reach and speed. Secondary attack: Claw Attack. Strikes three times with its claws, slightly moving forward with each lunge. Can’t be used mid-air.  The Mega level of Agumon is the prefect definition of average. It can move around well and its attacks are not to be taken lightly, specially its Super Attack, but it excels in no area. Main Attack: Mega Claw. Slashes twice with its claws, creating some sort of short-ranged heat wave that can nullify projectiles. Can only be used on the ground. Secondary attack: Great Tornado. Plunges forward rotating its body with its claws up in front. The attack can be aimed in any direction when pressing the control strick right before the attack is performed. Additionally, before the attack ends, it’s possible to add a follow-up by pressing the buttons again, allowing you to change direction and keep hitting your opponent. Pretty versatile attack that allows wide coverage of the screen and several hits that are hard to avoid. Super Attack: Terra Force. Jumps slightly backwards and charges a massive sphere of energy thrown diagonally downwards. If it hits, it creates a massive explosion dealing equally massive damage. Quick to pull out and usable in mid-air, contrary to most other Super Attacks.  Main nature-type of the game for me. Small in size but has greater jump and air mobility, so it shouldn’t be a problem in platform-filled stages. Main attack: Boom Bubble. Shoots a big bubble of air. Travels slowly and has shorter reach than most, but being transparent means it’s harder to notice and thus track if the blast will hit you. Secondary attack: Slamming Attack. Lunges forward, if it connects it will permorm an ascending spiralling jump to further hit the opponent. Can’t be used in mid-air, but helps with screen coverage.  The Mega level of Patamon and another long-range fighter with hard-hitting projectiles. While its Super Attack has a reduced efficiency, it overall has decent attack and can destroy foes with ease. Great mobility in the ground, but not as much in mid-air. Main attack: Hallowed Knuckle. Creates and fires a very big sphere that covers the whole screen horizontally. Hard to avoid even at standard speed. Secondary attack: Seven Heavens. Creates seven small yellow spheres which are hurled diagonally up, however the spheres’ rotation end up combining them and making the attack smaller as it goes forward thus also reducing its efficiency. When used in mid-air it is launched diagonally downwards, which coupled with its high jumps gives it a great advantage from above. Super Attack: Hallowed Ascension. Works only when up-close with the opponent on the ground. If it connects, the opponent is frozen on the spot as lightning bolts fall all over it, inflicting great damage.  A nature-type of the third anime series. It has excellent mobility thanks to its secondary attack, but lacks agility. Main attack: Bunny Blaster. Shoots a green sphere forward, covering the whole screen at great speed. One of the best attacks from a basic character. Secondary attack: Terrier Tornado. Moves forward spinning with its long ears floating in mid-air, giving it great reach and dealing noticeable damage.  The Mega level of Terriermon looks huge and bulky, and in a sense it acts like that. Not as powerful as it would seem but its movements are a bit clunky. Makes up for it with a unique Super Attack, but overall it’s relatively rough to use. Main attack: Gargo Missile. Shoots two big-sized missiles that home in on the opponent. Hard to avoid, though damage isn’t great. Secondary attack: Mega Twister. Only works when up-close with the opponent on the ground. If it connects, the opponent is knocked down and then launched away after rotating heavily. Big damage, but hard to pull off. Super Attack: Burst Shot. It launches a barrage of small missiles from its forearms for several seconds, capable of inflicting heavy damage. It has short reach, but the attack is thrown both forward and backward from its legs so you can catch an opponent by surprise!  A fire-type of the third anime series. Quite similar to Agumon, just bigger in size. Main attack: Pyro Sphere. A fire projectile that travels further than most. Secondary attack: Rock Breaker. Lunges forward engulfed in flames. Not a long leap, but knocks down the opponent on hit.  The Mega level of Guilmon is a short-range fighter, lacking projectiles in its main attacks. It also has reduced mobility, so not fall in the bait of pursuing opponents too far away and think your way towards them. Its Super Attack does make up for this in spectacular fashion. Main attack: Royal Joust. Dashes forward with its shield before extending its lance. Can deal up to two hits, but has short reach and can only be used on the ground. Secondary attack: Spiral Saver. Engulfs itself in fire as it jumps slightly. Not much damage, but allows for a bit extra mobility mid-air. Super Attack: Elysium Blaster. Charges a colossal beam shot from its shield that covers the whole screen. Hard to avoid and massive damage dealt.  Another nature-type of the third anime series. Bigger than all other basic characters, it has an excellent main attack but a tricky or directly unuseful secondary attack, as well as increased mobility. Main attack: Diamond Storm. Summons tons of energy shards and launches them to the spot the opponent was when the attack was triggered. Can deal several hits but not much damage, and it overpowers projectiles due to not being considered as such. Secondary attack: Kohenkyo. Usable only in the ground. Renamon uses a ninja technique to switch places with the opponent, allowing it to escape incoming dangers. It takes a few seconds to pull off correctly, so you may misfire in your attempt to escape danger if timed wrongly.  The Mega level of Renamon. Its attacks are tricky but can deal devastating damage if pulled off correctly, and keeps the agility of Renamon. It’s Super Attack is also above average. Main attack: Dragon Helix. Not usable in mid-air. Unleashes four ghostly foxes which can be directed with the control stick towards the opponent, dealing several hits but not that much damage. Sakuyamon stands still while the attack is performed, so its open for counterattacks as well as stage hazards. Secondary attack: Fox Drive. Summons a massive flare of purple energy diagonally upwards, which greatly damages anyone engulfed in it. If used mid-air, the attack is fired diagonally downwards. Super Attack: Talisman Sphere. Usable only in the ground. Jumps forward to strike the ground with its staff, freezing a short area for a few seconds before unleashing a massive dome of green energy that greatly damages a defenseless enemy.  A nature-type of the second anime series. Small in size and reduced mobility, and its attacks aren’t great either. Not the worst of choices, but not the greatest either. Main attack: Sticky Net. Shoots a short-ranged net, which isn’t very damaging nor does it stop an opponent’s movements. Secondary attack: Silk Thread. Extends a stiff thread of its net which it uses as an extension of its tail, and lunges forward performing two frontflips to attack the opponent. Good screen coverage to make up for its mobility.  The Champion level of Wormmon changes drastically. Excellent mobility and its attacks are quite deadly. Be sure to use its time if fighting as a digivolution, you’ll need this advanatge when reverting to its base form. Main attack: Moon Shooter. Shoots a solid sphere of silk like a cannon. Doesn’t cover the whole screen but deals nice damage and has nice speed. Shot straight on the ground, diagonally downwards in mid-air. Secondary attack: Spiking Strike. Lunges forward with the spikes on its wrists. Doesn’t cover much distance but it’s a rapid lunge that can come as a surprise. Done straight on the ground, diagonally downwards in mid-air. Super Attack: Evil Antenna. Creates a mystic field in front of it. If the opponent is caught, Stingmon will recover some health and a few seconds after the same amount will be inflicted as damage to the opponent, pushing them away. Only usable in the ground, and it has quite a great effect.  A fire-type of the second anime series. Similar to Agumon but lacks a projectile attack. Main attack: Vee Headbutt. Lunges forward head-first. Not a big lunge bit its quick to pull off. When used mid-air it heads downwards a little bit. Secondary attack: Vee Punch. Dashes forward while rotating its arms vertically. Can inflict a few hits and decent damage, but can only be used on the ground.  The Mega level of Veemon (technically also Wormmon’s, the two fuse to create this one). Nice attacks and mobility, and its Super Attack is quite unique. Main attack: Positron Laser. Fires a laser from the weapon on its right wrist. Covers the whole screen at decent speed with nice damage. Secondary Attack: Splendor Blade. Jumps forward with a kick, then through a slash of its claws forms a spectral blade creating a short-ranged wave. Can only be used on the ground, but it’s more useful than what you’d think for its double hit nature. Super Attack: Giga Crusher. Initiates a cinematic combo on the spot it’s triggered, which consist of two punches, a double rising kick, a hammer punch in mid-air and a back sommersault, which ends in a much stronger Positron Laser. If all hits connect it can deplete a lot of life, but it’s easy to avoid the initial hits or the stage platforms can thwart the continuity of the combo. Obviously, can only be used on the ground.  A water-type from the first two anime series. Owing to the fact it’s a higher level than the other basic Digimon, Gatomon is more agile but its strength is hampered somewhat by its weak attacks. Main attack: Cat’s Eye Hypnotism. Shoots a medium-ranged psychic wave. It does nothing more, probably to not be too broken, but the end result was a mediocre main attack. Secondary attack: Lightning Paw. Dashes forward for a while, if it catches the opponent initiates a flurry of strikes as it jumps high. Only usable in the ground and helps it cover the screen much faster than usual.  The Mega level of Gatomon. Has the same drawbacks as MetalGarurumon for being quadrupedal, though jumps quite higher, and its attacks have a trick or two to it. It’s Super Attack is a bit strange, too. Main attack: Fire Tornado. Shoots a spiralling wave that gets bigger as it crosses the screen, though the damage it inflicts stays the same. The original name doesn’t cope with the fact this Digimon is water-type in this game, but whatever. Secondary attack: Hermit Fog. Sprays a mystical fog at short range to damage close opponents. Also serves to nullify basic projectiles thrown at it, and since it can be used mid-air it’s a major defensive tool. Super Attack: Apocalypse. Creates an energy ring which, if it hits the opponent, lightning bolts will be called down to strike them on the spot. The ring has short reach, and the opponent can still attempt to get away, but if it connects it deals decent damage. Also, the lightning bolts look like directional arrows, for some unknown reason.  The final boss of the game, labelled as a fire-type Mega which was made exclusively for this game. Absolutely broken, maybe only in mobility it’s inferior to most. Its attacks are deadly, its Super Attack is an absolute pain to deal with and can stun opponents with relative ease. Main attack: Bone Duster. Forms a big flame right in front of it with the weapon on its left wrist, dealing several hits and noticeable damage. Also acts as a barrier to nullify projectiles. Secondary attack: Grim Slasher. After three vertical slashes with its right-hand sicle, it dashes forward to further damage the opponent. Delivers a ton of hits and causes severe damage, plus allows it to cover the screen much faster, but can only be used in the ground. Super Attack: Burning Cyclone. Engulfs itself at the center of a fiery tornado. It lasts for a long while, allowing it to connect twice and dealing devastating damage to opponents that are sent flying quite away. The rotation of the tornado also creates some form of attraction, so it’s very hard to avoid this attack.  A shadow version of WarGreymon, displaying its same characteristics in all fields. A wasted character slot in my opinion, even if it was a relevant figure in the first two anime series it should have been made noticeably different to effectively count as another character. Main attack: Dragon Crusher. Creates two waves of heat energy that travel a short distance. Serves to nullify projectiles as well as damaging, but can only be used on the ground. Secondary attack: Black Tornado. Lunges forward rotating with its claws extended. Can be connected twice and the direction it lunges can be adjusted with the control stick each time, allowing it to cover a long distance and deal massive damage. Super Attack: Terra Destroyer. Charges up a massive sphere of energy and throws it diagonally downwards, almost straight, though in this occasion it does it on the spot instead of jumping. Can deal severe damage if it connects, nearly half a life bar of a Mega opponent.  The Mega level fusion of WarGreymon and MetalGarurumon. Deals massive damage with its attacks and keeps the mobility of a bipedal, so it’s a major force to be reckoned with. Being a combination of types, he’s been given neutral damage received. Main attack: Garuru Cannon. Fires a laser shot from the cannon hidden in its right hand. Travels the whole screen very fast and deals noticeable water-type damage. Secondary attack: Trascendent Sword. Slashes twice with its Grey Sword hidden in its left hand, creating a short-ranged shockwave. Inflicts severe fire-type damage. Super Attack: Double Trent. Creates an icy chain with its left hand, which is then set ablaze like a powder trail by its right hand, dealing severe damage of both water-type, first, and fire-type, later. A massive attack that covers the whole screen and can prove devastating.  A partnerless Digimon from the third anime series. Not suited for close combat and quite powerful compared to the other basic characters. Not given a standard type. Main attack: Badda Boom. Shoots a long-ranged fireball, inflicting fire-type damage well above standard. Secondary attack. Summon. Invokes three miniballs of energy that are shot forward. Inflicts noticeable water-type damage with the same range as the previous attack, but this one can only be done on the ground.  The Mega level of Impmon. Its attacks and mobility are great, though its Super Attack can sometimes be hard to connect. Again, not given a standard type, but this time its attacks are also neutral-typed. Main attack: Dark Ringer. Shoots a round energy sphere from its Blaster. While it doesn’t cover the whole screen it does travel fast. Secondary attack: Darkness Claw. Performs an upwards swing with its free left hand. Kind of damaging, but can only be used on the ground. Super Attack: Chaos Flare. Forms a magic circle in front of it, which attracts and damages the opponent continuously, before shooting a major blast from its weapon to finish them off. Severely damaging, and its attractive properties are a boost.  Blessed with the data of Omnimon, displaying a new finisher weapon and a new body color. Otherwise, it’s exactly like Imperialdramon Fighter Mode, so another wasted character slot. Main attack: Positron Laser. Fires a laser beam from its right wrist-mounted weapon. Covers the whole screen at decent pace. Secondary attack: Splendor Blade. After jumping forward with a kick, it forms a spectral wave through a slash of its claws. Covers a wide range thanks to its double hit nature, but can only be used on the ground. Super Attack: Omega Sword. Only usable in the ground. Initiates a cinematic combo on the spot, consisting of two punches, a rising double kick, a mid-air hammer punch and a dragon uppercut that launches the opponent high. Then, as a finisher, it unsheathes its Omega Sword to deliver a massive slash to finish up the combo, dealing severe damage. Kind of surprisingly, fighting videogames haven’t been the most prolific ones, despite the fact that what kicked off the franchise was pitting two Digimon against each other when they were still the original Digital Monsters. We had to wait until this very game, which was released well after the PSX had a successor in the market, but nevertheless managed good sales and even spurred a sequel that completely overhauled the battle system… Though we’ll leave the sequel for a future time. This Master Guide will detail all the information you need to know about Digimon Rumble Arena: the 24 available characters, the controls, the stages and the power-ups. And while the game can initially look simple, it does have a component of strategy that, personally, is what makes this game stand out from most of the rest of fighting games of the time. So, starting with the business, here’s a little index to showcase the order in which the contents will be presented and quick links to each section to ease your trip through here. Getting Started Controls Digivolution and Super Attacks Stages Items Characters SECTION ONE: Getting Started As a fighting game, it is overall very simple, with a 1-Player Mode serving as the game’s Arcade Mode with its traditional final boss and two Versus Modes, one against another human player and another one against the CPU. There are also two unlockable modes for minigames but they’re not worth it: only three minigames exist, and they’re played randomly as a middle stage in the arcade mode with the only relevance being in the game’s end score. Here you can see how a battle goes on in the game. Things like the Digimon’s icon or the timer don’t need explanation, the orange bar is the Digimon’s remaining life and the scoreboard right to the Digimon’s icon only serves a purpose in 1-Player Mode, as it keeps track of the score you will end up with after all the battles. The score increases every time your opponent gets hit, be it either your attacks or the hazards present in the stage. The red dot lights up when you win a round, and winning a second one earns you the overall victory. The blue meter above the life bar is the Digivolve meter. This is a major point of the game, so I’ll expand on this matter on the next paragraph. Another thing to note are types. I’ve noticed that the game clearly makes a difference between three types: Fire, Water and Nature. Both Digimon and stage hazards are classified in these three types, and the damage they deal depends on the receiving Digimon’s type: Fire will deal lower damage against Water but higher against Nature, Water will deal lower damage against Nature but higher against Fire, and Nature will deal lower damage to Fire and higher against Water. Same type will deal standard damage (nope, they’re not exempt of being damaged by stage hazards of their same type). Lastly, there’s a mechanic I’d call “Stunned”. A Digimon is left in this state after it receives too much damage or too many attacks in a short span. It is easily seen because the Digimon is dizzy, with an appropriate sound playing. One hit and the Digimon will snap out of it, even if the hit didn’t knock it down. SECTION TWO: Controls Control Stick – Movement (double tap for short jump forward) Square – basic melee attack (up to three hits if hit consecutively while on the ground) Forward+Square – throw (when up-close to the opponent) Circle – main attack Triangle – secondary attack Cross – jump (usable in mid-air for a second jump) L1 – guard (not usable in mid-air) R1 – Digivolve/Super Attack NOTE: The basic melee attack has a sweep variant (down+Square) that knocks down the opponent and an upper variant (up+Square) that sends them flying slightly. In the air, pressing forward+Square uses a horizontal attack that allows for air mobility, the same attack used if you press Square during a short jump forward, and pressing up+Square can sometimes give you more vertical reach. MINI SECTION: About Digivolution and Super Attacks As I said before, the Digivolve meter is a major point in the game. It fills up whenever you land a hit on an opponent or viceversa. Once it is full, your Digimon will be able to Digivolve to a higher level to increase its fighting capabilities, for which the screen will zoom in on you as the Digivolution is formally announced and after a brief animation battle will resume. However, the digivolved form has a time limit, which is displayed with the Digivolve meter slowly depleting. When empty, the Digimon de-Digivolves back to its basic form. During the time you spend in the digivolved form you can use the Super Attack at any time, at the cost of immediately de-Digivolving, even if unsuccesful. Only the nine Digimon available from the start (plus one unlockable) are capable of digivolution. Progressing through the game should get you their digivolved forms to use in the Versus Modes as separate characters, just like other unlockable characters only have their digivolved form available. When playing directly with the digivolved forms, the Digivolve meter still fills up under the same circumstances, but only when full can you unleash the Super Attack. While in the Digimon universe there are several levels of digivolution (Champion, Ultimate and Mega), in this game all of them receive the same treatment as simply the digivolved form of a specific character. Obviously, digivolved forms deal a lot more damage to basic Digimon, so try to get your digivolved opponent to deplete its remaining time in the form and nullify said advantage. When fighting against a character with no basic form you better digivolve quickly and wisely use your time to fight on par with your opponent, and survive any way you can until you can digivolve again. This is important, as you’ll need to clear the 1-Player mode with the basic characters to unlock the slot of their digivolved forms and the final boss has no basic form (and as a final boss is quite of broken, as you’ll see below because it is also an unlockable character). SECTION THREE: Stages A total of 7 stages are featured in this game. Each of them is unique in some way, so learning their tricks is crucial to correctly fight in each one. (Not sure if there’s any official name for the stages, I made them up myself judging from their appearance) Disposal Factory At first glance a very simple level, with a main platform below, one side-moving floating platforms on each side, four platforms with conveyor belts at different altitudes and a small one atop them all. But the stage goes through an interesting cycle to spice things up a bit in your battles. A hook on the ceiling transports small dump containers it drops in the center of each of the four platforms. Once all four has one container deposited in it, a red alarm will initiate and the fun starts. The main platform opens up, the four higher platforms incline and activate the belts to let the containers down below into what should be an incinerator, and once the process ends everything returns to normal so the cycle can repeat itself. As you’d think, falling into the void of the main platform makes you lose health and respawn atop it, just like if you fall from the sides of the platform. You can get hit by the falling containers, as well as the always moving hook on the ceiling, so avoid them as much as possible. Since no type is associated with this stage, everyone receives the same damage from its hazards. The stage has four slots where items can appear: the main ones are the moving platforms on the side and the platform above everything. On rare occasions items may spawn in the center of the main platform when it’s closed. Heaven Sanctuary This stage is located high above the clouds, so falling off is very easy. A few stone platforms at different levels, with thin and small platforms that sink under weight, big square blocks moving and stopping at specific points and a holy pillar in the center. The key to survive in this level is to keep moving. While the risk of falling down increases, there aren’t many safe zones you can stay in and it’s not a place where fighting in a small space is recommended. Watch your step and trick your opponent into an attack leading nowhere and they’ll be left without the chance of recovering. As you see, the stage has a day-night cycle. During the day, the big blocks move about and stop every so often, and the hilly pillar stays dormant. At night, however, the blocks remain stationary in their last position and the holly pilar opens, unleashing divine judgement onto the stage. The blocks serve as lightning rods apparently, from which lightning explodes in the four directions at mid range in an alternate motion. Combined with the easyness to fall off if knocked down, you could take big damage if you decide to carelessly move about. And since the damage is neutral, no one can benefit of taking more risks. The stage has five slots where items can appear: the platforms below, the center of the upper platform and the outermost end of the middle platforms. Landslide Waterfall A cave in the background, a waterfall in the forefront, a battlefield for Digimon. The “shore” at each side has two steps, and the tree marking the stage wall has a branch extending forward that serves as a platform. The interesting part of the stage is the cave. At random times, a landslide will bring rocks rolling down into the waterfall (hence the name), which can be of small, medium or big size. The small ones can be pushed away somewhat with certain attacks, and will only inflict medium damage while pushing you aside. The bigger rocks cause a lot more damage, and if they hit you fully they will push you to the waterfall and respawn atop the tree branch (if hit only partially the effect is the same as the small rocks). Jumping over the rocks is possible, though the biggest ones are better avoided laterally. The stage is associated with the nature-type, so water Digimon will need to beware even more of the rocky hazards. The stage has five slots where items can appear: atop the two branches, on the higher step of both shores and right in the middle of the stream (this one should normally be the exact center, but I’ve sometimes seen items spawn closer to one of the shores). Volcanic Pit The devilish face in the background is kind of fitting for this relative inferno. Mostly dormant, the face sometimes lights up which signals the volcano is about to erupt. And while it’s nothing flashy whatsoever, you still need to be careful when that happens. This rocky area has a main big platform we start on, surrounded by four other platforms slightly above and below as well as two protrusions on each side. Down below the lava pit we have two more solid platforms at each end as well as two floating platforms in the middle of the fiery lake, leaving three openings. Not very hard to fall down into the lava, but it still has a trick up its sleeve: eruption. Normally, the background music is accompanied by a characteristic sound reminiscent of a boiling pot. From time to time, the devilish face in the background illuminates, and the sound is changed into something like a firestorm to indicate the eruption starts. At random, one of the openings starts spitting out a stream of fire which reaches up to the platforms below the main one. After some time, the volcano returns to its dormant state until the process initiates again. Obviously, the stream and the pit below deal fire-damage so nature-types will have to beware from going into the lower part of this stage. The stage has six points where items can spawn: the center of the main platform, the protrusions at each side and the openings down below. These last three pose some risk because you’ll have to jump for them and land safely or fall into the pit, as well as sudden eruptions blocking the way, and the main platform sometimes isn’t the best of places, specially for bombs. Iceberg Ocean From scorching heat to freezing cold, literally. We’re stranded in an iceberg in the middle of the ocean, which of course means a very slippery surface that will cause major problems. Standing still here is almost impossible, and absolutely not recommended or you’ll run out of time to react to a more than possible fall. The iceberg has three different levels, as we can see. The upper level has a smaller platform from which stalactites grow in the ends, which fall into the bigger platform below. In this platform also grow stalactites which fall into the lowest level, which for some reason is almost U-shaped. At each side, the freezing ocean awaits for anyone who ventures way too far. The thing is that the surface is very slippery, so moving around is much harder than the rest of stages specially when needing to change direction or keep distance. Additionally, for some weird reason, the bigger sides of the middle platform can fall off permanently, posing a serious threat and also diminishing the available space. The freezing water as well as the stalactites deal water-type damage, so fire-types will have a tough time staying out of harm in this place. The stage has five points where items can spawn: the far-ends of both the upper and middle platforms, as well as in the center of the lowest platform. The first two require jumping, so be wary of where you’re going or where do you land. And when the edges of the middle platform fall down, the items in both the upper and middle platform are almost unreachable without landing safely. Revolving Prison Just a very big squared cage with red digital platforms and solid yellow ones scattered through it. Simple and with no apparent hazards, but as you will have guessed from its name, it hides a trick up its sleeve. We start in one of the edges of this cage, with one yellow platform, a red smaller platform to the right and a corner-shaped platform a bit higher to the left. The red platforms disappear if a character stays on them for a prolonged while, though they reappear a few seconds later. No hazards apparently in sight, but the twist comes when, all of a sudden, characters freeze still as the camera zooms out to show the whole cage and one or two revolving arrows appear at the screen in the middle. The arrows rotate the cage one or two steps to one side, meaning characters will fall to a different side of the cage with a slightly different layout. While this twist is a bit bland, as you can check from the picture, squared bombs are placed in four key red platforms and fall down whenever the cage stops, dealing substantial damage to anybody they catch in their path. It’s not hard to avoid them, but if you’re not careful about them you can end up in the losing side. Items can appear atop each of the platforms, both red and yellow, as well as the center of the cage. They don’t appear only in the side you’re standing, you can try to aim higher and see if any helpful item lays in a platform above or if after a twist you want to reach for an item that appeared in the last side. It can sometimes be hard to reach the upper sides for having very limited space to propel yourself up. Digital Void The home of the final boss, but it has nothing epic to it. In fact, it’s an empty stage without any platforms, ledges, hazards, walls or even items. So, all you can do is fight flat out or evade in a linear way, nothing else to it. The background looks like the generic visuals generated by Windows Media Player from that time, they serve no real purpose. Well, except causing a bit of dizziness because it creates odd after-images. Such a shame that the only unlockable stage is so empty about everything. While I see how it poses an extreme challenge in Arcade mode, in part because the final boss is broken as you’ll see below, in a regular fight this stage falls very bland and tasteless compared to the ones we’ve already seen. Even without items, the other stages present hazards that makes battles thrilling and going in different directions, here you can only go from side to side, and occasionally up and down via jumping. SECTION FOUR: Items Items can be either helpful or hazardous items. Most of them appear in the form of cards, depending on the item, opened or unopened. A basic attack using Square or Circle will reveal any unopened cards you may find, simply passing over them won’t flip them nor allow you to collect them, only when they’re open can they be collected. There’s a special sound played for when an item spawns close by. Items have specific places throughout the stage they can appear in, and while I’ve seen some items appear almost always at certain spots I wouldn’t confirm it fully. Finally, after some 15 seconds, an uncollected item will disappear off the stage, and I haven’t seen a change in this time in an unopened card if it does get open. IMPORTANT: You collect items passing over them. Attacking them with your main or secondary attacks will push them away, which means you could accidentally put a helpful item right in your foe’s way! Here’s the list of available items: Bomb A bomb appears in the stage and its fuse lights up upon appearing, once the fuse runs out it explodes on its own hurting anyone close by. However, coming into contact with it at anytime will also make it explode, so avoid getting close to them. Food (bread, chocolate bar, wrapped candy) Restores a considerable amount of life. I’ve seen no difference between each edible, so it must be simply aesthetic for some reason. Plus (opened card) Increases the Digivolve meter by a noticeable amount. Minus (opened card) Decreases the Digivolve meter in the same noticeable amount as the Plus seen above. Digiwave (opened card) Automatically triggers Digivolution if the Digivolve meter is full. No effect otherwise. Elemental Projectiles (opened cards) Gives the Digimon the ability to fire a medium-ranged projectile once when pressing Circle (thus meaning the character won’t be able to use its main attack while holding the projectile). The projectiles can be of Fire (red), Nature (green) or Water (blue), and the Digimon will show a specific glow depending on which projectile it’s holding. Don’t wait too much using it or you run the risk of losing it! Down Arrow (opened card) Halves the Digimon’s attack power for a long while. Evil Ring (unopened card) Confuses the Digimon for a short period of time. It will move erratically but will still jump and attack when commanded. Evil Spiral (unopened card) Same effect as the Evil Ring, but harder to properly control. Grand Plus (unopened card) Completely fills up the Digivolve meter, allowing instant digivolution or use of the Super Attack. Marble Bust (unopened card) Doubles the Digimon’s attack power for the same period of time as the Down Arrow seen before. NOTE: Items that have a lasting effect (projectiles, evil ring and spiral, marble bust and down arrow) may be interswitched if the Digimon picks up another item. For example, you cannot hold a projectile and have the marble bust at the same time. Digivolving or de-Digivolving also cancels the effects of any of these items. NOTE 2: Projectiles between Digimon nullify each other, but Elemental Projectiles override them. Additionally, Elemental Projectiles override one another following the type strengths we saw earlier on. SECTION FIVE: Characters Main water-type of the game. Pretty average in all aspects, maybe lacks a bit of mobility. Main attack: Blue Blaster. A standard projectile traveling quite fast and far. Secondary attack: Horn Attack. Jumps very high damaging the opponent with the horn on its forehead. Deals a few hits and jumps quite high, but can’t be used in mid-air. The Mega level of Gabumon sports an arsenal of weapons at its disposal. Its offensive might is almost second to none, specializing in long range fights to extract the best of its attacks, but it lacks a bit of mobility which hinders its potential in plaform-filled stages. Main attack: Metal Wolf Claw. A powerful stream of freezing energy that lasts for a while covering the whole screen, dealing a few hits to the opponent. Secondary attack: Garuru Tomahawk. Fires a big missile doing a backflip, as its fired from its chest, which travels a bit slowly but deals massive damage. Super Attack: G Cross Freezer. Shoots several missiles from all over its body, one of them is much bigger and travels more slowly but all of them home in to the enemy (somewhat), the bigger one dealing the bulk of the damage. Main fire-type of the game. Decent stats overall, if anything it lacks a bit of vertical reach. Main attack: Pepper Breath. Standard projectile, I’d say it’s average in reach and speed. Secondary attack: Claw Attack. Strikes three times with its claws, slightly moving forward with each lunge. Can’t be used mid-air. The Mega level of Agumon is the prefect definition of average. It can move around well and its attacks are not to be taken lightly, specially its Super Attack, but it excels in no area. Main Attack: Mega Claw. Slashes twice with its claws, creating some sort of short-ranged heat wave that can nullify projectiles. Can only be used on the ground. Secondary attack: Great Tornado. Plunges forward rotating its body with its claws up in front. The attack can be aimed in any direction when pressing the control strick right before the attack is performed. Additionally, before the attack ends, it’s possible to add a follow-up by pressing the buttons again, allowing you to change direction and keep hitting your opponent. Pretty versatile attack that allows wide coverage of the screen and several hits that are hard to avoid. Super Attack: Terra Force. Jumps slightly backwards and charges a massive sphere of energy thrown diagonally downwards. If it hits, it creates a massive explosion dealing equally massive damage. Quick to pull out and usable in mid-air, contrary to most other Super Attacks. Main nature-type of the game for me. Small in size but has greater jump and air mobility, so it shouldn’t be a problem in platform-filled stages. Main attack: Boom Bubble. Shoots a big bubble of air. Travels slowly and has shorter reach than most, but being transparent means it’s harder to notice and thus track if the blast will hit you. Secondary attack: Slamming Attack. Lunges forward, if it connects it will permorm an ascending spiralling jump to further hit the opponent. Can’t be used in mid-air, but helps with screen coverage. The Mega level of Patamon and another long-range fighter with hard-hitting projectiles. While its Super Attack has a reduced efficiency, it overall has decent attack and can destroy foes with ease. Great mobility in the ground, but not as much in mid-air. Main attack: Hallowed Knuckle. Creates and fires a very big sphere that covers the whole screen horizontally. Hard to avoid even at standard speed. Secondary attack: Seven Heavens. Creates seven small yellow spheres which are hurled diagonally up, however the spheres’ rotation end up combining them and making the attack smaller as it goes forward thus also reducing its efficiency. When used in mid-air it is launched diagonally downwards, which coupled with its high jumps gives it a great advantage from above. Super Attack: Hallowed Ascension. Works only when up-close with the opponent on the ground. If it connects, the opponent is frozen on the spot as lightning bolts fall all over it, inflicting great damage. A nature-type of the third anime series. It has excellent mobility thanks to its secondary attack, but lacks agility. Main attack: Bunny Blaster. Shoots a green sphere forward, covering the whole screen at great speed. One of the best attacks from a basic character. Secondary attack: Terrier Tornado. Moves forward spinning with its long ears floating in mid-air, giving it great reach and dealing noticeable damage. The Mega level of Terriermon looks huge and bulky, and in a sense it acts like that. Not as powerful as it would seem but its movements are a bit clunky. Makes up for it with a unique Super Attack, but overall it’s relatively rough to use. Main attack: Gargo Missile. Shoots two big-sized missiles that home in on the opponent. Hard to avoid, though damage isn’t great. Secondary attack: Mega Twister. Only works when up-close with the opponent on the ground. If it connects, the opponent is knocked down and then launched away after rotating heavily. Big damage, but hard to pull off. Super Attack: Burst Shot. It launches a barrage of small missiles from its forearms for several seconds, capable of inflicting heavy damage. It has short reach, but the attack is thrown both forward and backward from its legs so you can catch an opponent by surprise! A fire-type of the third anime series. Quite similar to Agumon, just bigger in size. Main attack: Pyro Sphere. A fire projectile that travels further than most. Secondary attack: Rock Breaker. Lunges forward engulfed in flames. Not a long leap, but knocks down the opponent on hit. The Mega level of Guilmon is a short-range fighter, lacking projectiles in its main attacks. It also has reduced mobility, so not fall in the bait of pursuing opponents too far away and think your way towards them. Its Super Attack does make up for this in spectacular fashion. Main attack: Royal Joust. Dashes forward with its shield before extending its lance. Can deal up to two hits, but has short reach and can only be used on the ground. Secondary attack: Spiral Saver. Engulfs itself in fire as it jumps slightly. Not much damage, but allows for a bit extra mobility mid-air. Super Attack: Elysium Blaster. Charges a colossal beam shot from its shield that covers the whole screen. Hard to avoid and massive damage dealt. Another nature-type of the third anime series. Bigger than all other basic characters, it has an excellent main attack but a tricky or directly unuseful secondary attack, as well as increased mobility. Main attack: Diamond Storm. Summons tons of energy shards and launches them to the spot the opponent was when the attack was triggered. Can deal several hits but not much damage, and it overpowers projectiles due to not being considered as such. Secondary attack: Kohenkyo. Usable only in the ground. Renamon uses a ninja technique to switch places with the opponent, allowing it to escape incoming dangers. It takes a few seconds to pull off correctly, so you may misfire in your attempt to escape danger if timed wrongly. The Mega level of Renamon. Its attacks are tricky but can deal devastating damage if pulled off correctly, and keeps the agility of Renamon. It’s Super Attack is also above average. Main attack: Dragon Helix. Not usable in mid-air. Unleashes four ghostly foxes which can be directed with the control stick towards the opponent, dealing several hits but not that much damage. Sakuyamon stands still while the attack is performed, so its open for counterattacks as well as stage hazards. Secondary attack: Fox Drive. Summons a massive flare of purple energy diagonally upwards, which greatly damages anyone engulfed in it. If used mid-air, the attack is fired diagonally downwards. Super Attack: Talisman Sphere. Usable only in the ground. Jumps forward to strike the ground with its staff, freezing a short area for a few seconds before unleashing a massive dome of green energy that greatly damages a defenseless enemy. A nature-type of the second anime series. Small in size and reduced mobility, and its attacks aren’t great either. Not the worst of choices, but not the greatest either. Main attack: Sticky Net. Shoots a short-ranged net, which isn’t very damaging nor does it stop an opponent’s movements. Secondary attack: Silk Thread. Extends a stiff thread of its net which it uses as an extension of its tail, and lunges forward performing two frontflips to attack the opponent. Good screen coverage to make up for its mobility. The Champion level of Wormmon changes drastically. Excellent mobility and its attacks are quite deadly. Be sure to use its time if fighting as a digivolution, you’ll need this advanatge when reverting to its base form. Main attack: Moon Shooter. Shoots a solid sphere of silk like a cannon. Doesn’t cover the whole screen but deals nice damage and has nice speed. Shot straight on the ground, diagonally downwards in mid-air. Secondary attack: Spiking Strike. Lunges forward with the spikes on its wrists. Doesn’t cover much distance but it’s a rapid lunge that can come as a surprise. Done straight on the ground, diagonally downwards in mid-air. Super Attack: Evil Antenna. Creates a mystic field in front of it. If the opponent is caught, Stingmon will recover some health and a few seconds after the same amount will be inflicted as damage to the opponent, pushing them away. Only usable in the ground, and it has quite a great effect. A fire-type of the second anime series. Similar to Agumon but lacks a projectile attack. Main attack: Vee Headbutt. Lunges forward head-first. Not a big lunge bit its quick to pull off. When used mid-air it heads downwards a little bit. Secondary attack: Vee Punch. Dashes forward while rotating its arms vertically. Can inflict a few hits and decent damage, but can only be used on the ground. The Mega level of Veemon (technically also Wormmon’s, the two fuse to create this one). Nice attacks and mobility, and its Super Attack is quite unique. Main attack: Positron Laser. Fires a laser from the weapon on its right wrist. Covers the whole screen at decent speed with nice damage. Secondary Attack: Splendor Blade. Jumps forward with a kick, then through a slash of its claws forms a spectral blade creating a short-ranged wave. Can only be used on the ground, but it’s more useful than what you’d think for its double hit nature. Super Attack: Giga Crusher. Initiates a cinematic combo on the spot it’s triggered, which consist of two punches, a double rising kick, a hammer punch in mid-air and a back sommersault, which ends in a much stronger Positron Laser. If all hits connect it can deplete a lot of life, but it’s easy to avoid the initial hits or the stage platforms can thwart the continuity of the combo. Obviously, can only be used on the ground. A water-type from the first two anime series. Owing to the fact it’s a higher level than the other basic Digimon, Gatomon is more agile but its strength is hampered somewhat by its weak attacks. Main attack: Cat’s Eye Hypnotism. Shoots a medium-ranged psychic wave. It does nothing more, probably to not be too broken, but the end result was a mediocre main attack. Secondary attack: Lightning Paw. Dashes forward for a while, if it catches the opponent initiates a flurry of strikes as it jumps high. Only usable in the ground and helps it cover the screen much faster than usual. The Mega level of Gatomon. Has the same drawbacks as MetalGarurumon for being quadrupedal, though jumps quite higher, and its attacks have a trick or two to it. It’s Super Attack is a bit strange, too. Main attack: Fire Tornado. Shoots a spiralling wave that gets bigger as it crosses the screen, though the damage it inflicts stays the same. The original name doesn’t cope with the fact this Digimon is water-type in this game, but whatever. Secondary attack: Hermit Fog. Sprays a mystical fog at short range to damage close opponents. Also serves to nullify basic projectiles thrown at it, and since it can be used mid-air it’s a major defensive tool. Super Attack: Apocalypse. Creates an energy ring which, if it hits the opponent, lightning bolts will be called down to strike them on the spot. The ring has short reach, and the opponent can still attempt to get away, but if it connects it deals decent damage. Also, the lightning bolts look like directional arrows, for some unknown reason. The final boss of the game, labelled as a fire-type Mega which was made exclusively for this game. Absolutely broken, maybe only in mobility it’s inferior to most. Its attacks are deadly, its Super Attack is an absolute pain to deal with and can stun opponents with relative ease. Main attack: Bone Duster. Forms a big flame right in front of it with the weapon on its left wrist, dealing several hits and noticeable damage. Also acts as a barrier to nullify projectiles. Secondary attack: Grim Slasher. After three vertical slashes with its right-hand sicle, it dashes forward to further damage the opponent. Delivers a ton of hits and causes severe damage, plus allows it to cover the screen much faster, but can only be used in the ground. Super Attack: Burning Cyclone. Engulfs itself at the center of a fiery tornado. It lasts for a long while, allowing it to connect twice and dealing devastating damage to opponents that are sent flying quite away. The rotation of the tornado also creates some form of attraction, so it’s very hard to avoid this attack. A shadow version of WarGreymon, displaying its same characteristics in all fields. A wasted character slot in my opinion, even if it was a relevant figure in the first two anime series it should have been made noticeably different to effectively count as another character. Main attack: Dragon Crusher. Creates two waves of heat energy that travel a short distance. Serves to nullify projectiles as well as damaging, but can only be used on the ground. Secondary attack: Black Tornado. Lunges forward rotating with its claws extended. Can be connected twice and the direction it lunges can be adjusted with the control stick each time, allowing it to cover a long distance and deal massive damage. Super Attack: Terra Destroyer. Charges up a massive sphere of energy and throws it diagonally downwards, almost straight, though in this occasion it does it on the spot instead of jumping. Can deal severe damage if it connects, nearly half a life bar of a Mega opponent. The Mega level fusion of WarGreymon and MetalGarurumon. Deals massive damage with its attacks and keeps the mobility of a bipedal, so it’s a major force to be reckoned with. Being a combination of types, he’s been given neutral damage received. Main attack: Garuru Cannon. Fires a laser shot from the cannon hidden in its right hand. Travels the whole screen very fast and deals noticeable water-type damage. Secondary attack: Trascendent Sword. Slashes twice with its Grey Sword hidden in its left hand, creating a short-ranged shockwave. Inflicts severe fire-type damage. Super Attack: Double Trent. Creates an icy chain with its left hand, which is then set ablaze like a powder trail by its right hand, dealing severe damage of both water-type, first, and fire-type, later. A massive attack that covers the whole screen and can prove devastating. A partnerless Digimon from the third anime series. Not suited for close combat and quite powerful compared to the other basic characters. Not given a standard type. Main attack: Badda Boom. Shoots a long-ranged fireball, inflicting fire-type damage well above standard. Secondary attack. Summon. Invokes three miniballs of energy that are shot forward. Inflicts noticeable water-type damage with the same range as the previous attack, but this one can only be done on the ground. The Mega level of Impmon. Its attacks and mobility are great, though its Super Attack can sometimes be hard to connect. Again, not given a standard type, but this time its attacks are also neutral-typed. Main attack: Dark Ringer. Shoots a round energy sphere from its Blaster. While it doesn’t cover the whole screen it does travel fast. Secondary attack: Darkness Claw. Performs an upwards swing with its free left hand. Kind of damaging, but can only be used on the ground. Super Attack: Chaos Flare. Forms a magic circle in front of it, which attracts and damages the opponent continuously, before shooting a major blast from its weapon to finish them off. Severely damaging, and its attractive properties are a boost. Blessed with the data of Omnimon, displaying a new finisher weapon and a new body color. Otherwise, it’s exactly like Imperialdramon Fighter Mode, so another wasted character slot. Main attack: Positron Laser. Fires a laser beam from its right wrist-mounted weapon. Covers the whole screen at decent pace. Secondary attack: Splendor Blade. After jumping forward with a kick, it forms a spectral wave through a slash of its claws. Covers a wide range thanks to its double hit nature, but can only be used on the ground. Super Attack: Omega Sword. Only usable in the ground. Initiates a cinematic combo on the spot, consisting of two punches, a rising double kick, a mid-air hammer punch and a dragon uppercut that launches the opponent high. Then, as a finisher, it unsheathes its Omega Sword to deliver a massive slash to finish up the combo, dealing severe damage. |
Administrator
Site Staff Manager, Content Writer, Console Manager
Affected by 'Laziness Syndrome'
Registered: 07-03-13
Location: Barcelona, Spain
Last Post: 7 days
Last Active: 13 hours
Site Staff Manager, Content Writer, Console Manager
| Vizzed #1 Hardstyle fan |
Affected by 'Laziness Syndrome'
Registered: 07-03-13
Location: Barcelona, Spain
Last Post: 7 days
Last Active: 13 hours
Post Rating: 1 Liked By: Furret,
