

 User Notice
 Forum Links


Thread Information
Thread Actions


Suzuki Bakuhatsu Game Walkthrough and FAQ V0.90
04-16-17 09:35 AM
AuroVee is Offline
| ID: 1335314 | 7948 Words
ah2190

POSTS: 75/335
POST EXP: 33899
LVL EXP: 387658
CP: 2977.4
VIZ: 18637

Table of Contents:To quickly jump to a section, search for the provided hashtag code next to it.
---------- Disclaimer: S#DThis guide is owned by and copyleft AuroVee, and is only currently allowed on the following sites: Any sites which have this guide on while not being in this disclaimer will be in breach of copyleft, and will be asked to remove the guide from their site. Failure to comply will result in the site being blacklisted, and therefore unable to host any guides made by AuroVee. Suzuki Bakuhatsu is owned and trademarked by Enix / Square Enix. PlayStation is a trademark and copyright of Sony Computer Entertainment. ---------- Version History: S#HVersion 0.00 - 27/03/2017 - Concept for guide drafted. Google Sheet made to carry info about the stages. Version 0.10 - 28/03/2017 - Started guide, completing Controls, Guide Information, some FAQs, the Opening Block of the walkthrough and the final stage (barring Medium time limit information). Started Disclaimer, Special Thanks, and setup the template for all other bombs. Version 0.11 - 30/03/2017 - Finalized Table of Contents, and completed Gandar Bomb. Added all Bomb Numbers, and added details to a few Bombs, including the Keyhole Bomb. Extended Special Thanks. Version 0.20 - 01/04/2017 - Finished basic info on all bombs excluding some Medium time limits. Version 0.30 - 04/04/2017 - Added more information for some of the bombs, specifically the bombs in the first and fourth blocks, and both the Ice Tea and the Heated Table Bomb. Also gained contact with BakaOrochi for the first time. Version 0.40 - 05/04/2017 - More guides for bombs are completed. Version 0.50 - 06/04/2017 - Another day, another bomb guide completed. Also, the remaining guides have the basic info filled out, ready. Version 0.60 - 07/04/2017 - Did the Cassette Bomb, but then found out that the timed sections might be different depending on the difficulty. Also realised I put the incorrect ending for one of the bombs. Version 0.75 - 08/04/2017 - Only one bomb - the Submarine Bomb - left without the finished guide now. Once all guides are done, it'll be practically ready to be posted. Version 0.90 - 16/04/2017 - Guide is completed with regards to doing all the bombs on Hard. First version which is posted to Vizzed. ---------- Controls: S#CBomb - D-Pad: Moves around the object, Circle: Opens toolkit, Cross: Put away/remove Tool, Closes Toolkit. Square: Shows and hides Status Screen. Interlude - Circle: Advance through slide show. Start: Skip interlude. Clock - D-Pad: Circle: Menus - D-Pad: Circle: Confirm option or toggle option. Cross: Cancel menu. ---------- Guide Information: S#IThis guide will be split into sections, or Blocks based on when in the game you can disarm the bomb. In each block, with the exception of the Opening Block, the Sixth Block and the Endgame Block, you will disarm only one bomb in said block. The Sixth Block is optional, but you can only disarm one bomb from it if you take it, while both the Opening and Endgame Blocks have you doing all of the bombs in it in order. Bomb Template: Bomb Number: The number of the bomb in relation to when it shows up with the post-credits bonus sequence. Bomb Name: The name of the bomb Bomb Time: The time you choose to Prior Bombs: The bombs which occur before being able to Time Limits: How long you have to disarm the bomb, excluding trigger sections. Easy - Medium - Hard - Guide: A brief overview as to how to disarm the bomb, including key hints and trigger sections. Will also include optional sections for if you want 100% and the SA rank. ---------- FAQ: S#QQuestion) Who is the girl? Answer) Suzuki Bakuhatsu (played by Ozawa Rin) is the daughter of a bomb disposal expert, and as such she has a knack for dismantling bombs. Question) Who's making all these bombs? Answer) Apparently, some sick, twisted bastard has their eye on Suzuki, and they force her into disarming their bombs. Question) What are all the notes on the bombs? Answer) Some of them are hints left by the sick bastard, because they're so kind that they give them to her, while others are either them taunting Suzuki or trying to win her over. Question) Does the instruction booklet help? Answer) Nope, it doesn't. It only has the basic controls mentioned above and a few screenshots. Question) Why is Circle Answer) This is due to how Japanese games work - they use Circle, rather than X, to Question) How does the grading work? Answer) To get an SA (Special A) rank, you need to get 100% disarmament, and minimum time wasted. Other ranks are A, B, C, D, E and finally F. Your average grade is also recorded and is shown at the end of the credits along with the difficulty you took. Question) I can't get the SA rank on Gandar! Answer) That's not a question. But… yeah, that one 'bomb’ is a pain, as you have to play Rock-Paper-Scissors against Gandar and get them defeated in three throws without losing too much health. Question) What's that show which appears in the Puzzle Box stage? Answer) It's called “Enix Countdown”, which seems to be one of those idol shows. Also, the Puzzle Box has a “Zougan” marquetry picture pattern on it, in case you were wondering. Question) The song in the Music Box ending/the Cassette Bomb/the Ice Tea Bomb sounds familiar… Answer) Indeed. They're all the same song, although the Cassette only plays the chorus, while the Ice Tea Bomb plays an elevator tune jingle based on it. Question) Why is there a bomb in [ Answer) I have no idea. Ask the sick bastard who put the bomb in there. Question) Why does Suzuki [Redacted due to spoilers] in the ending? Answer) I have no idea myself either. I don't know why she would [Redacted due to spoilers]... Question) What wire do I have to cut in order to disarm the bomb in [ Answer) You'll find out soon enough. Read on… But, if you quickly want to find a bomb, use the Table of Contents to find the hashtag code, which is in the format of B#xx, and search for it in this FAQ. Question) I keep on tightening the screws! Answer) That's not a question, but remember this: Righty Tighty, Lefty Loosey. That is a very helpful term when it comes to unscrewing bolts and the like. Besides, except for in a few levels, you'd always want to turn left, not right. Question) What tools are there? Answer) You start with a pair of wire clippers, a magnifying glass (which acts as a sonar in one stage) and a screwdriver. Latter levels include electrical tape, a spanner, a cog wrench and one level even includes torpedoes. However, you don't have to worry about a tool being not used in a stage - if it's usable, you'd need to use it. Barring the magnifying glass, which is only used to examine objects and to act as a sonar when underwater. Question) How many possible routes are there? Answer) Each of the six blocks gives you a choice between two bombs, and so there are two to the sixth power possible routes, or sixty four possible routes through the game, of which thirty two have you disarm ten bombs, and another thirty two have you disarm eleven. Question) What's the quickest route to the final bomb? Answer) According to the TAS, once you're able to choose, it's the Moon, then the Ice Tea, then the Puzzle Box, then Gundam, then the Car Engine, and then into the Endgame stages. However, Gundam is totally luck based, so for a speed run, you might want to go for the Lunchbox Bomb instead. ---------- Walkthrough: S#WOpening Block SB#OThese three bombs are here to help you get into how the game works. These ones are some of the easiest bombs to defuse once you know how to. Bomb Number: B#01 Bomb Name: Orange Bomb Time: 08:21:00 Prior Bombs: This bomb is the first bomb you disarm at the start of a new game. Time Limits: Easy - 3 minutes Medium - 3 minutes Hard - 1 minute Guide: This bomb is very simple. All you need to do is turn the viewpoint until you can use your screwdriver on the screw on top of the orange. Once you start unscrewing it, the timer will start… and, if you're on Hard, it will trip a trap trigger of 32 seconds, which will not go away. Once you've unscrewed the screw on top of the orange, the peel will split and expose the bomb inside a casing of some sorts. All you need to do is unscrew both of the screws on the casing to gain access to the bomb wires. Now, you have to cut one of them to disarm the bomb - but the wrong wire would cause it to go off. Thankfully, the sick bastard who put the bomb into the orange was kind enough to put a danger label on the red wire, so what you want to cut is the blue wire to disarm the bomb. After this, you'll get a somewhat lengthy introduction cutscene after the ending of this first bomb, before you proceed onto the second bomb. Bomb Number: B#02 Bomb Name: Pistol Bomb Time: 09:54:00 Prior Bombs: This bomb comes automatically after the Orange Bomb. Time Limits: Easy - 3 minutes Medium - 3 minutes Hard - 1 minute, 30 seconds Guide: Yet another relatively easy bomb to disarm. First, you need to look down the barrel of the gun to find a screw. Unscrew it (which triggers the timer - from now on, whenever you first start unscrewing something, the timer will start unless I tell you otherwise) to gain access to what looks like a clip of sorts with four screws on it. You'll need to unscrew all of them, but on Hard, starting to do so triggers a trap trigger, giving you only 14 seconds to unscrew them all. Once the clip’s screws are unscrewed, you gain access to the first puzzle of the game. To solve this, unscrew both of the bottom screws first, then the top screws, so that the scissors do not cut the blue wire - but on Hard, this triggers a 16 second trap trigger which only stops once you've solved the puzzle. Finally, you can now cut the red wire of the bomb, and not the obviously dangerous blue wire, both because of the fact the scissors would had cut it, and the fact that there is a warning label on it. You now get the chance to save your game before progressing onto the next bomb, which is the final one of this Block. And after this, you'll be able to save after every bomb until you enter the Endgame Block. Bomb Number: B#03 Bomb Name: Phone Bomb Time: 18:37:00 Prior Bombs: This bomb comes automatically after the Pistol Bomb. Time Limits: Easy - 3 minutes Medium - 3 minutes Hard - 1 minute, 30 seconds Guide: For this one, all you need to do is move forwards, as the timer starts right away. However, when you have the option to move left or right, you can do so to get some calls of what other people think. One of them - the black phone - actually allows you to go forward, and here you'd get a message from Ito saying that “the Reaper is running through the blue. Cut the red one, Suzuki…” Once you hear that message, you can't check the other phones, and have to move forwards to the bomb. And, like Ito said, you should cut the red wire as the blue wire will trigger the bomb instantly. ---------- First Block SB#1Bomb Number: B#04 Bomb Name: Train Crossing Bomb Bomb Time: 14:15:00 Prior Bombs: Phone Bomb. Time Limits: Easy - 7 minutes Medium - 6 minutes Hard - 4 minutes Guide: How you progress through this bomb depends on if you want to get the SA rank, or just to complete it as fast as possible. If you just care for speed, ignore the crossing bar and go around to the back to find two bolts at the base, which I'll get to later. Otherwise, you use the new cog wrench to open the crossing bar and enter an optional area with two screws. Unscrew them, and you'll enter an area with another two screws and a hint pad where that sick bastard tells you that there's nothing behind there. You want to ignore that, though, and unscrew the two screws to expose… Well, a dead end with “BAKA!” engraved on the metal. So you want to back out and then head to the base of the crossing. Now, next to the two bolts is a warning that when you start unscrewing one of the bolts, a trap trigger will go off, but after taking off both bolts, it'll be disarmed. You'd only have 19 seconds to unscrew them, so use the new wrench to unscrew them quickly. After that, you'll have to start disassembling the train post. First, you need to use the wrench to take the base off and free the post from the rest of the train crossing, and then dismantle the pole itself with the cog wrench. However, on Hard, this will trigger yet another trap trigger of 28 seconds, so unscrew then go up, unscrew and go up, until you reach the top and the final trap of the bomb. To disarm this trap, you need to take your time unscrewing the screws, as there's a pendulum hammer which, if you unscrew too fast, will trigger the detonator. In Easy and Medium, you can make two turns before having to stop, while on Hard you can only do one turn at a time. Plus, on Hard, you also have only 40 seconds to disarm the trap, which is barely enough time to do it. Now, all you have to do is clip the correct wire in order to disarm the bomb. However, this is not as easy as earlier bombs, as the clues are more vague. This time, you have to “place your ear close to the wires” and “cut the one which makes a sound”. This is the red wire on Easy, and the blue wire on Normal and Hard. Bomb Number: B#05 Bomb Name: The Moon Bomb Time: The time you choose to Prior Bombs: Phone Bomb. Time Limits: Easy - 7 minutes Medium - 6 minutes, 30 seconds Hard - 4 minutes, 30 seconds Guide: It's time to do something which the moderators on TAS Videos dislike - dismantling the Moon. At first, it looks like it's just a moon, but as soon as you turn left or right, you'll find out that the side of the moon we can't see is, in fact, the tail of a missile which the moon apparently is. What you have to do is to unscrew the screw at the back to expose four screws - two on an outer ring, and two on the inner ring with a hint pad on it. If you want a SA Rank, unscrew the two screws next to the hint pad and then enter the back of the moon, where you'll have to go through two more sets of screws, the second of which has a hint pad next to them, before hitting yet another dead end with a weight which will fall down with something on it once you get closer. Afterwards, you want to get back out to properly disarm the bomb. You need to unscrew the side screws, but you'd have to beat a trap trigger of 11 seconds to unscrew both of them. But once you do so, the front of the moon will split in half, forming something which looks a lot like a screw head… Once you unscrew the moon, you'll gain access into the front inside of the missile, and four screws which you need to unscrew. Unscrew the top two (which will trigger a 25 second trap trigger on Hard once you start unscrewing) and then use the middle screw on the dog to be able to unscrew the two bottom screws. You'll have another set of four screws to unscrew, but only the bottom left one is exposed. Unscrew that, then use the screw on the cog to expose the other screws, and then you'll finally get to the final part of this bomb. This one is a bit trickier, as you can't screw the cog too much one way, or else you will trigger the detonator. On Hard, you'd only have 26 seconds to unscrew the five screws - start with the one next to the bottom gold bar, then the bottom two screws, then the top right screw. Then, tighten the cog (that is, screw right) one step to expose the final screw. Unscrew that, and you'll expose the bomb itself. You want to cut the red wire for this one. ---------- Second Block SB#2Bomb Number: B#06 Bomb Name: Pinball Table Bomb Time: 11:42:00 Prior Bombs: Train Crossing Bomb only. Time Limits: Easy - 5 minutes Medium - 4 minutes Hard - 3 minutes Guide: It may look like a pinball table, but there's no flippers, and there's a bomb in this table. To start off, use the cog wrench to remove the four bottom legs - although within 20 seconds on Hard due to the Trap Trigger - and then enter at the back under the table to loosen the two screws inside there. You now need to remove the four screws exposed within either 30 seconds on Easy and Normal, or 17 seconds on Hard. It's best to do one side first, then the other. Once you have done that, you finally can get to the bomb. However, you have a more complex version of the trap you took on in the Train Crossing Bomb, only with six screws to unscrew, and a timer in the form of the pinball - at the very right is the ball drain, with arrows above it which will begin to light up over time. Once the bottom one lights up, you have but seconds before the pinball pops out and if it hits the gold, just like if any of the hammers hit it, the bomb will go off. Thankfully, the middle hammer is only affected by the two middle screws, while the other hammers are only affected by the screws on their side. So alternate between an outer one and the inner one on the other side until both inner ones are taken off, then work on just the outer ones. Bomb Number: B#07 Bomb Name: Cassette Tape Bomb Time: 10:29:00 Prior Bombs: Train Crossing or The Moon Bombs. Time Limits: Easy - 6 minutes Medium - Hard - 3 minutes Guide: A cassette tape which plays music even when it's not in a tape player? This is obviously a bomb, and so you need to start off by unscrewing the screws on both sides of the tape, but you'll need to work fast as doing so trips a 28 second trap trigger timer - although this is 18 seconds on Hard. Once you've opened the tape… huh? The music is still playing? So it's not the tape itself… anyway, you want to loosen the gold screw twice so that the cog goes down and allows a panel to go down, exposing a way in. You'll find another gold screw which you need to use in order to expose the screws on the top or bottom. Loosen it twice to allow the cogs to expose the top screws, then tighten it twice before loosening the screws as, on Hard, this triggers a 24 second trap trigger. You need to loosen both sets of screws, which means after loosening the top ones, tightening the gold screw so that the bottom ones can be exposed to be loosened. The bomb itself can be seen now. But there is one final trap - you can't expose the bottom left screw too much, or else a detonator will be triggered. So loosen the gold screw, but as soon as the bottom left screw is free enough to be unscrewed, immediately tighten the gold screw one step. Then start unscrewing the screws, although you'll only have 32 seconds in which to do so on Hard. Bomb Number: B#08 Bomb Name: Iced Tea Bomb Time: 10:12:00 Prior Bombs: The Moon Bomb only. Time Limits: Easy - 5 minutes Medium - Hard - 1 minute, 30 seconds Guide: This bomb is easy once you know the trick to it. Once the timer starts automatically, you need to move forward until you find a message which says “It's up to you whether or not you want to live!” - and then when you move forward again, you will be viewing inside the ice, and looking at some of the molecules. In theory, you can move up to find the bomb with two wires easily, but if you try to snip either of the wires, it'd go off. This is because of the gimmick of this level being a maze of some sort, and that each step you make will toggle the bomb between going off or not going off - and you'll get a message saying “It will explode” or “It will not explode”, the latter being the longer one - when you cut a wire, and going up from the start will lead to where it would explode. The trick to this is that if you go right, down, left, then up, you'd move to somewhere where you'd normally get to just by moving up. This way, you can disarm the bomb easily. ---------- Third Block SB#3Bomb Number: B#09 Bomb Name: Light bulb Bomb Time: 23:58:00 Prior Bombs: Pinball Table, Cassette Tape or Iced Tea Bombs. Time Limits: How long you have to disarm the bomb, excluding trigger sections. Easy - 11 minutes Medium - Hard - 4 minutes Guide: For the SA rank, you should move to the right from the start to find a grate. This leads to a dead end, obviously, but you'll need those screws down that path in order to get 100%. Plus, somehow unscrewing those screws starts the timer despite being nowhere near the bomb. Afterwards, unscrew the screws around the light, but you'd only have 16 seconds on Hard in order to do so. Next, unscrew both of the cap screws to remove the cap and expose some of the wiring. Cut either of the two wires to drop a rock down, and break into the next area. This bomb starts to show its true colours, as you need to do some electrical fixing in order to disarm this bomb. This is where the new tape comes in handy - you can use it to tape together the break in the severed blue wire to complete the circuit to trigger a cog to turn and half unlock access to the next area. To fully unlock it, just loosen or tighten the only screw you can see to complete the other circuit. With this next part, you are introduced to panels which power can flow through which, if you remove, can break the circuit and potentially trigger a detonator. To avoid that, you need to go to the left and screw the screw there to connect a second path for the power to flow before you unscrew the panel - which has a 13 second trap trigger on Hard. Once that's done, go in. If you look down, you'll notice the trap for this next part - you need to make sure the ball goes to the left. In order to do that, you want to cut the left blue wire in the loop, then the right one - the first will force the ball to stick to the left magnet, the other will cause it to drop and complete the circuit, opening access to the final puzzle. On Easy or Normal, you can unscrew the currently exposed screws right away, but on Hard you first want to use the middle screw to switch circuits, turning off the light but turning on the bar to expose the top right screw. You want to turn it back to normal as soon as it's exposed, or else you might trigger the bomb. Now, unscrew all four screws, which triggers a trap trigger of 18 seconds on Hard - now you know why I told you to expose that screw first. Now, once you remove all four screws, you gain access to the bomb. But… by doing so, you also killed the lights, so you can't tell which wire is which. But, if you look carefully before removing the screws, you'd notice one wire was sparking. You want to cut the other wire - that means you cut the left wire on Easy, or the right wire on Normal and Hard. Bomb Number: B#10 Bomb Name: Puzzle Box Bomb Time: 15:24:00 Prior Bombs: Pinball Table, Cassette Tape or Iced Tea Bombs. Time Limits: Easy - 8 minutes Medium - 7 minutes Hard - 4 minutes, 30 seconds Guide: This bomb is inside of a puzzle box, so first you will need to open it. There are five steps which you need to take in order to open it and get access, but on Hard you will only have 37 seconds to complete all five steps, or else the bomb will go off. Step 1) At the back of the puzzle box is a single screw. Loosen it once to start the timer and expose another screw underneath the upper half of the box as the lower half is pushed to the front of the box. Step 2) Loosen the new screw once to push the front part up, which exposes yet another screw at the back of said part. Step 3) Loosen the new exposed screw once to slide two triangular shapes out from the front part of the upper half. Step 4) Tighten the second screw exposed once to bring the bottom half of the front part down and expose two final screws. Step 5) Completely loosen the two newly exposed screws to get access to the bomb itself. Now, if you're going for an SA Rank, unscrew the two screws at the front of the red box. And you know the drill by now - enter it, then keep on unscrewing the screws until you finally hit a dead end, then return out of the box. To actually disarm the bomb, what you need to do is go around to the back and unscrew all four screws within a 14 second trap trigger time limit. And then you reach yet another puzzle, similar to the one you faced in the Pistol Bomb, but much harder as the middle two sets move two sets of scissors, and you can't let them clip the strings on either side. This too is timed on Hard, with only 30 seconds to disarm it. And then, the final trap of the bomb is exposed - a fan floating a ball under a pendulum hammer. The ball won't rise and the pendulum doesn't react to you unscrewing the screws, so you can unscrew the top screws easily. However, there are two hidden screws, which require you to loosen the screw on the fan to drop it enough so that you can reach them. However, this also speeds up the fan, so you need to act fast to unscrew the two screws before the ball hits the pendulum hammer, which in turn would trigger the detonator. Once you finally reach the two wires, you can clip either wire to disarm the bomb and get an idol singing a song as the ending for this bomb. This is Enix Countdown, after all, so there needs to be some sort of song. ---------- Fourth Block SB#4This block contains some of the easiest bombs which you can disarm - and one of the most frustrating ones if you're unlucky. Bomb Number: B#11 Bomb Name: Lunchbox Bomb Time: 15:16:00 Prior Bombs: Light bulb or Puzzle Box Bombs. Time Limits: Easy - 3 minutes Medium - 2 minutes Hard - 1 minute, 30 seconds Guide: This is one of those very easy bombs, like the Phone Bomb. All you have to do once the timer starts automatically is to keep on pressing up to eat the food in the lunchbox, and once you finish, you'll find one rice grain with mould on it, and inside of that is the bomb. Now, one of the wires has some mould growing on it, so you want to clip the other side, which is the blue one. Bomb Number: B#12 Bomb Name: Jukebox Bomb Time: 21:23:00 Prior Bombs: Light bulb Bomb only. Time Limits: Easy - 4 minutes Medium - Hard - 1 minute, 30 seconds Guide: Another easy bomb to deal with, although this is harder to navigate. What you have to do once the timer starts automatically is to enter the Jukebox, and then find the record which is playing, which ironically is called “The Bomb”. You can check the needle by going up and notice that it's quite sharp, but you don't have to. Instead you want to go down and then find the crack. Once you do so, go in and you'll find the bomb inside a groove, with the blue wire being on the side where there's an opening. This should tell you that the blue wire, when cut, would set off the bomb, and so you want to cut the red wire instead. Bomb Number: B#13 Bomb Name: Gandar Bomb Time: 11:39:00 Prior Bombs: Puzzle Box Bomb only. Time Limits: Easy - 99 seconds Medium - 99 seconds Hard - 99 seconds Guide: This is not a bomb as such. Unlike all the other bombs, where you finish by cutting one of two wires, you don't do this here. In fact, you don't use your normal tools for this so-called 'bomb’ - instead, Suzuki is piloting a Mech, and is fighting against another Mech known as Gandar… in a game of Rock, Paper, Scissors. This is completely down to luck, because Gandar will throw a random throw every time, so getting that SA Rank is highly unlikely. All you have to do is win three games in order to destroy Gandar. But each game you lose causes damage to you - and your health is also your timer, so you lose time every time you lose a throw. And also, like any fighting game, the timer starts off right away, so you better choose quickly. ---------- Fifth Block SB#5Hoo boy! These bombs are the longest ones to deal with, with the highest time limits in the entire game. It's a good thing you only need to disarm one of them... Bomb Number: B#14 Bomb Name: Car Engine Bomb Time: 19:43:00 Prior Bombs: Lunchbox or Jukebox Bombs or Gandar. Time Limits: How long you have to disarm the bomb, excluding trigger sections. Easy - 12 minutes Medium - Hard - 6 minutes, 30 seconds Guide: This is the most complex bomb in the entire game. There is a lot to deal with in this bomb, so pay attention. You need to use the electrical tape to stick together at least one of (both if you want the SA Rank) the cut wires, because otherwise when you remove the two bolts that you can currently access, you'd break the circuit and trigger a detonator as a result. The two bolts leads into part of the engine, and a series of challenges. The first one requires you to time the loosening of the screw on the right so that when the gears stop, they won't be covering the screws - on Hard, this triggers a 40 second trap trigger, so try and get it right first time. The second is a bit harder, as if you get it wrong you may detonate the bomb. What you have to do is to loosen the screw on the cog enough so that you can access the screw hidden by a rock. Loosen that to plug one hole, then tighten the cog screw to give you more air to play with. Then, loosen the valve screw one step before loosening the cog screw as much as you can to open the path to your next challenge. The next one is timed in a way, as there's a needle which goes around which can hit the detonator. For this, you need to shift gears using the screw near the bottom, but above the hint pad, to expose the three screws inside the gold circle and then unscrew them to open the path onwards. The final challenge of this part is eight bolts you need to remove using the wrench. However, you will only have 41 seconds to unscrew all eight of them. But once you do so, you will finally be able to make progress on the outside. First, loosen the two bolts to the left of where you came out from - which triggers a 45 second trap trigger timer on Hard - and then go over to the other side and loosen the four bolts there to get access to the main part of the engine and stop the trap trigger. You should go in through the route right in front of you if you want the SA Rank because, you guessed it, it's a dead end with screws you need to loosen if you want 100%. Otherwise, or once you've done that and returned after seeing the message on the cog at the bottom, you want to enter the engine from the left. Now, this part is timed due to the bullet heading towards the detonator, but it's also tricky as one wrong cut can trigger another detonator. To solve this, go into the right hole and max out the speed by tightening the screw in there, then go out and then into the left hole, loosen the screw so that a circuit will be made, then cut the bottom blue wire to turn off the engine. All you have to do now is go out, then unscrew the screw there which is actually where the bomb is housed in. Get it out by unscrewing the bottom of it, and then cut the red wire. Bomb Number: B#15 Bomb Name: Submarine Bomb Time: 13:18:00 Prior Bombs: Lunchbox or Jukebox Bombs or Gandar. Time Limits: How long you have to disarm the bomb, excluding trigger sections. Easy - 13 minutes Medium - Hard - 8 minutes, 30 seconds Guide: This bomb starts with an area which is complex to actually describe, but it's a lot like a maze of sorts. To begin with, move either left or right until you can go forward into the maze, up to a hint pad. Now, for this, you'll always face the same way - let's call it North for the sake of argument. You want to head East once, and then North until something stops you. Now, for this, you want to examine the wall with your sonar (ie magnifying glass) - and you'll see a cylinder appear, blocking your path. Now, switch to the Torpedo tool, which you'll only use in this area, and fire it off to start the clock. Now, this next bit is a maze of sorts. As such, here is a map in order to help you out. In order to get the SA rank, you need to torpedo all the cylinders and destroyable rocks. The black lines are the routes you can take. The yellow lines indicate cylinders which can be destroyed using a torpedo, the purple lines are cylinders which, once destroyed, will drop rocks after some time which can't be destroyed, and the brown lines are rocks which can be blown up by torpedoes. The start, the Submarine which houses the bomb and the only dead end are marked as well. And the red line is where a 27 second Trap Timer can be triggered when you blow up the first cylinder of the trio, at least on Hard. Now, you've reached the Submarine, and you need to unscrew the back and front screws, with a 44 second trap timer on Hard. Just remember not to use a Torpedo, otherwise you might blow up the bomb. In fact, you no longer need the torpedoes. You also need to unscrew the two inner ones, one at the back and one at the front, before the trap timer would stop. Now, start off by unscrewing the two screws on the panel at the curved side of the remaining part, then the four screws on the panel to the right of that. Then go over to the final panel, unscrew the two screws by themselves, then unscrew the screw on top of the cog. Next, loosen the screw on the bottom cog, before loosening the one under the hammer, so that the hammer doesn't cause a chain reaction leading to the bomb blowing up. Now, this final part is harder, and has a 44 second trap timer on Hard. Your best bet is to work from left to right, starting with the two screws on the left hand side. When it comes to the right hand side, loosen the left screw first completely, then almost (but not fully) loosen the screw under the hammer. Loosen the screw on the cog, then finish unscrewing the screw under the hammer. If you're going right side first, you then need to tighten the screw on the cog before doing the screws on the left so that doesn't trigger the bomb. Finally, cut the wire on the right. ---------- Sixth Block SB#6This block is optional, as when you're able to choose one of these, you can also choose 00:00:00, which leads to the Endgame Block. Bomb Number: B#16 Bomb Name: Heated Table Bomb Time: 17:54:00 Prior Bombs: Car Engine Bomb only. Time Limits: How long you have to disarm the bomb, excluding trigger sections. Easy - 7 minutes Medium - Hard - 2 minutes Guide: Yet another easy bomb to deal with, although I don't understand Japanese that well, so I don't know what happens. All I know is that in the story which is shown, Suzuki is in some sort of spaceship, and is heading away from the red and towards the blue. This links to the bomb, as you want to clip the blue, and not the red - although you won't have much time to read it on Hard than you do on the other difficulties as the timer starts right away. A nice optional cool down from the Car Engine before you move onto the Endgame Bombs. Bomb Number: B#17 Bomb Name: Suzuki's Shadow Bomb Time: 06:27:00 Prior Bombs: Submarine Bomb only. Time Limits: How long you have to disarm the bomb, excluding trigger sections. Easy - 3 minutes, 30 seconds Medium - Hard - 1 minute Guide: If you thought that some of the prior Bombs were strange, you haven't seen nothing yet, as somehow there is a bomb which has been planted into the shadow of Suzuki. As such, every part of the bomb is black, even the wires. Well, with the exception of the timer, that is. You can either go left or right from the start, as they both have practically the same layout, just mirrored. Pay close attention to where the bomb is: as depending on where it is in relation to you, depends on which wire you want to cut in the end. Mainly as you can see one of the wires exposed, and a trap which, if triggered, will cut a wire which would set off the bomb. Now, you first of all need to use the screw in the middle to rotate a shield of sorts to one side, then loosen the screw above it to lift up the Newton's cradle so that it hits the hammer on that side, triggering a chain reaction leading to one of the hammers hitting a spike which, unless the shield is blocking it, will hit something, causing it to burst and drop a rock which would in turn trigger something which would knock a pair of scissors into the bomb to cut the wrong wire. Make sure to either bring it back down or, if you're confident enough, get ready to quickly move the shield to block the other chain reaction from bursting the trap. Once you've done that, unscrew the exposed screws (within a 30 second trap timer on Hard) to get to the bomb, and then cut the wire which is on the side which was protected earlier. ---------- Endgame Block SB#EThis is it, the final two bombs of the game. Once you Bomb Number: B#18 Bomb Name: Keyhole Bomb Time: 00:00:00 Prior Bombs: Car Engine, Submarine, Heated Table or Sukuki’s Shadow Bombs - the latter two automatically. Time Limits: Easy - 7 minutes Medium - Hard - 3 minutes, 30 seconds Guide: This is the Midnight Bomb, and as such this will be a true test of your skills. Don't bother about the screws you can see at the start - you can't do anything about them. Instead, you need to go into the Keyhole. In order to get access to the first set of screws, you need to use the middle screw to turn the green ring so that can rotate the other two rings - although this triggers a 50 second trap trigger on Hard. Your best bet is to tighten the middle screw so that the outer two parts line up and move together, then move them so that each the notches in the metal are in the gaps, then loosen the screw twice to expose a screw to remove by loosening. Once both are unscrewed, you can move forward once more. The next stage is similar, but you only have two rings to worry about… but there is both a detonator and, on Hard, a 23 second trap trigger to deal with. To solve this, tighten the middle screw until one of the screws is exposed, then loosen said free screw. Then, you can either tighten or loosen the middle screw until the red block drops down and locks the two rings together, before loosening it until the block falls down and unlocks the rings - and then a bit more to expose the other screw. Unscrew that to progress on. This next part is timed, but not with a trap trigger. Instead, there's an outer ring which rotates slowly towards the bomb. Quickly loosen the middle screw twice so the gold ring exposes one of the screws, and unscrew that quickly before the outer ring starts to push the gold ring. Then, you need to tighten the middle screw until the next screw is exposed, and unscrew that. Keep on doing this, but try not to over tighten the screw as it'll take time to loosen it enough to get the gold ring back in position, plus you can end up reducing how much time you have left if you over tighten too much or complete it very fast. Once all four screws are removed, only the bomb remains. Now, the trap in the third part would had cut the blue wire if you ran out of time, and the detonator in the second part would had triggered the bomb by speeding up the outer ring of the third part until it cut the blue wire, so you need to cut the red wire. And now, it's time for the final bomb. The interlude at the end of the Keyhole Bomb is also the intro to this final bomb… Bomb Number: B#19 Bomb Name: Ito’s Heart Bomb Time: ??:??:?? (You don't see a time after completing the Keyhole Bomb, so the time is unknown) Prior Bombs: This Bomb comes automatically after the Keyhole Bomb. Time Limits: Easy - 4 minutes Medium - Hard - 1 minute, 30 seconds Guide: This is it. Everything rests on you disarming the bomb inside of Ito. So go forward into her, and then wait for the gold rings to stop spinning so that you can go forward and reach what looks like a pacemaker of some kind. Now, this is the final puzzle. You need to make sure Ito doesn't flat line, so when you start unscrewing the screws - which triggers a 37 second trap trigger on Hard, but also starts the timer - make sure to stop whenever her heart rate flashes red and switch to another screw. Once all four screws are removed, (and the trap trigger is disabled,) you can move forward and find the bomb which is in Ito's heart. Now, pay close attention to what is said, as this tells you which wire to cut. If you hear “Akai”, it's the red wire you want to clip. If you hear “Aoi”, then clip the blue wire. Congratulations, you have defused the final bomb in Suzuki Bakuhatsu, and can now watch the ending followed by all of the game over explosions of the bombs you have defused so far. Afterwards, you can go back and start all over again to defuse the bombs you haven't defused before - and having to defuse harder versions of the ones you have unless you defused them on hard, in which case they'd stay as hard. It'll take you at least three playthroughs in order to disarm them all, anyway, so you will have to do the Orange, the Gun, the Phone, the Keyhole and Ito’s Heart on Hard at least once in order to get all 19 bombs defused and get all of the game over explosions at the end. ---------- Special Thanks: S#TSpikestuff from tasvideos.org for the TAS of the game which drew me into it. Xindictive and CPCGamer on YouTube for their Let's Plays which helped me understand the game better. Especially the former, as they were able to SA every level on Hard and show all bombs (barring Ito's Heart) on Easy to explain them. Redd Arremer on YouTube for their Let's Play on Normal which gave me the times for some of the Medium time limits - although their video stopped after defeating Gandar. Also, Dan Teasdale also on YouTube for the video of the Sarge Club stream which showed the Medium time limit for The Moon, and BigBangBlitz also on YouTube for their video which showed the Medium time limit for the Lunchbox Bomb. BakaOrochi on GameFAQs for his FAQ/Guide which, in combination with the first two mentioned Let's Plays, allowed me to find the solution to each of the puzzles of each bomb. He also had the time limit for Ito's Heart on Easy, too. Dylan from the Vizzed Discord for his help with the Submarine Bomb.Table of Contents:To quickly jump to a section, search for the provided hashtag code next to it.
---------- Disclaimer: S#DThis guide is owned by and copyleft AuroVee, and is only currently allowed on the following sites: Any sites which have this guide on while not being in this disclaimer will be in breach of copyleft, and will be asked to remove the guide from their site. Failure to comply will result in the site being blacklisted, and therefore unable to host any guides made by AuroVee. Suzuki Bakuhatsu is owned and trademarked by Enix / Square Enix. PlayStation is a trademark and copyright of Sony Computer Entertainment. ---------- Version History: S#HVersion 0.00 - 27/03/2017 - Concept for guide drafted. Google Sheet made to carry info about the stages. Version 0.10 - 28/03/2017 - Started guide, completing Controls, Guide Information, some FAQs, the Opening Block of the walkthrough and the final stage (barring Medium time limit information). Started Disclaimer, Special Thanks, and setup the template for all other bombs. Version 0.11 - 30/03/2017 - Finalized Table of Contents, and completed Gandar Bomb. Added all Bomb Numbers, and added details to a few Bombs, including the Keyhole Bomb. Extended Special Thanks. Version 0.20 - 01/04/2017 - Finished basic info on all bombs excluding some Medium time limits. Version 0.30 - 04/04/2017 - Added more information for some of the bombs, specifically the bombs in the first and fourth blocks, and both the Ice Tea and the Heated Table Bomb. Also gained contact with BakaOrochi for the first time. Version 0.40 - 05/04/2017 - More guides for bombs are completed. Version 0.50 - 06/04/2017 - Another day, another bomb guide completed. Also, the remaining guides have the basic info filled out, ready. Version 0.60 - 07/04/2017 - Did the Cassette Bomb, but then found out that the timed sections might be different depending on the difficulty. Also realised I put the incorrect ending for one of the bombs. Version 0.75 - 08/04/2017 - Only one bomb - the Submarine Bomb - left without the finished guide now. Once all guides are done, it'll be practically ready to be posted. Version 0.90 - 16/04/2017 - Guide is completed with regards to doing all the bombs on Hard. First version which is posted to Vizzed. ---------- Controls: S#CBomb - D-Pad: Moves around the object, Circle: Opens toolkit, Cross: Put away/remove Tool, Closes Toolkit. Square: Shows and hides Status Screen. Interlude - Circle: Advance through slide show. Start: Skip interlude. Clock - D-Pad: Circle: Menus - D-Pad: Circle: Confirm option or toggle option. Cross: Cancel menu. ---------- Guide Information: S#IThis guide will be split into sections, or Blocks based on when in the game you can disarm the bomb. In each block, with the exception of the Opening Block, the Sixth Block and the Endgame Block, you will disarm only one bomb in said block. The Sixth Block is optional, but you can only disarm one bomb from it if you take it, while both the Opening and Endgame Blocks have you doing all of the bombs in it in order. Bomb Template: Bomb Number: The number of the bomb in relation to when it shows up with the post-credits bonus sequence. Bomb Name: The name of the bomb Bomb Time: The time you choose to Prior Bombs: The bombs which occur before being able to Time Limits: How long you have to disarm the bomb, excluding trigger sections. Easy - Medium - Hard - Guide: A brief overview as to how to disarm the bomb, including key hints and trigger sections. Will also include optional sections for if you want 100% and the SA rank. ---------- FAQ: S#QQuestion) Who is the girl? Answer) Suzuki Bakuhatsu (played by Ozawa Rin) is the daughter of a bomb disposal expert, and as such she has a knack for dismantling bombs. Question) Who's making all these bombs? Answer) Apparently, some sick, twisted bastard has their eye on Suzuki, and they force her into disarming their bombs. Question) What are all the notes on the bombs? Answer) Some of them are hints left by the sick bastard, because they're so kind that they give them to her, while others are either them taunting Suzuki or trying to win her over. Question) Does the instruction booklet help? Answer) Nope, it doesn't. It only has the basic controls mentioned above and a few screenshots. Question) Why is Circle Answer) This is due to how Japanese games work - they use Circle, rather than X, to Question) How does the grading work? Answer) To get an SA (Special A) rank, you need to get 100% disarmament, and minimum time wasted. Other ranks are A, B, C, D, E and finally F. Your average grade is also recorded and is shown at the end of the credits along with the difficulty you took. Question) I can't get the SA rank on Gandar! Answer) That's not a question. But… yeah, that one 'bomb’ is a pain, as you have to play Rock-Paper-Scissors against Gandar and get them defeated in three throws without losing too much health. Question) What's that show which appears in the Puzzle Box stage? Answer) It's called “Enix Countdown”, which seems to be one of those idol shows. Also, the Puzzle Box has a “Zougan” marquetry picture pattern on it, in case you were wondering. Question) The song in the Music Box ending/the Cassette Bomb/the Ice Tea Bomb sounds familiar… Answer) Indeed. They're all the same song, although the Cassette only plays the chorus, while the Ice Tea Bomb plays an elevator tune jingle based on it. Question) Why is there a bomb in [ Answer) I have no idea. Ask the sick bastard who put the bomb in there. Question) Why does Suzuki [Redacted due to spoilers] in the ending? Answer) I have no idea myself either. I don't know why she would [Redacted due to spoilers]... Question) What wire do I have to cut in order to disarm the bomb in [ Answer) You'll find out soon enough. Read on… But, if you quickly want to find a bomb, use the Table of Contents to find the hashtag code, which is in the format of B#xx, and search for it in this FAQ. Question) I keep on tightening the screws! Answer) That's not a question, but remember this: Righty Tighty, Lefty Loosey. That is a very helpful term when it comes to unscrewing bolts and the like. Besides, except for in a few levels, you'd always want to turn left, not right. Question) What tools are there? Answer) You start with a pair of wire clippers, a magnifying glass (which acts as a sonar in one stage) and a screwdriver. Latter levels include electrical tape, a spanner, a cog wrench and one level even includes torpedoes. However, you don't have to worry about a tool being not used in a stage - if it's usable, you'd need to use it. Barring the magnifying glass, which is only used to examine objects and to act as a sonar when underwater. Question) How many possible routes are there? Answer) Each of the six blocks gives you a choice between two bombs, and so there are two to the sixth power possible routes, or sixty four possible routes through the game, of which thirty two have you disarm ten bombs, and another thirty two have you disarm eleven. Question) What's the quickest route to the final bomb? Answer) According to the TAS, once you're able to choose, it's the Moon, then the Ice Tea, then the Puzzle Box, then Gundam, then the Car Engine, and then into the Endgame stages. However, Gundam is totally luck based, so for a speed run, you might want to go for the Lunchbox Bomb instead. ---------- Walkthrough: S#WOpening Block SB#OThese three bombs are here to help you get into how the game works. These ones are some of the easiest bombs to defuse once you know how to. Bomb Number: B#01 Bomb Name: Orange Bomb Time: 08:21:00 Prior Bombs: This bomb is the first bomb you disarm at the start of a new game. Time Limits: Easy - 3 minutes Medium - 3 minutes Hard - 1 minute Guide: This bomb is very simple. All you need to do is turn the viewpoint until you can use your screwdriver on the screw on top of the orange. Once you start unscrewing it, the timer will start… and, if you're on Hard, it will trip a trap trigger of 32 seconds, which will not go away. Once you've unscrewed the screw on top of the orange, the peel will split and expose the bomb inside a casing of some sorts. All you need to do is unscrew both of the screws on the casing to gain access to the bomb wires. Now, you have to cut one of them to disarm the bomb - but the wrong wire would cause it to go off. Thankfully, the sick bastard who put the bomb into the orange was kind enough to put a danger label on the red wire, so what you want to cut is the blue wire to disarm the bomb. After this, you'll get a somewhat lengthy introduction cutscene after the ending of this first bomb, before you proceed onto the second bomb. Bomb Number: B#02 Bomb Name: Pistol Bomb Time: 09:54:00 Prior Bombs: This bomb comes automatically after the Orange Bomb. Time Limits: Easy - 3 minutes Medium - 3 minutes Hard - 1 minute, 30 seconds Guide: Yet another relatively easy bomb to disarm. First, you need to look down the barrel of the gun to find a screw. Unscrew it (which triggers the timer - from now on, whenever you first start unscrewing something, the timer will start unless I tell you otherwise) to gain access to what looks like a clip of sorts with four screws on it. You'll need to unscrew all of them, but on Hard, starting to do so triggers a trap trigger, giving you only 14 seconds to unscrew them all. Once the clip’s screws are unscrewed, you gain access to the first puzzle of the game. To solve this, unscrew both of the bottom screws first, then the top screws, so that the scissors do not cut the blue wire - but on Hard, this triggers a 16 second trap trigger which only stops once you've solved the puzzle. Finally, you can now cut the red wire of the bomb, and not the obviously dangerous blue wire, both because of the fact the scissors would had cut it, and the fact that there is a warning label on it. You now get the chance to save your game before progressing onto the next bomb, which is the final one of this Block. And after this, you'll be able to save after every bomb until you enter the Endgame Block. Bomb Number: B#03 Bomb Name: Phone Bomb Time: 18:37:00 Prior Bombs: This bomb comes automatically after the Pistol Bomb. Time Limits: Easy - 3 minutes Medium - 3 minutes Hard - 1 minute, 30 seconds Guide: For this one, all you need to do is move forwards, as the timer starts right away. However, when you have the option to move left or right, you can do so to get some calls of what other people think. One of them - the black phone - actually allows you to go forward, and here you'd get a message from Ito saying that “the Reaper is running through the blue. Cut the red one, Suzuki…” Once you hear that message, you can't check the other phones, and have to move forwards to the bomb. And, like Ito said, you should cut the red wire as the blue wire will trigger the bomb instantly. ---------- First Block SB#1Bomb Number: B#04 Bomb Name: Train Crossing Bomb Bomb Time: 14:15:00 Prior Bombs: Phone Bomb. Time Limits: Easy - 7 minutes Medium - 6 minutes Hard - 4 minutes Guide: How you progress through this bomb depends on if you want to get the SA rank, or just to complete it as fast as possible. If you just care for speed, ignore the crossing bar and go around to the back to find two bolts at the base, which I'll get to later. Otherwise, you use the new cog wrench to open the crossing bar and enter an optional area with two screws. Unscrew them, and you'll enter an area with another two screws and a hint pad where that sick bastard tells you that there's nothing behind there. You want to ignore that, though, and unscrew the two screws to expose… Well, a dead end with “BAKA!” engraved on the metal. So you want to back out and then head to the base of the crossing. Now, next to the two bolts is a warning that when you start unscrewing one of the bolts, a trap trigger will go off, but after taking off both bolts, it'll be disarmed. You'd only have 19 seconds to unscrew them, so use the new wrench to unscrew them quickly. After that, you'll have to start disassembling the train post. First, you need to use the wrench to take the base off and free the post from the rest of the train crossing, and then dismantle the pole itself with the cog wrench. However, on Hard, this will trigger yet another trap trigger of 28 seconds, so unscrew then go up, unscrew and go up, until you reach the top and the final trap of the bomb. To disarm this trap, you need to take your time unscrewing the screws, as there's a pendulum hammer which, if you unscrew too fast, will trigger the detonator. In Easy and Medium, you can make two turns before having to stop, while on Hard you can only do one turn at a time. Plus, on Hard, you also have only 40 seconds to disarm the trap, which is barely enough time to do it. Now, all you have to do is clip the correct wire in order to disarm the bomb. However, this is not as easy as earlier bombs, as the clues are more vague. This time, you have to “place your ear close to the wires” and “cut the one which makes a sound”. This is the red wire on Easy, and the blue wire on Normal and Hard. Bomb Number: B#05 Bomb Name: The Moon Bomb Time: The time you choose to Prior Bombs: Phone Bomb. Time Limits: Easy - 7 minutes Medium - 6 minutes, 30 seconds Hard - 4 minutes, 30 seconds Guide: It's time to do something which the moderators on TAS Videos dislike - dismantling the Moon. At first, it looks like it's just a moon, but as soon as you turn left or right, you'll find out that the side of the moon we can't see is, in fact, the tail of a missile which the moon apparently is. What you have to do is to unscrew the screw at the back to expose four screws - two on an outer ring, and two on the inner ring with a hint pad on it. If you want a SA Rank, unscrew the two screws next to the hint pad and then enter the back of the moon, where you'll have to go through two more sets of screws, the second of which has a hint pad next to them, before hitting yet another dead end with a weight which will fall down with something on it once you get closer. Afterwards, you want to get back out to properly disarm the bomb. You need to unscrew the side screws, but you'd have to beat a trap trigger of 11 seconds to unscrew both of them. But once you do so, the front of the moon will split in half, forming something which looks a lot like a screw head… Once you unscrew the moon, you'll gain access into the front inside of the missile, and four screws which you need to unscrew. Unscrew the top two (which will trigger a 25 second trap trigger on Hard once you start unscrewing) and then use the middle screw on the dog to be able to unscrew the two bottom screws. You'll have another set of four screws to unscrew, but only the bottom left one is exposed. Unscrew that, then use the screw on the cog to expose the other screws, and then you'll finally get to the final part of this bomb. This one is a bit trickier, as you can't screw the cog too much one way, or else you will trigger the detonator. On Hard, you'd only have 26 seconds to unscrew the five screws - start with the one next to the bottom gold bar, then the bottom two screws, then the top right screw. Then, tighten the cog (that is, screw right) one step to expose the final screw. Unscrew that, and you'll expose the bomb itself. You want to cut the red wire for this one. ---------- Second Block SB#2Bomb Number: B#06 Bomb Name: Pinball Table Bomb Time: 11:42:00 Prior Bombs: Train Crossing Bomb only. Time Limits: Easy - 5 minutes Medium - 4 minutes Hard - 3 minutes Guide: It may look like a pinball table, but there's no flippers, and there's a bomb in this table. To start off, use the cog wrench to remove the four bottom legs - although within 20 seconds on Hard due to the Trap Trigger - and then enter at the back under the table to loosen the two screws inside there. You now need to remove the four screws exposed within either 30 seconds on Easy and Normal, or 17 seconds on Hard. It's best to do one side first, then the other. Once you have done that, you finally can get to the bomb. However, you have a more complex version of the trap you took on in the Train Crossing Bomb, only with six screws to unscrew, and a timer in the form of the pinball - at the very right is the ball drain, with arrows above it which will begin to light up over time. Once the bottom one lights up, you have but seconds before the pinball pops out and if it hits the gold, just like if any of the hammers hit it, the bomb will go off. Thankfully, the middle hammer is only affected by the two middle screws, while the other hammers are only affected by the screws on their side. So alternate between an outer one and the inner one on the other side until both inner ones are taken off, then work on just the outer ones. Bomb Number: B#07 Bomb Name: Cassette Tape Bomb Time: 10:29:00 Prior Bombs: Train Crossing or The Moon Bombs. Time Limits: Easy - 6 minutes Medium - Hard - 3 minutes Guide: A cassette tape which plays music even when it's not in a tape player? This is obviously a bomb, and so you need to start off by unscrewing the screws on both sides of the tape, but you'll need to work fast as doing so trips a 28 second trap trigger timer - although this is 18 seconds on Hard. Once you've opened the tape… huh? The music is still playing? So it's not the tape itself… anyway, you want to loosen the gold screw twice so that the cog goes down and allows a panel to go down, exposing a way in. You'll find another gold screw which you need to use in order to expose the screws on the top or bottom. Loosen it twice to allow the cogs to expose the top screws, then tighten it twice before loosening the screws as, on Hard, this triggers a 24 second trap trigger. You need to loosen both sets of screws, which means after loosening the top ones, tightening the gold screw so that the bottom ones can be exposed to be loosened. The bomb itself can be seen now. But there is one final trap - you can't expose the bottom left screw too much, or else a detonator will be triggered. So loosen the gold screw, but as soon as the bottom left screw is free enough to be unscrewed, immediately tighten the gold screw one step. Then start unscrewing the screws, although you'll only have 32 seconds in which to do so on Hard. Bomb Number: B#08 Bomb Name: Iced Tea Bomb Time: 10:12:00 Prior Bombs: The Moon Bomb only. Time Limits: Easy - 5 minutes Medium - Hard - 1 minute, 30 seconds Guide: This bomb is easy once you know the trick to it. Once the timer starts automatically, you need to move forward until you find a message which says “It's up to you whether or not you want to live!” - and then when you move forward again, you will be viewing inside the ice, and looking at some of the molecules. In theory, you can move up to find the bomb with two wires easily, but if you try to snip either of the wires, it'd go off. This is because of the gimmick of this level being a maze of some sort, and that each step you make will toggle the bomb between going off or not going off - and you'll get a message saying “It will explode” or “It will not explode”, the latter being the longer one - when you cut a wire, and going up from the start will lead to where it would explode. The trick to this is that if you go right, down, left, then up, you'd move to somewhere where you'd normally get to just by moving up. This way, you can disarm the bomb easily. ---------- Third Block SB#3Bomb Number: B#09 Bomb Name: Light bulb Bomb Time: 23:58:00 Prior Bombs: Pinball Table, Cassette Tape or Iced Tea Bombs. Time Limits: How long you have to disarm the bomb, excluding trigger sections. Easy - 11 minutes Medium - Hard - 4 minutes Guide: For the SA rank, you should move to the right from the start to find a grate. This leads to a dead end, obviously, but you'll need those screws down that path in order to get 100%. Plus, somehow unscrewing those screws starts the timer despite being nowhere near the bomb. Afterwards, unscrew the screws around the light, but you'd only have 16 seconds on Hard in order to do so. Next, unscrew both of the cap screws to remove the cap and expose some of the wiring. Cut either of the two wires to drop a rock down, and break into the next area. This bomb starts to show its true colours, as you need to do some electrical fixing in order to disarm this bomb. This is where the new tape comes in handy - you can use it to tape together the break in the severed blue wire to complete the circuit to trigger a cog to turn and half unlock access to the next area. To fully unlock it, just loosen or tighten the only screw you can see to complete the other circuit. With this next part, you are introduced to panels which power can flow through which, if you remove, can break the circuit and potentially trigger a detonator. To avoid that, you need to go to the left and screw the screw there to connect a second path for the power to flow before you unscrew the panel - which has a 13 second trap trigger on Hard. Once that's done, go in. If you look down, you'll notice the trap for this next part - you need to make sure the ball goes to the left. In order to do that, you want to cut the left blue wire in the loop, then the right one - the first will force the ball to stick to the left magnet, the other will cause it to drop and complete the circuit, opening access to the final puzzle. On Easy or Normal, you can unscrew the currently exposed screws right away, but on Hard you first want to use the middle screw to switch circuits, turning off the light but turning on the bar to expose the top right screw. You want to turn it back to normal as soon as it's exposed, or else you might trigger the bomb. Now, unscrew all four screws, which triggers a trap trigger of 18 seconds on Hard - now you know why I told you to expose that screw first. Now, once you remove all four screws, you gain access to the bomb. But… by doing so, you also killed the lights, so you can't tell which wire is which. But, if you look carefully before removing the screws, you'd notice one wire was sparking. You want to cut the other wire - that means you cut the left wire on Easy, or the right wire on Normal and Hard. Bomb Number: B#10 Bomb Name: Puzzle Box Bomb Time: 15:24:00 Prior Bombs: Pinball Table, Cassette Tape or Iced Tea Bombs. Time Limits: Easy - 8 minutes Medium - 7 minutes Hard - 4 minutes, 30 seconds Guide: This bomb is inside of a puzzle box, so first you will need to open it. There are five steps which you need to take in order to open it and get access, but on Hard you will only have 37 seconds to complete all five steps, or else the bomb will go off. Step 1) At the back of the puzzle box is a single screw. Loosen it once to start the timer and expose another screw underneath the upper half of the box as the lower half is pushed to the front of the box. Step 2) Loosen the new screw once to push the front part up, which exposes yet another screw at the back of said part. Step 3) Loosen the new exposed screw once to slide two triangular shapes out from the front part of the upper half. Step 4) Tighten the second screw exposed once to bring the bottom half of the front part down and expose two final screws. Step 5) Completely loosen the two newly exposed screws to get access to the bomb itself. Now, if you're going for an SA Rank, unscrew the two screws at the front of the red box. And you know the drill by now - enter it, then keep on unscrewing the screws until you finally hit a dead end, then return out of the box. To actually disarm the bomb, what you need to do is go around to the back and unscrew all four screws within a 14 second trap trigger time limit. And then you reach yet another puzzle, similar to the one you faced in the Pistol Bomb, but much harder as the middle two sets move two sets of scissors, and you can't let them clip the strings on either side. This too is timed on Hard, with only 30 seconds to disarm it. And then, the final trap of the bomb is exposed - a fan floating a ball under a pendulum hammer. The ball won't rise and the pendulum doesn't react to you unscrewing the screws, so you can unscrew the top screws easily. However, there are two hidden screws, which require you to loosen the screw on the fan to drop it enough so that you can reach them. However, this also speeds up the fan, so you need to act fast to unscrew the two screws before the ball hits the pendulum hammer, which in turn would trigger the detonator. Once you finally reach the two wires, you can clip either wire to disarm the bomb and get an idol singing a song as the ending for this bomb. This is Enix Countdown, after all, so there needs to be some sort of song. ---------- Fourth Block SB#4This block contains some of the easiest bombs which you can disarm - and one of the most frustrating ones if you're unlucky. Bomb Number: B#11 Bomb Name: Lunchbox Bomb Time: 15:16:00 Prior Bombs: Light bulb or Puzzle Box Bombs. Time Limits: Easy - 3 minutes Medium - 2 minutes Hard - 1 minute, 30 seconds Guide: This is one of those very easy bombs, like the Phone Bomb. All you have to do once the timer starts automatically is to keep on pressing up to eat the food in the lunchbox, and once you finish, you'll find one rice grain with mould on it, and inside of that is the bomb. Now, one of the wires has some mould growing on it, so you want to clip the other side, which is the blue one. Bomb Number: B#12 Bomb Name: Jukebox Bomb Time: 21:23:00 Prior Bombs: Light bulb Bomb only. Time Limits: Easy - 4 minutes Medium - Hard - 1 minute, 30 seconds Guide: Another easy bomb to deal with, although this is harder to navigate. What you have to do once the timer starts automatically is to enter the Jukebox, and then find the record which is playing, which ironically is called “The Bomb”. You can check the needle by going up and notice that it's quite sharp, but you don't have to. Instead you want to go down and then find the crack. Once you do so, go in and you'll find the bomb inside a groove, with the blue wire being on the side where there's an opening. This should tell you that the blue wire, when cut, would set off the bomb, and so you want to cut the red wire instead. Bomb Number: B#13 Bomb Name: Gandar Bomb Time: 11:39:00 Prior Bombs: Puzzle Box Bomb only. Time Limits: Easy - 99 seconds Medium - 99 seconds Hard - 99 seconds Guide: This is not a bomb as such. Unlike all the other bombs, where you finish by cutting one of two wires, you don't do this here. In fact, you don't use your normal tools for this so-called 'bomb’ - instead, Suzuki is piloting a Mech, and is fighting against another Mech known as Gandar… in a game of Rock, Paper, Scissors. This is completely down to luck, because Gandar will throw a random throw every time, so getting that SA Rank is highly unlikely. All you have to do is win three games in order to destroy Gandar. But each game you lose causes damage to you - and your health is also your timer, so you lose time every time you lose a throw. And also, like any fighting game, the timer starts off right away, so you better choose quickly. ---------- Fifth Block SB#5Hoo boy! These bombs are the longest ones to deal with, with the highest time limits in the entire game. It's a good thing you only need to disarm one of them... Bomb Number: B#14 Bomb Name: Car Engine Bomb Time: 19:43:00 Prior Bombs: Lunchbox or Jukebox Bombs or Gandar. Time Limits: How long you have to disarm the bomb, excluding trigger sections. Easy - 12 minutes Medium - Hard - 6 minutes, 30 seconds Guide: This is the most complex bomb in the entire game. There is a lot to deal with in this bomb, so pay attention. You need to use the electrical tape to stick together at least one of (both if you want the SA Rank) the cut wires, because otherwise when you remove the two bolts that you can currently access, you'd break the circuit and trigger a detonator as a result. The two bolts leads into part of the engine, and a series of challenges. The first one requires you to time the loosening of the screw on the right so that when the gears stop, they won't be covering the screws - on Hard, this triggers a 40 second trap trigger, so try and get it right first time. The second is a bit harder, as if you get it wrong you may detonate the bomb. What you have to do is to loosen the screw on the cog enough so that you can access the screw hidden by a rock. Loosen that to plug one hole, then tighten the cog screw to give you more air to play with. Then, loosen the valve screw one step before loosening the cog screw as much as you can to open the path to your next challenge. The next one is timed in a way, as there's a needle which goes around which can hit the detonator. For this, you need to shift gears using the screw near the bottom, but above the hint pad, to expose the three screws inside the gold circle and then unscrew them to open the path onwards. The final challenge of this part is eight bolts you need to remove using the wrench. However, you will only have 41 seconds to unscrew all eight of them. But once you do so, you will finally be able to make progress on the outside. First, loosen the two bolts to the left of where you came out from - which triggers a 45 second trap trigger timer on Hard - and then go over to the other side and loosen the four bolts there to get access to the main part of the engine and stop the trap trigger. You should go in through the route right in front of you if you want the SA Rank because, you guessed it, it's a dead end with screws you need to loosen if you want 100%. Otherwise, or once you've done that and returned after seeing the message on the cog at the bottom, you want to enter the engine from the left. Now, this part is timed due to the bullet heading towards the detonator, but it's also tricky as one wrong cut can trigger another detonator. To solve this, go into the right hole and max out the speed by tightening the screw in there, then go out and then into the left hole, loosen the screw so that a circuit will be made, then cut the bottom blue wire to turn off the engine. All you have to do now is go out, then unscrew the screw there which is actually where the bomb is housed in. Get it out by unscrewing the bottom of it, and then cut the red wire. Bomb Number: B#15 Bomb Name: Submarine Bomb Time: 13:18:00 Prior Bombs: Lunchbox or Jukebox Bombs or Gandar. Time Limits: How long you have to disarm the bomb, excluding trigger sections. Easy - 13 minutes Medium - Hard - 8 minutes, 30 seconds Guide: This bomb starts with an area which is complex to actually describe, but it's a lot like a maze of sorts. To begin with, move either left or right until you can go forward into the maze, up to a hint pad. Now, for this, you'll always face the same way - let's call it North for the sake of argument. You want to head East once, and then North until something stops you. Now, for this, you want to examine the wall with your sonar (ie magnifying glass) - and you'll see a cylinder appear, blocking your path. Now, switch to the Torpedo tool, which you'll only use in this area, and fire it off to start the clock. Now, this next bit is a maze of sorts. As such, here is a map in order to help you out. In order to get the SA rank, you need to torpedo all the cylinders and destroyable rocks. The black lines are the routes you can take. The yellow lines indicate cylinders which can be destroyed using a torpedo, the purple lines are cylinders which, once destroyed, will drop rocks after some time which can't be destroyed, and the brown lines are rocks which can be blown up by torpedoes. The start, the Submarine which houses the bomb and the only dead end are marked as well. And the red line is where a 27 second Trap Timer can be triggered when you blow up the first cylinder of the trio, at least on Hard. Now, you've reached the Submarine, and you need to unscrew the back and front screws, with a 44 second trap timer on Hard. Just remember not to use a Torpedo, otherwise you might blow up the bomb. In fact, you no longer need the torpedoes. You also need to unscrew the two inner ones, one at the back and one at the front, before the trap timer would stop. Now, start off by unscrewing the two screws on the panel at the curved side of the remaining part, then the four screws on the panel to the right of that. Then go over to the final panel, unscrew the two screws by themselves, then unscrew the screw on top of the cog. Next, loosen the screw on the bottom cog, before loosening the one under the hammer, so that the hammer doesn't cause a chain reaction leading to the bomb blowing up. Now, this final part is harder, and has a 44 second trap timer on Hard. Your best bet is to work from left to right, starting with the two screws on the left hand side. When it comes to the right hand side, loosen the left screw first completely, then almost (but not fully) loosen the screw under the hammer. Loosen the screw on the cog, then finish unscrewing the screw under the hammer. If you're going right side first, you then need to tighten the screw on the cog before doing the screws on the left so that doesn't trigger the bomb. Finally, cut the wire on the right. ---------- Sixth Block SB#6This block is optional, as when you're able to choose one of these, you can also choose 00:00:00, which leads to the Endgame Block. Bomb Number: B#16 Bomb Name: Heated Table Bomb Time: 17:54:00 Prior Bombs: Car Engine Bomb only. Time Limits: How long you have to disarm the bomb, excluding trigger sections. Easy - 7 minutes Medium - Hard - 2 minutes Guide: Yet another easy bomb to deal with, although I don't understand Japanese that well, so I don't know what happens. All I know is that in the story which is shown, Suzuki is in some sort of spaceship, and is heading away from the red and towards the blue. This links to the bomb, as you want to clip the blue, and not the red - although you won't have much time to read it on Hard than you do on the other difficulties as the timer starts right away. A nice optional cool down from the Car Engine before you move onto the Endgame Bombs. Bomb Number: B#17 Bomb Name: Suzuki's Shadow Bomb Time: 06:27:00 Prior Bombs: Submarine Bomb only. Time Limits: How long you have to disarm the bomb, excluding trigger sections. Easy - 3 minutes, 30 seconds Medium - Hard - 1 minute Guide: If you thought that some of the prior Bombs were strange, you haven't seen nothing yet, as somehow there is a bomb which has been planted into the shadow of Suzuki. As such, every part of the bomb is black, even the wires. Well, with the exception of the timer, that is. You can either go left or right from the start, as they both have practically the same layout, just mirrored. Pay close attention to where the bomb is: as depending on where it is in relation to you, depends on which wire you want to cut in the end. Mainly as you can see one of the wires exposed, and a trap which, if triggered, will cut a wire which would set off the bomb. Now, you first of all need to use the screw in the middle to rotate a shield of sorts to one side, then loosen the screw above it to lift up the Newton's cradle so that it hits the hammer on that side, triggering a chain reaction leading to one of the hammers hitting a spike which, unless the shield is blocking it, will hit something, causing it to burst and drop a rock which would in turn trigger something which would knock a pair of scissors into the bomb to cut the wrong wire. Make sure to either bring it back down or, if you're confident enough, get ready to quickly move the shield to block the other chain reaction from bursting the trap. Once you've done that, unscrew the exposed screws (within a 30 second trap timer on Hard) to get to the bomb, and then cut the wire which is on the side which was protected earlier. ---------- Endgame Block SB#EThis is it, the final two bombs of the game. Once you Bomb Number: B#18 Bomb Name: Keyhole Bomb Time: 00:00:00 Prior Bombs: Car Engine, Submarine, Heated Table or Sukuki’s Shadow Bombs - the latter two automatically. Time Limits: Easy - 7 minutes Medium - Hard - 3 minutes, 30 seconds Guide: This is the Midnight Bomb, and as such this will be a true test of your skills. Don't bother about the screws you can see at the start - you can't do anything about them. Instead, you need to go into the Keyhole. In order to get access to the first set of screws, you need to use the middle screw to turn the green ring so that can rotate the other two rings - although this triggers a 50 second trap trigger on Hard. Your best bet is to tighten the middle screw so that the outer two parts line up and move together, then move them so that each the notches in the metal are in the gaps, then loosen the screw twice to expose a screw to remove by loosening. Once both are unscrewed, you can move forward once more. The next stage is similar, but you only have two rings to worry about… but there is both a detonator and, on Hard, a 23 second trap trigger to deal with. To solve this, tighten the middle screw until one of the screws is exposed, then loosen said free screw. Then, you can either tighten or loosen the middle screw until the red block drops down and locks the two rings together, before loosening it until the block falls down and unlocks the rings - and then a bit more to expose the other screw. Unscrew that to progress on. This next part is timed, but not with a trap trigger. Instead, there's an outer ring which rotates slowly towards the bomb. Quickly loosen the middle screw twice so the gold ring exposes one of the screws, and unscrew that quickly before the outer ring starts to push the gold ring. Then, you need to tighten the middle screw until the next screw is exposed, and unscrew that. Keep on doing this, but try not to over tighten the screw as it'll take time to loosen it enough to get the gold ring back in position, plus you can end up reducing how much time you have left if you over tighten too much or complete it very fast. Once all four screws are removed, only the bomb remains. Now, the trap in the third part would had cut the blue wire if you ran out of time, and the detonator in the second part would had triggered the bomb by speeding up the outer ring of the third part until it cut the blue wire, so you need to cut the red wire. And now, it's time for the final bomb. The interlude at the end of the Keyhole Bomb is also the intro to this final bomb… Bomb Number: B#19 Bomb Name: Ito’s Heart Bomb Time: ??:??:?? (You don't see a time after completing the Keyhole Bomb, so the time is unknown) Prior Bombs: This Bomb comes automatically after the Keyhole Bomb. Time Limits: Easy - 4 minutes Medium - Hard - 1 minute, 30 seconds Guide: This is it. Everything rests on you disarming the bomb inside of Ito. So go forward into her, and then wait for the gold rings to stop spinning so that you can go forward and reach what looks like a pacemaker of some kind. Now, this is the final puzzle. You need to make sure Ito doesn't flat line, so when you start unscrewing the screws - which triggers a 37 second trap trigger on Hard, but also starts the timer - make sure to stop whenever her heart rate flashes red and switch to another screw. Once all four screws are removed, (and the trap trigger is disabled,) you can move forward and find the bomb which is in Ito's heart. Now, pay close attention to what is said, as this tells you which wire to cut. If you hear “Akai”, it's the red wire you want to clip. If you hear “Aoi”, then clip the blue wire. Congratulations, you have defused the final bomb in Suzuki Bakuhatsu, and can now watch the ending followed by all of the game over explosions of the bombs you have defused so far. Afterwards, you can go back and start all over again to defuse the bombs you haven't defused before - and having to defuse harder versions of the ones you have unless you defused them on hard, in which case they'd stay as hard. It'll take you at least three playthroughs in order to disarm them all, anyway, so you will have to do the Orange, the Gun, the Phone, the Keyhole and Ito’s Heart on Hard at least once in order to get all 19 bombs defused and get all of the game over explosions at the end. ---------- Special Thanks: S#TSpikestuff from tasvideos.org for the TAS of the game which drew me into it. Xindictive and CPCGamer on YouTube for their Let's Plays which helped me understand the game better. Especially the former, as they were able to SA every level on Hard and show all bombs (barring Ito's Heart) on Easy to explain them. Redd Arremer on YouTube for their Let's Play on Normal which gave me the times for some of the Medium time limits - although their video stopped after defeating Gandar. Also, Dan Teasdale also on YouTube for the video of the Sarge Club stream which showed the Medium time limit for The Moon, and BigBangBlitz also on YouTube for their video which showed the Medium time limit for the Lunchbox Bomb. BakaOrochi on GameFAQs for his FAQ/Guide which, in combination with the first two mentioned Let's Plays, allowed me to find the solution to each of the puzzles of each bomb. He also had the time limit for Ito's Heart on Easy, too. Dylan from the Vizzed Discord for his help with the Submarine Bomb. |
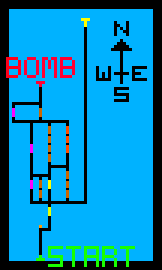
| The Latius of Vizzed |
Affected by 'Laziness Syndrome'
Registered: 05-15-13
Last Post: 2438 days
Last Active: 1091 days
