

 User Notice
 Forum Links

Thread Information
Thread Actions


"Fatal Labyrinth", the survival game guide
05-31-16 04:09 PM
Laian is Offline
| ID: 1272806 | 2560 Words

POSTS: 2149/2232
POST EXP: 457173
LVL EXP: 7124234
CP: 23726.2
VIZ: 3569925

Hello everyone, Laian here, with a new game guide. Well, let's just call that one «game guide survival» since it's going to be a mix of everything you need to know about the game and a few extra tips in order to make your quest easier. You'll see why I cannot write a typical walkthrough as usual in a moment. The monthly walkthrough will deal with a Sega Genesis game called «Fatal Labyrinth». I'm not going to ramble as always. We're going to start that walkthrough right now and jump into the «Fatal Labyrinth» folks.
CHAPTER 1: WHAT IS «FATAL LABYRINTH» ABOUT? Well my dear, that game is a RPG, dungeon crawling with randomly generated dungeons. See why I cannot write a typical walkthrough? Because of «randomly generated dungeons». That means everytime you will start a new game, the dungeon won't be the same, you won't find the same items to the same locations, the potions won't have the same effect... If you're new to that type of game, you've been warned now. You can survive and make it to the end but you may die in the very first floors (that unfortunately happens sometimes). Also, there's a plot that you can figure out by talking to the NPCs at the beginning of the game. Basically, you enter the dungeon, you bring back the holy goblet stolen by a goblin and that's it. Now, how long will it take to get there? That is up to you and how you will play the game. That is why I will help you the best I can in order to survive as long as you can and eventually beat the game.
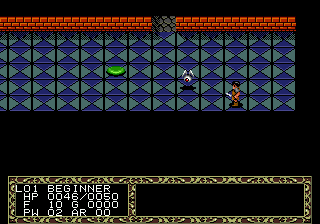
CHAPTER 2: FIRST STEPS After pressing the start button, you will appear at the village. You can talk to the people to get your goal but it's optional. Don't expect any optional quest and starters stuff, oh no. This is «Fatal Labyrinth». Once you entered the dungeon, you'll be on your own and will have to survive to the top. You can skip that part by pressing the «start» button once more to be teleported to the dungeon and start your quest. Or you can go north, be interrupted by the old man who asks you to talk to the people and go back north. Once inside the dungeon, the character is quite easy to control. -Up button: move the character up, attack -Left button: move the character left, attack -Down button: move the character down, attack -Right button: move the character right, attack -Start button: pause the game -A button: pick items up, interact (for secret doors), skip your turn -B button: cancel -C button: open the inventory, As you can tell, you need to press the specific direction to attack. To summarize this up, if you face an enemy to your left, you need to press the left button to attack. And that goes to the other directions. In order to pick up an item, step on it and press A button. The item will go in your inventory. You can only carry 8 items in each category of your inventory. You can throw items at enemies, any item you want. Though, you can discard items if you want to. Keep in mind that the discarded items will stay where you put them down for the last time. You can equip gear by going to the specific category, Potions, scrolls and canes have random effects everytime you start a new game so don't rely on colors. It doesn't mean anything at all. At first, the effect is unknown. In order to know the effect of any of these items, either you use an appraise scroll or you simply try the item. The effect will be revealed once used and, everytime you will find that item, the effect will be shown down below. Let's talk about the stats shown at the bottom left hand corner. You can see lot of informations in this part of the screen. The first thing is the level. It's not your level but the floor on which you currently are. You start at floor 1 and the holy goblet stolen is located to floor 30. The boss awaits you at floor 31 for the final showdown. Then, you can see next to that information a word. It's your current rank. You start at the rank «Beginner» and the final rank is «Lordmaster», as far as I played. I couldn't go beyond that rank even after killing dozens of creatures. Indeed, killing creatures will make you gain experience needed to get a new rank. Each rank reached will grant you more HP and more PW. Down below, you can see the food meter. It will drop down constantly until it reaches 0. It means that you're starving and you need food so badly. You'll find food (symbolized by meat) in the dungeon and their value is completely random. It can recover the food meter slightly like it can greatly recover it. Be very careful with that food meter though. Starving will make you hit points fall down but eating too much food will make you move slowly and you can die horribly if you're stuffed. Just a friendly tip: keep your food meter between 60 and 75. There's a ring that slows down the fall of the food meter called the food ring (see «rings» category of the chapter x ). Next to the food meter, you can see the amount of gold you carry. Gold does not have a real meaning in this game considering you won't buy anything. Well, to my knowledge, I did not see any shop in the dungeon when I played this game. However, some enemies like to steal your gold (for example the ninjas). The only way to increase that amount of gold is to grab the bag of gold you'll find here and there in the dungeon. And finally you have PW and AR. PW is your power attack and AR is your defence. They are multiple ways to increase these stats: by gaining a rank, by drinking a potion or using a scroll. The gears once equipped will also increase or decrease your PW and your AR, depending on the value of the equipment. The more you have in these two stats, the longer you will survive in the dungeon. And that concludes that part. Let me give you a few survival tips before we proceed to the list of equipment you can find in the game, the different effects and a basic monster list.
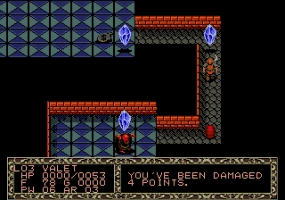
CHAPTER 3: A FEW SURVIVAL TIPS 1- An axe has a better power attack than a sword, a spear or a bow. Though the axe has a bad accuracy compared to the sword or the bow. Don't rely on one weapon. Better have a good gear ready for any situation you'll face. 2- Walk with caution. There are traps you can't see such as pits that take you back to the previous floor and trapped tiles that summon enemies. Also, the rooms are not empty all the time. You may face a horde of enemies and every step could be the last you'll do. 3- Beware of the cursed items. They have no power attack and can't be removed at all unless you find a way to remove the curse. Usually, they have names that don't smell good like «Evil bow» or «Skull lance». Though, a common item may be cursed but the probability of chances is quite low. Refer to the next chapter to see which ones are cursed and not cursed. 4- If there's lot of enemies in a room, go back to the closest hallway and kill them one by one to make the fight easier. Press A button a few times to skip your turn and let them come at you. 5- Once a floor is gotten rid of the enemies, they will respawn a few minutes after you killed the last one. The screen will flash red. You can skip some of them to avoid that or you can get to the stairs as soon as possible after killing the last enemy. I highly recommend letting one enemy live. The enemies once respawned will chase you at all times. Definitely not a good thing, especially when you're looking for the stairs leading to the next floor. 6- Out of potions that restore life? Don't worry. Keep walking back and forth with either the heal ring to restore a good amount of life or with the food ring to slow down the fall of the food meter as you do this. You can even do this if an enemy stands next to you. It will follow you but it won't hit you at all if you keep moving. 7- I suggest you to keep these six rings: the power ring, the heal ring, the food ring, the blizzard ring, the flame ring and the lightning ring. They are helpful to survive in this dungeon. 8- Look everywhere, try the A button on every single part of a wall. You may find a secret door leading to a secret room with good stuff. Usually, you find the secret doors in the rooms and at the end of the hallways. 9- Having trouble defeating the final boss? Keep a good bow like the Sagittarius bow to start the battle and keep a distance between you and your opponent. If he gets close to you, use a good sword to hit him. Keep some recover potions, useful canes and scrolls (especially the curse removal scroll) and use the technique mentioned previously on tip number 6. Hopefully these few tips will help you to survive in Dragonia.
CHAPTER 4: EQUIPMENT AND EFFECTS Here's a list of the items and effects you will find this game. I have to tell you that I forgot a few things but, don't worry folks, I'll edit that part in due time. If you find stuff I missed, feel free to let me know.
Close combat weapons -Blood sword: +0 PW (cursed item) -Skull lance: +0 PW (cursed item) -Golden axe: +0 PW (cursed item) -Knife: +1 PW (the default weapon) -Spear: +1 PW -Short sword: +2 PW -Shuriken: +2 PW -Lance: +2 PW -Long sword: +4 PW -Trident: +5 PW -Hand axe: +7 PW -Cutlass sword: +7 PW -Silver sword: +14 PW -Battle axe: +15 PW -Lightning sword: +18 PW -Heavy axe: +20 PW
Shields -Leather shield: +1 AR -Wood shield: +2 AR -Large shield: +4 AR -Steel shield: +6 AR
Helms -Dark helm: +0 AR (cursed item). -Leather helm: +1 AR -Chain helm: +3 AR -Iron helm: +5 AR -Silver helm: +12 AR -Hyper helm: +15 AR
Armors -Lambada armor: +0 AR (cursed item) -Leather armor: +1 AR -Ring armor: +6 AR -Scale armor: +10 AR -Silver armor: +15 AR -Battle armor: +22 AR
Canes (random effect, single use) -Hypnosis cane: make an enemy fall a -Anti-magic cane: prevents enemies from casting spells -Blizzard cane: casts a two tiles blizzard attack before you. -Slow cane: slow enemies down when used. -Kamikaze cane: instantly kills any common creature. -Lightning cane: casts a lightning spell -Wood cane: does nothing.
Potions (random effect, single use) -Power up potion: +1 PW -Blinder potion: hides the current floor for a period of time -Slow potion: slows you down if you drink it. -Recover potion: fully restores your life. -Poison potion: Deals some damage.
Scrolls (random effect) -Chaos scroll: inflicts confusion status to the creatures. -Appraise scroll: reveals the effect of a potion, a scroll, a ring... -Rust proof scroll: saves your equipment from rust. -Teleport scroll: teleports you elsewhere on the map. -Kamikaze scroll: instantly kill any common creature. -Power up weapon scroll: allows you to permanently add 1 to the power of a weapon -Defence up scroll: permanently increases your AR by 1 -Curse removal scroll: removes the status ailment inflicted to you. -Newspaper: does absolutely nothing!
Rings (random effect) -Power up ring: +3 PW -Blizzard ring: adds ice resistance. -Food ring: slows down the food meter. -Heal ring: slightly increases the health recovery rate -Flame ring: adds fire resistance. -Lightning ring: adds lightning resistance.
Distance combat weapons -Evil bow: +0 PW (cursed item) -Short bow: +1 PW -Long bow: +3 PW -Elf bow: +6 PW -Sagittarius bow: +10 PW
CHAPTER 5: MONSTER LIST Last stop: the monster list. Simple, with the name of the creature, the HP and some info you need to know about the creatures.The "+" after the number means that the HP of the said creature are above the number written.
-Jelly HP: 2 Note: The weakest enemy of the game
-Bat HP: 3
-Worm HP: 6 Note: the worm has a range attack
-Magician HP: 5+ Note: the magician may make you fall a
-Snail HP: 12+
-Ice bar HP: 7+ Note: the ice bar has a range attack.
-Amoeba HP: 14+
-Ninja HP: 16+ Note: the ninja has a range attack (legit).
-Robot HP: 24+ Note: the robot has a range attack and can deal a good amount of damages to you.
-Killer fly HP: 28+
-Wizard HP: 9+
-Big eye HP: 18+ Note: Casts spells
-Mimic HP: 12+ Note: As the name tells, they have the shape of a bag of gold to trick you.
-Shinobi HP: 26+ Note: Likes to steal gold.
-Blue jelly HP: 16+ Note: May split.
-Ghost HP: 45+ Note: the ghost has the shape of a sword. Watch out!
-Fire tree HP: 40+ Note: may throw fireballs at you.
-Insect HP: 28+ Note: the insect has a range attack.They also can melt away a part of your gear, permanently (which is bad).
-Bablou HP: 45+ Note: casts spells.
-Green bar HP: 24+ Note: casts
-Necromancer HP: 32+ Note: casts a powerful fire spell. Better get a fire resistance ring in your inventory. Also, the necromancer casts a confusion spell sometimes.
Chaser HP: 79+
Medusa HP: 48+ Note: casts confusion spell, can surround you with darkness, inflicts a disease that slightly drop your max HP.
Clay HP: 66+ Note: decreases your food meter slightly when you're hit.
Floor shark HP: 90+
Granz HP: 74+
Scarlet HP: 97+ Note: has the ability to inflict confusion to you.
Flowster HP: 166+ Note: casts a fire spell.
Sasuke HP: 120+ Note: may steal gold.
Dune HP:113+ Note: lightning spell and lightning attack.
Trunadai HP: 387+ Note: can inflict paralysis to you.
Mercury HP: 74+ Note: can weaken your strength.
Chaos HP: 259+
Hell fish HP: 191+ Note: quite dangerous. May deal a good amount of damages. Better be careful with that enemy.
Gogon HP: 17+ Note: Annoying creature that likes to teleport yourself elsewhere on the map. Also, it can inflict confusion to you.
Dragon HP: 417+ Note: can breathe fire.
Great dragon HP: 600+ Note: The final boss. Has a deadly fire breath, can teleport you and can cast the confusion spell.
And that's all for this game guide folks. Or should I say «survival guide». I see you, as always, in the next game guide. Until next time, take care!
Hello everyone, Laian here, with a new game guide. Well, let's just call that one «game guide survival» since it's going to be a mix of everything you need to know about the game and a few extra tips in order to make your quest easier. You'll see why I cannot write a typical walkthrough as usual in a moment. The monthly walkthrough will deal with a Sega Genesis game called «Fatal Labyrinth». I'm not going to ramble as always. We're going to start that walkthrough right now and jump into the «Fatal Labyrinth» folks.
CHAPTER 1: WHAT IS «FATAL LABYRINTH» ABOUT? Well my dear, that game is a RPG, dungeon crawling with randomly generated dungeons. See why I cannot write a typical walkthrough? Because of «randomly generated dungeons». That means everytime you will start a new game, the dungeon won't be the same, you won't find the same items to the same locations, the potions won't have the same effect... If you're new to that type of game, you've been warned now. You can survive and make it to the end but you may die in the very first floors (that unfortunately happens sometimes). Also, there's a plot that you can figure out by talking to the NPCs at the beginning of the game. Basically, you enter the dungeon, you bring back the holy goblet stolen by a goblin and that's it. Now, how long will it take to get there? That is up to you and how you will play the game. That is why I will help you the best I can in order to survive as long as you can and eventually beat the game.
CHAPTER 2: FIRST STEPS After pressing the start button, you will appear at the village. You can talk to the people to get your goal but it's optional. Don't expect any optional quest and starters stuff, oh no. This is «Fatal Labyrinth». Once you entered the dungeon, you'll be on your own and will have to survive to the top. You can skip that part by pressing the «start» button once more to be teleported to the dungeon and start your quest. Or you can go north, be interrupted by the old man who asks you to talk to the people and go back north. Once inside the dungeon, the character is quite easy to control. -Up button: move the character up, attack -Left button: move the character left, attack -Down button: move the character down, attack -Right button: move the character right, attack -Start button: pause the game -A button: pick items up, interact (for secret doors), skip your turn -B button: cancel -C button: open the inventory, As you can tell, you need to press the specific direction to attack. To summarize this up, if you face an enemy to your left, you need to press the left button to attack. And that goes to the other directions. In order to pick up an item, step on it and press A button. The item will go in your inventory. You can only carry 8 items in each category of your inventory. You can throw items at enemies, any item you want. Though, you can discard items if you want to. Keep in mind that the discarded items will stay where you put them down for the last time. You can equip gear by going to the specific category, Potions, scrolls and canes have random effects everytime you start a new game so don't rely on colors. It doesn't mean anything at all. At first, the effect is unknown. In order to know the effect of any of these items, either you use an appraise scroll or you simply try the item. The effect will be revealed once used and, everytime you will find that item, the effect will be shown down below. Let's talk about the stats shown at the bottom left hand corner. You can see lot of informations in this part of the screen. The first thing is the level. It's not your level but the floor on which you currently are. You start at floor 1 and the holy goblet stolen is located to floor 30. The boss awaits you at floor 31 for the final showdown. Then, you can see next to that information a word. It's your current rank. You start at the rank «Beginner» and the final rank is «Lordmaster», as far as I played. I couldn't go beyond that rank even after killing dozens of creatures. Indeed, killing creatures will make you gain experience needed to get a new rank. Each rank reached will grant you more HP and more PW. Down below, you can see the food meter. It will drop down constantly until it reaches 0. It means that you're starving and you need food so badly. You'll find food (symbolized by meat) in the dungeon and their value is completely random. It can recover the food meter slightly like it can greatly recover it. Be very careful with that food meter though. Starving will make you hit points fall down but eating too much food will make you move slowly and you can die horribly if you're stuffed. Just a friendly tip: keep your food meter between 60 and 75. There's a ring that slows down the fall of the food meter called the food ring (see «rings» category of the chapter x ). Next to the food meter, you can see the amount of gold you carry. Gold does not have a real meaning in this game considering you won't buy anything. Well, to my knowledge, I did not see any shop in the dungeon when I played this game. However, some enemies like to steal your gold (for example the ninjas). The only way to increase that amount of gold is to grab the bag of gold you'll find here and there in the dungeon. And finally you have PW and AR. PW is your power attack and AR is your defence. They are multiple ways to increase these stats: by gaining a rank, by drinking a potion or using a scroll. The gears once equipped will also increase or decrease your PW and your AR, depending on the value of the equipment. The more you have in these two stats, the longer you will survive in the dungeon. And that concludes that part. Let me give you a few survival tips before we proceed to the list of equipment you can find in the game, the different effects and a basic monster list.
CHAPTER 3: A FEW SURVIVAL TIPS 1- An axe has a better power attack than a sword, a spear or a bow. Though the axe has a bad accuracy compared to the sword or the bow. Don't rely on one weapon. Better have a good gear ready for any situation you'll face. 2- Walk with caution. There are traps you can't see such as pits that take you back to the previous floor and trapped tiles that summon enemies. Also, the rooms are not empty all the time. You may face a horde of enemies and every step could be the last you'll do. 3- Beware of the cursed items. They have no power attack and can't be removed at all unless you find a way to remove the curse. Usually, they have names that don't smell good like «Evil bow» or «Skull lance». Though, a common item may be cursed but the probability of chances is quite low. Refer to the next chapter to see which ones are cursed and not cursed. 4- If there's lot of enemies in a room, go back to the closest hallway and kill them one by one to make the fight easier. Press A button a few times to skip your turn and let them come at you. 5- Once a floor is gotten rid of the enemies, they will respawn a few minutes after you killed the last one. The screen will flash red. You can skip some of them to avoid that or you can get to the stairs as soon as possible after killing the last enemy. I highly recommend letting one enemy live. The enemies once respawned will chase you at all times. Definitely not a good thing, especially when you're looking for the stairs leading to the next floor. 6- Out of potions that restore life? Don't worry. Keep walking back and forth with either the heal ring to restore a good amount of life or with the food ring to slow down the fall of the food meter as you do this. You can even do this if an enemy stands next to you. It will follow you but it won't hit you at all if you keep moving. 7- I suggest you to keep these six rings: the power ring, the heal ring, the food ring, the blizzard ring, the flame ring and the lightning ring. They are helpful to survive in this dungeon. 8- Look everywhere, try the A button on every single part of a wall. You may find a secret door leading to a secret room with good stuff. Usually, you find the secret doors in the rooms and at the end of the hallways. 9- Having trouble defeating the final boss? Keep a good bow like the Sagittarius bow to start the battle and keep a distance between you and your opponent. If he gets close to you, use a good sword to hit him. Keep some recover potions, useful canes and scrolls (especially the curse removal scroll) and use the technique mentioned previously on tip number 6. Hopefully these few tips will help you to survive in Dragonia.
CHAPTER 4: EQUIPMENT AND EFFECTS Here's a list of the items and effects you will find this game. I have to tell you that I forgot a few things but, don't worry folks, I'll edit that part in due time. If you find stuff I missed, feel free to let me know.
Close combat weapons -Blood sword: +0 PW (cursed item) -Skull lance: +0 PW (cursed item) -Golden axe: +0 PW (cursed item) -Knife: +1 PW (the default weapon) -Spear: +1 PW -Short sword: +2 PW -Shuriken: +2 PW -Lance: +2 PW -Long sword: +4 PW -Trident: +5 PW -Hand axe: +7 PW -Cutlass sword: +7 PW -Silver sword: +14 PW -Battle axe: +15 PW -Lightning sword: +18 PW -Heavy axe: +20 PW
Shields -Leather shield: +1 AR -Wood shield: +2 AR -Large shield: +4 AR -Steel shield: +6 AR
Helms -Dark helm: +0 AR (cursed item). -Leather helm: +1 AR -Chain helm: +3 AR -Iron helm: +5 AR -Silver helm: +12 AR -Hyper helm: +15 AR
Armors -Lambada armor: +0 AR (cursed item) -Leather armor: +1 AR -Ring armor: +6 AR -Scale armor: +10 AR -Silver armor: +15 AR -Battle armor: +22 AR
Canes (random effect, single use) -Hypnosis cane: make an enemy fall a -Anti-magic cane: prevents enemies from casting spells -Blizzard cane: casts a two tiles blizzard attack before you. -Slow cane: slow enemies down when used. -Kamikaze cane: instantly kills any common creature. -Lightning cane: casts a lightning spell -Wood cane: does nothing.
Potions (random effect, single use) -Power up potion: +1 PW -Blinder potion: hides the current floor for a period of time -Slow potion: slows you down if you drink it. -Recover potion: fully restores your life. -Poison potion: Deals some damage.
Scrolls (random effect) -Chaos scroll: inflicts confusion status to the creatures. -Appraise scroll: reveals the effect of a potion, a scroll, a ring... -Rust proof scroll: saves your equipment from rust. -Teleport scroll: teleports you elsewhere on the map. -Kamikaze scroll: instantly kill any common creature. -Power up weapon scroll: allows you to permanently add 1 to the power of a weapon -Defence up scroll: permanently increases your AR by 1 -Curse removal scroll: removes the status ailment inflicted to you. -Newspaper: does absolutely nothing!
Rings (random effect) -Power up ring: +3 PW -Blizzard ring: adds ice resistance. -Food ring: slows down the food meter. -Heal ring: slightly increases the health recovery rate -Flame ring: adds fire resistance. -Lightning ring: adds lightning resistance.
Distance combat weapons -Evil bow: +0 PW (cursed item) -Short bow: +1 PW -Long bow: +3 PW -Elf bow: +6 PW -Sagittarius bow: +10 PW
CHAPTER 5: MONSTER LIST Last stop: the monster list. Simple, with the name of the creature, the HP and some info you need to know about the creatures.The "+" after the number means that the HP of the said creature are above the number written.
-Jelly HP: 2 Note: The weakest enemy of the game
-Bat HP: 3
-Worm HP: 6 Note: the worm has a range attack
-Magician HP: 5+ Note: the magician may make you fall a
-Snail HP: 12+
-Ice bar HP: 7+ Note: the ice bar has a range attack.
-Amoeba HP: 14+
-Ninja HP: 16+ Note: the ninja has a range attack (legit).
-Robot HP: 24+ Note: the robot has a range attack and can deal a good amount of damages to you.
-Killer fly HP: 28+
-Wizard HP: 9+
-Big eye HP: 18+ Note: Casts spells
-Mimic HP: 12+ Note: As the name tells, they have the shape of a bag of gold to trick you.
-Shinobi HP: 26+ Note: Likes to steal gold.
-Blue jelly HP: 16+ Note: May split.
-Ghost HP: 45+ Note: the ghost has the shape of a sword. Watch out!
-Fire tree HP: 40+ Note: may throw fireballs at you.
-Insect HP: 28+ Note: the insect has a range attack.They also can melt away a part of your gear, permanently (which is bad).
-Bablou HP: 45+ Note: casts spells.
-Green bar HP: 24+ Note: casts
-Necromancer HP: 32+ Note: casts a powerful fire spell. Better get a fire resistance ring in your inventory. Also, the necromancer casts a confusion spell sometimes.
Chaser HP: 79+
Medusa HP: 48+ Note: casts confusion spell, can surround you with darkness, inflicts a disease that slightly drop your max HP.
Clay HP: 66+ Note: decreases your food meter slightly when you're hit.
Floor shark HP: 90+
Granz HP: 74+
Scarlet HP: 97+ Note: has the ability to inflict confusion to you.
Flowster HP: 166+ Note: casts a fire spell.
Sasuke HP: 120+ Note: may steal gold.
Dune HP:113+ Note: lightning spell and lightning attack.
Trunadai HP: 387+ Note: can inflict paralysis to you.
Mercury HP: 74+ Note: can weaken your strength.
Chaos HP: 259+
Hell fish HP: 191+ Note: quite dangerous. May deal a good amount of damages. Better be careful with that enemy.
Gogon HP: 17+ Note: Annoying creature that likes to teleport yourself elsewhere on the map. Also, it can inflict confusion to you.
Dragon HP: 417+ Note: can breathe fire.
Great dragon HP: 600+ Note: The final boss. Has a deadly fire breath, can teleport you and can cast the confusion spell.
And that's all for this game guide folks. Or should I say «survival guide». I see you, as always, in the next game guide. Until next time, take care! |

| Games have secrets, I have my eagle gaze. |
Affected by 'Laziness Syndrome'
Registered: 10-21-11
Location: France
Last Post: 1836 days
Last Active: 1010 days
