

 User Notice
 Forum Links
Thread Information
Thread Actions


Order
Walkthrough Mickey Mania: The Timeless Adventures of Mickey Mouse
Game's Ratings
Overall
Graphics
Sound
Addictiveness
Depth
Story
Difficulty
Average User Score
9
10
9
9
8
N/A
10
09-30-15 09:32 AM
Laian is Offline
| ID: 1206013 | 3016 Words
| ID: 1206013 | 3016 Words
Laian
Level: 92


POSTS: 2027/2232
POST EXP: 457173
LVL EXP: 7472010
CP: 23733.5
VIZ: 3570463

POSTS: 2027/2232
POST EXP: 457173
LVL EXP: 7472010
CP: 23733.5
VIZ: 3570463
Likes: 3 Dislikes: 0
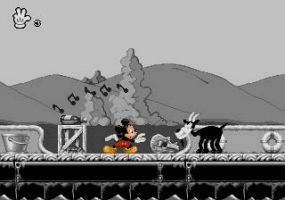
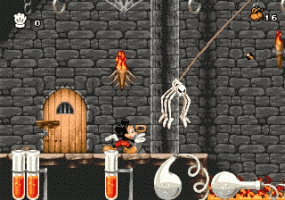
 Hello everyone, this is Laian and I'm back! For real! Back with a new walkthrough after a long period of work during the summer holidays. So this month, we're going to join our favorite mouse on another adventure. After "Mickey Mouse 5: Magic Wand" and "Castle of Illusion starring Mickey Mouse", now is the time to play "Mickey Mania: The Timeless Adventures of Mickey Mouse", released for Sega Genesis and other systems such as the PSX later. As I'd like to play the remake on PSX, I'll go with the Sega Genesis version because... it seriously lacks of Genesis games on "my walkthroughs done list", yeah. So let's not waste our time blabbering and let's jump into it, shall we? STEAMBOAT WILLIE This is probably one of my favorite Disney short cartoon starring Mickey Mouse. I even made a recreation of the boat on the server as a tribute to Mister Walter Elias Disney but that's beside the point. The whole stage is interesting to say the least. No, no, there's no problem with your screen. The first part is in black and white because you will go through the very first Steamboat Willie. Colors didn't exist when the first version was released so that's perfectly normal. First things first, jump on the bottle to throw the cork away, right into the mouth of the unfortunate singing goat to the right and carry on. Climb up the bunch of crates, avoid the smoke from the chimneys and talk to your clone of the past to the left. He will go away. You can play with the bell if you want to, otherwise, jump on the cat and go through the floor you just destroyed to find some ammo and a star (it recovers one health point symbolized by the glove and the fingers at the top right hand corner). Push the crates to the left to leave the place and carry on. Avoid the heads popping out from the crates and jump on the top crate to cross the gap and finish the first part of the level. Grab the ammos and avoid the wrecking balls ( you expect the Miley Cyrus joke? Nope, dream on guys THE MAD DOCTOR Avoid the bats, trigger the checkpoint and enter the castle. Stand underneath the skeleton and avoid the skull and the bones when it explodes into pieces. You can blast them with a projectile if you want to. Avoid the sharp knives and destroy the walking skeleton. Climb up the stairs, destroy the last enemy of that part collect the ammos and proceed to the next part. Grab the ammos, kill the bats, then the spider skeleton and grab the rope to make the gap like Tarzan. Kill the next spider skeleton and grab the rope to take the goodies and get through the crazed fi This part is optional, which means that if you lose your last life, there's no game over. You proceed to the next stage. You have to use the trolleys (that's how the game called that but it does look like a bed for surgeries, just saying) to go from point A to B and avoid the pools, the spiked balls and the buzzsaws. At the very beginning, there's an extra life that you can miss if you don't leap over the buzzsaws. It's not a hard part actually, as long as you have a good timing to avoid the traps and step on the beds. In this part, you have to descend some wooden stairs. Easy, may you think? HA! There's a few traps, creatures and rolling barrels. Yes, you'll be chased by rolling barrels from time to time. You can dodge them by leaping over them easily. Grab the goodies scattered on your way and reach the opening down below. What to say about that next part? Usual stuff, which means pools, skeletons and bats to take care of. I mean, I don't really need to explain what I have to do in this part. Use the swinging ropes to make the gaps and shoot the enemies to reach the end of the level and proceed to the next one. Drop in the elevator and here we go for a joy ride. Do not worry, this one goes up and doesn't go suddenly up and down. Although, you'll be harassed by skeletons from the sides and the top. You can only shoot the ones you'll see to the left and to the right. Avoid the bones and the skull and grab the stuff. At the end of the ride, go to the right to end the level. This is the final part of "The mad doctor". You have a puzzle to solve before facing the boss. It's not that hard to solve, it's just a little experiment. You can see a locked door to the right, a glass container on the table, some chemical substances and a spot nearby the door with a button on a ledge above. Mix the chemical substances in the container by pushing it and pressing the button at the top of the chemical substance (the order doesn't matter but you should start from the one to the left and finish with the one close to the door), then place the container on the device nearby the door and press the button. Even if there's a dangerous substance in the container, you can step on it without being hurt. Wait until it explodes and go through the passageway to grab some ammo and face the boss. Needless to use your ammo for this one. Go back to the platform to the left, wait until he comes close to you and jump on his head. Step on the other platform to the right (the one with the star above and the firework) and do the same thing. There's some ammo and stars if you need them. After a few hits, you will free your fellow buddy Pluto. This will end the level. MOOSE HUNTERS In this level, you need to pay attention to each Pluto's reaction. When he faces west, that means a moose is coming and you need to jump to avoid it. When he stops, that means there's either a branch (you can see a bit of it at the top of the screen) falling down from the tree or some boulders. Walk carefully towards the end of the level. Oh no! You are chased by a moose. Run for your life! The only way to make this part is to collect as many apples as you can (they increases your speed for a period of time) and avoid the rocks and the water (both of these things slows you down). Reach the end of the track symbolized by a white line and you'll be done with this chase and "Moose Hunters".  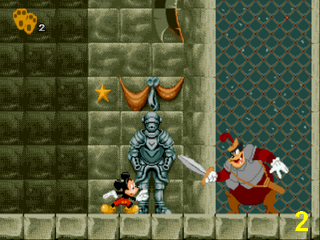 THE LONESOME GHOSTS Right at the beginning, you will see a pit. Actually there are three of them, with different sizes. The first one is easy to leap over, the second one is quite long and tough and the last one... don't even try to leap over the last one. Actually you have to drop down, Pluto is waiting down below with a raft. But it's a matter of goodies in this part. The first pit has a few ammos, the second one has some ammos and some stars and the last one has two extra lives, some stars and some ammos. You can't grab all the stuff in the last pit so choose wisely what you want the most. Also, you need to jump exactly when your feet are out of the ledge to make the second gap and reach the last pit. It requires perfect timing otherwise you'll go down in the basement. After a short ride on the raft, you'll be in the basement. Your progress needs to be slow and cautious. Some ghostly ghosts appear and disappear from time to time and cannot be defeated with your ammo and your feet. Also, tricky slippery stairs, yeah. And swinging platforms because why not. You must use these platforms to make your way through the basement and grab the goodies. Kill the two bats and trigger the checkpoint, then avoid the crazed pipes. Go up, pass the crumbling bridge and proceed to the next part. The first bit of that level requires a bit of timing since you need the barrels to stand out of the water and reach the next part of the level. Unfortunately, the barrels will drown at one point so you have to jump on another barrel and carry on. Ah, and watch out for the ghosts on boat. Go up the stairs, grab the rope, take the star if you need it and carry on. See that table? You must push it to the far right in order to climb up the stairs and reach the last part of the level. Be careful: two ghosts appear (one to the left and another one to the right) and likes to throw their hat at you. Dodge it and continue pushing the table. Grab the rope, get the star and use the moving platform to avoid the last ghosts and escape the mansion. Time to explore the next level. MICKEY AND THE BEANSTALK Make your way to a flower pot, push it underneath the water then push it back to its original spot and climb up the ledge using the leaves. Step on the leaf on the water, duck to avoid the evil fireflies and use the other leaves to reach the next level. Welcome to some sort of cave. Maybe it's somewhere underground, who knows. Anyway, grab the ammos, avoid the cocoons and the bugs a bit further, pass the trapdoor and carry on. After some cocoons and three bugs, you'll see a switch to activate. It will open the trapdoor. Go back there, fall down, grab the star and run away from the spider with the help of the supersonic ladybug. You will leave the underground area and proceed to the next part. Grab the ammos, stomp the seeds to make some ivies appear and climb them up. Enter the house, get rid of the enemies and go up then leap to the left and to the right to get the goodies and go up to reach the top of the table. Grab the ammos, kill the enemies you can get rid of with the ammos, push the jelly and use to reach the checkpoint. Avoid the last enemies and meet the Mickey from "Mickey and the Beanstalk", escaping the house on a cork. Time to explore the last stage of the game. THE PRINCE AND THE PAUPER I like this movie and I like this stage. The first part has one of my favorite, if not my most favorite tune from the Genesis version. First things first, go east, kill the weasel, go back and push the chest to get the star underneath the stairs and push it to the west. Step on the platform then swing the chandeliers to reach the stairs to the east. Activate the checkpoint, turn the light on with the switch above your head and carry on. Pass the library, go down, grab the star, kill the last enemies and proceed to the next part. Push the container on the table, kill the weasel, step on the platform, kill the other weasel and go activate the switch. Carry on to the right, push the moving platform to the left, go back and step on it. Kill the weasel, grab the stuff, jump on the metallic bars, pick up the star, kill the last weasel and drop down the small opening in the wall. You can skip the platform part if you want to and go east but you'll have to avoid two fi Hurry up, the water is raising so use the pump to inflate the rubber ring and carry on. Kill the weasels, grab the ammos and get on the platform. It's a moving platform with a specific pattern and your only task is to avoid the spiked balls on the way. Kill the two weasels and here we go again for another joyride. This time, the spiked balls are moving so be careful. Kill the weasel, go down, kill another weasel, make the gap, kill more weasel, then make the other gap, kill the weasels, leap over the last gap and go down as fast as possible (or the walls will turn you into a nice pancake). Kill the weasels, avoid the spikes, kill the weasel, push the rock on the button and go up. You finally found the Prince. Time to proceed to the next part. Remember the descent of the tower in "The Mad Doctor"? Time to do the opposite way. And faster because there's fire! Watch out for the rolling spiked balls and the crumbling platforms. You're not done with the fire once you reach the other door. Quickly go up while killing the weasels, grab the goodies and carry on. Unless you save enough ammos, you can't kill all the weasels in this last bit so try to avoid as many as you can and leave the blazing dungeon. Now, it's time to face Captain Pete, the final boss (2). Don't even try to use your ammos during this fight. The method is simple. Pete will try to smash you on the ground with his butt twice. The first time, some spiked balls will fall down and some kind of wooden plank with spikes. Push it enough towards Pete and let him do his bodyslam once more. Step back and behold the fail as he is hit by the spikes. Repeat this a few times to proceed to the second part. You now need to activate the levers to trigger that giant wrecking ball. But the levers are too high and your jumps are not enough to reach them. Pete will be delighted to help you by throwing a sword towards you. Duck and let the sword hit the wall and use it to flip the switch to release the ball. Do that with the other switch. After a few hits with the wrecking ball, Pete will be defeated. Watch the credits. Congratulations, you completed "Mickey Mania: The Timeless Adventures of Mickey Mouse". Now, there is one more thing I should tell you. I didn't mention it but there's a secret bonus stage. How to get it? That's what the bonus part will tell you. BONUS PART - HIDDEN MICKEY MOUSE AND BAND CONCERT About the hidden Mickey Mouse, you must reach the elevator in "The Mad Doctor". When the ride is over, don't go through the door, go back in the elevator. You will go up at the speed of light and reach a hidden part of the castle. There's some goodies to grab and a hidden Mickey Mouse to find: the one from "The Mad Doctor". Now, the bonus stage. You must reach the entrance of the giant's house in "Mickey and the Beanstalk". You'll see a lever but you can't reach it. Use the enemy to flip it. You have one chance to do this so don't miss it. Then head back west, just a bit and jump on the butterflies to reach a platform with some stars, another hidden Mickey Mouse and an exclamation mark. Touch it to be teleported to the bonus stage called "Band Concert". Again, in order to reach the platform, it's all or nothing. One chance, that's it. Now, let's see how this bonus stage works. You must go at the top of the whirlwind with the cooperation of the crates. Perfect timing and accurate jumps are the key to success. And you have one chance to reach the top. If you fall, the bonus stage is over and you're back to the main story. The reward is nice though: an extra continue just for you. However, don't expect an alternate ending at the end of the game if you find all the Mickey Mouse. Well, that's all for this walkthrough. I see next month for another walkthrough. A walkthrough really... horrifying. See you next time folks. Take care  Hello everyone, this is Laian and I'm back! For real! Back with a new walkthrough after a long period of work during the summer holidays. So this month, we're going to join our favorite mouse on another adventure. After "Mickey Mouse 5: Magic Wand" and "Castle of Illusion starring Mickey Mouse", now is the time to play "Mickey Mania: The Timeless Adventures of Mickey Mouse", released for Sega Genesis and other systems such as the PSX later. As I'd like to play the remake on PSX, I'll go with the Sega Genesis version because... it seriously lacks of Genesis games on "my walkthroughs done list", yeah. So let's not waste our time blabbering and let's jump into it, shall we? STEAMBOAT WILLIE This is probably one of my favorite Disney short cartoon starring Mickey Mouse. I even made a recreation of the boat on the server as a tribute to Mister Walter Elias Disney but that's beside the point. The whole stage is interesting to say the least. No, no, there's no problem with your screen. The first part is in black and white because you will go through the very first Steamboat Willie. Colors didn't exist when the first version was released so that's perfectly normal. First things first, jump on the bottle to throw the cork away, right into the mouth of the unfortunate singing goat to the right and carry on. Climb up the bunch of crates, avoid the smoke from the chimneys and talk to your clone of the past to the left. He will go away. You can play with the bell if you want to, otherwise, jump on the cat and go through the floor you just destroyed to find some ammo and a star (it recovers one health point symbolized by the glove and the fingers at the top right hand corner). Push the crates to the left to leave the place and carry on. Avoid the heads popping out from the crates and jump on the top crate to cross the gap and finish the first part of the level. Grab the ammos and avoid the wrecking balls ( you expect the Miley Cyrus joke? Nope, dream on guys THE MAD DOCTOR Avoid the bats, trigger the checkpoint and enter the castle. Stand underneath the skeleton and avoid the skull and the bones when it explodes into pieces. You can blast them with a projectile if you want to. Avoid the sharp knives and destroy the walking skeleton. Climb up the stairs, destroy the last enemy of that part collect the ammos and proceed to the next part. Grab the ammos, kill the bats, then the spider skeleton and grab the rope to make the gap like Tarzan. Kill the next spider skeleton and grab the rope to take the goodies and get through the crazed fi This part is optional, which means that if you lose your last life, there's no game over. You proceed to the next stage. You have to use the trolleys (that's how the game called that but it does look like a bed for surgeries, just saying) to go from point A to B and avoid the pools, the spiked balls and the buzzsaws. At the very beginning, there's an extra life that you can miss if you don't leap over the buzzsaws. It's not a hard part actually, as long as you have a good timing to avoid the traps and step on the beds. In this part, you have to descend some wooden stairs. Easy, may you think? HA! There's a few traps, creatures and rolling barrels. Yes, you'll be chased by rolling barrels from time to time. You can dodge them by leaping over them easily. Grab the goodies scattered on your way and reach the opening down below. What to say about that next part? Usual stuff, which means pools, skeletons and bats to take care of. I mean, I don't really need to explain what I have to do in this part. Use the swinging ropes to make the gaps and shoot the enemies to reach the end of the level and proceed to the next one. Drop in the elevator and here we go for a joy ride. Do not worry, this one goes up and doesn't go suddenly up and down. Although, you'll be harassed by skeletons from the sides and the top. You can only shoot the ones you'll see to the left and to the right. Avoid the bones and the skull and grab the stuff. At the end of the ride, go to the right to end the level. This is the final part of "The mad doctor". You have a puzzle to solve before facing the boss. It's not that hard to solve, it's just a little experiment. You can see a locked door to the right, a glass container on the table, some chemical substances and a spot nearby the door with a button on a ledge above. Mix the chemical substances in the container by pushing it and pressing the button at the top of the chemical substance (the order doesn't matter but you should start from the one to the left and finish with the one close to the door), then place the container on the device nearby the door and press the button. Even if there's a dangerous substance in the container, you can step on it without being hurt. Wait until it explodes and go through the passageway to grab some ammo and face the boss. Needless to use your ammo for this one. Go back to the platform to the left, wait until he comes close to you and jump on his head. Step on the other platform to the right (the one with the star above and the firework) and do the same thing. There's some ammo and stars if you need them. After a few hits, you will free your fellow buddy Pluto. This will end the level. MOOSE HUNTERS In this level, you need to pay attention to each Pluto's reaction. When he faces west, that means a moose is coming and you need to jump to avoid it. When he stops, that means there's either a branch (you can see a bit of it at the top of the screen) falling down from the tree or some boulders. Walk carefully towards the end of the level. Oh no! You are chased by a moose. Run for your life! The only way to make this part is to collect as many apples as you can (they increases your speed for a period of time) and avoid the rocks and the water (both of these things slows you down). Reach the end of the track symbolized by a white line and you'll be done with this chase and "Moose Hunters". THE LONESOME GHOSTS Right at the beginning, you will see a pit. Actually there are three of them, with different sizes. The first one is easy to leap over, the second one is quite long and tough and the last one... don't even try to leap over the last one. Actually you have to drop down, Pluto is waiting down below with a raft. But it's a matter of goodies in this part. The first pit has a few ammos, the second one has some ammos and some stars and the last one has two extra lives, some stars and some ammos. You can't grab all the stuff in the last pit so choose wisely what you want the most. Also, you need to jump exactly when your feet are out of the ledge to make the second gap and reach the last pit. It requires perfect timing otherwise you'll go down in the basement. After a short ride on the raft, you'll be in the basement. Your progress needs to be slow and cautious. Some ghostly ghosts appear and disappear from time to time and cannot be defeated with your ammo and your feet. Also, tricky slippery stairs, yeah. And swinging platforms because why not. You must use these platforms to make your way through the basement and grab the goodies. Kill the two bats and trigger the checkpoint, then avoid the crazed pipes. Go up, pass the crumbling bridge and proceed to the next part. The first bit of that level requires a bit of timing since you need the barrels to stand out of the water and reach the next part of the level. Unfortunately, the barrels will drown at one point so you have to jump on another barrel and carry on. Ah, and watch out for the ghosts on boat. Go up the stairs, grab the rope, take the star if you need it and carry on. See that table? You must push it to the far right in order to climb up the stairs and reach the last part of the level. Be careful: two ghosts appear (one to the left and another one to the right) and likes to throw their hat at you. Dodge it and continue pushing the table. Grab the rope, get the star and use the moving platform to avoid the last ghosts and escape the mansion. Time to explore the next level. MICKEY AND THE BEANSTALK Make your way to a flower pot, push it underneath the water then push it back to its original spot and climb up the ledge using the leaves. Step on the leaf on the water, duck to avoid the evil fireflies and use the other leaves to reach the next level. Welcome to some sort of cave. Maybe it's somewhere underground, who knows. Anyway, grab the ammos, avoid the cocoons and the bugs a bit further, pass the trapdoor and carry on. After some cocoons and three bugs, you'll see a switch to activate. It will open the trapdoor. Go back there, fall down, grab the star and run away from the spider with the help of the supersonic ladybug. You will leave the underground area and proceed to the next part. Grab the ammos, stomp the seeds to make some ivies appear and climb them up. Enter the house, get rid of the enemies and go up then leap to the left and to the right to get the goodies and go up to reach the top of the table. Grab the ammos, kill the enemies you can get rid of with the ammos, push the jelly and use to reach the checkpoint. Avoid the last enemies and meet the Mickey from "Mickey and the Beanstalk", escaping the house on a cork. Time to explore the last stage of the game. THE PRINCE AND THE PAUPER I like this movie and I like this stage. The first part has one of my favorite, if not my most favorite tune from the Genesis version. First things first, go east, kill the weasel, go back and push the chest to get the star underneath the stairs and push it to the west. Step on the platform then swing the chandeliers to reach the stairs to the east. Activate the checkpoint, turn the light on with the switch above your head and carry on. Pass the library, go down, grab the star, kill the last enemies and proceed to the next part. Push the container on the table, kill the weasel, step on the platform, kill the other weasel and go activate the switch. Carry on to the right, push the moving platform to the left, go back and step on it. Kill the weasel, grab the stuff, jump on the metallic bars, pick up the star, kill the last weasel and drop down the small opening in the wall. You can skip the platform part if you want to and go east but you'll have to avoid two fi Hurry up, the water is raising so use the pump to inflate the rubber ring and carry on. Kill the weasels, grab the ammos and get on the platform. It's a moving platform with a specific pattern and your only task is to avoid the spiked balls on the way. Kill the two weasels and here we go again for another joyride. This time, the spiked balls are moving so be careful. Kill the weasel, go down, kill another weasel, make the gap, kill more weasel, then make the other gap, kill the weasels, leap over the last gap and go down as fast as possible (or the walls will turn you into a nice pancake). Kill the weasels, avoid the spikes, kill the weasel, push the rock on the button and go up. You finally found the Prince. Time to proceed to the next part. Remember the descent of the tower in "The Mad Doctor"? Time to do the opposite way. And faster because there's fire! Watch out for the rolling spiked balls and the crumbling platforms. You're not done with the fire once you reach the other door. Quickly go up while killing the weasels, grab the goodies and carry on. Unless you save enough ammos, you can't kill all the weasels in this last bit so try to avoid as many as you can and leave the blazing dungeon. Now, it's time to face Captain Pete, the final boss (2). Don't even try to use your ammos during this fight. The method is simple. Pete will try to smash you on the ground with his butt twice. The first time, some spiked balls will fall down and some kind of wooden plank with spikes. Push it enough towards Pete and let him do his bodyslam once more. Step back and behold the fail as he is hit by the spikes. Repeat this a few times to proceed to the second part. You now need to activate the levers to trigger that giant wrecking ball. But the levers are too high and your jumps are not enough to reach them. Pete will be delighted to help you by throwing a sword towards you. Duck and let the sword hit the wall and use it to flip the switch to release the ball. Do that with the other switch. After a few hits with the wrecking ball, Pete will be defeated. Watch the credits. Congratulations, you completed "Mickey Mania: The Timeless Adventures of Mickey Mouse". Now, there is one more thing I should tell you. I didn't mention it but there's a secret bonus stage. How to get it? That's what the bonus part will tell you. BONUS PART - HIDDEN MICKEY MOUSE AND BAND CONCERT About the hidden Mickey Mouse, you must reach the elevator in "The Mad Doctor". When the ride is over, don't go through the door, go back in the elevator. You will go up at the speed of light and reach a hidden part of the castle. There's some goodies to grab and a hidden Mickey Mouse to find: the one from "The Mad Doctor". Now, the bonus stage. You must reach the entrance of the giant's house in "Mickey and the Beanstalk". You'll see a lever but you can't reach it. Use the enemy to flip it. You have one chance to do this so don't miss it. Then head back west, just a bit and jump on the butterflies to reach a platform with some stars, another hidden Mickey Mouse and an exclamation mark. Touch it to be teleported to the bonus stage called "Band Concert". Again, in order to reach the platform, it's all or nothing. One chance, that's it. Now, let's see how this bonus stage works. You must go at the top of the whirlwind with the cooperation of the crates. Perfect timing and accurate jumps are the key to success. And you have one chance to reach the top. If you fall, the bonus stage is over and you're back to the main story. The reward is nice though: an extra continue just for you. However, don't expect an alternate ending at the end of the game if you find all the Mickey Mouse. Well, that's all for this walkthrough. I see next month for another walkthrough. A walkthrough really... horrifying. See you next time folks. Take care |
Vizzed Elite
Affected by 'Laziness Syndrome'
Registered: 10-21-11
Location: France
Last Post: 2292 days
Last Active: 1466 days
| Games have secrets, I have my eagle gaze. |
Affected by 'Laziness Syndrome'
Registered: 10-21-11
Location: France
Last Post: 2292 days
Last Active: 1466 days
10-04-15 10:36 PM
janus is Offline
| ID: 1207823 | 41 Words
| ID: 1207823 | 41 Words
janus
SecureYourCodeDavid
SecureYourCodeDavid
Level: 126
POSTS: 2005/4810
POST EXP: 565150
LVL EXP: 22626670
CP: 63441.8
VIZ: 536023
POSTS: 2005/4810
POST EXP: 565150
LVL EXP: 22626670
CP: 63441.8
VIZ: 536023
Likes: 0 Dislikes: 0
From what I remember from the game (I only got to the Lonely Ghost) your walkthrough is pretty accurate. I also liked how you highlighted key words; I should learn from that. Did you put them in bold? in larger font? |
Site Staff
YouTube Video Editor
Affected by 'Carpal Tunnel Syndrome'
Registered: 12-14-12
Location: Murica
Last Post: 2 hours
Last Active: 2 hours
YouTube Video Editor
| the unknown |
Affected by 'Carpal Tunnel Syndrome'
Registered: 12-14-12
Location: Murica
Last Post: 2 hours
Last Active: 2 hours
10-05-15 04:02 AM
Laian is Offline
| ID: 1207877 | 36 Words
| ID: 1207877 | 36 Words
Laian
Level: 92
POSTS: 2029/2232
POST EXP: 457173
LVL EXP: 7472010
CP: 23733.5
VIZ: 3570463
POSTS: 2029/2232
POST EXP: 457173
LVL EXP: 7472010
CP: 23733.5
VIZ: 3570463
Likes: 0 Dislikes: 0
janus : "The Lonesome Ghosts" is quite challenging, mostly because the enemies cannot be defeated, which makes the progress kinda slow exactly like "The Moose Hunters". As for the key words, it's written in bold and colored. "The Lonesome Ghosts" is quite challenging, mostly because the enemies cannot be defeated, which makes the progress kinda slow exactly like "The Moose Hunters". As for the key words, it's written in bold and colored. |
Vizzed Elite
Affected by 'Laziness Syndrome'
Registered: 10-21-11
Location: France
Last Post: 2292 days
Last Active: 1466 days
| Games have secrets, I have my eagle gaze. |
Affected by 'Laziness Syndrome'
Registered: 10-21-11
Location: France
Last Post: 2292 days
Last Active: 1466 days
